Automating Wordpress Containers with Ansible and Podman
If you asked, “how I set up WordPress sites super fast and easy using Podman quadlet files and Ansible?”
You’ve come to the right place.
This guide includes:
Ansible role for running rootless WordPress pods.
Running those pods as a systemd startup service.
Backing up your WordPress and SQL Podman volumes.
Automatic container updates and rollbacks.
I’m using AlmaLinux 10 as the OS. Feel free to use whatever ya like. Just make adjustments as needed. You’ll also need an Ansible control node set up to run playbooks on the target server. This not a guide for all that so you are on your own!
Building the Ansible container role
Let’s create a role that sets up a host to run containers via Podman Quadlets as a rootless user. In my lab, the role is called container-ship.
Here’s how I set up the proper directory structure for this role:
ansible-galxy role init container-ship
container-ship/tasks/
Under the role directory, I set up tasks/main.yml to include:
Notice the it-tools-container.yml import. This role can be used to run other containers as well.
The pre-tasks set up a host to run rootless containers under a dedicated user. Then, any other containers on the system are set up. The WordPress block will loop through a list of sites defined in a host’s variable file.
Let’s look at tasks/pre.yml:
❯ cat tasks/pre.yml - name:Make sure rootless user exists to run containersuser:name:"{{ podman_user }}"uid:"{{ podman_user_uid }}"password:"{{ podman_user_password }}"create_home:yesshell:/bin/bashstate:present- name:Enable linger for {{ podman_user }}command:loginctl enable-linger {{ podman_user }}become:yes- name:Create quadlet directoryfile:path:/etc/containers/systemd/users/{{ podman_user }}state:directorymode:'0755'- name:Enable podman socketbecome:truebecome_user:"{{ podman_user }}"ansible.builtin.systemd_service:name:podman.socketstate:startedenabled:truescope:userenvironment:XDG_RUNTIME_DIR:"/run/user/{{ podman_user_uid }}"
The pre-tasks set up the rootless user for running the containers, enable linger for the user so that we can run the container as a user service, and creates the Quadlet directory for the user.
There is also a task for enabling the Podman Socket. This is not needed for this setup. I just have it so that I can interact with Podman using Podman Desktop.
Add firewall rule for port used. You will add the port for each site later.
Add the Pod, Database, and WordPress Quadlet files.
Reload the container user’s daemon so systemd detects the Quadlet file.
Run and enable the Pod service.
Create the volume backup directory under /home/podman_user/backups/
Set up cron jobs to take volume backups and delete old backups. This uses Podman volume export to export the volumes to the directory mentioned above. You can restore these with Podman volume import {{ filename }}.
Enable Podman auto-update. Later, you’ll see that the Quadlet files have auto-updates enabled. The auto-update timer automatically updates container images at midnight each day. If a health check fails, then it will automatically rollback the changes.
`container-ship/defaults/
Set up the default variables under defaults/main.yml:
❯ cat main.yml containers:falsepodman_user:dogmanpodman_user_uid:22222################################################ Worpress Pod ###################################################################wordpress_image:docker.io/wordpress:latestmysql_image:docker.io/mysql:latest
By default, container pre-tasks are turned off. So we’ll enable them in the host’s variables later. Then we have defaults for the rootless Podman user and UID. The WordPress and MySQL images are set with the tag “latest”. This will let us automatically get the latest images for these tools.
Technically, this can be dangerous without testing major releases for MySQL before upgrading. But I am willing to accept the risk since I have volume backups and can rollback if something breaks.
Also note, there is nothing magic about containers, you could build these images out yourself. Which is a great option if you don’t trust others..
container-ship/handlers
Under handlers/main.yml, we simply have tasks that reload daemons as needed:
Here’s were we get to the Quadlet files. I’ve set the Quadlet files to be reusable with Jinja2. Which let’s our loop mentioned earlier create multiple sites.
There are two ways to go about this. We can:
Add MySQL and WordPress containers to a pod. That way they share the same network namespace by default. Or:
Add each container to it’s own pod, and create a shared network used by both pods.
Option 2 is closer to how Kubernetes pods work, and would be better if you wanted to migrate this setup to Kubernetes later. But I decided to go with option 1 for simplicity.
Let’s look under templates/. First, the Pod Quadlet template, which defines networking options for all containers in the Pod:
The host I am testing this on is dt-lab3. To configure the host, I need to add the correct variables to it’s variable file under inventories/host_vars/dt-lab3.yml:
Notice I have set containers to true. The default being false let’s me choose which hosts are going to run container pre-tasks. I have another container for running IT Tools on this server. That is enabled with it_tools_container: true.
The wordpress_pod: true variable enables WordPress container tasks. Assuming that wordpress_sites is defined correctly.
For each site, we have a unique external port, site name. As well as the database username and password for that site.
Setting up required collections
You need the following collections installed on your Ansible control node I manage my collections in a requirements.yml file:
Let’s run a timed test to see how long it takes to build our 3 test sites:
time ansible-playbook site.yml -l dt-lab3 -t containers
real	1m51.199s
1 minute and 52 seconds is not bad!
Let’s verify, as the Podman user (dogman in our case) run podman ps to see the running containers:
dogman@dt-lab3:~$ podman ps
CONTAINER ID  IMAGE                                 COMMAND               CREATED        STATUS                    PORTS                                      NAMES
f09e74c5b2e3  docker.io/corentinth/it-tools:latest  nginx -g daemon o...  2 days ago     Up 2 days                 0.0.0.0:8080->80/tcp                       it-tools
a0f73383ff29                                                              4 minutes ago  Up 4 minutes              0.0.0.0:8086->80/tcp                       systemd-potato-infra
c488e7a668d2  docker.io/library/mysql:latest        mysqld                4 minutes ago  Up 4 minutes (healthy)    0.0.0.0:8086->80/tcp, 3306/tcp, 33060/tcp  systemd-potato-db
baa4266c4009  docker.io/library/wordpress:latest    apache2-foregroun...  4 minutes ago  Up 4 minutes (unhealthy)  0.0.0.0:8086->80/tcp                       systemd-potato-wordpress
aa6187dbd166                                                              4 minutes ago  Up 4 minutes              0.0.0.0:8085->80/tcp                       systemd-tomato-infra
c3a0eeef4fff  docker.io/library/mysql:latest        mysqld                4 minutes ago  Up 4 minutes (healthy)    0.0.0.0:8085->80/tcp, 3306/tcp, 33060/tcp  systemd-tomato-db
50b05ce44da4  docker.io/library/wordpress:latest    apache2-foregroun...  4 minutes ago  Up 4 minutes (unhealthy)  0.0.0.0:8085->80/tcp                       systemd-tomato-wordpress
f29bb5f71dbf                                                              4 minutes ago  Up 4 minutes              0.0.0.0:8087->80/tcp                       systemd-sandwich-infra
8c8d8af3ddde  docker.io/library/mysql:latest        mysqld                4 minutes ago  Up 4 minutes (healthy)    0.0.0.0:8087->80/tcp, 3306/tcp, 33060/tcp  systemd-sandwich-db
7ce5c6130a4d  docker.io/library/wordpress:latest    apache2-foregroun...  4 minutes ago  Up 4 minutes (unhealthy)  0.0.0.0:8087->80/tcp                       systemd-sandwich-wordpress
As you can see, we now have three rootless pods running under our dogman user. Each pod starts an infra container, as well as the mysql and wordpress container.
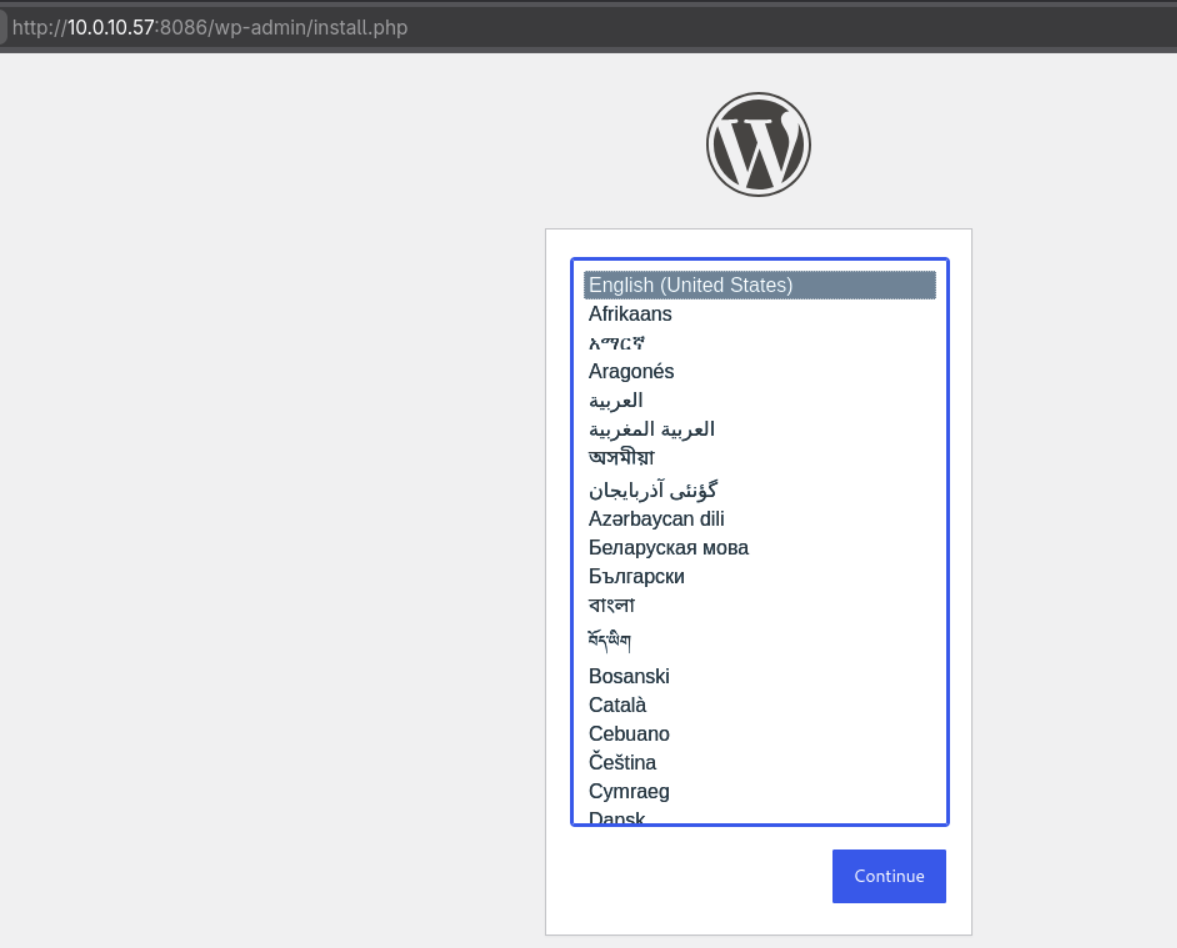
We can verify the sites are live by visiting the browser using the port numbers for each site. 8085, 8086, and 8087.
You should now get a WordPress setup page for all three sites now. What’s next? You can configure the sites and pipe DNS records into a reverse proxy that handles SSL certs or whatever you like.
To view what containers were updated and when, and if any rollbacks happened run:
journalctl --user -u podman-auto-update.service
Are we done?
There is a lot more you can do with this setup. For example, you could set up the volumes to be sent to multiple other hosts as RO copies. Then you can load balance the live site through a proxy. Or you could keep expanding the resiliency by version controlling bind-mounted volumes in git instead of using Podman volumes.
I like this setup though. Maybe we’ll get a part two with some of those adjustments some day.
P.S. Feel free to reach out with any questions or improvements to this setup! I’m always open to doing things better and/or more efficient.