Linux Reader
Contact me or see what this site is all about
Contact me or see what this site is all about
Ad hoc commands are ansible tasks you can run against managed hosts without the need of a playbook or script. These are used for bringing nodes to their desired states, verifying playbook results, and verifying nodes meet any needed criteria/pre-requisites. These must be ran as the ansible user (whatever your remote_user directive is set to under [defaults] in ansible.cfg)
Run the user module with the argument name=lisa on all hosts to make sure the user “lisa” exists. If the user doesn’t exist, it will be created on the remote system:
ansible all -m user -a "name=lisa"
{command} {host} -m {module} -a {"argument1 argument2 argument3"}
In our lab:
ansible all -m user -a "name=lisa"This Ad Hoc command created user “Lisa” on ansible1 and ansible2. If we run the command again, we get “SUCCESS” on the first line instead of “CHANGED”. Which means the hosts already meet the requirements:
[ansible@control base]$ ansible all -m user -a "name=lisa"indempotent Regardless of current condition, the host is brought to the desired state. Even if you run the command multiple times.
Run the command id lisa on all managed hosts:
[ansible@control base]$ ansible all -m command -a "id lisa"Here, the command module is used to run a command on the specified hosts. And the output is displayed on screen. To note, this does not show up in our ansible user’s command history on the host:
[ansible@ansible1 ~]$ historyRemove the user lisa from all managed hosts:
[ansible@control base]$ ansible all -m user -a "name=lisa state=absent"You can also use the -u option to specify the Ansible user that Ansible will use to run the command. Remember, with no modules specified, ansible uses the command module:
ansible all -a "free -m" -u david
`
Follow normal bash scripting guidelines to run ansible commands in a script:
[ansible@control base]$ vim httpd-ansible.shLet’s set up a script that installs and starts/enables httpd, creates a user called “anna”, and copies the ansible control node’s /etc/hosts file to /tmp/ on the managed nodes:
#!/bin/bash

ansible all -m yum -a "name=httpd state=latest"
ansible all -m service -a "name=httpd state=started enabled=yes"
ansible all -m user -a "name=anna"
ansible all -m copy -a "src=/etc/hosts dest=/tmp/hosts"[ansible@control base]$ chmod +x httpd-ansible.sh
[ansible@control base]$ ./httpd-ansible.sh
web2 | UNREACHABLE! => {
"changed": false,
"msg": "Failed to connect to the host via ssh: ssh: Could not resolve hostname web2: Name or service not known",
"unreachable": true
}
web1 | UNREACHABLE! => {
"changed": false,
"msg": "Failed to connect to the host via ssh: ssh: Could not resolve hostname web1: Name or service not known",
"unreachable": true
}
ansible1 | SUCCESS => {
"ansible_facts": {
"discovered_interpreter_python": "/usr/bin/python3"
},
"changed": false,
"msg": "Nothing to do",
"rc": 0,
"results": []
}
ansible2 | SUCCESS => {
"ansible_facts": {
"discovered_interpreter_python": "/usr/bin/python3"
},
"changed": false,
"msg": "Nothing to do",
"rc": 0,
"results": []
}
... <-- Results truncatedAnd from the ansible1 node we can verify:
[ansible@ansible1 ~]$ cat /etc/passwd | grep anna
anna:x:1001:1001::/home/anna:/bin/bash[ansible@ansible1 ~]$ cat /tmp/hosts
127.0.0.1 localhost localhost.localdomain localhost4 localhost4.localdomain4
::1 localhost localhost.localdomain localhost6 localhost6.localdomain6
192.168.124.201 ansible1
192.168.124.202 ansible2View a file from a managed node:
ansible ansible1 -a "cat /somfile.txt"
ansible-navigatorWas advised to start using this tools for Ansible because it is available during the RHCE exam. https://ansible.readthedocs.io/projects/navigator/
ansible-dochttps://docs.ansible.com/ansible/latest/cli/ansible-doc.html
An Ansible fact is a variable that contains information about a target system.This information can be used in conditional statements to tailor playbooks to that system. Systems facts are system property values. Custom facts are user-defined variables stored on managed hosts. system.
Facts are collected when Ansible executes on the remote system. You’ll see a “Gathering Facts” task everytime you run a playbook. These facts are then stored in the variable ansible_facts.
Use the debug module to check the value of variables. This module requires variables to be enclosed in curly brackets. This example shows a large list of facts from managed nodes:
---
- name: show facts
  hosts: all
  tasks:
  - name: show facts
    debug:
      var: ansible_facts
There are two supported formats for using Ansible fact variables:
It’s recommended to use square brackets: ansible_facts['default_ipv4']['address'] but dotted notation is also supported for now: ansible_facts.default_ipv4.address
Commonly used ansible_facts:
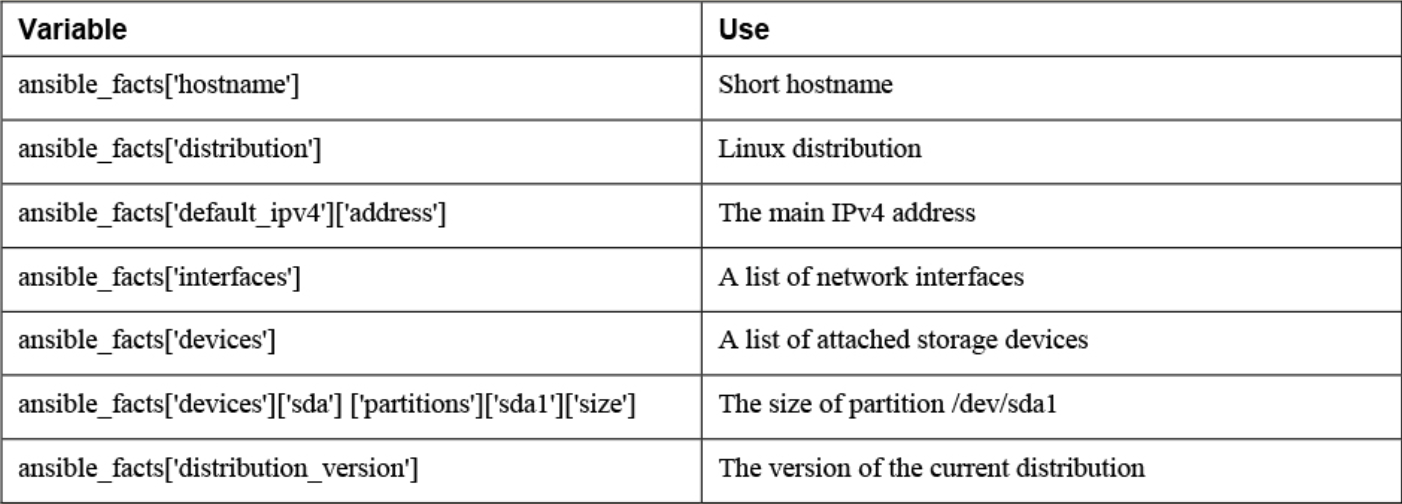
There are additional Ansible modules for gathering more information. See `ansible-doc -l | grep fact
package_facts module collects information about software packages installed on managed hosts.
Ansible_facts variable (current way)
ansible_facts['distribution_version']injected variables (old way)
Variable are prefixed with the string ansible_
Will lose support eventually
Old approach and the new approach both still occur.
ansible ansible1 -m setup command Ansible facts are injected as variables. ansible1 | SUCCESS => {
"ansible_facts": {
"ansible_all_ipv4_addresses": [
"192.168.122.1",
"192.168.4.201"
],
"ansible_all_ipv6_addresses": [
"fe80::e564:5033:5dec:aead"
],
"ansible_apparmor": {Comparing ansible_facts Versus Injected Facts as Variables
ansible_facts                               Injected Variable
--------------------------------------------------------------
ansible_facts['hostname']                  ansible_hostname
ansible_facts['distribution']              ansible_distribution
ansible_facts['default_ipv4']['address']   ansible_default_ipv4['address']
ansible_facts['interfaces']                ansible_interfaces
ansible_facts['devices']                   ansible_devices
ansible_facts['devices']['sda']\
['partitions']['sda1']['size']             ansible_devices['sda']['partitions']['sda1']['size']
ansible_facts['distribution_version']      ansible_distribution_version
Different notations can be used in either method, the listings address the facts in dotted notation, not in the notation with square brackets.
Addressing Facts with Injected Variables:
    - hosts: all
      tasks:
      - name: show IP address
        debug:
          msg: >
            This host uses IP address {{ ansible_default_ipv4.address }}
Addressing Facts Using the ansible_facts Variable
    ---
    - hosts: all
      tasks:
      - name: show IP address
        debug:
          msg: >
            This host uses IP address {{ ansible_facts.default_ipv4.address }}
If, for some reason, you want the method where facts are injected into variables to be the default method, you can use inject_facts_as_vars=true in the [default] section of the ansible.cfg file.
• In Ansible versions since 2.5, all facts are stored in one variable: ansible_facts. This method is used while gathering facts from a playbook.
• Before Ansible version 2.5, facts were injected into variables such as ansible_hostname. This method is used by the setup module. (Note that this may change in future versions of Ansible.)
• Facts can be addressed in dotted notation:
{{ansible_facts.default_ipv4.address }}
• Alternatively, facts can be addressed in square brackets notation:
{{ ansible_facts['default_ipv4']['address'] }}. (preferred)
By default, upon execution of each playbook, facts are gathered. This does slow down playbooks, and for that reason, it is possible to disable fact gathering completely. To do so, you can use the gather_facts: no parameter in the play header. If later in the same playbook it is necessary to gather facts, you can do this by running the setup module in a task.
Even if it is possible to disable fact gathering for all of your Ansible configuration, this practice is not recommended. Too many playbooks use conditionals that are based on the current value of facts, and all of these conditionals would stop working if fact gathering were disabled altogether.
As an alternative to make working with facts more efficient, you can disable a fact cache. To do so, you need to install an external plug-in. Currently, two plug-ins are available for this purpose: jsonfile and redis. To configure fact caching using the redis plug-in, you need to install it first. Next, you can enable fact caching through ansible.cfg.
The following procedure describes how to do this:
1. Use yum install redis.
2. Use service redis start.
3. Use pip install redis.
4. Edit /etc/ansible/ansible.cfg and ensure it contains the following parameters:
[defaults]
gathering = smart
fact_caching = redis
fact_caching_timeout = 86400
Note
Fact caching can be convenient but should be used with caution. If, for instance, a playbook installs a certain package only if a sufficient amount of disk space is available, it should not do this based on information that may be up to 24 hours old. For that reason, using a fact cache is not recommended in many situations.
Used to provide a host with arbitrary values that Ansible can use to change the behavior of plays.
can be provided as static files.
files must
can be generated by a script, and
Dynamic custom facts are useful because they allow the facts to be determined at the moment that a script is running. provides an example of a static custom fact file.
Custom Facts Sample File:
    [packages]
    web_package = httpd
    ftp_package = vsftpd

    [services]
    web_service = httpd
    ftp_service = vsftpd
To get the custom facts files on the managed hosts, you can use a playbook that copies a local custom fact file (existing in the current Ansible project directory) to the appropriate location on the managed hosts. Notice that this playbook uses variables, which are explained in more detail in the section titled “Working with Variables.”
    ---
    - name: Install custom facts
      hosts: all
      vars:
        remote_dir: /etc/ansible/facts.d
        facts_file: listing68.fact
      tasks:
      - name: create remote directory
        file:
          state: directory
          recurse: yes
          path: "{{ remote_dir }}"
      - name: install new facts
        copy:
          src: "{{ facts_file }}"
          dest: "{{ remote_dir }}"
Custom facts are stored in the variable ansible_facts.ansible_local. In this variable, you use the filename of the custom fact file and the label in the custom fact file. For instance, after you run the playbook in Listing 6-9, the web_package fact that was defined in listing68.fact is accessible as
{{ ansible_facts[’ansible_local’][’listing67’][’packages’][’web_package’] }}
To verify, you can use the setup module with the filter argument. Notice that because the setup module produces injected variables as a result, the ad hoc command to use is ansible all -m setup -a "filter=ansible_local" . The command ansible all -m setup -a "filter=ansible_facts\['ansible_local'\]" does not work.
1. Create a custom fact file with the name custom.fact and the following contents:
[software]
package = httpd
service = httpd
state = started
enabled = true
2. Write a playbook with the name copy_facts.yaml and the following contents:
---
- name: copy custom facts
  become: yes
  hosts: ansible1
  tasks:
  - name: create the custom facts directory
    file:
      state: directory
      recurse: yes
      path: /etc/ansible/facts.d
  - name: copy the custom facts
    copy:
      src: custom.fact
      dest: /etc/ansible/facts.d
3. Apply the playbook using ansible-playbook copy_facts.yaml -i inventory
4. Check the availability of the custom facts by using ansible all -m setup -a "filter=ansible_local" -i inventory
5. Use an ad hoc command to ensure that the httpd service is not installed on any of the managed servers: ansible all -m yum -a "name=httpd state=absent" -i inventory -b
6. Create a playbook with the name setup_with_facts.yaml that installs and enables the httpd service, using the custom facts:
---
- name: install and start the web service
  hosts: ansible1
  tasks:
  - name: install the package
    yum:
      name: "{{ ansible_facts['ansible_local']['custom']['software']['package'] }}"
      state: latest
  - name: start the service
    service:
      name: "{{ ansible_facts['ansible_local']['custom']['software']['service'] }}"
      state: "{{ ansible_facts['ansible_local']['custom']['software']['state'] }}"
      enabled: "{{ ansible_facts['ansible_local']['custom']['software']['enabled'] }}"
7. Run the playbook to install and set up the service by using ansible-playbook setup_with_facts.yaml -i inventory -b
8. Use an ad hoc command to verify the service is running: ansible ansible1 -a "systemctl status httpd" -i inventory -b
The easiest way to work with Ansible Galaxy is to use the website at https://galaxy.ansible.com:


Use the Search Feature to Search for Specific Packages
In the result of any Search action, you see a list of collections as well as a list of roles.
An Ansible Galaxy collection is a distribution format for Ansible content.
It can contain roles, but also playbooks, modules, and plug-ins.
In most cases you just need the roles, not the collection: roles contain all that you include in the playbooks you’re working with.
Some important indicators are the number of times the role has been downloaded and the score of the role.
This information enables you to easily distinguish between commonly used roles and roles that are not used that often.
Also, you can use tags to make identifying Galaxy roles easier.
These tags provide more information about a role and make it possible to search for roles in a more efficient way.

ansible-galaxy commandansible-galaxy Commandansible-galaxy search
Useful Command-Line Options: –platforms
`ansible-galaxy info
[ansible@control ansible-lab]$ ansible-galaxy info geerlingguy.docker

Role: geerlingguy.docker
        description: Docker for Linux.
        commit: 9115e969c1e57a1639160d9af3477f09734c94ac
        commit_message: Merge pull request #501 from adamus1red/adamus1red/alpine-compose

add compose package to Alpine specific variables
        created: 2023-05-08T20:49:45.679874Z
        download_count: 23592264
        github_branch: master
        github_repo: ansible-role-docker
        github_user: geerlingguy
        id: 10923
        imported: 2025-03-24T00:01:45.901567
        modified: 2025-03-24T00:01:47.840887Z
        path: ('/home/ansible/.ansible/roles', '/usr/share/ansible/roles', '/etc/ansible/roles')
        upstream_id: None
username: geerlingguyansible-galaxy install
-prequirements file.
ansible-roles command. - src: geerlingguy.nginx
version: "2.7.0"src option.scm keyword is also required and must be set to git.To install a role using the requirements file, you can use the -r option with the ansible-galaxy install command:
ansible-galaxy install -r roles/requirements.yml
ansible-galaxy list
ansible-galaxy remove
ansible-galaxy to Manage Rolesansible-galaxy search --author geerlingguy --platforms EL to see a list of roles that geerlingguy has created.ansible-galaxy search nginx --author geerlingguy --platforms EL to find the geerlingguy.nginx role.ansible-galaxy info geerlingguy.nginx.- src: geerlingguy.nginx
version: "2.7.0"Add the line roles_path = /home/ansible/roles to the ansible.cfg file.
Use the command ansible-galaxy install -r listing96.yaml to install the role from the requirements file. It is possible that by the time you run this exercise, the specified version 2.7.0 is no longer available. If that is the case, use ansible-galaxy info again to find a version that still is available, and change the requirements file accordingly.
Type ansible-galaxy list to verify that the new role was successfully installed on your system.
Write a playbook with the name exercise92.yaml that uses the role and has the following contents:
---
- name: install nginx using Galaxy role
  hosts: ansible2
  roles:
- geerlingguy.nginxansible-playbook exercise92.yaml and observe that the new role is installed from the custom roles path.For small companies, you can use a single Ansible configuration. But for larger ones, it’s a good idea to use different project directories. A project directory contains everything you need to work on a single project. Including:
playbook An Ansible script written in YAML that enforce the desired configuration on manage hosts.
A file that Identifies hosts that Ansible has to manage. You can also use this to list and group hosts and specify host variables. Each project should have it’s own inventory file.
/etc/ansible/hosts
localhost is not defined in inventory. It is an implicit host that is usable and refers to the Ansible control machine. Using localhost can be a good way to verify the accessibility of services on managed hosts.
List hosts by IP address or hostname. You can list a range of hosts in an inventory file as well such as web-server[1:10].example.com
ansible1:2222 < specify ssh port if the host is not using the default port 22
ansible2
10.0.10.55
web-server[1:10].example.comYou can list groups and groups of groups. See the groups web and db are included in the group “servers:children”
ansible1
ansible2
10.0.10.55
web-server[1:10].example.com

[web]
web-server[1:10].example.com

[db]
db1
db2

[servers:children] <-- servers is the group of groups and children is the parameter that specifies child groups
web
db
There are 3 general approaches to using groups:
Functional groups Address a specific group of hosts according to use. Such as web servers or database servers.
Regional host groups Used when working with region oriented infrastructure. Such as USA, Canada.
Staging host groups Used to address different hosts according to the staging phase that the current environment is in. Such as testing, development, production.
Undefined host groups are called implicit host groups. These are all, ungrouped, and localhost. Names making the meaning obvious.
In older versions of Ansible you could define variables for hosts. This is no longer used. Example:
[groupname:vars]
ansible=ansible_user
Variables are now set using host_vars and group_vars directories instead.
Put all inventory files in a directory and specify the directory as the inventory to be used. For dynamic directories you also need to set the execution bit on the inventory file.
Lets create our first playbook:
[ansible@control base]$ vim playbook.yaml
---
- name: install start and enable httpd <-- play is at the highest level
  hosts: all
  tasks: <-- play has a list of tasks
  - name: install package <-- name of task 1
    yum: <-- module
      name: httpd <-- argument 1
      state: installed <-- argument 2
  - name: start and enable service <-- task 2
    service:
      name: httpd
      state: started
      enabled: yes
There are thee dashes at the top of the playbook. And sometimes you’ll find three dots at the end of a playbook. These make it easy to isolate the playbook and embed the playbook code into other projects.
Playbooks are written in YAML format and saved as either .yml or .yaml. YAML specifies objects as key-value pairs (dictionaries). Key value pairs can be listed in either key: value (preferred) or key=value. And dashes specify lists of embedded objects.
There is a collection of one or more plays in a playbook. Each play targets specific hosts and lists tasks to perform on those hosts. There is one play here with the name “install start and enable httpd”. You target the host names to target at the top of the play, not in the individual tasks performed.
Each task is identified by “- name” (not required but recommended for troubleshooting and identifying tasks). Then the module is listed with arguments and their values under that.
Indentation is important here. It identifies the relationships between different elements. Data elements at the same level must have the same indentation. And items that are children or properties of another element must be indented more than their parent elements.
Indentation is created using spaces. Usually two spaces is used, but not required. You cannot use tabs for indentation.
You can also edit your .vimrc file to help with indentation when it detects that you are working with a YAML file:
vim ~/.vimrc
autocmd FileType yaml setlocal ai ts=2 sw=2 etRequired elements:
To run a playbook:
[ansible@control base]$ ansible-playbook playbook.yaml

# Name of the play
PLAY [install start and enable http+userd] ***********************************************

# Overview of tasks and the hosts it was successful on
TASK [Gathering Facts] **************************************************************
fatal: [web1]: UNREACHABLE! => {"changed": false, "msg": "Failed to connect to the host via ssh: ssh: Could not resolve hostname web1: Name or service not known", "unreachable": true}
fatal: [web2]: UNREACHABLE! => {"changed": false, "msg": "Failed to connect to the host via ssh: ssh: Could not resolve hostname web2: Name or service not known", "unreachable": true}
ok: [ansible1]
ok: [ansible2]

TASK [install package] **************************************************************
ok: [ansible1]
ok: [ansible2]

TASK [start and enable service] *****************************************************
ok: [ansible2]
ok: [ansible1]

# overview of the status of each task
PLAY RECAP **************************************************************************
ansible1                   : ok=3 (no changes required)    changed=0 (indicates the task was successful and target node was modified.)   unreachable=0    failed=0    skipped=0    rescued=0    ignored=0
ansible2                   : ok=3    changed=0    unreachable=0    failed=0    skipped=0    rescued=0    ignored=0
web1                       : ok=0    changed=0    unreachable=1    failed=0    skipped=0    rescued=0    ignored=0
web2                       : ok=0    changed=0    unreachable=1    failed=0    skipped=0    rescued=0    ignored=0
Before running tasks, the ansible-playbook command gathers facts (current configuration and settings) about managed nodes.
Ansible does not have a built in feature to undo a playbook that you ran. So to undo changes, you need to make another playbook that defines the new desired state of the host.
Key value pairs can also be listed as:
tasks:
 - name: install vsftpd
   yum: name=vsftpd
 - name: enable vsftpd
   service: name=vsftpd enabled=true
 - name: create readme file
But better to list them as such for better readability:
    copy:
      content: "welcome to the FTP server\n"
      dest: /var/ftp/pub/README
      force: no
      mode: 0444
Some modules support multiple values for a single key:
---
- name: install multiple packages
  hosts: all
  tasks:
  - name: install packages
    yum:
      name: <-- key with multiple values
      - nmap
      - httpd
      - vsftpd
state: latest <-- will install and/or update to latest versionValid fomats for a string in YAML:
super string"super string"'super string'When inserting text into a file, you may have to deal with spacing. You can either preserve newline characters with a pipe | such as:
    - name: Using | to preserve newlines
      copy:
        dest: /tmp/rendezvous-with-death.txt
        content: |
          I have a rendezvous with Death
          At some disputed barricade,
          When Spring comes back with rustling shade
          And apple-blossoms fill the air—
Output:
I have a rendezvous with Death
At some disputed barricade,
When Spring comes back with rustling shade
And apple-blossoms fill the air—
Or chose not to with a carrot >
 - name: Using > to fold lines into one
      copy:
        dest: /tmp/rendezvous-with-death.txt
        content: >
          I have a rendezvous with Death
          At some disputed barricade,
          When Spring comes back with rustling shade
          And apple-blossoms fill the air—
Output:
I have a rendezvous with Death At some disputed barricade, When Spring comes back with rustling shade And apple-blossoms fill the air—--syntax-checkYou can use the --syntax-check flag to check a playbook for errors. The ansible-playbook command does check syntax by default though, and will throw the same error messages. The syntax check stops after detecting a single error. So you will need to fix the first errors in order to see errors further in the file. I’ve added a tab in front of the host key to demonstrate:
[ansible@control base]$ cat playbook.yaml
---
- name: install start and enable httpd
    hosts: all
  tasks:
  - name: install package
    yum:
      name: httpd
      state: installed
  - name: start and enable service
    service:
      name: httpd
      state: started
      enabled: yes

[ansible@control base]$ ansible-playbook --syntax-check playbook.yaml
ERROR! We were unable to read either as JSON nor YAML, these are the errors we got from each:
JSON: Expecting value: line 1 column 1 (char 0)

Syntax Error while loading YAML.
  mapping values are not allowed in this context

The error appears to be in '/home/ansible/base/playbook.yaml': line 3, column 10, but may
be elsewhere in the file depending on the exact syntax problem.

The offending line appears to be:

- name: install start and enable httpd
    hosts: all
         ^ here
And here it is again, after fixing the syntax error:
[ansible@control base]$ vim playbook.yaml
[ansible@control base]$ cat playbook.yaml
---
- name: install start and enable httpd
  hosts: all
  tasks:
  - name: install package
    yum:
      name: httpd
      state: installed
  - name: start and enable service
    service:
      name: httpd
      state: started
      enabled: yes
[ansible@control base]$ ansible-playbook --syntax-check playbook.yaml

playbook: playbook.yamlUse the -C flag to perform a dry run. This will check the success status of all of the tasks without actually making any changes.
ansible-playbook -C playbook.yaml
Using multiple plays in a playbook lets you set up one group of servers with one configuration and another group with a different configuration. Each play has it’s own list of hosts to address.
You can also specify different parameters in each play such as become: or the remote_user: parameters.
Try to keep playbooks small. As bigger playbooks will be harder to troubleshoot. You can use include: to include other playbooks. Other than troubleshooting, using smaller playbooks lets you use your playbooks in a flexible way to perform a wider range of tasks.
Here is an example of a playbook with two plays:
---
- name: install start and enable httpd   <--- play 1
  hosts: all
  tasks:
  - name: install package
    yum:
      name: httpd
      state: installed
  - name: start and enable service
    service:
      name: httpd
      state: started
      enabled: yes

- name: test httpd accessibility <-- play 2
  hosts: localhost
  tasks:
  - name: test httpd access
    uri:
url: http://ansible1You can increase the output of verbosity to an amount hitherto undreamt of. This can be useful for troubleshooting.
Verbose output of the playbook above showing task results:
[ansible@control base]$ ansible-playbook -v playbook.yaml
Verbose output of the playbook above showing task results and task configuration:
[ansible@control base]$ ansible-playbook -vv playbook.yaml
Verbose output of the playbook above showing task results, task configuration, and info about connections to managed hosts:
[ansible@control base]$ ansible-playbook -vvv playbook.yaml
Verbose output of the playbook above showing task results, task configuration, and info about connections to managed hosts, plug-ins, user accounts, and executed scripts:
[ansible@control base]$ ansible-playbook -vvvv playbook.yaml
Now we know enough to create and enable a simple webserver. Here is a playbook example. Just make sure to download the posix collection or you won’t be able to use the firewalld module:
[ansible@control base]$ ansible-galaxy collection install ansible.posix
[ansible@control base]$ cat playbook.yaml
---
- name: Enable web server
  hosts: ansible1
  tasks:
  - name: install package
    yum:
      name:
        - httpd
        - firewalld
      state: installed
  - name: Create welcome page
    copy:
      content: "Welcome to the webserver!\n"
      dest: /var/www/html/index.html
  - name: start and enable service
    service:
      name: httpd
      state: started
      enabled: yes
  - name: enable firewall
    service:
      name: firewalld
      state: started
      enabled: true
  - name: Open service in firewall
    firewalld:
      service: http
      permanent: true
      state: enabled
      immediate: yes

- name: test webserver accessibility
  hosts: localhost
  become: no
  tasks:
  - name: test webserver access
    uri:
      url: http://ansible1
      return_content: yes <-- Return the body of the response as a content key in the dictionary result
      status_code: 200 <--
After running this playbook, you should be able to reach the webserver at http://ansible1
With return content and status code
ok: [localhost] => {"accept_ranges": "bytes", "changed": false, "connection": "close", "content": "Welcome to the webserver!\n", "content_length": "26", "content_type": "text/html; charset=UTF-8", "cookies": {}, "cookies_string": "", "date": "Thu, 10 Apr 2025 12:12:37 GMT", "elapsed": 0, "etag": "\"1a-6326b4cfb4042\"", "last_modified": "Thu, 10 Apr 2025 11:58:14 GMT", "msg": "OK (26 bytes)", "redirected": false, "server": "Apache/2.4.62 (Red Hat Enterprise Linux)", "status": 200, "url": "http://ansible1"}Adds this: "content": "Welcome to the webserver!\n" and this: "status": 200, "url": "http://ansible1"} to verbose output for that task.
Work with roles and Create roles
Roles Sample Directory Structure:
    [ansible@control roles]$ tree testrole/
    testrole/
    |-- defaults
    |   `-- main.yml
    |-- files
    |-- handlers
    |   `-- main.yml
    |-- meta
    |   `-- main.yml
    |-- README.md
    |-- tasks
    |   `-- main.yml
    |-- templates
    |-- tests
    |   |-- inventory
    |   `-- test.yml
    `-- vars
        `-- main.yml
Role Directory Structure defaults
Default variables that may be overwritten by other variables files
Static files that are needed by role tasks handlers
Handlers for use in this role meta
metadata, such as dependencies, plus license and maintainer information tasks
Role task definitions templates
Jinja2 templates tests
Optional inventory and a test.yml file to test the role vars
Variables that are not meant to be overwritten
Most of the role directories have a main.yml file.
This is the entry-point YAML file that is used to define components in the role.
Roles can be stored in different locations:
./roles
~/.ansible/roles
/etc/ansible/roles
/usr/share/ansible/roles
ansible-galaxy init { newrolename }
    ---
    - name: include some roles
      roles:
      - role1
- role2mkdir roles to create a roles subdirectory in the current directory, and use cd roles to get into that subdirectory.ansible-galaxy init motd to create the motd role structure.ansible-playbook exercise91.yamlansible ansible2 -a "cat /etc/motd"Sample role all under roles/motd/:
defaults/main.yml
---
# defaults file for motd
system_manager: anna@example.com
meta/main.yml
galaxy_info:
author: Sander van V
description: your description
company: your company (optional)
license: license (GPLv2, CC-BY, etc)
min_ansible_version: 2.5
tasks/main.yml
---
tasks file for motd
- name: copy motd file
  template:
    src: templates/motd.j2
    dest: /etc/motd
    owner: root
    group: root
    mode: 0444
templates/motd.j2
Welcome to {{ ansible_hostname }}

This file was created on {{ ansible_date_time.date }}
Disconnect if you have no business being here

Contact {{ system_manager }} if anything is wrong
Playbook motd.yml:
---
- name: use the motd role playbook
  hosts: ansible2
  roles:
  - role: motd
    system_manager: bob@example.com
handlers/main.yml example:
---
# handlers file for base-config
  - name: source profile
    command: source /etc/profile

  - name: source bash
command: source /etc/bash.bashrc Defining dependencies in meta/main.yml
    dependencies:
    - role: apache
      port: 8080
    - role: mariabd
when: environment == ’production’Working with roles splits the contents of the role off the tasks that are run through the playbook.
Splitting files to store them in a location that makes sense is common in Ansible
When you’re working with Ansible, it’s a good idea to work with project directories in bigger environments.
Working with project directories makes it easier to delegate tasks and have the right people responsible for the right things.
Each project directory may have its own ansible.cfg file, inventory file, and playbooks.
If the project grows bigger, variable files and other include files may be used, and they are normally stored in subdirectories.
At the top-level directory, create the main playbook from which other playbooks are included. The suggested name for the main playbook is site.yml.
Use group_vars/ and host_vars/ to set host-related variables and do not define them in inventory.
Consider using different inventory files to differentiate between production and staging phases.
Use roles to standardize common tasks.
When you are working with roles, some additional recommendations apply:
Use a version control repository to maintain roles in a consistent way. Git is commonly used for this purpose.
Sensitive information should never be included in roles. Use Ansible Vault to store sensitive information in an encrypted way.
Use ansible-galaxy init to create the role base structure. Remove files and directories you don’t use.
Don’t forget to provide additional information in the role’s README.md and meta/main.yml files.
Keep roles focused on a specific function. It is better to use multiple roles to perform multiple tasks.
Try to develop roles in a generic way, such that they can be used for multiple purposes.
Create a playbook that starts the Nginx web server on ansible1, according to the following requirements: • A requirements file must be used to install the Nginx web server. Do NOT use the latest version of the Galaxy role, but instead use the version before that. • The same requirements file must also be used to install the latest version of postgresql. • The playbook needs to ensure that neither httpd nor mysql is currently installed.
Use the RHEL SELinux System Role to manage SELinux properties according to the following requirements:
• A Boolean is set to allow SELinux relabeling to be automated using
cron.
• The directory /var/ftp/uploads is created, permissions are set to 777,
and the context label is set to public_content_rw_t.
• SELinux should allow web servers to use port 82 instead of port 80.
• SELinux is in enforcing state.
Subjects:
ansible-playbook timesync.yaml to run the playbook. Observe its output. Notice that some messages in red are shown, but these can safely be ignored.
5. Use ansible ansible2 -a "timedatectl show" and notice that the timezone variable is set to UTC.
Create a playbook that starts the Nginx web server on ansible1, according to the following requirements:
• A requirements file must be used to install the Nginx web server. Do NOT use the latest version of the Galaxy role, but instead use the version before that.
• The same requirements file must also be used to install the latest version of postgresql.
ansible-galaxy install -r roles/requirements.yml
cat roles/requirements.yml
- src: geerlingguy.nginx
  version: "3.1.4"

- src: geerlingguy.postgresql
• The playbook needs to ensure that neither httpd nor mysql is currently installed.
---
- name: ensure conflicting packages are not installed
  hosts: web1
  tasks:
  - name: remove packages
    yum:
      name:
      - mysql
      - httpd
      state: absent

- name: nginx web server
  hosts: web1
  roles:
  - geerlingguy.nginx
  - geerlingguy.postgresql
(Had to add a variable file for redhat 10 into the role. )
Use the RHEL SELinux System Role to manage SELinux properties according to the following requirements:
• A Boolean is set to allow SELinux relabeling to be automated using cron. • The directory /var/ftp/uploads is created, permissions are set to 777, and the context label is set to public_content_rw_t. • SELinux should allow web servers to use port 82 instead of port 80. • SELinux is in enforcing state.
vim lab92.yml
---
- name: manage ftp selinux properties
  hosts: ftp1
  vars:
    selinux_booleans:
      - name: cron_can_relabel
        state: true
        persistent: true
    selinux_state: enforcing
    selinux_ports:
    - ports: 82
      proto: tcp
      setype: http_port_t
      state: present
      local: true

  tasks:

  - name: create /var/ftp/uploads/
    file:
      path: /var/ftp/uploads
      state: directory
      mode: 777

  - name: set selinux context
    sefcontext:
      target: '/var/ftp/uploads(/.*)?'
      setype: public_content_rw_t
      ftype: d
      state: present
    notify: run restorecon

  - name: Execute the role and reboot in a rescue block
    block:
      - name: Include selinux role
        include_role:
          name: rhel-system-roles.selinux
    rescue:
      - name: >-
          Fail if failed for a different reason than selinux_reboot_required
        fail:
          msg: "role failed"
        when: not selinux_reboot_required

      - name: Restart managed host
        reboot:

      - name: Wait for managed host to come back
        wait_for_connection:
          delay: 10
          timeout: 300

      - name: Reapply the role
        include_role:
          name: rhel-system-roles.selinux

  handlers:
    - name:  run restorecon
command: restorecon -v /var/ftp/uploads1. Sensitive data is stored as values in variables in a separate variable file. 2. The variable file is encrypted, using the ansible-vault command. 3. While accessing the variable file from a playbook, you enter a password to decrypt.
ansible-vault create secret.yaml
ansible-vault create \--vault-password-file=passfile secret.yamlansible-vault encrypt
ansible-vault decrypt
Commonly used ansible-vault commands:
create
encryptencrypt_stringdecryptrekeyviewedit--vault-id @prompt
ansible-playbook command prompt for a password for each of the Vault-encrypted files that may be usedansible-playbook --ask-vault-pass
ansible-playbook --vault-password-file=secret
You should separate files containing unencrypted variables from files that contain encrypted variables.
Use group_vars and host_vars variable inclusion for this.
You may create a directory (instead of a file) with the name of the host or host group.
Within that directory you can create a file with the name vars, which contains unencrypted variables, and a file with the name vault, which contains Vault-encrypted variables.
Vault-encrypted variables can be included from a file using the vars_files parameter.
1. Create a secret file containing encrypted values for a variable user and a variable password by using ansible-vault create secrets.yaml
Set the password to password and enter the following lines:
username: bob
pwhash: password
When creating users, you cannot provide the password in plain text; it needs to be provided as a hashed value. Because this exercise focuses on the use of Vault, the password is not provided as a hashed value, and as a result, a warning is displayed. You may ignore this warning.
2. Create the file create-users.yaml and provide the following contents:
---
- name: create a user with vaulted variables
  hosts: ansible1
  vars_files:
    - secrets.yaml
  tasks:
  - name: creating user
    user:
      name: "{{ username }}"
      password: "{{ pwhash }}"
3. Run the playbook by using ansible-playbook --ask-vault-pass create-users.yaml
4. Change the current password on secrets.yaml by using ansible-vault rekey secrets.yaml and set the new password to
secretpassword.
5. To automate the process of entering the password, use echo secretpassword > vault-pass
6. Use chmod 400 vault-pass to ensure the file is readable for the ansible user only; this is about as much as you can do to secure the file.
7. Verify that it’s working by using ansible-playbook --vault-password-file=vault-pass create-users.yaml
JunctionScallopPoise
To view the inventory, specify the inventory file such as ~/base/inventory in the command line. You can name the inventory file anything you want. You can also set the default in the ansible.cfg file.
View the current inventory:
ansible -i inventory <pattern> --list-hosts
List inventory hosts in JSON format:
ansible-inventory -i inventory --list
Display overview of hosts as a graph:
ansible-inventory -i inventory --graph
In our lab example:
[ansible@control base]$ pwd
/home/ansible/base

[ansible@control base]$ ls
inventory

[ansible@control base]$ cat inventory
ansible1
ansible2

[web]
web1
web2

[ansible@control base]$ ansible-inventory -i inventory --graph
@all:
  |--@ungrouped:
  |  |--ansible1
  |  |--ansible2
  |--@web:
  |  |--web1
  |  |--web2

[ansible@control base]$ ansible-inventory -i inventory --list
{
    "_meta": {
        "hostvars": {}
    },
    "all": {
        "children": [
            "ungrouped",
            "web"
        ]
    },
    "ungrouped": {
        "hosts": [
            "ansible1",
            "ansible2"
        ]
    },
    "web": {
        "hosts": [
            "web1",
            "web2"
        ]
    }
}

[ansible@control base]$ ansible -i inventory all --list-hosts
  hosts (4):
    ansible1
    ansible2
    web1
    web2

[ansible@control base]$ ansible -i inventory ungrouped --list-hosts
  hosts (2):
    ansible1
ansible2ansible-inventory command.--list and --host options, this command also uses the --graph option to show a list of hosts, including the host groups they are a member of. [ansible@control rhce8-book]$ ansible-inventory -i listing101.py --graph
[WARNING]: A duplicate localhost-like entry was found (localhost). First found
localhost was 127.0.0.1
@all:
|--@ungrouped:
| |--127.0.0.1
| |--192.168.4.200
| |--192.168.4.201
| |--192.168.4.202
| |--ansible1
| |--ansible1.example.com
| |--ansible2
| |--ansible2.example.com
| |--control
| |--control.example.com
| |--localhost
| |--localhost.localdomain
| |--localhost4
| |--localhost4.localdomain4
| |--localhost6
| |--localhost6.localdomain6You can store this in a project’s directory or a user’s home directory, in the case that multiple user’s want to have their own Ansible configuration. Or in /etc/ansible if the configuration will be the same for every user and every project. You can also specify these settings in Ansible playbooks. The settings in a playbook take precedence over the .cfg file.
ansible.cfg precedence (Ansible uses the first one it finds and ignores the rest.)
Generate an example config file in the current directory. All directive are commented out by default:
[ansible@control base]$ ansible-config init --disabled > ansible.cfg
Include existing plugin to the file:
ansible-config init --disabled -t all > ansible.cfg
This generates an extremely large file. So I’ll just show Van Vugt’s example in .ini format:
[defaults] <-- General information
remote_user = ansible <--Required
host_key_checking = false <-- Disable SSH host key validity check
inventory = inventory

[privilege_escalation] <-- Define how ansible user requires admin rights to connect to hosts
become = True <-- Escalation required
become_method = sudo
become_user = root <-- Escalated user
become_ask_pass = False <-- Do not ask for escalation password
Privilege escalation parameters can be specified in ansible.cfg, playbooks, and on the command line.
No modules for managing boot process.
file module
lineinfile module
reboot module
To manage the default systemd target:
ls -l /etc/systemd/system/default.target
    lrwxrwxrwx. 1 root root 37 Mar 23 05:33 /etc/systemd/system/default.target -> /lib/systemd/system/multi-user.target
---
- name: set default boot target
hosts: ansible2
tasks:
- name: set boot target to graphical
file:
src: /usr/lib/systemd/system/graphical.target
dest: /etc/systemd/system/default.target
state: linkreboot module.
test_command argument
Equally useful while using the reboot module are the arguments that relate to timeouts. The reboot module uses no fewer than four of them:
• connect_timeout: The maximum seconds to wait for a successful connection before trying again
• post_reboot_delay: The number of seconds to wait after the reboot command before trying to validate the managed host is available again
• pre_reboot_delay: The number of seconds to wait before actually issuing the reboot
• reboot_timeout: The maximum seconds to wait for the rebooted machine to respond to the test command
When the rebooted host is back, the current playbook continues its tasks. This scenario is shown in the example in Listing 14-7, where first all managed hosts are rebooted, and after a successful reboot is issued, the message “successfully rebooted” is shown. Listing 14-8 shows the result of running this playbook. In Exercise 14-2 you can practice rebooting hosts using the reboot module.
Listing 14-7 Rebooting Managed Hosts
::: pre_1 — - name: reboot all hosts hosts: all gather_facts: no tasks: - name: reboot hosts reboot: msg: reboot initiated by Ansible test_command: whoami - name: print message to show host is back debug: msg: successfully rebooted :::
Listing 14-8 Verifying the Success of the reboot Module
::: pre_1 [ansible@control rhce8-book]$ ansible-playbook listing147.yaml
PLAY [reboot all hosts] *************************************************************************************************

TASK [reboot hosts] *****************************************************************************************************
changed: [ansible2]
changed: [ansible1]
changed: [ansible3]
changed: [ansible4]
changed: [ansible5]

TASK [print message to show host is back] *******************************************************************************
ok: [ansible1] => {
    "msg": "successfully rebooted"
}
ok: [ansible2] => {
    "msg": "successfully rebooted"
}
ok: [ansible3] => {
    "msg": "successfully rebooted"
}
ok: [ansible4] => {
    "msg": "successfully rebooted"
}
ok: [ansible5] => {
    "msg": "successfully rebooted"
}

PLAY RECAP **************************************************************************************************************
ansible1                   : ok=2    changed=1    unreachable=0    failed=0    skipped=0    rescued=0    ignored=0
ansible2                   : ok=2    changed=1    unreachable=0    failed=0    skipped=0    rescued=0    ignored=0
ansible3                   : ok=2    changed=1    unreachable=0    failed=0    skipped=0    rescued=0    ignored=0
ansible4                   : ok=2    changed=1    unreachable=0    failed=0    skipped=0    rescued=0    ignored=0
ansible5                   : ok=2    changed=1    unreachable=0    failed=0    skipped=0    rescued=0    ignored=0
:::
::: box Exercise 14-2 Managing Boot State
1. As a preparation for this playbook, so that it actually changes the default boot target on the managed host, use ansible ansible2 -m file -a “state=link src=/usr/lib/systemd/system/graphical.target dest=/etc/systemd/system/default.target”.
2. Use your editor to create the file exercise142.yaml and write the following playbook header:
---
- name: set default boot target and reboot
  hosts: ansible2
  tasks:
3. Now you set the default boot target to multi-user.target. Add the following task to do so:
- name: set default boot target
  file:
    src: /usr/lib/systemd/system/multi-user.target
    dest: /etc/systemd/system/default.target
    state: link
4. Complete the playbook to reboot the managed hosts by including the following tasks:
- name: reboot hosts
  reboot:
    msg: reboot initiated by Ansible
    test_command: whoami
- name: print message to show host is back
  debug:
    msg: successfully rebooted
5. Run the playbook by using ansible-playbook exercise142.yaml.
6. Test that the reboot was issued successfully by using ansible ansible2 -a “systemctl get-default”. :::
When I started studying for RHCE, the study guide had me manually set up virtual machines for the Ansible lab environment. I thought.. Why not start my automation journey right, and automate them using Vagrant.
I use Libvirt to manage KVM/QEMU Virtual Machines and the Virt-Manager app to set them up. I figured I could use Vagrant to automatically build this lab from a file. And I got part of the way. I ended up with this Vagrant file:
Vagrant.configure("2") do |config|
  config.vm.box = "almalinux/9"

  config.vm.provider :libvirt do |libvirt|
    libvirt.uri = "qemu:///system"
    libvirt.cpus = 2
    libvirt.memory = 2048
  end

   config.vm.define "control" do |control|
    control.vm.network "private_network", ip: "192.168.124.200"
    control.vm.hostname = "control.example.com"
  end

  config.vm.define "ansible1" do |ansible1|
    ansible1.vm.network "private_network", ip: "192.168.124.201"
    ansible1.vm.hostname = "ansible1.example.com"

  end

  config.vm.define "ansible2" do |ansible2|
    ansible2.vm.network "private_network", ip: "192.168.124.202"
    ansible2.vm.hostname = "ansible2.example.com"
  end

end
I could run this Vagrant file and Build and destroy the lab in seconds. But there was a problem. The Libvirt plugin, or Vagrant itself, I’m not sure which, kept me from doing a couple important things.
First, I could not specify the initial disk creation size. I could add additional disks of varying sizes but, if I wanted to change the size of the first disk, I would have to go back in after the fact and expand it manually…
Second, the Libvirt plugin networking settings were a bit confusing. When you add the private network option as seen in the Vagrant file, it would add this as a secondary connection, and route everything through a different public connection.
Now I couldn’t get the VMs to run using the public connection for whatever reason, and it seems the only workaround was to make DHCP reservations for the guests Mac addresses which gave me even more problems to solve. But I won’t go there..
So why not get my feet wet and learn how to deploy VMs with Ansible? This way, I would get the granularity and control that Ansible gives me, some extra practice with Ansible, and not having to use software that has just enough abstraction to get in the way.
The guide I followed to set this up can be found on Redhat’s blog here. And it was pretty easy to set up all things considered.
I’ll rehash the steps here:
Move to roles directory
cd roles
Initialize the role
ansible-galaxy role init kvm_provision
Switch into the role directory
cd kvm_provision/
Remove unused directories
rm -r files handlers vars
Add default variables to main.yml
cd defaults/ && vim main.yml
---
# defaults file for kvm_provision
base_image_name: AlmaLinux-9-GenericCloud-9.5-20241120.x86_64.qcow2
base_image_url: https://repo.almalinux.org/almalinux/9/cloud/x86_64/images/{{ base_image_name }}
base_image_sha: abddf01589d46c841f718cec239392924a03b34c4fe84929af5d543c50e37e37
libvirt_pool_dir: "/var/lib/libvirt/images"
vm_name: f34-dev
vm_vcpus: 2
vm_ram_mb: 2048
vm_net: default
vm_root_pass: test123
cleanup_tmp: no
ssh_key: /root/.ssh/id_rsa.pub
# Added option to configure ip address
ip_addr: 192.168.124.250
gw_addr: 192.168.124.1
# Added option to configure disk size
vm_disksize: 20The community.libvirt.virt module is used to provision a KVM VM. This module uses a VM definition in XML format with libvirt syntax. You can dump a VM definition of a current VM and then convert it to a template from there. Or you can just use this:
cd templates/ && vim vm-template.xml.j2
<domain type='kvm'>
  <name>{{ vm_name }}</name>
  <memory unit='MiB'>{{ vm_ram_mb }}</memory>
  <vcpu placement='static'>{{ vm_vcpus }}</vcpu>
  <os>
    <type arch='x86_64' machine='pc-q35-5.2'>hvm</type>
    <boot dev='hd'/>
  </os>
  <cpu mode='host-model' check='none'/>
  <devices>
    <emulator>/usr/bin/qemu-system-x86_64</emulator>
    <disk type='file' device='disk'>
      <driver name='qemu' type='qcow2'/>
      <source file='{{ libvirt_pool_dir }}/{{ vm_name }}.qcow2'/>
      <target dev='vda' bus='virtio'/>
      <address type='pci' domain='0x0000' bus='0x05' slot='0x00' function='0x0'/>
       <!-- Added: Specify the disk size using a variable -->
      <size unit='GiB'>{{ disk_size }}</size>
    </disk>
    <interface type='network'>
      <source network='{{ vm_net }}'/>
      <model type='virtio'/>
      <address type='pci' domain='0x0000' bus='0x01' slot='0x00' function='0x0'/>
    </interface>
    <channel type='unix'>
      <target type='virtio' name='org.qemu.guest_agent.0'/>
      <address type='virtio-serial' controller='0' bus='0' port='1'/>
    </channel>
    <channel type='spicevmc'>
      <target type='virtio' name='com.redhat.spice.0'/>
      <address type='virtio-serial' controller='0' bus='0' port='2'/>
    </channel>
    <input type='tablet' bus='usb'>
      <address type='usb' bus='0' port='1'/>
    </input>
    <input type='mouse' bus='ps2'/>
    <input type='keyboard' bus='ps2'/>
    <graphics type='spice' autoport='yes'>
      <listen type='address'/>
      <image compression='off'/>
    </graphics>
    <video>
      <model type='qxl' ram='65536' vram='65536' vgamem='16384' heads='1' primary='yes'/>
      <address type='pci' domain='0x0000' bus='0x00' slot='0x01' function='0x0'/>
    </video>
    <memballoon model='virtio'>
      <address type='pci' domain='0x0000' bus='0x06' slot='0x00' function='0x0'/>
    </memballoon>
    <rng model='virtio'>
      <backend model='random'>/dev/urandom</backend>
      <address type='pci' domain='0x0000' bus='0x07' slot='0x00' function='0x0'/>
    </rng>
  </devices>
</domain>
The template uses some of the variables from earlier. This allows flexibility to changes things by just changing the variables.
cd ../tasks/ && vim main.yml
---
# tasks file for kvm_provision

# ensure the required package dependencies `guestfs-tools` and `python3-libvirt` are installed. This role requires these packages to connect to `libvirt` and to customize the virtual image in a later step. These package names work on Fedora Linux. If you're using RHEL 8 or CentOS, use `libguestfs-tools` instead of `guestfs-tools`. For other distributions, adjust accordingly.

- name: Ensure requirements in place
  package:
    name:
      - guestfs-tools
      - python3-libvirt
    state: present
  become: yes

# obtain a list of existing VMs so that you don't overwrite an existing VM on accident. uses the `virt` module from the collection `community.libvirt`, which interacts with a running instance of KVM with `libvirt`. It obtains the list of VMs by specifying the parameter `command: list_vms` and saves the results in a variable `existing_vms`. `changed_when: no` for this task to ensure that it's not marked as changed in the playbook results. This task doesn't make any change in the machine; it only checks the existing VMs. This is a good practice when developing Ansible automation to prevent false reports of changes.
- name: Get VMs list
  community.libvirt.virt:
    command: list_vms
  register: existing_vms
  changed_when: no

#execute only when the VM name the user provides doesn't exist. And uses the module `get_url` to download the base cloud image into the `/tmp` directory
- name: Create VM if not exists
  block:
  - name: Download base image
    get_url:
      url: "{{ base_image_url }}"
      dest: "/tmp/{{ base_image_name }}"
      checksum: "sha256:{{ base_image_sha }}"

# copy the file to libvirt's pool directory so we don't edit the original, which can be used to provision other VMS later
  - name: Copy base image to libvirt directory
    copy:
      dest: "{{ libvirt_pool_dir }}/{{ vm_name }}.qcow2"
      src: "/tmp/{{ base_image_name }}"
      force: no
      remote_src: yes
      mode: 0660
    register: copy_results
  -
# Resize the VM disk
  - name: Resize VM disk
    command: qemu-img resize "{{ libvirt_pool_dir }}/{{ vm_name }}.qcow2" "{{ disk_size }}G"
    when: copy_results is changed

# uses command module to run virt-customize to customize the image
  - name: Configure the image
    command: |
      virt-customize -a {{ libvirt_pool_dir }}/{{ vm_name }}.qcow2 \
      --hostname {{ vm_name }} \
      --root-password password:{{ vm_root_pass }} \
      --ssh-inject 'root:file:{{ ssh_key }}' \
      --uninstall cloud-init --selinux-relabel
# Added option to configure an IP address
      --firstboot-command "nmcli c m eth0 con-name eth0 ip4 {{ ip_addr }}/24 gw4 {{ gw_addr }} ipv4.method manual && nmcli c d eth0 && nmcli c u eth0"

    when: copy_results is changed

  - name: Define vm
    community.libvirt.virt:
      command: define
      xml: "{{ lookup('template', 'vm-template.xml.j2') }}"
    when: "vm_name not in existing_vms.list_vms"

- name: Ensure VM is started
  community.libvirt.virt:
    name: "{{ vm_name }}"
    state: running
  register: vm_start_results
  until: "vm_start_results is success"
  retries: 15
  delay: 2

- name: Ensure temporary file is deleted
  file:
    path: "/tmp/{{ base_image_name }}"
    state: absent
  when: cleanup_tmp | bool
Changed my user to own the libvirt directory:
chown -R david:david /var/lib/libvirt/images
Create playbook kvm_provision.yaml
---
- name: Deploys VM based on cloud image
  hosts: localhost
  gather_facts: yes
  become: yes
  vars:
    pool_dir: "/var/lib/libvirt/images"
    vm: control
    vcpus: 2
    ram_mb: 2048
    cleanup: no
    net: default
    ssh_pub_key: "/home/davidt/.ssh/id_ed25519.pub"
    disksize: 20

  tasks:
    - name: KVM Provision role
      include_role:
        name: kvm_provision
      vars:
        libvirt_pool_dir: "{{ pool_dir }}"
        vm_name: "{{ vm }}"
        vm_vcpus: "{{ vcpus }}"
        vm_ram_mb: "{{ ram_mb }}"
        vm_net: "{{ net }}"
        cleanup_tmp: "{{ cleanup }}"
        ssh_key: "{{ ssh_pub_key }}"
Add the libvirt collection
ansible-galaxy collection install community.libvirt
Create a VM with a new name
ansible-playbook -K kvm_provision.yaml -e vm=ansible1
–run-command ’nmcli c a type Ethernet ifname eth0 con-name eth0 ip4 192.168.124.200 gw4 192.168.124.1'
parted /dev/vda resizepargit t 4 100%
Warning: Partition /dev/vda4 is being used. Are you sure you want to continue?
Yes/No? y
Information: You may need to update /etc/fstab.
lsblk NAME MAJ:MIN RM SIZE RO TYPE MOUNTPOINTS vda 252:0 0 20G 0 disk ├─vda2 252:2 0 200M 0 part /boot/efi ├─vda3 252:3 0 1G 0 part /boot └─vda4 252:4 0 8.8G 0 part /
variables {{ ansible_user }} {{ ansible_password }} {{ gw_addr }} {{ ip_addr }}
; useradd -m -p {{ ansible_user }} ; chage -d 0 {{ ansible_user }} ; cat {{ ansible_password }} > passwd {{ ansible_user }} –stdin" \
  - name: Configure the image
    command: |
      virt-customize -a {{ libvirt_pool_dir }}/{{ vm_name }}.qcow2 \
      --hostname {{ vm_name }} \
      --root-password password:{{ vm_root_pass }} \
      --uninstall cloud-init --selinux-relabel \
      --firstboot-command "nmcli c m eth0 con-name eth0 ip4 \
                           {{ ip_addr }}/24 gw4 {{ gw_addr }} \
                           ipv4.method manual && nmcli c d eth0 \
                           && nmcli c u eth0 && adduser \
                           {{ ansible_user }} && echo \
                           "{{ ansible_password }}" | passwd \
                           --stdin {{ ansible_user }}"
    when: copy_results is changed

  - name: Add ssh keys
    command: |
      virt-customize -a {{ libvirt_pool_dir }}/{{ vm_name }}.qcow2 \
--ssh-inject '{{ ansible_user }}:file:{{ ssh_key }}'uri: Interacts with basic http and https web services. (Verify connectivity to a web server +9)
Test httpd accessibility:
uri:
  url: http://ansible1
Show result of the command while running the playbook:
uri:
  url: http://ansible1
  return_content: yes
Show the status code that signifies the success of the request:
uri:
  url: http://ansible1
  status_code: 200
debug: Prints statements during execution. Used for debugging variables or expressions without stopping a playbook.
Print out the value of the ansible_facts variable:
debug:
var: ansible_factsThis chapter covers the following subjects:
• Using Modules to Manipulate Files • Managing SELinux Properties • Using Jinja2 Templates
• Use Ansible modules for system administration tasks that work with: • File contents • Use advanced Ansible features • Create and use templates to create customized configuration files
Common modules to manipulate files copy
acl
ansible-doc stat for list of full output- name: stat module tests
hosts: ansible1
tasks:
- stat:
path: /etc/hosts
register: st
- name: show current values
debug:
msg: current value of the st variable is {{ st }}---
- name: stat module test
hosts: ansible1
tasks:
- command: touch /tmp/statfile
- stat:
path: /tmp/statfile
register: st
- name: show current values
debug:
msg: current value of the st variable is {{ st }}
- fail:
msg: "unexpected file mode, should be set to 0640"
when: st.stat.mode != '0640' ---
- name: stat module tests
hosts: ansible1
tasks:
- command: touch /tmp/statfile
- stat:
path: /tmp/statfile
register: st
- name: show current values
debug:
msg: current value of the st variable is {{ st }}
- name: changing file permissions if that's needed
file:
path: /tmp/statfile
mode: 0640
when: st.stat.mode != '0640'Use lineinfile or blockinfile instead of copy to manage text in a file
---
- name: configuring SSH
  hosts: all
  tasks:
  - name: disable root SSH login
    lineinfile:
      dest: /etc/ssh/sshd_config
      regexp: "^PermitRootLogin"
      line: "PermitRootLogin no"
    notify: restart sshd

  handlers:
  - name: restart sshd
    service:
      name: sshd
state: restarted---
- name: modifying file
hosts: all
tasks:
- name: ensure /tmp/hosts exists
file:
path: /tmp/hosts
state: touch
- name: add some lines to /tmp/hosts
blockinfile:
path: /tmp/hosts
block: |
192.168.4.110 host1.example.com
192.168.4.120 host2.example.com
state: presentWhen blockinfile is used, the text specified in the block is copied with a start and end indicator.
[ansible@ansible1 ~]$ cat /tmp/hosts
127.0.0.1   localhost localhost.localdomain localhost4 localhost4.localdomain4
::1         localhost localhost.localdomain localhost6 localhost6.localdomain6
192.168.122.201 ansible1
192.168.122.202 ansible2
192.168.122.203 ansible3
# BEGIN ANSIBLE MANAGED BLOCK
192.168.4.110 host1.example.com
192.168.4.120 host2.example.com
# END ANSIBLE MANAGED BLOCKUse the file module to create a new directory and in that directory create an empty file, then remove the directory recursively.
---
- name: using the file module
  hosts: ansible1
  tasks:
  - name: create directory
    file:
      path: /newdir
      owner: ansible
      group: ansible
      mode: 770
      state: directory
  - name: create file in that directory
    file:
      path: /newdir/newfile
      state: touch
  - name: show the new file
    stat:
      path: /newdir/newfile
    register: result
  - debug:
      msg: |
        This shows that newfile was created
        "{{ result }}"
  - name: removing everything again
    file:
      path: /newdir
state: absent copy module copies a file from the Ansible control host to a managed machine.
fetch module enables you to do the opposite
synchronize module performs Linux rsync-like tasks, ensuring that a file from the control host is synchronized to a file with that name on the managed host.
copy module always creates a new file, whereas the synchronize module updates a current existing file.
---
- name: file copy modules
  hosts: all
  tasks:
  - name: copy file demo
    copy:
      src: /etc/hosts
      dest: /tmp/
  - name: add some lines to /tmp/hosts
    blockinfile:
      path: /tmp/hosts
      block: |
        192.168.4.110 host1.example.com
        192.168.4.120 host2.example.com
      state: present
  - name: verify file checksum
    stat:
      path: /tmp/hosts
      checksum_algorithm: md5
    register: result
  - debug:
      msg: "The checksum of /tmp/hosts is {{ result.stat.checksum }}"
  - name: fetch a file
    fetch:
      src: /tmp/hosts
dest: /tmp//tmp/ansible1/tmp/hosts
/tmp/ansible2/tmp/hosts1. Create a file with the name exercise81.yaml and give it the following play header:
2. Add a task that creates a new empty file:
3. Use the stat module to check on the status of the new file:
4. To see what the status module is doing, add a line that uses the debug module:
5. Now that you understand which values are stored in newfile, you can add a conditional play that changes the current owner if not set correctly:
6. Add a second play to the playbook that fetches a remote file:
7. Now that you have fetched the file so that it is on the Ansible control machine, use blockinfile to edit it:
8. In the final step, copy the modified file to ansible2 by including the following play:
9. At this point you’re ready to run the playbook. Type ansible-playbook exercise81.yaml to run it and observe the results.
10. Type ansible ansible2 -a "cat /tmp/motd" to verify that the modified motd file was successfully copied to ansible2.
---
- name: testing file manipulation skills
  hosts: ansible1
  tasks:
    - name: create new file
      file:
        name: /tmp/newfile
        state: touch
    - name: check the status of the new file
      stat:
        path: /tmp/newfile
      register: newfile
    - name: for debugging only
      debug:
        msg: the current values for newfile are {{ newfile }}
    - name: change file owner if needed
      file:
        path: /tmp/newfile
        owner: ansible
      when: newfile.stat.pw_name != 'ansible'

- name: fetching a remote file
  hosts: ansible1
  tasks:
    - name: fetch file from remote machine
      fetch:
        src: /etc/motd
        dest: /tmp

- name: adding text to the text file that is now on localhost
  hosts: localhost
  tasks:
  - name: add a message
    blockinfile:
      path: /tmp/ansible1/etc/motd
      block: |
        welcome to this server
        for authorized users only
      state: present

- name: copy the modified file to ansible2
  hosts: ansible2
  tasks:
  - name: copy motd file
    copy:
      src: /tmp/ansible1/etc/motd
dest: /tmpTable 15-2 Modules for Managing Storage

To make sure that your playbook is applied to the right devices, you first need to find which devices are available on your managed system.
After you find them, you can use conditionals to make sure that tasks are executed on the right devices.
Ansible_facts related to storage
ansible_devices
ansible ansible1 -m setup -a 'filter=ansible_devices'
Find generic information about storage devices.
The filter argument to the setup module uses a shell-style wildcard to search for matching items and for that reason can search in the highest level facts, such as ansible_devices, but it is incapable of further specifying what is searched for. For that reason, in the filter argument to the setup module, you cannot use a construction like ansible ansible1 -m setup -a "filter=ansible_devices.sda" which is common when looking up the variable in conditional statements.
Assert module
Listing 15-2 Using assert to Run a Task Only If a Device Exists
    ---
    - name: search for /dev/sdb continue only if it is found
      hosts: all
      vars:
        disk_name: sdb
      tasks:
      - name: abort if second disk does not exist
        assert:
          that:
            - "ansible_facts['devices']['{{ disk_name }}'] is defined"
          fail_msg: second hard disk not found
      - debug:
          msg: "{{ disk_name }} was found, lets continue"
Write a playbook that finds out the name of the disk device and puts that in a variable that you can work with further on in the playbook.
The set_fact argument comes in handy to do so.
You can use it in combination with a when conditional statement to store a detected device name in a variable.
Storing the Detected Disk Device Name in a Variable
    ---
    - name: define variable according to diskname detected
      hosts: all
      tasks:
      - ignore_errors: yes
        set_fact:
          disk2name: sdb
        when: ansible_facts[’devices’][’sdb’]
- name: Detect secondary disk name
ignore_errors: yes
set_fact:
disk2name: vda
when: ansible_facts['devices']['vda'] is defined
- name: Search for second disk, continue only if it is found
assert:
that:
- "ansible_facts['devices'][disk2name] is defined"
fail_msg: second hard disk not found
- name: Debug detected disk
debug:
msg: "{{ disk2name }} was found. Moving forward."
~ Next, see Managing Partitions and LVM
A script is used to detect inventory hosts so that you do not have to manually enter them. This is good for larger environments. You can find community provided dynamic inventory scripts that come with an .ini file that provides information on how to connect to a resource.
Inventory scripts must include –list and –host options and output must be JSON formatted. Here is an example from sandervanvught that generates an inventory script using /etc/hosts:
[ansible@control base]$ cat inventory-helper.py

#!/usr/bin/python

from subprocess import Popen,PIPE
import sys

try:
     import json
except ImportError:
     import simplejson as json


result = {}

result['all'] = {}


pipe = Popen(['getent', 'hosts'], stdout=PIPE, universal_newlines=True)


result['all']['hosts'] = []

for line in pipe.stdout.readlines():
    s = line.split()
    result['all']['hosts']=result['all']['hosts']+s


result['all']['vars'] = {}


if len(sys.argv) == 2 and sys.argv[1] == '--list':
    print(json.dumps(result))

elif len(sys.argv) == 3 and sys.argv[1] == '--host':
    print(json.dumps({}))

else:
    print("Requires an argument, please use --list or --host <host>")
When ran on our sample lab:
[ansible@control base]$sudo python3 ./inventory-helper.py
Requires an argument, please use --list or --host <host>

[ansible@control base]$ sudo python3 ./inventory-helper.py --list
{"all": {"hosts": ["127.0.0.1", "localhost", "localhost.localdomain", "localhost4", "localhost4.localdomain4", "127.0.0.1", "localhost", "localhost.localdomain", "localhost6", "localhost6.localdomain6", "192.168.124.201", "ansible1", "192.168.124.202", "ansible2"], "vars": {}}}
To use a dynamic inventory script:
[ansible@control base]$ chmod u+x inventory-helper.py
[ansible@control base]$ sudo ansible -i inventory-helper.py all --list-hosts
[WARNING]: A duplicate localhost-like entry was found (localhost). First found localhost was 127.0.0.1
  hosts (11):
    127.0.0.1
    localhost
    localhost.localdomain
    localhost4
    localhost4.localdomain4
    localhost6
    localhost6.localdomain6
    192.168.124.201
    ansible1
    192.168.124.202
ansible2dynamic inventory
script that can be used to detect whether new hosts have been added to the managed environment.
Dynamic inventory scripts are provided by the community and exist for many different environments.
easy to write your own dynamic inventory script.
The main requirement is that the dynamic inventory script works with a --list and a --host <hostname> option and produces its output in JSON format.
Script must have the Linux execute permission set.
Many dynamic inventory scripts are written in Python, but this is not a requirement.
Writing dynamic inventory scripts is not an exam requirement
#!/usr/bin/python

from subprocess import Popen,PIPE
import sys

try:
     import json
except ImportError:
     import simplejson as json

result = {}
result['all'] = {}

pipe = Popen(['getent', 'hosts'], stdout=PIPE, universal_newlines=True)

result['all']['hosts'] = []

for line in pipe.stdout.readlines():
    s = line.split()
    result['all']['hosts']=result['all']['hosts']+s

result['all']['vars'] = {}

if len(sys.argv) == 2 and sys.argv[1] == '--list':
    print(json.dumps(result))

elif len(sys.argv) == 3 and sys.argv[1] == '--host':
    print(json.dumps({}))

else:
    print("Requires an argument, please use --list or --host <host>")
pipe = Popen(\['getent', 'hosts'\], stdout=PIPE, universal_newline=True)
getent function.\--list command\--host hostname. [ansible@control rhce8-book]$ ./listing101.py --list
{"all": {"hosts": ["127.0.0.1", "localhost", "localhost.localdomain", "localhost4", "localhost4.localdomain4", "127.0.0.1", "localhost", "localhost.localdomain", "localhost6", "localhost6.localdomain6", "192.168.4.200", "control.example.com", "control", "192.168.4.201", "ansible1.example.com", "ansible1", "192.168.4.202", "ansible2.example.com", "ansible2"], "vars": {}}}-i option to either the ansible or the ansible-playbook command to pass the name of the inventory script as an argument.External directory service can be based on a wide range of solutions:
FreeIPA
Active Directory
Red Hat Satellite
etc.
Also are available for virtual machine-based infrastructures such as VMware of Red Hat Enterprise Virtualization, where virtual machines can be discovered dynamically.
Can be found in cloud environments, where scripts are available for many solutions, including AWS, GCE, Azure, and OpenStack.
When you are working with dynamic inventory, additional parameters are normally required:
Another feature that is seen in many inventory scripts is cache management:
When managing users in Ansible, you probably want to set user passwords as well. The challenge is that you cannot just enter a password as the value to the password: argument in the user module because the user module expects you to use an encrypted string.
When a user creates a password, it is encrypted. The hash of the encrypted password is stored in the /etc/shadow file, a file that is strictly secured and accessible only with root privileges. The string looks like $6$237687687/$9809erhb8oyw48oih290u09. In this string are three elements, which are separated by $ signs:
• The hashing algorithm that was used
• The random salt that was used to encrypt the password
• The encrypted hash of the user password
When a user sets a password, a random salt is used to prevent two users who have identical passwords from having identical entries in /etc/shadow. The salt and the unencrypted password are combined and encrypted, which generates the encrypted hash that is stored in /etc/shadow. Based on this string, the password that the user enters can be verified against the password field in /etc/shadow, and if it matches, the user is authenticated.
When you’re creating users with the Ansible user module, there is a password option. This option is not capable of generating an encrypted password. It expects an encrypted password string as its input. That means an external utility must be used to generate an encrypted string. This encrypted string must be stored in a variable to create the password. Because the variable is basically the user password, the variable should be stored securely in, for example, an Ansible Vault secured file.
To generate the encrypted variable, you can choose to create the variable before creating the user account. Alternatively, you can run the command to create the variable in the playbook, use register to write the result to a variable, and use that to create the encrypted user. If you want to generate the variable beforehand, you can use the following ad hoc command:
ansible localhost -m debug -a "msg={{ ‘password’ | password_hash(‘sha512’,’myrandomsalt’) }}"
This command generates the encrypted string as shown in Listing 13-11, and this string can next be used in a playbook. An example of such a playbook is shown in Listing 13-12.
Listing 13-11 Generating the Encrypted Password String
::: pre_1 [ansible@control ~]$ ansible localhost -m debug -a “msg={{ ‘password’ | password_hash(‘sha512’,’myrandomsalt’) }}” localhost | SUCCESS => { “msg”: “$6$myrandomsalt$McEB.xAVUWe0./6XqZ8n/7k9VV/Gxndy9nIMLyQAiPnhyBoToMWbxX2vA4f.Uv9PKnPRaYUUc76AjLWVAX6U10” } :::
Listing 13-12 Sample Playbook That Creates an Encrypted User Password
    ---
    - name: create user with encrypted pass
      hosts: ansible2.example.com
      vars:
        password: "$6$myrandomsalt$McEB.xAVUWe0./6XqZ8n/7k9VV/Gxndy9nIMLyQAiPnhyBoToMWbxX2vA4f.Uv9PKnPRaYUUc76AjLWVAX6U10"
      tasks:
      - name: create the user
        user:
          name: anna
          password: "{{ password }}"
The method that is used here works but is not elegant. First, you need to generate the encrypted password manually beforehand. Also, the encrypted password string is used in a readable way in the playbook. By seeing the encrypted password and salt, it’s possible to get to the original password, which is why the password should not be visible in the playbook in a secure environment.
In Exercise 13-3 you create a playbook that prompts for the user password and that uses the debug module, which was used in Listing 13-11 inside the playbook, together with register, so that the password no longer is readable in clear text. Before looking at Exercise 13-3, though, let’s first look at an alternative approach that also works.
The procedure to use encrypted passwords while creating user accounts is documented in the Frequently Asked Questions from the Ansible documentation. Because the documentation is available on the exam, make sure you know where to find this information! Search for the item “How do I generate encrypted passwords for the user module?”
As has been mentioned on multiple occasions, in Ansible often different solutions exist for the same problem. And sometimes, apart from the most elegant solution, there’s also a quick-and-dirty solution, and that counts for setting a user-encrypted password as well. Instead of using the solution described in the previous section, “Generating Encrypted Passwords,” you can use the Linux command echo password | passwd --stdin to set the user password. Listing 13-13 shows how to do this. Notice this example focuses on how to do it, not on security. If you want to make the playbook more secure, it would be nice to store the password in Ansible Vault.
Listing 13-13 Setting the User Password: Alternative Solution
    ---
    - name: create user with encrypted password
      hosts: ansible3
      vars:
        password: mypassword
        user: anna
      tasks:
      - name: configure user {{ user }}
        user:
          name: "{{ user }}"
          groups: wheel
          append: yes
          state: present
      - name: set a password for {{ user }}
        shell: ‘echo {{ password }} | passwd --stdin {{ user }}’
::: box Exercise 13-3 Creating Users with Encrypted Passwords
1. Use your editor to create the file exercise133.yaml.
2. Write the play header as follows:
---
- name: create user with encrypted password
  hosts: ansible3
  vars_prompt:
  - name: passw
    prompt: which password do you want to use
  vars:
    user: sharon
  tasks:
3. Add the first task that uses the debug module to generate the encrypted password string and register to store the string in the variable mypass:
- debug:
    msg: "{{ ‘{{ passw }}’| password_hash(‘sha512’,’myrandomsalt’) }}"
  register: mypass
4. Add a debug module to analyze the exact format of the registered variable:
- debug:
    var: mypass
5. Use ansible-playbook exercise133.yaml to run the playbook the first time so that you can see the exact name of the variable that you have to use. This code shows that the mypass.msg variable contains the encrypted password string (see Listing 13-14).
Listing 13-14 Finding the Variable Name Using debug
::: pre_1
TASK [debug] *******************************************************************
ok: [ansible2] => {
    "mypass": {
        "changed": false,
        "failed": false,
        "msg": "$6$myrandomsalt$Jesm4QGoCGAny9ebP85apmh0/uUXrj0louYb03leLoOWSDy/imjVGmcODhrpIJZt0rz.GBp9pZYpfm0SU2/PO."
    }
}
:::
6. Based on the output that you saw with the previous command, you can now use the user module to refer to the password in the right way. Add the following task to do so:
- name: create the user
  user:
    name: "{{ user }}"
    password: "{{ mypass.msg }}"
7. Use ansible-playbook exercise133.yaml to run the playbook and verify its output. :::
Why use EEs?
A container that has a specific version of Ansible. Can test execution in a specific Ansible environment to make sure it will work with that version.
EEs are built leveraging ansible-bulder They can be pushed to a private automation hub or any container registry Run EEs from the cli using ansible-navigator Or run in your production environment using automation controller as part of the Ansible Automation Platform If you want them to automatically occur, schedule them as a job inside AAP
    ---
    - name: create file on localhost
      hosts: localhost
      tasks:
      - name: create index.html on localhost
        copy:
          content: "welcome to the webserver"
          dest: /tmp/index.html

    - name: set up web server
      hosts: all
      tasks:
        - name: install httpd
          yum:
            name: httpd
            state: latest
        - name: copy index.html
          copy:
            src: /tmp/index.html
            dest: /var/www/html/index.html
          notify:
            - restart_web
        - name: copy nothing - intended to fail
          copy:
            src: /tmp/nothing
            dest: /var/www/html/nothing.html
      handlers:
        - name: restart_web
          service:
            name: httpd
            state: restarted
All tasks up to copy index.html run successfully. However, the task copy nothing fails, which is why the handler does not run. The solution seems easy: the handler doesn’t run because the task that copies the file /tmp/nothing fails as the source file doesn’t exist.
Create the source file using touch /tmp/nothing on the control host and run the task again.
After creating the source file and running the playbook again, the handler still doesn’t run.
Handlers run only if the task that triggers them gives a changed status.
Run an ad hoc command to remove the /var/www/html/index.html file on the managed hosts and run the playbook again:
ansible ansible2 -m file -a "name=/var/www/html/index.html state=absent"
Run the playbook again and you’ll see the handler runs.
When a task fails, none of the following tasks run. How does that make handlers different? A handler runs only on the success of a task, but the next task in the list also runs only if the previous task was successful. What, then, is so special about handlers?
The difference is in the nature of the handler.
Two methods to get Handlers to run even if a subsequent task fails:
force_handlers: true (More specific and preferred)
ignore_errors: true
• Handlers are specified in a handlers section at the end of the play. • Handlers run in the order they occur in the handlers section and not in the order as triggered. • Handlers run only if the task calling them generates a changed status. • Handlers by default will not run if any task in the same play fails, unless force_handlers or ignore_errors are used. • Handlers run only after all tasks in the play where the handler is activated have been processed. You might want to define multiple plays to avoid this behavior.
1. Open a playbook with the name exercise73.yaml.
2. Define the play header:
---
- name: update the kernel
  hosts: all
  force_handlers: true
  tasks:
3. Add a task that updates the current kernel:
---
- name: update the kernel
  hosts: all
  force_handlers: true
  tasks:
  - name: update kernel
    yum:
      name: kernel
      state: latest
    notify: reboot_server
4. Add a handler that reboots the server in case the kernel was successfully updated:
---
- name: update the kernel
  hosts: all
  force_handlers: true
  tasks:
  - name: update kernel
    yum:
      name: kernel
      state: latest
    notify: reboot_server
  handlers:
  - name: reboot_server
    command: reboot
5. Run the playbook using ansible-playbook exercise73.yaml andobserve its result. Notice that the handler runs only if the kernel was updated. If the kernel already was at the latest version, nothing has changed and the handler does not run. Also notice that it wasn’t really necessary to use force_handlers in the play header, but by using it anyway, at least you now know where to use it.
any_errors_fatal
Generically, tasks can generate three different types of results. ok
ignore_errors: yes
force_handlers. If
    ---
    - name: restart sshd only if crond is running
      hosts: all
      tasks:
        - name: get the crond server status
          command: /usr/bin/systemctl is-active crond
          ignore_errors: yes
          register: result
        - name: restart sshd based on crond status
          service:
            name: sshd
            state: restarted
when: result.rc == 0 ---
- name: create file on localhost
hosts: localhost
tasks:
- name: create index.html on localhost
copy:
content: "welcome to the webserver"
dest: /tmp/index.html
- name: set up web server
hosts: all
force_handlers: yes
tasks:
- name: install httpd
yum:
name: httpd
state: latest
- name: copy index.html
copy:
src: /tmp/index.html
dest: /var/www/html/index.html
notify:
- restart_web
- name: copy nothing - intended to fail
copy:
src: /tmp/nothing
dest: /var/www/html/nothing.html
handlers:
- name: restart_web
service:
name: httpd
state: restartedfailed_when
    ---
    - name: demonstrating failed_when
      hosts: all
      tasks:
      - name: run a script
        command: echo hello world
        ignore_errors: yes
        register: command_result
        failed_when: "’world’ in command_result.stdout"
      - name: see if we get here
        debug:
          msg: second task executed
fail module
    ---
    - name: demonstrating the fail module
      hosts: all
      ignore_errors: yes
      tasks:
      - name: run a script
        command: echo hello world
        register: command_result
      - name: report a failure
        fail:
          msg: the command has failed
        when: "’world’ in command_result.stdout"
      - name: see if we get here
        debug:
msg: second task executedIn Ansible, there are commands that change something and commands that don’t. Some commands, however, are not very obvious in reporting their status.
    ---
    - name: demonstrate changed status
      hosts: all
      tasks:
      - name: check local time
        command: date
        register: command_result

      - name: print local time
        debug:
          var: command_result.stdout
Reports a changed status, even if nothing really was changed!
Managing the changed status can be useful in avoiding unexpected results while running a playbook.
changed_when
---
- name: demonstrate changed status
  hosts: all
  tasks:
  - name: check local time
    command: date
    register: command_result
    changed_when: false

  - name: print local time
    debug:
var: command_result.stdout---
- name: simple block example
hosts: all
tasks:
- name: setting up http
block:
- name: installing http
yum:
name: httpd
state: present
- name: restart httpod
service:
name: httpd
state: started
when: ansible_distribution == "CentOS"- name: using blocks
hosts: all
tasks:
- name: intended to be successful
block:
- name: remove a file
shell:
cmd: rm /var/www/html/index.html
- name: printing status
debug:
msg: block task was operated
rescue:
- name: create a file
shell:
cmd: touch /tmp/rescuefile
- name: printing rescue status
debug:
msg: rescue task was operated
always:
- name: always write a message to logs
shell:
cmd: logger hello
- name: always printing this message
debug:
msg: this message is always printedcommand_warnings=False
Setting in ansible.cfg to avoid seeing command module warning message.
you cannot use a block on a loop.
If you need to iterate over a list of values, think of using a different solution.
Working with host name patterns
If you want to use an IP address in a playbook, the IP address must be specified as such in the inventory.
You cannot use IP addresses that are based only on DNS name resolving.
So specifying an IP address in the playbook but not in the inventory file—assuming DNS name resolution is going to take care of the IP address resolving—doesn’t work.
apart from the specified groups, there are the implicit host groups all and ungrouped.
host name wildcards may be used.
ansible -m ping 'ansible\*'
ansible -m ping '\*ble1'When you use wildcards to match host names, Ansible doesn’t distinguish between IP addresses, host names, or hosts; it just matches anything.
'web\*'
To address multiple hosts:
ansible -m ping ansible1,192.168.4.202Operators:
web,&file applies to hosts only if they are members of the web and file groupsweb,!webserver1 applies to all hosts in the web group, except host webserver1.web,&file as &web,file also.When content is included, it is dynamically processed at the moment that Ansible reaches that content.
Files can be included and imported at different levels:
• Roles: Roles are typically used to process a complete set of instructions provided by the role. Roles have a specific structure as well.
• Playbooks: Playbooks can be imported as a complete playbook. You cannot do this from within a play. Playbooks can be imported only at the top level of the playbook.
• Tasks: A task file is just a list of tasks and can be imported or included in another task.
• Variables: As discussed in Chapter 6, “Working with Variables and Facts,” variables can be maintained in external files and included in a playbook. This makes managing generic multipurpose variables easier.
Importing playbooks is common in a setup where one master playbook is used, from which different additional playbooks are included. According to the Ansible Best Practices Guide (which is a part of the Ansible documentation), the master playbook could have the name site.yaml, and it can be used to include playbooks for each specific set of servers, for instance. When a playbook is imported, this replaces the entire play. So, you cannot import a playbook at a task level; it needs to happen at a play level. Listing 10-4 gives an example of the playbook imported in Listing 10-5. In Listing 10-6, you can see the result of running the ansible-playbook listing105.yaml command.
Listing 10-4 Sample Playbook to Be Imported
::: pre_1 - hosts: all tasks: - debug: msg: running the imported play :::
Listing 10-5 Importing a Playbook
::: pre_1 — - name: run a task hosts: all tasks: - debug: msg: running task1
- name: importing a playbook
  import_playbook: listing104.yaml
:::
Listing 10-6 Running ansible-playbook listing105.yaml Result
::: pre_1 [ansible@control rhce8-book]$ ansible-playbook listing105.yaml
PLAY [run a task] **************************************************************

TASK [Gathering Facts] *********************************************************
ok: [ansible2]
ok: [ansible1]
ok: [ansible3]
ok: [ansible4]

TASK [debug] *******************************************************************
ok: [ansible1] => {
    "msg": "running task1"
}
ok: [ansible2] => {
    "msg": "running task1"
}
ok: [ansible3] => {
    "msg": "running task1"
}
ok: [ansible4] => {
    "msg": "running task1"
}

PLAY [all] *********************************************************************

TASK [Gathering Facts] *********************************************************
ok: [ansible2]
ok: [ansible1]
ok: [ansible3]
ok: [ansible4]

TASK [debug] *******************************************************************
ok: [ansible1] => {
    "msg": "running the imported play"
}
ok: [ansible2] => {
    "msg": "running the imported play"
}
ok: [ansible3] => {
    "msg": "running the imported play"
}
ok: [ansible4] => {
    "msg": "running the imported play"
}

PLAY RECAP *********************************************************************
ansible1                   : ok=4    changed=0    unreachable=0    failed=0    skipped=0    rescued=0    ignored=0
ansible2                   : ok=4    changed=0    unreachable=0    failed=0    skipped=0    rescued=0    ignored=0
ansible3                   : ok=4    changed=0    unreachable=0    failed=0    skipped=0    rescued=0    ignored=0
ansible4                   : ok=4    changed=0    unreachable=0    failed=0    skipped=0    rescued=0    ignored=0
:::
import_tasks
include_tasks
There are a few considerations when working with import_tasks to statically import tasks:
• Loops cannot be used with import_tasks.
• If a variable is used to specify the name of the file to import, this cannot be a host or group inventory variable.
• When you use a when statement on the entire import_tasks file, the conditional statements are applied to each task that is involved.
As an alternative, include_tasks can be used to dynamically include a task file. This approach also comes with some considerations:
• When you use the ansible-playbook --list-tasks command, tasks that are in the included tasks are not displayed.
• You cannot use ansible-playbook --start-at-task to start a playbook on a task that comes from an included task file.
• You cannot use a notify statement in the main playbook to trigger a handler that is in the included tasks file.
::: note
Tip
When you use includes and imports to work with task files, the recommendation is to store the task files in a separate directory. Doing so makes it easier to delegate task management to specific users.
:::
The main goal to work with imported and included files is to make working with reusable code easy. To make sure you reach this goal, the imported and included files should be as generic as possible. That means it’s a bad idea to include names of specific items that may change when used in a different context. Think, for instance, of the names of packages, users, services, and more.
To deal with include files in a flexible way, you should define specific items as variables. Within the include_tasks file, for instance, you refer to {{ package }}, and in the main playbook from which the include files are called, you can define the variables. Obviously, you can use this approach with a straight variable definition or by using host variable or group variable include files.
::: note
Exam tip
It’s always possible to configure items in a way that is brilliant but quite complex. On the exam it’s not a smart idea to go for complex. Just keep your solution as easy as possible. The only requirement on the exam is to get things working, and it doesn’t matter exactly how you do that.
:::
In Listings 10-7 through 10-10, you can see how include and import files are used to work on one project. The main playbook, shown in Listing 10-9, defines the variables to be used, as well as the names of the include and import files. Listings 10-7 and 10-8 show the code from the include files, which use the variables that are defined in Listing 10-9. The result of running the playbook in Listing 10-9 can be seen in Listing 10-10.
Listing 10-7 The Include Tasks File tasks/service.yaml Used for Services Definition
::: pre_1 - name: install {{ package }} yum: name: “{{ package }}” state: latest - name: start {{ service }} service: name: “{{ service }}” enabled: true state: started :::
The sample tasks file in Listing 10-7 is straightforward; it uses the yum module to install a package and the service module to start and enable the package. The variables this file refers to are defined in the main playbook in Listing 10-9.
Listing 10-8 The Import Tasks File tasks/firewall.yaml Used for Firewall Definition
::: pre_1 - name: install the firewall package: name: “{{ firewall_package }}” state: latest - name: start the firewall service: name: “{{ firewall_service }}” enabled: true state: started - name: open the port for the service firewalld: service: “{{ item }}” immediate: true permanent: true state: enabled loop: “{{ firewall_rules }}” :::
In the sample firewall file in Listing 10-8, the firewall service is installed, defined, and configured. In the configuration of the firewalld service, a loop is used on the variable firewall_rules. This variable obviously is defined in Listing 10-9, which is the file where site-specific contents such as variables are defined.
Listing 10-9 Main Playbook Example
::: pre_1 — - name: setup a service hosts: ansible2 tasks: - name: include the services task file include_tasks: tasks/service.yaml vars: package: httpd service: httpd when: ansible_facts[’os_family’] == ’RedHat’ - name: import the firewall file import_tasks: tasks/firewall.yaml vars: firewall_package: firewalld firewall_service: firewalld firewall_rules: - http - https :::
The main playbook in Listing 10-9 shows the site-specific configuration. It performs two main tasks: it defines variables, and it calls an include file and an import file. The variables that are defined are used by the include and import files. The include_tasks statement is executed in a when statement. Notice that the firewall_rules variable contains a list as its value, which is used by the loop that is defined in the import file.
Listing 10-10 Running ansible-playbook listing109.yaml
::: pre_1 [ansible@control rhce8-book]$ ansible-playbook listing109.yaml
PLAY [setup a service] *********************************************************

TASK [Gathering Facts] *********************************************************
ok: [ansible2]

TASK [include the services task file] ******************************************
included: /home/ansible/rhce8-book/tasks/service.yaml for ansible2

TASK [install httpd] ***********************************************************
ok: [ansible2]

TASK [start httpd] *************************************************************
changed: [ansible2]

TASK [install the firewall] ****************************************************
changed: [ansible2]

TASK [start the firewall] ******************************************************
ok: [ansible2]

TASK [open the port for the service] *******************************************
changed: [ansible2] => (item=http)
changed: [ansible2] => (item=https)

PLAY RECAP *********************************************************************
ansible2                   : ok=7    changed=3    unreachable=0    failed=0    skipped=0    rescued=0    ignored=0
:::
The interesting thing in the Listing 10-10 output is that the include file is dynamically included while running the playbook. This is not the case for the statically imported file. In Exercise 10-3 you practice working with include files.
::: box Exercise 10-3 Using Includes and Imports
In this exercise you create a simple master playbook that installs a service. The name of the service is defined in a variable file, and the specific tasks are included through task files.
1. Open the file exercise103-vars.yaml and define three variables as follows:
packagename: vsftpd
servicename: vsftpd
firewalld_servicename: ftp
2. Create the exercise103-ftp.yaml file and give it the following contents to install, enable, and start the vsftpd service and also to make it accessible in the firewall:
- name: install {{ packagename }}
  yum:
    name: "{{ packagename }}"
    state: latest
- name: enable and start {{ servicename }}
  service:
    name: "{{ servicename }}"
    state: started
    enabled: true
- name: open the service in the firewall
  firewalld:
    service: "{{ firewalld_servicename }}"
    permanent: yes
    state: enabled
3. Create the exercise103-copy.yaml file that manages the /var/ftp/pub/README file and make sure it has the following contents:
- name: copy a file
  copy:
    content: "welcome to this server"
    dest: /var/ftp/pub/README
4. Create the master playbook exercise103.yaml that includes all of them and give it the following contents:
---
- name: install vsftpd on ansible2
  vars_files: exercise103-vars.yaml
  hosts: ansible2
  tasks:
  - name: install and enable vsftpd
    import_tasks: exercise103-ftp.yaml
  - name: copy the README file
    import_tasks: exercise103-copy.yaml
5. Run the playbook and verify its output
6. Run an ad hoc command to verify the /var/ftp/pub/README file has been created: ansible ansible2 -a “cat /var/ftp/pub/README”.
In the end-of-chapter lab with this chapter, you reorganize a playbook to work with several different files instead of one big file. Do this according to the instructions in Lab 10-1.
The lab82.yaml file, which you can find in the GitHub repository that goes with this course, is an optimal candidate for optimization. Optimize this playbook according to the following requirements:
• Use includes and import to make this a modular playbook where different files are used to distinguish between the different tasks.
• Optimize this playbook such that it will run on no more than two hosts at the same time and completes the entire playbook on these two hosts before continuing with the next host.
In a Jinja2 template, three elements can be used. data
sample text
comment{# sample text #}
variable{{ ansible_facts['default_ipv4']['address'] }}
expression{% for myhost in groups['web'] %}
{{ myhost }}
{% endfor %}Sample Template:
# {{ ansible_managed }}

<VirtualHost *:80>
        ServerAdmin webmaster@{{ ansible_facts['fqdn'] }}
        ServerName {{ ansible_facts['fqdn'] }}
        ErrorLog logs/{{ ansible_facts['hostname'] }}-error.log
        CustomLog       logs/{{ ansible_facts['hostname'] }}-common.log common
        DocumentRoot /var/www/vhosts/{{ ansible_facts['hostname'] }}/

        <Directory /var/www/vhosts/{{ ansible_facts['hostname'] }}>
                Options +Indexes +FollowSymlinks +Includes
                Require all granted
        </Directory>
</VirtualHost>
starts with # {{ ansible_managed }}.
This string is commonly used to identify that a file is managed by Ansible so that administrators are not going to change file contents by accident.
While processing the template, this string is replaced with the value of the ansible_managed variable.
This variable can be set in ansible.cfg.
For instance, you can use ansible_managed = This file is managed by Ansible to substitute the variable with its value while generating the template.
template file is just a text file that uses variables to substitute specific variables to their values.
Calling a template:
    ---
    - name: installing a template file
      hosts: ansible1
      tasks:
      - name: install httpd
        yum:
          name: httpd
          state: latest
      - name: start and enable httpd
        service:
          name: httpd
          state: started
          enabled: true
      - name: install vhost config file
        template:
          src: listing813.j2
          dest: /etc/httpd/conf.d/vhost.conf
          owner: root
          group: root
          mode: 0644
      - name: restart httpd
        service:
          name: httpd
state: restarted{% for node in groups['all'] %}
host_port={{ node }}:8080
{% endfor %} ---
- name: generate host list
hosts: ansible2
tasks:
- name: template loop
template:
src: listing815.j2
dest: /tmp/hostports.txtTo verify, you can use the ad hoc command ansible ansible2 -a "cat /tmp/hostports.txt"
Template Example with if if.j2
    {% if apache_package == 'apache2' %}
      Welcome to Apache2
    {% else %}
      Welcome to httpd
    {% endif %}
---
- name: work with template file
vars:
apache_package: 'httpd'
hosts: ansible2
tasks:
- template:
src: if.j2
dest: /tmp/httpd.conf[ansible@control ~]$ ansible ansible2 -a "cat /tmp/httpd.conf"
ansible2 | CHANGED | rc=0 >>
Welcome to httpdCommon filters {{ myvar | to_json }}
A pretty common pattern is to iterate over a list of hosts inside of a host group, perhaps to populate a template configuration file with a list of servers. To do this, you can just access the “$groups” dictionary in your template, like this:
{% for host in groups['db_servers'] %}
    {{ host }}
{% endfor %}
If you need to access facts about these hosts, for example, the IP address of each hostname, you need to make sure that the facts have been populated. For example, make sure you have a play that talks to db_servers:
- hosts:  db_servers
  tasks:
    - debug: msg="doesn't matter what you do, just that they were talked to previously."
Then you can use the facts inside your template, like this:
{% for host in groups['db_servers'] %}
   {{ hostvars[host]['ansible_eth0']['ipv4']['address'] }}
{% endfor %}1. Use your editor to create the file exercise83.j2. Include the following line to open the Jinja2 conditional statement:
{% for host in groups['all'] %}2. This statement defines a variable with the name host. This variable iterates over the magic variable groups, which holds all Ansible host groups as defined in inventory. Of these groups, the all group (which holds all inventory host names) is processed.
3. Add the following line (write it as one line; it will wrap over two lines, but do not press Enter to insert a newline character):
{{ hostvars[host]['ansible_default_ipv4']['address'] }} {{ hostvars[host]['ansible_fqdn'] }} {{ hostvars[host]['ansible_hostname'] }}4. Add the following line to close the for loop:
{% endfor %}5. Verify that the complete file contents look like the following and write and quit the file:
{% for host in groups['all'] %}
{{ hostvars[host]['ansible_default_ipv4']['address'] }} {{ hostvars[host]['ansible_fqdn'] }} {{ hostvars[host]['ansible_hostname'] }}
{% endfor %}
6. Use your editor to create the file exercise83.yaml. It should contain the following lines:
---
- name: generate /etc/hosts file
  hosts: all
  tasks:
  - name:
    template:
      src: exercise83.j2
      dest: /tmp/hosts
7. Run the playbook by using ansible-playbook exercise83.yaml
8. Verify the /tmp/hosts file was generated by using ansible all -a "cat /tmp/hosts"
This lab only worked if every host in the inventory file was reachable.
Write a playbook that generates an /etc/hosts file on all managed hosts. Apply the following requirements:
• All hosts that are defined in inventory should be added to the /etc/hosts file.
[ansible@control ~]$ cat hostfile.yaml
---
- name: generate /etc/hosts
  hosts: all
  gather_facts: yes
  tasks:
  - name: Generate hosts file with template
    template:
      src: hosts.j2
      dest: /etc/hosts
[ansible@control ~]$ cat hosts.j2
{% for host in groups['all'] %}
{{ hostvars[host]['ansible_default_ipv4']['address'] }} {{ hostvars[host]['ansible_fqdn'] }} {{ hostvars[host]['ansible_hostname'] }}
{% endfor %}}Anonymous_enable: yes
Local_enable: yes
Write_enable: yes
Anon_upload_enable: yes vim vsftpd.yaml
---
- name: manage vsftpd
  hosts: ansible1
  vars:
    anonymous_enable: yes
    local_enable: yes
    write_enable: yes
    Anon_upload_enable: yes
  tasks:
    - name: install vsftpd
      dnf:
        name: vsftpd
        state: latest

    - name: configure vsftpd configuration file
      template:
        src: vsftpd.j2
        dest: /etc/vsftpd/vsftpd.conf

- name: apply permissions
  hosts: ansible1
  tasks:
    - name: set folder permissions to /var/ftp/pub
      file:
        path: /var/ftp/pub
        mode: 0777

    - name: set ftpd_anon_write boolean
      seboolean:
        name: ftpd_anon_write
        state: yes
        persistent: yes

    - name: set public_content_rw_t SELinux context type to /var/ftp/pub directory
      sefcontext:
        target: '/var/ftp/pub(/.*)?'
        setype: public_content_rw_t
        state: present
      notify: restore selinux contexts

    - name: firewall stuff
      firewalld:
        service: ftp
        state: enabled
        permanent: true
        immediate: true

    - name: start and enable fsftpd
      service:
        name: vsftpd
        state: started
        enabled: yes

  handlers:
    - name: restore selinux contexts
      command: restorecon -v /var/ftp/pub
vsftpd.j2
{{ ansible_managed }}

anonymous_enable={{ anonymous_enable }}
local_enable={{ local_enable }}
write_enable={{ write_enable }}
Anon_upload_enable{{ Anon_upload_enable }}
local_umask=022
dirmessage_enable=YES
xferlog_enable=YES
connect_from_port_20=YES
xferlog_std_format=YES
listen=NO
listen_ipv6=YES
pam_service_name=vsftpd
userlist_enable=YESBefore actually running a playbook in a way that all changes are implemented, you can start the playbooks in check mode. To do this, you use the --check or -C command-line argument to the ansible or ansible-playbook command. The effect of using check mode is that changes that would have been made are shown but not executed. You should realize, though, that check mode is not supported in all cases. You will, for instance, have problems with check mode if it is applied to conditionals, where a specific task can do its work only after a preceding task has made some changes. Also, to successfully use check mode, the modules need to support it, but some don’t. Modules that don’t support check mode don’t show any result while running check mode, but also they don’t make any changes.
Apart from the command-line argument, you can use check_mode: yes or check_mode: no with any task in a playbook. If check_mode: yes is used, the task always runs in check mode (and does not implement any changes), regardless of the use of the --check option. If a task has check_mode: no set, it never runs in check mode and just does its work, even if the ansible-playbook command is used with the --check option. Using check mode on individual tasks might be a good idea if using check mode on the entire playbook gives unpredicted results: you can enable it on just a couple of tasks to ensure that they run successfully before proceeding to the next set of tasks. Notice that using check_mode: no for specific tasks can be dangerous; these tasks will make changes, even if the entire playbook was started with the --check option!
::: note
Note
The check_mode argument is a replacement for the always_run option that was used in Ansible 2.5 and earlier. In current Ansible versions, you should not use always_run anymore.
Another option that is commonly used with the --check option is --diff. This option reports changes to template files without actually applying them. Listing 11-1 shows a sample playbook, Listing 11-2 shows the template that it is processing, and Listing 11-3 shows the result of running this playbook with the ansible-playbook listing111.yaml --check --diff command.
    ---
    - name: simple template example
      hosts: ansible2
      tasks:
      - template:
          src: listing112.j2
          dest: /etc/issue
:::

**Listing 11-2** Sample Template File

::: pre_1
    {# /etc/issue #}
    Welcome to {{ ansible_facts[’hostname’] }}
:::

**Listing 11-3** Running the listing111.yaml Sample Playbook

::: pre_1
    [ansible@control rhce8-book]$ ansible-playbook listing111.yaml --check --diff

    PLAY [simple template example] *************************************************

    TASK [Gathering Facts] *********************************************************
    ok: [ansible2]

    TASK [template] ****************************************************************
    --- before
    +++ after: /home/ansible/.ansible/tmp/ansible-local-4493uxbpju1e/tmpm5gn7crg/listing112.j2
    @@ -0,0 +1,3 @@
    +Welcome to ansible2
    +
    +

    changed: [ansible2]

    PLAY RECAP *********************************************************************
ansible2 : ok=2 changed=1 unreachable=0 failed=0 skipped=0 rescued=0 ignored=0When you run the ansible-playbook command, output is generated. You’ve probably had a glimpse of it before, but let’s look at the output in a more structured way now. Listing 11-4 shows some typical sample output generated by running the ansible-playbook command.
Listing 11-4 ansible-playbook Command Output
::: pre_1 [ansible@control rhce8-book]$ ansible-playbook listing52.yaml
PLAY [install start and enable httpd] ******************************************

TASK [Gathering Facts] *********************************************************
ok: [ansible2]
ok: [ansible1]
ok: [ansible3]
ok: [ansible4]

TASK [install package] *********************************************************
changed: [ansible2]
changed: [ansible1]
changed: [ansible3]
changed: [ansible4]

TASK [start and enable service] ************************************************
changed: [ansible2]
changed: [ansible1]
changed: [ansible3]
changed: [ansible4]

PLAY RECAP *********************************************************************
ansible1                   : ok=3    changed=2    unreachable=0    failed=0    skipped=0    rescued=0    ignored=0
ansible2                   : ok=3    changed=2    unreachable=0    failed=0    skipped=0    rescued=0    ignored=0
ansible3                   : ok=3    changed=2    unreachable=0    failed=0    skipped=0    rescued=0    ignored=0
ansible4                   : ok=3    changed=2    unreachable=0    failed=0    skipped=0    rescued=0    ignored=0
:::
In the output of any ansible-playbook command, you can see different items:
![]()
![]() {width=“64” height=“51”}
{width=“64” height=“51”}
• An indicator of the play that is started
• If not disabled, the Gathering Facts task that is executed for each play
• Each individual task, including the task name if that was specified
• The Play Recap, which summarizes the play results
In the Play Recap, different results can be shown. Table 11-2 gives an overview.
::: group Table 11-2 Playbook Recap Overview
 {width=“941” height=“338”}
:::
{width=“941” height=“338”}
:::
As discussed before, when you use the ansible-playbook command, you can increase the output verbosity level using one or more -v options. Table 11-3 lists what these options accomplish. For generic troubleshooting, you might want to consider using -vv, which shows output as well as input data. In particular cases using the -vvv option can be useful because it adds connection information as well.
The -vvvv option just brings too much information in many cases but can be useful if you need to analyze which exact scripts are executed or whether any problems were encountered in privilege escalation. Make sure to capture the output of any command that runs with -vvvv to a text file, though, so that you can read it in an easy way. Even for a simple playbook, it can easily generate more than 10 screens of output.
::: group Table 11-3 Verbosity Options Overview
 {width=“941” height=“209”}
:::
{width=“941” height=“209”}
:::
In Listing 11-5 you can see the output of a small playbook that runs different tasks on the managed hosts. Listing 11-5 shows details about execution of one task on host ansible4, and as you can see, it goes deep in the amount of detail that is shown. One component is worth looking at, and that is the escalation succeeded that you can see in the output. This means that privilege escalation was successful and tasks were executed because become_user was defined in ansible.cfg. Failing privilege escalation is one of the common reasons why playbook execution may go wrong, which is why it’s worth keeping an eye on this indicator.
Listing 11-5 Analyzing Partial -vvvv Output
    <ansible4> ESTABLISH SSH CONNECTION FOR USER: ansible
    <ansible4> SSH: EXEC ssh -vvv -C -o ControlMaster=auto -o ControlPersist=60s -o StrictHostKeyChecking=no -o KbdInteractiveAuthentication=no -o PreferredAuthentications=gssapi-with-mic,gssapi-keyex,hostbased,publickey -o PasswordAuthentication=no -o ’User="ansible"’ -o ConnectTimeout=10 -o ControlPath=/home/ansible/.ansible/cp/859d5267e3 ansible4 ’/bin/sh -c ’"’"’chmod u+x /home/ansible/.ansible/tmp/ansible-tmp-1587544652.4716983-118789810824208/ /home/ansible/.ansible/tmp/ansible-tmp-1587544652.4716983-118789810824208/AnsiballZ_systemd.py && sleep 0’"’"’’
    Escalation succeeded
    <ansible4> (0, b’’, b"OpenSSH_8.0p1, OpenSSL 1.1.1c FIPS  28 May 2019\r\ndebug1: Reading configuration data /etc/ssh/ssh_config\r\ndebug3: /etc/ssh/ssh_config line 51: Including file /etc/ssh/ssh_config.d/05-redhat.conf depth 0\r\ndebug1: Reading configuration data /etc/ssh/ssh_config.d/05-redhat.conf\r\ndebug2: checking match for ’final all’ host ansible4 originally ansible4\r\ndebug3: /etc/ssh/ssh_config.d/05-redhat.conf line 3: not matched ’final’\r\ndebug2: match not found\r\ndebug3: /etc/ssh/ssh_config.d/05-redhat.conf line 5: Including file /etc/crypto-policies/back-ends/openssh.config depth 1 (parse only)\r\ndebug1: Reading configuration data /etc/crypto-policies/back-ends/openssh.config\r\ndebug3: gss kex names ok: [gss-gex-sha1-,gss-group14-sha1-]\r\ndebug3: kex names ok: [curve25519-sha256,curve25519-sha256@libssh.org,ecdh-sha2-nistp256,ecdh-sha2-nistp384,ecdh-sha2-nistp521,diffie-hellman-group-exchange-sha256,diffie-hellman-group14-sha256,diffie-hellman-group16-sha512,diffie-hellman-group18-sha512,diffie-hellman-group-exchange-sha1,diffie-hellman-group14-sha1]\r\ndebug1: configuration requests final Match pass\r\ndebug1: re-parsing configuration\r\ndebug1: Reading configuration data /etc/ssh/ssh_config\r\ndebug3: /etc/ssh/ssh_config line 51: Including file /etc/ssh/ssh_config.d/05-redhat.conf depth 0\r\ndebug1: Reading configuration data /etc/ssh/ssh_config.d/05-redhat.conf\r\ndebug2: checking match for ’final all’ host ansible4 originally ansible4\r\ndebug3: /etc/ssh/ssh_config.d/05-redhat.conf line 3: matched ’final’\r\ndebug2: match found\r\ndebug3: /etc/ssh/ssh_config.d/05-redhat.conf line 5: Including file /etc/crypto-policies/back-ends/openssh.config depth 1\r\ndebug1: Reading configuration data /etc/crypto-policies/back-ends/openssh.config\r\ndebug3: gss kex names ok: [gss-gex-sha1-,gss-group14-sha1-]\r\ndebug3: kex names ok: [curve25519-sha256,curve25519-sha256@libssh.org,ecdh-sha2-nistp256,ecdh-sha2-nistp384,ecdh-sha2-nistp521,diffie-hellman-group-exchange-sha256,diffie-hellman-group14-sha256,diffie-hellman-group16-sha512,diffie-hellman-group18-sha512,diffie-hellman-group-exchange-sha1,diffie-hellman-group14-sha1]\r\ndebug1: auto-mux: Trying existing master\r\ndebug2: fd 4 setting O_NONBLOCK\r\ndebug2: mux_client_hello_exchange: master version 4\r\ndebug3: mux_client_forwards: request forwardings: 0 local, 0 remote\r\ndebug3: mux_client_request_session: entering\r\ndebug3: mux_client_request_alive: entering\r\ndebug3: mux_client_request_alive: done pid = 4764\r\ndebug3: mux_client_request_session: session request sent\r\ndebug3: mux_client_read_packet: read header failed: Broken pipe\r\ndebug2: Received exit status from master 0\r\n")
    <ansible4> ESTABLISH SSH CONNECTION FOR USER: ansible
    <ansible4> SSH: EXEC ssh -vvv -C -o ControlMaster=auto -o ControlPersist=60s -o StrictHostKeyChecking=no -o KbdInteractiveAuthentication=no -o PreferredAuthentications=gssapi-with-mic,gssapi-keyex,hostbased,publickey -o PasswordAuthentication=no -o ’User="ansible"’ -o ConnectTimeout=10 -o ControlPath=/home/ansible/.ansible/cp/859d5267e3 -tt ansible4 ’/bin/sh -c ’"’"’sudo -H -S -n  -u root /bin/sh -c ’"’"’"’"’"’"’"’"’echo BECOME-SUCCESS-muvtpdvqkslnlegyhoibfcrilvlyjcqp ; /usr/libexec/platform-python /home/ansible/.ansible/tmp/ansible-tmp-1587544652.4716983-118789810824208/AnsiballZ_systemd.py’"’"’"’"’"’"’"’"’ && sleep 0’"’"’’
Escalation succeededYou might have noticed that the formatting of error messages in Ansible command output can be a bit hard to read. Fortunately, there’s an easy way to make it a little more readable by including two options in the ansible.cfg file. These options are stdout_callback = debug and stdout_callback = error. After including these options, you’ll notice it’s a lot easier to read error output and distinguish between its different components!
By default, Ansible does not write anything to log files. The reason is that the Ansible commands have all the options that may be useful to write output to the STDOUT. If so required, it’s always possible to use shell redirection to write the command output to a file.
If you do need Ansible to write log files, you can set the log_path parameter in ansible.cfg. Alternatively, Ansible can log to the filename that is specified as the argument to the $ANSIBLE_LOG_PATH variable. Notice that Ansible logs can grow big very fast, so if logging to output files is enabled, make sure that Linux log rotation is configured to ensure that files cannot grow beyond a specific maximum size.
When you analyze playbook behavior, it’s possible to run playbook tasks one by one or to start running a playbook at a specific task. The ansible-playbook --step command runs playbooks task by task and prompts for confirmation before running the next task. Alternatively, you can use the ansible-playbook --start-at-task="task name" command to start playbook execution as a specific task. Before using this command, you might want to use ansible-playbook --list-tasks for a list of all tasks that have been configured. To use these options in an efficient way, you must configure each task with its own name. In Listing 11-6 you can see what running playbooks this way looks like. This listing first shows how to list tasks in a playbook and next how the --start-at-task and --step options are used.
Listing 11-6 Running Tasks One by One
::: pre_1 [ansible@control rhce8-book]$ ansible-playbook –list-tasks exercise81.yaml
playbook: exercise81.yaml

  play #1 (ansible1): testing file manipulation skills.    TAGS: []
    tasks:
      create a new file              TAGS: []
      check status of the new file   TAGS: []
      for debugging purposes only    TAGS: []
      change file owner if needed    TAGS: []

  play #2 (ansible1): fetching a remote file.    TAGS: []
    tasks:
      fetch file from remote machine.    TAGS: []

  play #3 (localhost): adding text to the file that is now on localhost TAGS: []
    tasks:
      add a message.    TAGS: []

  play #4 (ansible2): copy the modified file to ansible2.    TAGS: []
    tasks:
      copy motd file.    TAGS: []
[ansible@control rhce8-book]$ ansible-playbook --start-at-task "add a message"  --step exercise81.yaml

PLAY [testing file manipulation skills] ****************************************

PLAY [fetching a remote file] **************************************************

PLAY [adding text to the file that is now on localhost] ************************
Perform task: TASK: Gathering Facts (N)o/(y)es/(c)ontinue:
:::
In Exercise 11-1 you learn how to apply check mode while working with templates.
::: box Exercise 11-1 Using Templates in Check Mode
1. Locate the file httpd.conf; you can find it in the rhce8-book directory, which you can download from the GitHub repository at https://github.com/sandervanvugt/rhce8-book. Use mv httpd.conf exercise111-httpd.j2 to rename it to a Jinja2 template file.
2. Open the exercise111-httpd.j2 file with an editor, and apply modifications to existing parameters so that they look like the following:
ServerRoot "{{ apache_root }}"
User {{ apache_user }}
Group {{ apache_group }}
3. Write a playbook that takes care of the complete Apache web server setup and installation, starts and enables the service, opens a port in the firewall, and uses the template module to create the /etc/httpd/conf/httpd.conf file based on the template that you created in step 2 of this exercise. The complete playbook with the name exercise111.yaml looks like the following (make sure you have the exact contents shown below and do not correct any typos):
---
- name: perform basic apache setup
  hosts: ansible2
  vars:
    apache_root: /etc/httpd
    apache_user: httpd
    apache_group: httpd
  tasks:
  - name: install RPM package
    yum:
      name: httpd
      state: latest
  - name: copy template file
    template:
      src: exercise111-httpd.j2
      dest: /etc/httpd/httpd.conf
  - name: start and enable service
    service:
      name: httpd
      state: started
      enabled: yes
  - name: open port in firewall
    firewalld:
      service: http
      permanent: yes
      state: enabled
      immediate: yes
4. Run the command ansible-playbook --syntax-check exercise111.yaml. If no errors are found in the playbook syntax, you should just see the name of the playbook.
5. Run the command ansible-playbook --check --diff exercise111.yaml. In the output of the command, pay attention to the task copy template file. After the line that starts with +++ after, you should see the lines in the template that were configured to use a variable, using the right variables.
6. Run the playbook to perform all its tasks step by step, using the command ansible-playbook --step exercise111.yaml. Press y to confirm the first step. Next, press c to automatically continue. The playbook will fail on the copy template file task because the target directory does not exist. Notice that the --syntax-check and the --check options do not check for any logical errors in the playbook and for that reason have not detected this problem.
7. Edit the exercise111.yaml file and ensure the template task contains the following corrected line: (replace the old line starting with dest:):
dest: /etc/httpd/conf/httpd.conf8. Type ansible-playbook --list-tasks exercise111.yaml to list all the tasks in the playbook.
9. To avoid running the entire playbook again, use ansible-playbook --start-at-task="copy template file" exercise111.yaml to run the playbook to completion. :::
Modules used to manage packages:

The yum_repository module lets you work with yum repository files in the /etc/yum.repos.d/ directory.
    ---
    - name: setting up repository access
      hosts: all
      tasks:
      - name: connect to example repo
        yum_repository:
          name: example repo
          description: RHCE8 example repo
          file: examplerepo
          baseurl: ftp://control.example.com/repo/
          gpgcheck: no
yum_repository Key Arguments

Notice that use of the gpgcheck argument is recommended but not mandatory. Most repositories are provided with a GPG key to verify that packages in the repository have not been tampered with. However, if no GPG key is set up for the repository, the gpgcheck parameter can be set to no to skip checking the GPG key.
The yum module can be used to manage software packages. You use it to install and remove packages or to update packages. This can be done for individual packages, as well as package groups and modules. Let’s look at some examples that go beyond the mere installation or removal of packages, which was covered sufficiently in earlier chapters.
Listing 12-2 shows a module that will update all packages on this system.
Listing 12-2 Using yum to Perform a System Update
::: pre_1 — - name: updating all packages hosts: ansible2 tasks: - name: system update yum: name: ’*’ state: latest :::
Notice the use of the name argument to the yum module. It has ’*’ as its argument. To prevent the wildcard from being interpreted by the shell, you must make sure it is placed between single quotes.
Listing 12-3 shows an example where yum package groups are used to install the Virtualization Host package group.
Listing 12-3 Installing Package Groups
::: pre_1 — - name: install or update a package group hosts: ansible2 tasks: - name: install or update a package group yum: name: ’@Virtualization Host’ state: latest :::
When a yum package group instead of an individual package needs to be installed, the name of the package group needs to start with an at sign (@), and the entire package group name needs to be put between single quotes. Also notice the use of state: latest in Listing 12-3. This line ensures that the packages in the package group are installed if they have not been installed yet. If they have already been installed, they are updated to the latest version.
A new feature in RHEL 8 is the yum AppStream module. Modules as listed by the Linux yum modules list command can be managed with the Ansible yum module also. Working with yum modules is similar to working with yum package groups. In the example in Listing 12-4, the main difference is that a version number and the installation profile are included in the module name.
Listing 12-4 Installing AppStream Modules with the yum Module
::: pre_1 — - name: installing an AppStream module hosts: ansible2 tasks: - name: install or update an AppStream module yum: name: ’@php:7.3/devel’ state: present :::
::: note
Note
When using the yum module to install multiple packages, you can provide the name argument with a list of multiple packages. Alternatively, you can provide multiple packages in a loop. Of these solutions, using a list of multiple packages as the argument to name is always preferred. If multiple package names are provided in a loop, the module must execute a task for every single package. If multiple package names are provided as the argument to name, yum can install all these packages in one single task.
:::
When Ansible is gathering facts, package facts are not included. To include package facts as well, you need to run a separate task; that is, you need to use the package_facts module. Facts that have been gathered about packages are stored to the ansible_facts.packages variable. The sample playbook in Listing 12-5 shows how to use the package_facts module.
Listing 12-5 Using the package_facts Module to Show Package Details
::: pre_1 — - name: using package facts hosts: ansible2 vars: my_package: nmap tasks: - name: install package yum: name: “{{ my_package }}” state: present - name: update package facts package_facts: manager: auto - name: show package facts for {{ my_package }} debug: var: ansible_facts.packages[my_package] when: my_package in ansible_facts.packages :::
As you can see, the package_facts module does not need much to do its work. The only argument used here is the manager argument, which specifies which package manager to communicate to. Its default value of auto automatically detects the appropriate package manager and uses that. If you want, you can specify the package manager manually, using any package manager such as yum or dnf. Listing 12-6 shows the output of running the Listing 12-5 playbook, where you can see details that are collected by the package_facts module.
Listing 12-6 Running ansible-playbook listing125.yaml Results
::: pre_1 [ansible@control rhce8-book]$ ansible-playbook listing125.yaml
PLAY [using package facts] **************************************************************

TASK [Gathering Facts] ******************************************************************
ok: [ansible2]

TASK [install package] ******************************************************************
ok: [ansible2]

TASK [update package facts] *************************************************************
ok: [ansible2]

TASK [show package facts for my_package] ************************************************
ok: [ansible2] => {
    "ansible_facts.packages[my_package]": [
        {
            "arch": "x86_64",
            "epoch": 2,
            "name": "nmap",
            "release": "5.el8",
            "source": "rpm",
            "version": "7.70"
        }
    ]
}

PLAY RECAP ******************************************************************************
ansible2                   : ok=4    changed=0    unreachable=0    failed=0    skipped=0    rescued=0    ignored=0
:::
In Exercise 12-1 you can practice working with the different tools Ansible provides for module management.
::: box Exercise 12-1 Managing Software Packages
1. Use your editor to create a new file with the name exercise121.yaml.
2. Write a play header that defines the variable my_package and sets its value to virt-manager:
---
- name: exercise121
  hosts: ansible2
  vars:
    my_package: virt-manager
  tasks:
3. Add a task that installs the package based on the name of the variable that was provided:
- name: install package
  yum:
    name: "{{ my_package }}"
    state: present
4. Add a task that gathers facts about installed packages:
- name: update package facts
  package_facts:
    manager: auto
5. As the last part of this exercise, add a task that shows facts about the package that you have just installed:
- name: show package facts for {{ my_package }}
  debug:
    var: ansible_facts.packages[my_package]
  when: my_package in ansible_facts.packages
6. Run the playbook using ansible-playbook exercise121.yaml and verify its output. :::
After detecting the disk device that needs to be used, you can move on and start creating partitions and logical volumes.
Parted Module name:
part_start:
flags:
      - name: create new partition
        parted:
          name: files
          label: gpt
          device: /dev/sdb
          number: 1
          state: present
          part_start: 1MiB
          part_end: 2GiB
      - name: create another new partition
        parted:
          name: swap
          label: gpt
          device: /dev/sdb
          number: 2
          state: present
          part_start: 2GiB
          part_end: 4GiB
flags: [ lvm ]lvg module
lvol module
Creating an LVM volume group
- name: create a volume group
  lvg:
    vg: vgdata
    pesize: "8"
    pvs: /dev/sdb1
After you create an LVM volume group, you can create LVM logical volumes.
lvol Common Options: lv
Creating an LVM Logical Volume
- name: create a logical volume
    lvol:
      lv: lvdata
      size: 100%FREE
vg: vgdatafilesystem module
Options: dev
Creating an XFS File System
- name: create an XFS filesystem
  filesystem:
    dev: /dev/vgdata/lvdata
fstype: xfsmount module.
Options: fstype
      - name: mount the filesystem
        mount:
          src: /dev/vgdata/lvdata
          fstype: xfs
          state: mounted
path: /mydirTo set up swap space, you first must format a device as swap space and next mount the swap space.
To format a device as swap space, you use the filesystem module.
There is no specific Ansible module to activate theswap space, so you use the command module to run the Linux swapon command.
Because adding swap space is not always required, it can be done in a conditional statement.
In the statement, use the ansible_swaptotal_mb fact to discover how much swap is actually available.
If that amount falls below a specific threshold, the swap space can be created and activated.
A conditional check is performed, and additional swap space is configured if the current amount of swap space is lower than 256 MiB.
    ---
    - name: configure swap storage
      hosts: ansible2
      tasks:
      - name: setup swap
        block:
        - name: make the swap filesystem
          filesystem:
            fstype: swap
            dev: /dev/sdb1
        - name: activate swap space
          command: swapon /dev/sdb1
        when: ansible_swaptotal_mb < 256
Run an ad hoc command to ensure that /dev/sdb on the target host is empty:
ansible ansible2 -a "dd if=/dev/zero of=/dev/sdb bs=1M count=10"To make sure that you don’t get any errors about partitions that are in use, also reboot the target host:
ansible ansible2 -m rebootServices can be managed in many ways. You can manage systemd services, but Ansible also allows for management of tasks using Linux cron and at. Apart from that, you can use Ansible to manage the desired systemd target that a managed system should be started in, and it can reboot running machines. Table 14-2 gives an overview of the most significant modules for managing services.
Table 14-2 Modules Related to Service Management

Throughout this book you have used the service module a lot. This module enables you to manage services, regardless of the init system that is used, so it works with System-V init, with Upstart, as well as systemd. In many cases, you can use the service module for any service-related task.
If systemd specifics need to be addressed, you must use the systemd module instead of the service module. Such systemd-specific features include daemon_reload and mask. The daemon_reload feature forces the systemd daemon to reread its configuration files, which is useful after applying changes (or after editing the service files directory, without using the Linux systemctl command). The mask feature marks a systemd service in such a way that it cannot be started, not even by accident. Listing 14-1 shows an example where the systemd module is used to manage services.
Listing 14-1 Using systemd Module Features
::: pre_1 — - name: using systemd module to manage services hosts: ansible2 tasks: - name: enable service httpd and ensure it is not masked systemd: name: httpd enabled: yes masked: no daemon_reload: yes :::
Given the large amount of functionality that is available in systemd, the functions that are offered by the systemd services are a bit limited, and for many specific features, you must use generic modules such as file and command instead. An example is setting the default target, which is done by creating a symbolic link using the file module.
The cron module can be used to manage cron jobs. A Linux cron job is one that is periodically executed by the Linux crond daemon at a specific time. The cron module can manage jobs in different ways:
• Write the job directly to a user’s crontab
• Write the job to /etc/crontab or under the /etc/cron.d directory
• Pass the job to anacron so that it will be run once an hour, day, week, month, or year without specifically defining when exactly
If you are familiar with Linux cron, using the Ansible cron module is straightforward. Listing 14-2 shows an example that runs the fstrim command every day at 4:05 and at 19:05.
Listing 14-2 Running a cron Job
---
- name: run a cron job
  hosts: ansible2
  tasks:
  - name: run a periodic job
    cron:
      name: "run fstrim"
      minute: "5"
      hour: "4,19"
      job: "fstrim"
As a result of this playbook, a crontab file is created for user root. To create a crontab file for another user, you can use the user attribute. Notice that while managing cron jobs using the cron module, a name attribute is specified. This attribute is required for Ansible to manage the cron jobs and has no meaning for Linux crontab itself. If, for instance, you later want to remove a cron job, you must use the name of the job as an identifier.
Listing 14-3 shows a sample playbook that removes the job that was created in Listing 14-2. Notice that it just specifies state: absent as well as the name of the job that was previously created; no other parameters are required.
Listing 14-3 Removing a cron Job Using the name Attribute
::: pre_1 — - name: run a cron job hosts: ansible2 tasks: - name: run a periodic job cron: name: “run fstrim” state: absent :::
Whereas you use Linux cron to schedule tasks at a regular interval, you use Linux at to manage tasks that need to run once only. To interface with Linux at, the Ansible at module is provided. Table 14-3 gives an overview of the arguments it takes to specify how the task should be executed.
::: group Table 14-3 at Module Arguments Overview

The most important point to understand when working with at is that it is used to defined how far from now a task has to be executed. This is done using count and units. If, for example, you want to run a task five minutes from now, you specify the job with the arguments count: 5 and units: minutes. Also notice the use of the unique argument. If set to yes, the task is ignored if a similar job is scheduled to run already. Listing 14-4 shows an example.
Listing 14-4 Running Commands in the Future with at
::: pre_1 — - name: run an at task hosts: ansible2 tasks: - name: run command and write output to file at: command: “date > /tmp/my-at-file” count: 5 units: minutes unique: yes state: present :::
In Exercise 14-1 you practice your skills working with the cron module.
::: box Exercise 14-1 Managing cron Jobs
1. Use your editor to create the playbook exercise141-1.yaml and give it the following contents:
---
- name: run a cron job
  hosts: ansible2
  tasks:
  - name: run a periodic job
    cron:
      name: "run logger"
      minute: "0"
      hour: "5"
      job: "logger IT IS 5 AM"
2. Use ansible-playbook exercise141-1.yaml to run the job.
3. Use the command ansible ansible2 -a “crontab -l” to verify the cron job has been added. The output should look as follows:
ansible2 | CHANGED | rc=0 >>
#Ansible: run logger
0 5 * * * logger IT IS 5 AM
4. Create a new playbook with the name exercise141-2 that runs a new cron job but uses the same name:
---
- name: run a cron job
  hosts: ansible2
  tasks:
  - name: run a periodic job
    cron:
      name: "run logger"
      minute: "0"
      hour: "6"
      job: "logger IT IS 6 AM"
5. Run this new playbook by using ansible-playbook exercise141-2.yaml. Notice that the job runs with a changed status.
6. Repeat the command ansible ansible2 -a “crontab -l”. This shows you that the new cron job has overwritten the old job because it was using the same name. Here is something important to remember: all cron jobs should have a unique name!
7. Write the playbook exercise141-3.yaml to remove the cron job that you just created:
---
- name: run a cron job
  hosts: ansible2
  tasks:
  - name: run logger
    cron:
      name: "run logger"
      state: absent
8. Use ansible-playbook exercise141-3.yaml to run the last playbook. Next, use ansible ansible2 -a “crontab -l” to verify that the cron job was indeed removed.
3 modules for managing the networking on nodes:
Server hosting the storage:
---
  - name: Install Packages
    package:
      name:
        - nfs-utils
      state: present

  - name: Ensure directories to export exist
    file:  # noqa 208
      path: "{{ item }}"
      state: directory
    with_items: "{{ nfs_exports | map('split') | map('first') | unique }}"

  - name: Copy exports file
    template:
      src: exports.j2
      dest: /etc/exports
      owner: root
      group: root
      mode: 0644
    notify: reload nfs

  - name: Add firewall rule to enable NFS service
    ansible.posix.firewalld:
      immediate: true
      state: enabled
      permanent: true
      service: nfs
    notify: reload firewalld

  - name: Start and enable NFS service
    service:
      name: nfs-server
      state: started
      enabled: yes
     when: nfs_exports|length > 0

  - name: Set SELinux boolean for NFS
    ansible.posix.seboolean:
      name: nfs_export_all_rw
      state: yes
      persistent: yes

  - name: install required package for sefcontext module
    yum:
      name: policycoreutils-python-utils
      state: present

  - name: Set proper SELinux context on export dir
    sefcontext:
      target: /{{ item }}(/.*)?
      setype: nfs_t
      state: present
    notify: run restorecon
    with_items: "{{ nfs_exports | map('split') | map('first') | unique }}"
{% for host in nfs_hosts %}
/data {{ host }} (rw,wdelay,root_squash,no_subtree_check,sec=sys,rw,root_squash,no_all_squash)
{% endfor %}Variables: nfs_exports:
Handlers
---
- name: reload nfs
  command: 'exportfs -ra'

- name: reload firewalld
  command: firewall-cmd --reload

- name: run restorecon
  command: restorecon -Rv /codata
storage:
 name: Detect secondary disk name
    ignore_errors: yes
    set_fact:
      disk2name: vda
    when: ansible_facts['devices']['vda'] is defined

  - name: Search for second disk, continue only if it is found
    assert:
      that:
        - disk2name is defined
      fail_msg: second hard disk not found

  - name: Debug detected disk
    debug:
      msg: "{{ disk2name }} was found. Moving forward."

  - name: Create LVM and partitions
    block:
    - name: Create LVM Partition on second disk
      parted:
        name: data
        label: gpt
        device: /dev/{{ disk2name }}
        number: 1
        state: present
        flags: [ lvm ]

    - name: Create an LVM volume group
      lvg:
        vg: vgcodata
        pvs: /dev/{{ disk2name }}1

    - name: Create lv
      lvol:
        lv: lvdata
        size: 100%FREE
        vg: vgdata

    - name: create filesystem
      filesystem:
        dev: /dev/vgdata/lvdata
        fstype: xfs

    when: ansible_facts['devices']['vda']['partitions'] is not defined

  - name: Create data directory
    file:
      dest: /data
      mode: 777
      state: directory

  - name: Mount the filesystem
    mount:
      src: /dev/vgdata/lvdata
      fstype: xfs
      state: present
      path: /data

  - name: Set permissions on mounted filesystem
    file:
      path: /data
      state: directory
      mode: '0777'
```Parallel task execution
-f option with the ansible and ansible-playbook commands.ansible3
ansible4forks = 4 to the [defaults] section.ansible-playbook exercise102-remove.yaml to remove and disable the Apache web server on all hosts. This is just to make sure you start with a clean configuration.time ansible-playbook exercise102-install.yaml, and notice the time it takes to run the playbook.ansible-playbook exercise102-remove.yaml again to get back to a clean state.forks = 2.time ansible-playbook exercise102-install.yaml command again to see how much time it takes nowexercise102-install.yaml playbook and include the line serial: 2 in the play header.ansible-playbook exercise102-remove.yaml command again to get back to a clean state.ansible-playbook exercise102-install.yaml command again and observe that the entire play is executed on two hosts only before the next group of two hosts is taken care of.To work with software packages, you need to make sure that repositories are accessible and subscriptions are available. In the previous section you learned how to write a playbook that enables you to access an existing repository. In this section you learn how to set up the server part of a repository if that still needs to be done. Also, you learn how to manage RHEL subscriptions using Ansible.
Most managed systems access the default distributions that are provided while installing the operating system. In some cases external repositories might not be accessible. If that happens, you need to set up a repository yourself. Before you can do that, however, it’s important to know what a repository is. A repository is a directory that contains RPM files, as well as the repository metadata, which is an index that allows the repository client to figure out which packages are available in the repository.
Ansible does not provide a specific module to set up a repository. You must use a number of modules instead. Exactly which modules are involved depends on how you want to set up the repository. For instance, if you want to set up an FTP-based repository on the Ansible control host, you need to accomplish the following tasks:
• Install the FTP package.
• Start and enable the FTP server.
• Open the firewall for FTP traffic.
• Make sure the FTP shared repository directory is available.
• Download packages to the repository directory.
• Use the Linux createrepo command to generate the index that is required in each repository.
The playbook in Listing 12-7 provides an example of how this can be done.
Listing 12-7 Setting Up an FTP-based Repository
::: pre_1 - name: install FTP to export repo hosts: localhost tasks: - name: install FTP server yum: name: - vsftpd - createrepo_c state: latest - name: start FTP server service: name: vsftpd state: started enabled: yes - name: open firewall for FTP firewalld: service: ftp state: enabled permanent: yes
- name: setup the repo directory
  hosts: localhost
  tasks:
  - name: make directory
    file:
      path: /var/ftp/repo
      state: directory
  - name: download packages
    yum:
      name: nmap
      download_only: yes
      download_dir: /var/ftp/repo
  - name: createrepo
    command: createrepo /var/ftp/repo
:::
The most significant tasks in setting up the repository are the download packages and createrepo tasks. In the download packages task, the yum module is used to download a single package. To do so, the download_only argument is used to ensure that the package is not installed but downloaded to a directory. When you use the download_only argument, you also must specify where the package needs to be installed. To do this, the task uses the download_dir argument.
There is one disadvantage in using this approach to download the package, though: it requires repository access. If repository access is not available, the fetch module can be used instead to download a file from a specific URL.
To guarantee the integrity of packages, most repositories are set up with a GPG key. This enables the client to verify that packages have not been tampered with while transmitted between the repository server and client. For that reason, if packages are installed from a repository server on the Internet, you should always make sure that gpgcheck: yes is set while using the yum_repository module.
However, if you want to make sure that a GPG check is performed, you need to make sure the client knows where to fetch the repository key. To help with that, you can use the rpm_key module. You can see how to do this in Listing 12-8. Notice that the playbook in this listing doesn’t work because no GPG-protected repository is available. Setting up GPG-protected repositories is complex and outside the scope of the EX294 objectives, and for that reason is not covered here.
Listing 12-8 Using rpm_key to Fetch an RPM Key
::: pre_1 - name: use rpm_key in repository access hosts: all tasks: - name: get the GPG public key rpm_key: key: ftp://control.example.com/repo/RPM-GPG-KEY state: present - name: set up the repository client yum_repository: file: myrepo name: myrepo description: example repo baseurl: ftp://control.example.com/repo enabled: yes gpgcheck: yes state: present :::
When you work with Red Hat Enterprise Linux, configuring repository access using the method described before is not enough. Red Hat Enterprise Linux works with subscriptions, and to be able to access software that is provided through your subscription entitlement, you need to set up managed systems to access these subscriptions.
::: note
Tip
Free developer subscriptions are available for RHEL as well as Ansible. Register yourself at https://developers.redhat.com and sign up for a free subscription if you want to test the topics described in this section on RHEL and you don’t have a valid subscription yet.
:::
To understand how to use the Ansible modules to register a RHEL system, you need to understand how to use the Linux command-line utilities. When you are managing subscriptions from the Linux command line, multiple steps are involved.
1. First, you use the subscription-manager register command to provide your RHEL credentials. Use, for instance, subscription-manager register --username=yourname --password=yourpassword.
2. Next, you need to find out which pools are available in your account. A pool is a collection of software channels available to your account. Use subscription-manager list --available for an overview.
3. Now you can connect to a specific pool using subscription-manager attach --pool=poolID. Note that if only one subscription pool is available in your account, you don’t have to provide the --pool argument.
4. Next, you need to find out which additional repositories are available to your account by using subscription-manager repos --list.
5. To register to use additional repositories, you use subscription-manager repos --enable “repos name”. Your system then has full access to its subscription and related repositories.
Two significant modules are provided by Ansible:
• redhat_subscription: This module enables you to perform subscription and registration in one task.
• rhsm_repository: This module enables you to add subscription manager repositories.
Listing 12-9 shows an example of a playbook that uses these modules to fully register a new RHEL 8 machine and add a new repository to the managed machine. Notice that this playbook is not runnable as such because important additional information needs to be provided. Exercise 12-3, later in the section titled “Implementing a Playbook to Manage Software,” will guide you to a scenario that shows how to use this code in production.
Listing 12-9 Using Subscription Manager to Set Up Ansible
::: pre_1 — - name: use subscription manager to register and set up repos hosts: ansible5 tasks: - name: register and subscribe ansible5 redhat_subscription: username: bob@example.com password: verysecretpassword state: present - name: configure additional repo access rhsm_repository: name: - rh-gluster-3-client-for-rhel-8-x86_64-rpms - rhel-8-for-x86_64-appstream-debug-rpms state: present :::
In the sample playbook in Listing 12-9, you can see how the redhat_subscription and rhsm_repository modules are used. Notice that redhat_subscription requires a password. In Listing 12-9 the username and password are provided as clear-text values in the playbook. From a security perspective, this is very bad practice. You should use Ansible Vault instead. Exercise 12-3 will guide you through a setup where this is done.
In Exercise 12-2 you are guided through the procedure of setting up your own repository and using it. This procedure consists of two distinct parts. In the first part you set up a repository server that is based on FTP. Because in Ansible you often need to configure topics that don’t have your primary attention, you set up the FTP server and also change its configuration. Next, you write a second playbook that configures the clients with appropriate repository access, and after doing so, install a package.
::: box Exercise 12-2 Setting Up a Repository
1. Use your editor to create the file exercise122-server.yaml.
2. Define the play that sets up the basic FTP configuration. Because all its tasks should be familiar to you at this point, you can enter all the tasks at once:
---
- name: install, configure, start and enable FTP
  hosts: localhost
  tasks:
  - name: install FTP server
    yum:
      name: vsftpd
      state: latest
  - name: allow anonymous access to FTP
    lineinfile:
      path: /etc/vsftpd/vsftpd.conf
      regexp: ’^anonymous_enable=NO’
      line: anonymous_enable=YES
  - name: start FTP server
    service:
      name: vsftpd
      state: started
      enabled: yes
  - name: open firewall for FTP
    firewalld:
      service: ftp
      state: enabled
      immediate: yes
      permanent: yes
3. Set up a repository directory. Add the following play to the playbook. Notice the use of the download packages task, which uses the yum module to download a package without installing it. Also notice the createrepo task, which creates the repository metadata that converts the /var/ftp/repo directory into a repository.
- name: setup the repo directory
  hosts: localhost
  tasks:
  - name: make directory
    file:
      path: /var/ftp/repo
      state: directory
  - name: download packages
    yum:
      name: nmap
      download_only: yes
      download_dir: /var/ftp/repo
  - name: install createrepo package
    yum:
      name: createrepo_c
      state: latest
  - name: createrepo
    command: createrepo /var/ftp/repo
    notify:
    - restart_ftp
  handlers:
  - name: restart_ftp
    service:
      name: vsftpd
      state: restarted
4. Use the command ansible-playbook exercise122-server.yaml to set up the FTP server on control.example.com. If you haven’t made any typos, you shouldn’t encounter any errors.
5. Now that the repository server has been installed, it’s time to set up the repository client. Use your editor to create the file exercise122-client.yaml and write the play header as follows:
---
- name: configure repository
  hosts: all
  vars:
    my_package: nmap
  tasks:
6. Add a task that uses the yum_repository module to configure access to the new repository:
- name: connect to example repo
  yum_repository:
    name: exercise122
    description: RHCE8 exercise 122 repo
    file: exercise122
    baseurl: ftp://control.example.com/repo/
    gpgcheck: no
7. After setting up the repository client, you also need to make sure that the clients know how to reach the repository server by addressing its name. Add the next task that writes a new line to /etc/hosts to make sure host name resolving on the clients is set up correctly:
- name: ensure control is resolvable
  lineinfile:
    path: /etc/hosts
    line: 192.168.4.200  control.example.com  control

- name: install package
  yum:
    name: "{{ my_package }}"
    state: present
8. If you are using the package_facts module, you need to remember to update it after installing new packages. Add the following task to get this done:
- name: update package facts
  package_facts:
    manager: auto
9. As the last task, just because it’s fun, use the debug module together with the package facts to get information about the newly installed package:
- name: show package facts for {{ my_package }}
  debug:
    var: ansible_facts.packages[my_package]
  when: my_package in ansible_facts.packages
10. Use the command ansible-playbook exercise122-client.yaml -e my_package=redis. That’s right; this command overwrites the my_package variable that was set in the playbook—just to remind you a bit about variable precedence. :::
Modules for Managing Changes on SELinux: file
restorecon command after using sefcontext
selinuxsefcontext module.
restorecon command to do this.file module
policycoreutils-python-utils RPM
restorecon command---
- name: show selinux
hosts: all
tasks:
- name: install required packages
yum:
name: policycoreutils-python-utils
state: present
- name: create testfile
file:
name: /tmp/selinux
state: touch
- name: set selinux context
sefcontext:
target: /tmp/selinux
setype: httpd_sys_content_t
state: present
notify:
- run restorecon
handlers:
- name: run restorecon
command: restorecon -v /tmp/selinuxselinux module
seboolean module
    ---
    - name: enabling SELinux and a boolean
      hosts: ansible1
      vars:
        myboolean: httpd_read_user_content
      tasks:
      - name: enabling SELinux
        selinux:
          policy: targeted <--- must specify policy
          state: enforcing
      - name: checking current {{ myboolean }} Boolean status
        shell: getsebool -a | grep {{ myboolean }}
        register: bool_stat
      - name: showing boolean status
        debug:
          msg: the current {{ myboolean }} status is {{ bool_stat.stdout }}
      - name: enabling boolean
        seboolean:
          name: "{{ myboolean }}"
          state: yes
persistent: yes1. Start by creating a playbook outline. A good approach for doing this is to create the playbook play header and list all tasks that need to be accomplished by providing a name as well as the name of the task that you want to run.
2. Enable SELinux and set to the enforcing state.
3. Install the web server, start and enable it, create the /web directory, and create the index.html file in the /web directory.
4. Use the lineinfile module to change the httpd.conf contents. Two different lines need to be changed.
5. Configure the SELinux-specific settings.
6. Run the playbook and verify its output.
8. Verify that the web service is accessible by using curl http://ansible1. In this case, it should not work. Try to analyze why.
---
- name: Managing web server SELinux properties
  hosts: ansible1
  tasks:
  - name: ensure SELinux is enabled and enforcing
    selinux:
      policy: targeted
      state: enforcing
  - name: install the webserver
    yum:
      name: httpd
      state: latest
  - name: start and enable the webserver
    service:
      name: httpd
      state: started
      enabled: yes
  - name: open the firewall service
    firewalld:
      service: http
      state: enabled
      immediate: yes
  - name: create the /web directory
    file:
      name: /web
      state: directory
  - name: create the index.html file in /web
    copy:
      content: ’welcome to the exercise82 web server’
      dest: /web/index.html
  - name: use lineinfile to change webserver configuration
    lineinfile:
      path: /etc/httpd/conf/httpd.conf
      regexp: ’^DocumentRoot "/var/www/html"’
      line: DocumentRoot "/web"
    notify: restart httpd

  - name: use lineinfile to change webserver security
    lineinfile:
      path: /etc/httpd/conf/httpd.conf
      regexp: ’^<Directory "/var/www">’
      line: ’<Directory "/web">’
  - name: use sefcontext to set context on new documentroot
    sefcontext:
      target: ’/web(/.*)?’
      setype: httpd_sys_content_t
      state: present
  - name: run the restorecon command
    command: restorecon -Rv /web
  - name: allow the web server to run user content
    seboolean:
      name: httpd_read_user_content
      state: yes
      persistent: yes

  handlers:
    - name: restart httpd
      service:
        name: httpd
state: restartedFor this lab, we will need three virtual machines using RHEL 9. 1 control node and 2 managed nodes. Use IP addresses based on your lab network environment:
| Hostname | pretty hostname | ip addreess | RAM | Storage | vCPUs |
|---|---|---|---|---|---|
| control.example.com | control | 192.168.122.200 | 2048MB | 20G | 2 |
| ansible1.example.com | ansible1 | 192.168.122.201 | 2048MB | 20G | 2 |
| ansible2.example.com | ansible2 | 192.168.122.202 | 2048MB | 20G | 2 |
| I have set these VMs up in virt-manager, then cloned them so I can rebuild the lab later. You can automate this using Vagrant or Ansible but that will come later. Ignore the Win10 VM. It’s a necessary evil: |
Set a hostname on all three machines:
[root@localhost ~]# hostnamectl set-hostname control.example.com
[root@localhost ~]# hostnamectl set-hostname --pretty control
Install Ansible on Control Node
[root@localhost ~]# dnf -y install ansible-core
...
Verify python3 is installed:
[root@localhost ~]# python --version
Python 3.9.18Add a user for Ansible. This can be any username you like, but we will use “ansible” as our lab user. Also, the ansible user needs sudo access. We will also make it so no password is required for convenience. You will need to do this on the control node and both managed nodes:
[root@control ~]# useradd ansible
[root@control ~]# visudo
Add this line to the file that comes up:
ansible ALL=(ALL) NOPASSWD: ALL
Configure a password for the ansible user:
[root@control ~]# passwd ansible
Changing password for user ansible.
New password:
BAD PASSWORD: The password is shorter than 8 characters
Retype new password:
passwd: all authentication tokens updated successfully.
On the control node only: Add host names of the nodes to /etc/hosts:
echo "192.168.124.201 ansible1 >> /etc/hosts
> ^C
[root@control ~]# echo "192.168.124.201 ansible1" >> /etc/hosts
[root@control ~]# echo "192.168.124.202 ansible2" >> /etc/hosts
[root@control ~]# cat /etc/hosts
127.0.0.1   localhost localhost.localdomain localhost4 localhost4.localdomain4
::1         localhost localhost.localdomain localhost6 localhost6.localdomain6
192.168.124.201 ansible1
192.168.124.202 ansible2
Log in to the ansible user account for the remaining steps. Note, Ansible assumes passwordless (key-based) login for ssh. If you insist on using passwords, add the –ask-pass (-k) flag to your Ansible commands. (This may require sshpass package to work)
On the control node only: Generate an ssh key to send to the hosts for passwordless Login:
[ansible@control ~]$ ssh-keygen -N "" -q
Enter file in which to save the key (/home/ansible/.ssh/id_rsa):
Copy the public key to the nodes and test passwordless access and test passwordless login to the managed nodes:
^C[ansible@control ~]$ ssh-copy-id ansible@ansible1
/usr/bin/ssh-copy-id: INFO: Source of key(s) to be installed: "/home/ansible/.ssh/id_rsa.pub"
/usr/bin/ssh-copy-id: INFO: attempting to log in with the new key(s), to filter out any that are already installed
/usr/bin/ssh-copy-id: INFO: 1 key(s) remain to be installed -- if you are prompted now it is to install the new keys
ansible@ansible1's password:

Number of key(s) added: 1

Now try logging into the machine, with:   "ssh 'ansible@ansible1'"
and check to make sure that only the key(s) you wanted were added.

[ansible@control ~]$ ssh-copy-id ansible@ansible2
/usr/bin/ssh-copy-id: INFO: Source of key(s) to be installed: "/home/ansible/.ssh/id_rsa.pub"
The authenticity of host 'ansible2 (192.168.124.202)' can't be established.
ED25519 key fingerprint is SHA256:r47sLc/WzVA4W4ifKk6w1gTnxB3Iim8K2K0KB82X9yo.
This key is not known by any other names
Are you sure you want to continue connecting (yes/no/[fingerprint])? yes
/usr/bin/ssh-copy-id: INFO: attempting to log in with the new key(s), to filter out any that are already installed
/usr/bin/ssh-copy-id: INFO: 1 key(s) remain to be installed -- if you are prompted now it is to install the new keys
ansible@ansible2's password:

Number of key(s) added: 1

Now try logging into the machine, with:   "ssh 'ansible@ansible2'"
and check to make sure that only the key(s) you wanted were added.

[ansible@control ~]$ ssh ansible1
Register this system with Red Hat Insights: insights-client --register
Create an account or view all your systems at https://red.ht/insights-dashboard
Last failed login: Thu Apr  3 05:34:20 MST 2025 from 192.168.124.200 on ssh:notty
There was 1 failed login attempt since the last successful login.
[ansible@ansible1 ~]$
logout
Connection to ansible1 closed.
[ansible@control ~]$ ssh ansible2
Register this system with Red Hat Insights: insights-client --register
Create an account or view all your systems at https://red.ht/insights-dashboard
[ansible@ansible2 ~]$
logout
Connection to ansible2 closed.
Install lab stuff from the RHCE guide:
sudo dnf -y install git
[ansible@control base]$ cd

[ansible@control ~]$ git clone https://github.com/sandervanvugt/rhce8-book
Cloning into 'rhce8-book'...
remote: Enumerating objects: 283, done.
remote: Counting objects: 100% (283/283), done.
remote: Compressing objects: 100% (233/233), done.
remote: Total 283 (delta 27), reused 278 (delta 24), pack-reused 0 (from 0)
Receiving objects: 100% (283/283), 62.79 KiB | 357.00 KiB/s, done.
Resolving deltas: 100% (27/27), done.How SSH keys are used in the communication process between a user and an SSH server:
In the authentication procedure, two key pairs play an important role. First, there is the server’s public/private key pair, which is used to establish a secure connection. To manage the host public key, you can use the Ansible known_hosts module. Next, there is the user’s public/private key pair, which the user uses to authenticate. To manage the public key in this key pair, you can use the Ansible authorized_key module.
Set the value of a variable to the contents of a file:
---
- name: simple demo with the lookup plugin
  hosts: localhost
  vars:
    file_contents: "{{lookup(‘file’, ‘/etc/hosts’)}}"
  tasks:
  - debug:
var: file_contentsauthorized_key module
---
- name: authorized_key simple demo
  hosts: ansible2
  tasks:
  - name: copy authorized key for ansible user
    authorized_key:
      user: ansible
      state: present
      key: "{{ lookup(‘file’, ‘/home/ansible/.ssh/id_rsa.pub’) }}"
Do the same for multiple users: vars/users
---
users:
  - username: linda
    groups: sales
  - username: lori
    groups: sales
  - username: lisa
    groups: account
  - username: lucy
    groups: account
vars/groups
---
usergroups:
  - groupname: sales
  - groupname: account
---
- name: configure users with SSH keys
hosts: ansible2
vars_files:
- vars/users
- vars/groups
tasks:
- name: add groups
group:
name: "{{ item.groupname }}"
loop: "{{ usergroups }}"
- name: add users
user:
name: "{{ item.username }}"
groups: "{{ item.groups }}"
loop: "{{ users }}"
- name: add SSH public keys
authorized_key:
user: "{{ item.username }}"
key: "{{ lookup(‘file’, ‘files/’+ item.username + ‘/id_rsa.pub’) }}"
loop: "{{ users }}"authorized_key module is set up to work on item.username, using a loop on the users variable.
The id_rsa.pub files that have to be copied over are expected to exist in the files directory, which exists in the current project directory.
Copying over the user public keys to the project directory is a solution because the authorized_keys module cannot read files from a hidden directory.
It would be much nicer to use key: “{{ lookup(‘file’, ‘/home/’+ item.username + ‘.ssh/id_rsa.pub’) }}”, but that doesn’t work.
In the first task you create a local user, including an SSH key.
Because an SSH key should include the name of the user and host that it applies to, you need to use the generate_ssh_key argument, as well as the ssh_key_comment argument to write the correct comment into the public key.
Without this content, the key will have generic content and not be considered a valid key.
- name: create the local user, including SSH key
  user:
    name: "{{ username }}"
    generate_ssh_key: true
ssh_key_comment: "{{ username }}@{{ ansible_fqdn }}"- name: create a directory to store the file
file:
name: "{{ username }}"
state: directory
- name: copy the local user ssh key to temporary {{ username }} key
shell: ‘cat /home/{{ username }}/.ssh/id_rsa.pub > {{ username }}/id_rsa.pub’
- name: verify that file exists
command: ls -l {{ username }}/Exercise 13-2 Managing Users with SSH Keys Steps
---
- name: prepare localhost
hosts: localhost
tasks:
- name: create the local user, including SSH key
user:
name: "{{ username }}"
generate_ssh_key: true
ssh_key_comment: "{{ username }}@{{ ansible_fqdn }}"
- name: create a directory to store the file
  file:
    name: "{{ username }}"
    state: directory
- name: copy the local user ssh key to temporary {{ username }} key
  shell: ‘cat /home/{{ username }}/.ssh/id_rsa.pub > {{ username }}/id_rsa.pub’
- name: verify that file exists
  command: ls -l {{ username }}/
- name: setup remote host
hosts: ansible1
tasks:
- name: create remote user, no need for SSH key
user:
name: "{{ username }}"
- name: use authorized_key to set the password
authorized_key:
user: "{{ username }}"
key: "{{ lookup(‘file’, ‘./’+ username +’/id_rsa.pub’) }}"Apart from the problems that may arise in playbooks, another type of error relates to connectivity issues. To connect to managed hosts, SSH must be configured correctly, and also authentication and privilege escalation must work as expected.
To be able to connect to a managed host, you need to have an IP network connection. Apart from that, you need to make sure that the host has been set up correctly:
• The SSH service needs to be accessible on the remote host.
• Python must be installed.
• Privilege escalation needs to be set up.
Apart from these, inventory settings may be specified to indicate how to connect to a remote host. Normally, the inventory contains a host name only. If a host resolves to multiple IP addresses, you may want to specify how exactly the remote host must be connected to. The ansible_host parameter can be configured to do so. In inventory, for instance, you may include the following line to ensure that your host is connected in the right way:
ansible5.example.com ansible_host=192.168.4.55
Notice that this setting makes sense only in an environment where a host can be reached on multiple different IP addresses.
To test connectivity to remote hosts, you can use the ping module. It checks for IP connectivity, accessibility of the SSH service, sudo privilege escalation, and the availability of a Python stack. The ping module does not take any arguments. Listing 11-18 shows the result of running on the ad hoc command ansible all -m ping where hosts that are available send “pong” as a reply, and for hosts that are not available, you see why they are not available.
Listing 11-18 Verifying Connectivity Using the ping Module
::: pre_1 [ansible@control rhce8-book]$ ansible all -m ping ansible2 | SUCCESS => { “ansible_facts”: { “discovered_interpreter_python”: “/usr/libexec/platform-python” }, “changed”: false, “ping”: “pong” } ansible1 | SUCCESS => { “ansible_facts”: { “discovered_interpreter_python”: “/usr/libexec/platform-python” }, “changed”: false, “ping”: “pong” } ansible3 | SUCCESS => { “ansible_facts”: { “discovered_interpreter_python”: “/usr/libexec/platform-python” }, “changed”: false, “ping”: “pong” } ansible4 | FAILED! => { “msg”: “Missing sudo password” } :::
A few settings play a role in authentication on the remote host to execute tasks:
• The remote_user setting determines which user account to use on the managed nodes.
• SSH keys need to be configured for the remote_user to enable smooth authentication.
• The become parameter needs to be set to true.
• The become_user needs to be set to the root user account.
• Linux sudo needs to be set up correctly.
In Exercise 11-4 you work on troubleshooting some common scenarios.
::: box Exercise 11-4 Troubleshooting Connectivity Issues
1. Use an editor to create the file exercise114-1.yaml and give it the following contents:
---
- name: remove user from wheel group
  hosts: ansible4
  tasks:
  - user:
      name: ansible
      groups: ’’
2. Run the playbook using ansible-playbook exercise114-1.yaml and use ansible ansible4 -m reboot to reboot node ansible4.
3. Once the reboot is completed, use ansible all -m ping to verify connectivity. Host ansible4 should give a “Missing sudo password” error.
4. Type ansible ansible4 -m raw -a “usermod -aG wheel ansible” -u root -k to make user ansible a member of the group wheel again.
5. Repeat the ansible all -m ping command. You should now be able to connect normally to the host ansible4 again. :::
user
group
pamd
known_hosts
authorized_key
lineinfile
    ---
    - name: creating a user and group
      hosts: ansible2
      tasks:
      - name: setup the group account
        group:
          name: students
          state: present
      - name: setup the user account
        user:
          name: anna
          create_home: yes
          groups: wheel,students
          append: yes
          generate_ssh_key: yes
          ssh_key_bits: 2048
          ssh_key_file: .ssh/id_rsa
group argument is
groups argument is
used to make the user a member of additional groups.
While using the groups argument for existing users, make sure to include the append argument as well.
Without append, all current secondary group assignments are overwritten.
Also notice that the user module has some options that cannot normally be managed with the Linux useradd command. The module can also be used to generate an SSH key and specify its properties.
No Ansible module specifically targets managing a sudo configuration
two options:
Users are created and added to a sudo file that is generated from a template:
    [ansible@control rhce8-book]$ cat vars/sudo
    sudo_groups:
      - name: developers
        groupid: 5000
        sudo: false
      - name: admins
        groupid: 5001
        sudo: true
      - name: dbas
        groupid: 5002
        sudo: false
      - name: sales
        groupid: 5003
        sudo: true
      - name: account
        groupid: 5004
        sudo: false
    [ansible@control rhce8-book]$ cat vars/users
    users:
      - username: linda
        groups: sales
      - username: lori
        groups: sales
      - username: lisa
        groups: account
      - username: lucy
groups: account{% for item in sudo_groups %}
{% if item.sudo %}
%{{ item.name}} ALL=(ALL:ALL) NOPASSWD:ALL
{% endif %}
{% endfor %}Listing 13-4 Managing sudo
    ---
    - name: configure sudo
      hosts: ansible2
      vars_files:
        - vars/sudo
        - vars/users
      tasks:
      - name: add groups
        group:
          name: "{{ item.name }}"
        loop: "{{ sudo_groups }}"
      - name: add users
        user:
          name: "{{ item.username }}"
          groups: "{{ item.groups }}"
        loop: "{{ users }}"
      - name: allow group members in sudo
        template:
          src: listing133.j2
          dest: /etc/sudoers.d/sudogroups
          validate: ‘visudo -cf %s’
mode: 0440Install software packages using the yum module and then ensures that services installed from these packages are started using the service module:
    ---
    - name: install and start services
      hosts: ansible1
      tasks:
      - name: install packages
        yum:
          name:
          - vsftpd
          - httpd
          - samba
          state: latest
      - name: start the services
        service:
          name: "{{ item }}"
          state: started
          enabled: yes
        loop:
        - vsftpd
        - httpd
        - smb
A loop is defined at the same level as the service module.
The loop has a list of services in a list (array) statement
Items in the loop can be accessed by using the system internal variable item.
At no place in the playbook is there a definition of the variable item; the loop takes care of this.
When considering whether to use a loop, you should first investigate whether a module offers support for providing lists as values to the keys that are used.
If this is the case, just provide a list, as all items in the list can be considered in one run of the module.
If not, define the list using loop and provide "{{ item }}" as the value to the key.
When using loop, the module is activated again on each iteration.
Include the loop from a variable:
    ---
    - name: install and start services
      hosts: ansible1
      vars:
        services:
        - vsftpd
        - httpd
        - smb
      tasks:
      - name: install packages
        yum:
          name:
          - vsftpd
          - httpd
          - samba
          state: latest
      - name: start the services
        service:
          name: "{{ item }}"
          state: started
          enabled: yes
loop: "{{ services }}"An item can be a simple list, but it can also be presented as a multivalued variable, as long as the multivalued variable is presented as a list.
Use variables that are imported from the file vars/users-list:
users:
  - username: linda
    homedir: /home/linda
    shell: /bin/bash
    groups: wheel
  - username: lisa
    homedir: /home/lisa
    shell: /bin/bash
    groups: users
  - username: anna
    homedir: /home/anna
    shell: /bin/bash
    groups: users
Use the list in a playbook:
    ---
    - name: create users using a loop from a list
      hosts: ansible1
      vars_files: vars/users-list
      tasks:
      - name: create users
        user:
          name: "{{ item.username }}"
          state: present
          groups: "{{ item.groups }}"
          shell: "{{ item.shell }}"
loop: "{{ users }}"With_keyword Options Overview with_items
Loop over a list using with_keyword:
    ---
    - name: install and start services
      hosts: ansible1
      vars:
        services:
        - vsftpd
        - httpd
        - smb
      tasks:
      - name: install packages
        yum:
          name:
          - vsftpd
          - httpd
          - samba
          state: latest
      - name: start the services
        service:
          name: "{{ item }}"
          state: started
          enabled: yes
with_items: "{{ services }}"1. Use your editor to define a variables file with the name vars/packages and the following contents:
packages:
- name: httpd
  state: absent
- name: vsftpd
  state: installed
- name: mysql-server
  state: latest
2. Use your editor to define a playbook with the name exercise71.yaml and create the play header:
- name: manage packages using a loop from a list
  hosts: ansible1
  vars_files: vars/packages
  tasks:
3. Continue the playbook by adding the yum task that will manage the packages, using the packages variable as defined in the vars/packages variable include file:
- name: manage packages using a loop from a list
  hosts: ansible1
  vars_files: vars/packages
  tasks:
  - name: install packages
    yum:
      name: "{{ item.name }}"
      state: "{{ item.state }}"
    loop: "{{ packages }}"
4. Run the playbook using ansible-playbook exercise71.yaml, and observe the results. In the results you should see which packages it is trying to manage and in which state it is trying to get the packages.
While working with playbooks, you may use different modules for troubleshooting. The debug module was used in previous chapters and is particularly useful for analyzing variable behavior. Some other modules may prove useful when troubleshooting Ansible. Table 11-4 gives an overview.
::: group Table 11-4 Troubleshooting Modules Overview
 {width=“940” height=“295”}
:::
{width=“940” height=“295”}
:::
The following sections discuss how these modules can be used.
The debug module is useful to visualize what is happening at a certain point in a playbook. It works with two arguments: the msg argument can be used to print a message, and the var argument can be used to print the value of a variable. Notice that when you use the var argument, the variable does not have to be referred to using the usual {{ varname }} structure, just use varname instead. If variables are used in the msg argument, they must be referred to the normal way, using the {{ varname }} syntax.
Because you have already seen the debug module in action in numerous examples in Chapters 6, 7, and 8 of this book, no new examples are included here.
The best way to learn how to work with these modules is to look at some examples. Listing 11-7 shows an example where the uri module is used.
Listing 11-7 Using the uri Module
::: pre_1 — - name: test webserver access hosts: localhost become: no tasks: - name: connect to the web server uri: url: http://ansible2.example.com return_content: yes register: this failed_when: “’welcome’ not in this.content” - debug: var: this.content :::
The playbook in Listing 11-7 uses the uri module to connect to a web server. The return_content argument captures the web server content, which is stored in a variable using register. Next, the failed_when statement makes this module fail if the text “welcome” is not in the registered variable. For debugging purposes, the debug module is used to show the contents of the variable.
In Listing 11-8 you can see the partial result of running this playbook. Notice that the playbook does not generate a failure because the default web page that is shown by the Apache web server contains the text “welcome.”
Listing 11-8 ansible-playbook listing117.yaml Command Result
[ansible@control rhce8-book]$ ansible-playbook listing117.yaml

    PLAY [test webserver access] ***************************************************

    TASK [Gathering Facts] *********************************************************
    ok: [localhost]

    TASK [connect to the web server] ***********************************************
    ok: [localhost]

    TASK [debug] *******************************************************************
    ok: [localhost] => {
        "this.content": "

    PLAY RECAP *********************************************************************
    localhost                  : ok=3    changed=0    unreachable=0    failed=0    skipped=0    rescued=0    ignored=0
Using the uri module can be useful to perform a simple test to check whether a web server is available, but you can also use it to check accessibility or returned information from an API endpoint.
You can use the stat module to check on the status of files. Although this module can be useful for checking on the status of just a few files, it’s not a file system integrity checker that was developed to check file status on a large scale. If you need large-scale file system integrity checking, you should use Linux utilities such as aide.
The stat module is useful in combination with register. In this use, the stat module is used to register the status of a specific file, and in a when statement, a check can be done to see whether the file status is not as expected. In combination with the fail module, you can use this module to generate a failure and error message if the file does not meet the expected status. Listing 11-9 shows an example, and Listing 11-10 shows the resulting output, where you can see that the fail module fails the playbook because the file owner is not root.
Listing 11-9 Using stat to Check Expected File Status
::: pre_1 — - name: create a file hosts: all tasks: - file: path: /tmp/statfile state: touch owner: ansible
- name: check file status
  hosts: all
  tasks:
  - stat:
      path: /tmp/statfile
    register: stat_out
  - fail:
      msg: "/tmp/statfile file owner not as expected"
    when: stat_out.stat.pw_name != ’root’
:::
Listing 11-10 ansible-playbook listing119.yaml Command Result
::: pre_1 [ansible@control rhce8-book]$ ansible-playbook listing119.yaml
PLAY [create a file] ***********************************************************

TASK [Gathering Facts] *********************************************************
ok: [ansible2]
ok: [ansible1]
ok: [ansible3]
ok: [ansible4]
fatal: [ansible6]: UNREACHABLE! => {"changed": false, "msg": "Failed to connect to the host via ssh: ansible@ansible6: Permission denied (publickey,gssapi-keyex,gssapi-with-mic,password).", "unreachable": true}
fatal: [ansible5]: UNREACHABLE! => {"changed": false, "msg": "Failed to connect to the host via ssh: ssh: connect to host ansible5 port 22: No route to host", "unreachable": true}

TASK [file] ********************************************************************
changed: [ansible2]
changed: [ansible1]
changed: [ansible3]
changed: [ansible4]

PLAY [check file status] *******************************************************

TASK [Gathering Facts] *********************************************************
ok: [ansible1]
ok: [ansible2]
ok: [ansible3]
ok: [ansible4]

TASK [stat] ********************************************************************
ok: [ansible2]
ok: [ansible1]
ok: [ansible3]
ok: [ansible4]

TASK [fail] ********************************************************************
fatal: [ansible2]: FAILED! => {"changed": false, "msg": "/tmp/statfile file owner not as expected"}
fatal: [ansible1]: FAILED! => {"changed": false, "msg": "/tmp/statfile file owner not as expected"}
fatal: [ansible3]: FAILED! => {"changed": false, "msg": "/tmp/statfile file owner not as expected"}
fatal: [ansible4]: FAILED! => {"changed": false, "msg": "/tmp/statfile file owner not as expected"}

PLAY RECAP *********************************************************************
ansible1                   : ok=4    changed=1    unreachable=0    failed=1    skipped=0    rescued=0    ignored=0
ansible2                   : ok=4    changed=1    unreachable=0    failed=1    skipped=0    rescued=0    ignored=0
ansible3                   : ok=4    changed=1    unreachable=0    failed=1    skipped=0    rescued=0    ignored=0
ansible4                   : ok=4    changed=1    unreachable=0    failed=1    skipped=0    rescued=0    ignored=0
ansible5                   : ok=0    changed=0    unreachable=1    failed=0    skipped=0    rescued=0    ignored=0
ansible6                   : ok=0    changed=0    unreachable=1    failed=0    skipped=0    rescued=0    ignored=0
:::
The assert module is a bit like the fail module. You can use it to perform a specific conditional action. The assert module works with a that option that defines a list of conditionals. If any one of these conditionals is false, the task fails, and if all the conditionals are true, the task is successful. Based on the success or failure of a task, the module uses the success_msg or fail_msg options to print a message. Listing 11-11 shows an example that uses the assert module.
Listing 11-11 Using the assert Module
::: pre_1 — - hosts: localhost vars_prompt: - name: filesize prompt: “specify a file size in megabytes” tasks: - name: check if file size is valid assert: that: - “{{ (filesize | int) <= 100 }}” - “{{ (filesize | int) >= 1 }}” fail_msg: “file size must be between 0 and 100” success_msg: “file size is good, let\’s continue” - name: create a file command: dd if=/dev/zero of=/bigfile bs=1 count={{ filesize }} :::
The example in Listing 11-11 contains a few new items. As you can see, the play header starts with a vars_prompt. This defines a variable named filesize, which is based on the input provided by the user. This filesize variable is next used by the assert module. The that statement contains a list in which two conditions are stated. If specified like this, all conditions stated in the that condition must be true. So you are looking for filesize to be equal to or bigger than 1, and smaller than or equal to 100.
Before this can be done, one little problem needs to be managed: when vars_prompt is used, the variable type is set to be a string by default. This means that a statement like
**filesize left caret= 100**would fail with a type mismatch. That is why a Jinja2 filter is used to convert the variable type from string to integer.
Filters are a powerful feature provided by the Jinja2 templating language and can be used in Ansible to modify variables before processing. For more information about filters, see https://docs.ansible.com/ansible/latest/user_guide/playbooks_filters.html. The int filter can be used to convert the value of a string variable to an integer. To do this, you need to rewrite the entire variable as a Jinja2 operation, which is done using "{{ (filesize | int) left caret= 100 }}".
In this line, the entire string is written as a variable. The variable is further treated in a Jinja2 context. In this context, the part (filesize | int) ensures that the string is converted to an integer, which makes it possible to check if the value is smaller than 100.
When you run the code in Listing 11-11, the result shown in Listing 11-12 is produced.
Listing 11-12 ansible-playbook listing1111.yaml Output
::: pre_1 [ansible@control rhce8-book]$ ansible-playbook listing1111.yaml
PLAY [localhost] *****************************************************************
TASK [Gathering Facts] ***********************************************************
ok: [localhost]
TASK [check if file size is valid] ***********************************************
fatal: [localhost]: FAILED! => {
"assertion": "filesize left caret= 100",
"changed": false,
"evaluated_to": false,
"msg": "file size must be between 0 and 100"
}
PLAY RECAP ***********************************************************************
localhost : ok=1 changed=0 unreachable=0 failed=1 skipped=0 rescued=0 ignored=0
:::
As you can see, the task that is defined with the assert module fails because the variable has a value that is not between the minimum and maximum sizes that are defined.
Understanding the need for using the filter to convert the variable type might not be easy. So, let’s also look at Listing 11-13, which shows an example of a playbook that will fail. You can see its behavior in Listing 11-14, where the playbook is executed.
Listing 11-13 Failing Version of the Listing 11-11 Playbook
::: pre_1 — - hosts: localhost vars_prompt: - name: filesize prompt: “specify a file size in megabytes” tasks: - name: check if file size is valid assert: that: - filesize <= 100 - filesize >= 1 fail_msg: “file size must be between 0 and 100” success_msg: “file size is good, let\’s continue” - name: create a file command: dd if=/dev/zero of=/bigfile bs=1 count={{ filesize }} :::
Listing 11-14 ansible-playbook listing1113.yaml Failing Result
::: pre_1 [ansible@control rhce8-book]$ ansible-playbook listing1113.yaml specify a file size in megabytes:
PLAY [localhost] *****************************************************************
TASK [Gathering Facts] ***********************************************************
ok: [localhost]
TASK [check if file size is valid] ***********************************************
fatal: [localhost]: FAILED! => {"msg": "The conditional check ’filesize left caret= 100’ failed. The error was: Unexpected templating type error occurred on ({% if filesize left caret= 100 %} True {% else %} False {% endif %}): ’left caret=’ not supported between instances of ’str’ and ’int’"}
PLAY RECAP ***********************************************************************
localhost : ok=1 changed=0 unreachable=0 failed=1 skipped=0 rescued=0 ignored=0
:::
As you can see, the code in Listing 11-13 fails because the \left caret= test is not supported between a string and an integer.
In Exercise 11-2 you work with some of the modules discussed in this section.
::: box Exercise 11-2 Using Modules for Troubleshooting
1. Open your editor to create the file exercise112.yaml and define the play header:
---
- name: using assert to check if volume group vgdata exists
hosts: all
tasks:2. Add a task that uses the command vgs vgdata to check whether a volume group with the name vgdata exists. The task should use register to register the command result, and it should continue if this is not the case.
- name: check if vgdata exists
command: vgs vgdata
register: vg_result
ignore_errors: true3. To make it easier to use assert in the next step on the right variable, include a debug task to show the value of the variable:
- name: show vg_result variable
debug:
var: vg_result4. Add a task to print a success or failure message, depending on the result of the vgs command from the first task:
- name: print a message
assert:
that:
- vg_result.rc == 0
fail_msg: volume group not found
success_msg: volume group was found5. Use the command ansible-playbook exercise112.yaml to verify its contents. Assuming that the LVM Volume Group vgdata was not found, it should print “volume group not found.”
6. Change the playbook to verify that it will print the success_msg if the requested volume group was found. You can do so by having it run the command vgs cl, which on CentOS 8 should give a positive result. :::
-i parameters with the ansible or ansible-playbook commands to specify the name of the files to be used.ansible-inventory -i inventory -i listing101.py --list
-i option.
webserver1
webserver2192.168.4.203 ansible3.example.com ansible3
192.168.4.204 ansible4.example.com ansible4ansible-inventory -i inventories --list.RHEL System Roles:
rhel-system-roles.kdump
To use RHEL System Roles, you need to install the rhel-system-roles package on the control node by using sudo yum install rhel-system-roles.
This package can be found in the RHEL 8 AppStream repository.
After installation, the roles are copied to the /usr/share/ansible/roles directory, a directory that is a default part of the Ansible roles_path setting.
If a modification to the roles_path setting has been made in ansible.cfg, the roles are applied to the first directory listed in the roles_path.
With the roles, some very useful documentation is installed also; you can find it in the /usr/share/doc/rhel-system-roles directory.
To pass configuration to the RHEL System Roles, variables are important.
In the documentation directory, you can find information about variables that are required and used by the role.
Some roles also contain a sample playbook that can be used as a blueprint when defining your own role.
It’s a good idea to use these as the basis for your own RHEL System Roles–based configuration.
The next two sections describe the SELinux and the TimeSync System Roles, which provide nice and easy-to-implement examples of how you can use the RHEL System Roles.
You learned earlier how to manage SELinux settings using task definitions in your own playbooks.
Using the RHEL SELinux System Role provides an easy-to-use alternative.
To use this role, start by looking at the documentation, which is in the /usr/share/doc/rhel-system-roles/selinux directory.
A good file to start with is the README.md file, which provides lists of all the ingredients that can be used.
The SELinux System Role also comes with a sample playbook file.
The most important part of this file is the vars: section, which defines the variables that should be applied by SELinux.
Variable Definition in the SELinux System Role:
---
- hosts: all
become: true
become_method: sudo
become_user: root
vars:
selinux_policy: targeted
selinux_state: enforcing
selinux_booleans:
- { name: ’samba_enable_home_dirs’, state: ’on’ }
- { name: ’ssh_sysadm_login’, state: ’on’, persistent: ’yes’ }
selinux_fcontexts:
- { target: ’/tmp/test_dir(/.*)?’, setype: ’user_home_dir_t’, ftype: ’d’ }
selinux_restore_dirs:
- /tmp/test_dir
selinux_ports:
- { ports: ’22100’, proto: ’tcp’, setype: ’ssh_port_t’, state: ’present’ }
selinux_logins:
- { login: ’sar-user’, seuser: ’staff_u’, serange: ’s0-s0:c0.c1023’, state: ’present’ }SELinux Variables Overview
selinux_policy
Policy to use, usually set to targeted selinux_state
SELinux state, as managed with setenforce selinux_booleans
List of Booleans that need to be set selinux_fcontext
List of file contexts that need to be set, including the target file or directory to which they should be applied. selinux_restore_dir
List of directories at which the Linux restorecon command needs to be executed to apply new context. selinux_ports
List of ports and SELinux port types selinux_logins
A list of SELinux user and roles that can be created
Most of the time while configuring SELinux, you need to apply the correct state as well as file context.
To set the appropriate file context, you first need to define the selinux_fcontext variable.
Next, you have to define selinux_restore_dirs also to ensure that the desired context is applied correctly.
---
- hosts: ansible2
vars:
selinux_policy: targeted
selinux_state: enforcing
selinux_fcontexts:
- { target: ’/web(/.*)?’, setype: ’httpd_sys_content_t’, ftype: ’d’ }
selinux_restore_dirs:
- /web
# prepare prerequisites which are used in this playbook
tasks:
- name: Creates directory
file:
path: /web
state: directory
- name: execute the role and catch errors
block:
- include_role:
name: rhel-system-roles.selinux
rescue:
# Fail if failed for a different reason than selinux_reboot_required.
- name: handle errors
fail:
msg: "role failed"
when: not selinux_reboot_required
- name: restart managed host
shell: sleep 2 && shutdown -r now "Ansible updates triggered"
async: 1
poll: 0
ignore_errors: true
- name: wait for managed host to come back
wait_for_connection:
delay: 10
timeout: 300
- name: reapply the role
include_role:
name: rhel-system-roles.selinuxtimesync_ntp_servers variable
most important setting
specifies attributes to indicate which time servers should be used.
The hostname attribute identifies the name of IP address of the time server.
The iburst option is used to enable or disable fast initial time synchronization using the timesync_ntp_servers variable.
The System Role finds out which version of RHEL is used, and according to the currently used version, it either configures NTP or Chronyd.
1. Copy the sample timesync playbook to the current directory:
cp /usr/share/doc/rhel-system-roles/timesync/example-single-pool-playbook.yml timesync.yaml
2. Add the target host, NTP hostname pool.ntp.org, and remove pool true in the file timesync.yaml:
---
- name: Configure NTP
hosts: "{{ host }}"
vars:
timesync_ntp_servers:
- hostname: pool.ntp.org
iburst: true
roles:
- rhel-system-roles.timesync3. Add the timezone module and the timezone variable to the playbook to set the timezone as well. The complete playbook should look like the following:
---
- hosts: ansible2
vars:
timesync_ntp_servers:
- hostname: pool.ntp.org
iburst: yes
timezone: UTC
roles:
- rhel-system-roles.timesync
tasks:
- name: set timezone
timezone:
name: "{{ timezone }}"4. Use ansible-playbook timesync.yaml to run the playbook. Observe its output. Notice that some messages in red are shown, but these can safely be ignored.
5. Use ansible ansible2 -a "timedatectl show" and notice that the timezone variable is set to UTC.
When you are using larger playbooks, Ansible enables you to use the tags attribute. A tag is a label that is applied to a task or another item like a block or a play, and while using the ansible-playbook --tags or ansible-playbook --skip-tags command, you can specify which tags need to be executed. Listing 11-15 shows a simple playbook example where tags are used, and in Listing 11-16 you can see the output generated while running this playbook.
Listing 11-15 Using tags in a Playbook
::: pre_1 — - name: using tags example hosts: all vars: service: - vsftpd - httpd tasks: - yum: name: - httpd - vsftpd state: present tags: - install - service: name: “{{ item }}” state: started enabled: yes loop: “{{ services }}” tags: - services :::
Listing 11-16 ansible-playbook --tags “install” listing1115.yaml Output
::: pre_1 [ansible@control rhce8-book]$ ansible-playbook –tags “install” listing1115.yaml
PLAY [using tags example] ******************************************************
TASK [Gathering Facts] *********************************************************
ok: [ansible2]
ok: [ansible1]
ok: [ansible4]
ok: [ansible3]
TASK [yum] *********************************************************************
ok: [ansible2]
ok: [ansible1]
changed: [ansible3]
changed: [ansible4]
PLAY RECAP *********************************************************************
ansible1 : ok=2 changed=0 unreachable=0 failed=0 skipped=0 rescued=0 ignored=0
ansible2 : ok=2 changed=0 unreachable=0 failed=0 skipped=0 rescued=0 ignored=0
ansible3 : ok=2 changed=1 unreachable=0 failed=0 skipped=0 rescued=0 ignored=0
ansible4 : ok=2 changed=1 unreachable=0 failed=0 skipped=0 rescued=0 ignored=0
:::
Tags can be applied to many structures, such as imported plays, tasks, and roles, but the easiest way to get familiar with tags is to use them on a task. Note that tags cannot be applied on items that are dynamically included (instead of imported), using include_roles or include_tasks.
While writing playbooks, you may apply the same tag multiple times. This capability allows you to define groups of tasks, where multiple tasks are configured with the same tag, and as a result, you can easily run a specific part of the requested configuration. When multiple tasks with multiple tags are used, you can get an overview of each using the ansible-playbook --list-tasks --list-tags command. In Listing 11-17 you can see an example that is based on the playbook listing1114.yaml.
Listing 11-17 Listing Tasks and Tags
::: pre_1 [ansible@control rhce8-book]$ ansible-playbook –list-tags –list-tasks listing1115.yaml
playbook: listing1115.yaml
play #1 (all): using tags example. TAGS: []
tasks:
yum. TAGS: [install]
service. TAGS: [services]
TASK TAGS: [install, services]
:::
When working with tags, you can use some special tags. Table 11-5 gives an overview.
Table 11-5 Special Tags Overview
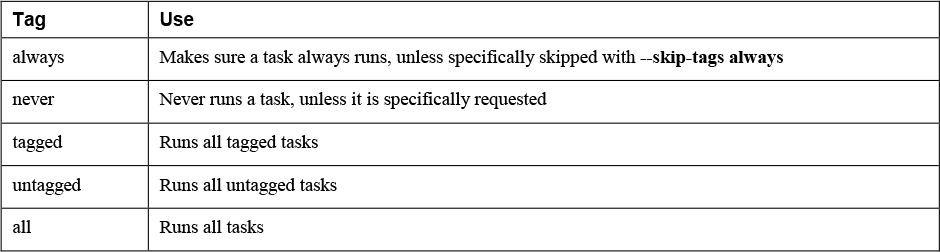
Apart from these special tags, you might also want to set a debug tag to easily identify tasks that should be run only if you specifically want to run debug tasks as well. If combined with the never tag, the task that is tagged with the debug,never tasks runs only if the debug tag is specifically requested. So in case you want to run the entire playbook, including tasks that have been tagged with debug, you need to use the ansible-playbook --tags all,debug command. In Exercise 11-3 you can see how this can be used to optimize the playbook that was previously used in Exercise 11-2.
::: box Exercise 11-3 Using Tags to Make Debugging Easier
1. Rewrite the exercise112.yaml playbook that you created in the previous exercise, and include the line tags: [never, debug ] in the debug task. The complete playbook looks as follows:
---
- name: using assert to check if volume group vgdata exists
hosts: all
tasks:
- name: check if vgdata exists
command: vgs vgdata
register: vg_result
ignore_errors: true
- name: show vg_result variable
debug:
var: vg_result
tags: [ never, debug ]
- name: print a message
assert:
that:
- vg_result.rc == 0
fail_msg: volume group not found
success_msg: volume group was found2. Run the playbook using ansible-playbook --tags all exercise113.yaml. Notice that it does not run the debug task.
3. Run the playbook using ansible-playbook --tags all,debug exercise113.yaml. Notice that it now does run the debug task as well. :::
Install the right software package for the Apache web server, based on the Linux distribution that was found in the Ansible facts. Notice that
---
- name: conditional install
hosts: all
tasks:
- name: install apache on Red Hat and family
yum:
name: httpd
state: latest
when: ansible_facts[’os_family’] == "RedHat"
- name: install apache on Ubuntu and family
apt:
name: apache2
state: latest
when: ansible_facts[’os_family’] == "Debian"not a part of any properties of the modules on which it is used
must be indented at the same level as the module itself.
For a string test, the string itself must be between double quotes.
Without the double quotes, it would be considered an integer test.
Common conditional tests that you can perform with the when statement:
Variable exists
variable is defined Variable does not exist
variable is not defined First variable is present in list mentioned as second
ansible_distribution in distributions Variable is true, 1 or yes
variable Variable is false, 0 or no
not variable Equal (string)
key == “value” Equal (numeric)
key == value Less than
key < value Less than or equal to
key <= value Greater than
key > value Greater than or equal to
key >= value Not equal to
key != value
Look for “Tests” in the Ansible documentation, and use the item that is found in Templating (Jinja2).
When referring to variables in when statements, you don’t have to use curly brackets because items in a when statement are considered to be variables by default.
So you can write when: text == “hello” instead of when: “{{ text }}” == “hello”.
There are roughly four types of when conditional tests: • Checks related to variable existence • Boolean checks • String comparisons • Integer comparisons
The first type of test checks whether a variable exists or is a part of another variable, such as a list.
Checks for the existence of a specific disk device, using variable is defined and variable is not defined. All failing tests result in the message “skipping.”
---
- name: check for existence of devices
hosts: all
tasks:
- name: check if /dev/sda exists
debug:
msg: a disk device /dev/sda exists
when: ansible_facts[’devices’][’sda’] is defined
- name: check if /dev/sdb exists
debug:
msg: a disk device /dev/sdb exists
when: ansible_facts[’devices’][’sdb’] is defined
- name: dummy test, intended to fail
debug:
msg: failing
when: dummy is defined
- name: check if /dev/sdc does not exist
debug:
msg: there is no /dev/sdc device
when: ansible_facts[’devices’][’sdc’] is not defined ---
- name: test if variable is in another variables list
hosts: all
vars_prompt:
- name: my_answer
prompt: which package do you want to install
vars:
supported_packages:
- httpd
- nginx
tasks:
- name: something
debug:
msg: you are trying to install a supported package
when: my_answer in supported_packagesBoolean check
string comparisons and integer comparisons
---
- name: conditionals test
hosts: all
tasks:
- name: install vsftpd if sufficient memory available
package:
name: vsftpd
state: latest
when: ansible_facts[’memory_mb’][’real’][’free’] > 50 ---
- name: testing multiple conditions
hosts: all
tasks:
- name: showing output
debug:
msg: using CentOS 8.1
when: ansible_facts[’distribution_version’] == "8.1" and ansible_facts[’distribution’] == "CentOS" ---
- name: using multiple conditions
hosts: all
tasks:
- package:
name: httpd
state: removed
when: >
( ansible_facts[’distribution’] == "RedHat" and
ansible_facts[’memfree_mb’] < 512 )
or
( ansible_facts[’distribution’] == "CentOS" and
ansible_facts[’memfree_mb’] < 256 ) ---
- name: conditionals test
hosts: all
tasks:
- name: update the kernel if sufficient space is available in /boot
package:
name: kernel
state: latest
loop: "{{ ansible_facts[’mounts’] }}"
when: item.mount == "/boot" and item.size_available > 200000000 ---
- name: test register
hosts: all
tasks:
- shell: cat /etc/passwd
register: passwd_contents
- debug:
msg: passwd contains user lisa
when: passwd_contents.stdout.find(’lisa’) != -1passwd_contents.stdout.find,
1. Use your editor to create a new file with the name exercise72.yaml. Start writing the play header as follows:
---
- name: restart sshd service if httpd is running
hosts: ansible1
tasks:2. Add the first task, which checks whether the httpd service is running, using command output that will be registered. Notice the use of ignore_errors: yes. This line makes sure that if the service is not running, the play is still executed further.
---
- name: restart sshd service if httpd is running
hosts: ansible1
tasks:
- name: get httpd service status
command: systemctl is-active httpd
ignore_errors: yes
register: result3. Add a debug task that shows the output of the command so that you can analyze what is currently in the registered variable:
---
- name: restart sshd service if httpd is running
hosts: ansible1
tasks:
- name: get httpd service status
command: systemctl is-active httpd
ignore_errors: yes
register: result
- name: show result variable contents
debug:
msg: printing contents of the registered variable {{ result }}4. Complete the playbook by including the service task, which is started only if the value stored in result.rc (which is the return code of the command that was registered) contains a 0. This is the case if the previous command executed successfully.
---
- name: restart sshd service if httpd is running
hosts: ansible1
tasks:
- name: get httpd service status
command: systemctl is-active httpd
ignore_errors: yes
register: result
- name: show result variable contents
debug:
msg: printing contents of the registered variable {{ result }}
- name: restart sshd service
service:
name: sshd
state: restarted
when: result.rc == 05. Use an ad hoc command to make sure the httpd service is installed: ansible ansible1 -m yum -a "name=httpd state=latest".
6. Use an ad hoc command to make sure the httpd service is stopped: ansible ansible1 -m service -a "name=httpd state=stopped".
7. Run the playbook using ansible-playbook exercise72.yaml and analyze the result. You should see that the playbook skips the service task.
8. Type ansible ansible1 -m service -a "name=httpd state=started" and run the playbook again, using ansible-playbook exercise72.yaml. Playbook execution at this point should be successful.
Using and working with variables
Three types of variables:
Variables make Ansible really flexible. Especially when used in combination with conditionals. These are defined at the discretion of the user.:
---
- name: create a user using a variable
hosts: ansible1
vars:
users: lisa <-- defaults value for this play
tasks:
- name: create a user {{ users }} on host {{ ansible_hostname }} <-- ansible fact variable
user:
name: "{{ users }}" <-- If value starts with variable, the whole line must have double quotesTo define a variable
---
- name: using variables
hosts: ansible1
vars: <-------------
ftp_package: vsftpd <------------
tasks:
- name: install package
yum:
name: "{{ ftp_package }}" <------------
state: latestVariable equirements:
• Must start with a letter. • Case sensitive. • Can contain only letters, numbers, and underscores.
---
- name: using a variable include file
hosts: ansible1
vars_files: vars/common <--------------
tasks:
- name: install package
yum:
name: "{{ my_package }}" <------------
state: latestvars/common
my_package: nmap
my_ftp_service: vsftpd
my_file_service: smbhost_vars and group_vars
host_vars
group_vars
If no variables are defined at the command prompt, it will use the variable set for the play. You can also define the variables with the -e flag when running the playbook:
[ansible@control base]$ ansible-playbook variable-pb.yaml -e users=john
PLAY [create a user using a variable] ************************************************************************************************************************
TASK [Gathering Facts] ***************************************************************************************************************************************
ok: [ansible1]
TASK [create a user john on host ansible1] *******************************************************************************************************************
changed: [ansible1]
PLAY RECAP ***************************************************************************************************************************************************
ansible1 : ok=2 changed=1 unreachable=0 failed=0 skipped=0 rescued=0 ignored=0 1. Create a project directory in your home directory. Type mkdir ~/chapter6 to create the chapter6 project directory, and use cd ~/chapter6 to go into this directory.
2. Type cp ../ansible.cfg . to copy the ansible.cfg file that you used before. No further modifications to this file are required.
3. Type vim inventory to create a file with the name inventory, and ensure it has the following contents:
[webservers]
ansible1
[dbservers]
ansible24. Create the file webservers.yaml, containing the following contents. Notice that nothing is really changed by running this playbook. It just uses the debug module to show the current value of the variables.
---
- name: configure web services
hosts: webservers
tasks:
- name: this is the {{ web_package }} package
debug:
msg: "Installing {{ web_package }}"
- name: this is the {{ web_service }} service
debug:
msg: "Starting the {{ web_service }}"5. Create the file group_vars/webservers with the following contents:
web_package: httpd
web_service: httpd6. Run the playbook with some verbosity to verify it is working by using ansible-playbook -vv webservers.yaml
Two types of multivalued variables:
array (list)
users:
- linda:
username: linda
homedir: /home/linda
shell: /bin/bash
- lisa:
username: lisa
homedir: /home/lisa
shell: /bin/bash
- anna:
username: anna
homedir: /home/anna
shell: /bin/bashdictionary (hash)
users:
linda:
username: linda
homedir: /home/linda
shell: /bin/bash
lisa:
username: lisa
homedir: /home/lisa
shell: /bin/bash
anna:
username: anna
homedir: /home/anna
shell: /bin/bashAddressing Specific Keys in a Dictionary Multivalued Variable:
---
- name: show dictionary also known as hash
hosts: ansible1
vars_files:
- vars/users-dictionary
tasks:
- name: print dictionary values
debug:
msg: "User {{ users.linda.username }} has homedirectory {{ users.linda.homedir }} and shell {{ users.linda.shell }}"Using the Square Brackets Notation to Address Multivalued Variables (recommended method)
---
- name: show dictionary also known as hash
hosts: ansible1
vars_files:
- vars/users-dictionary
tasks:
- name: print dictionary values
debug:
msg: "User {{ users[’linda’][’username’] }} has homedirectory {{ users[’linda’][’homedir’] }} and shell {{ users[’linda’][’shell’] }}"Magic Variables

Debug module can be used to show the current values assigned to the hostvars magic variable.
[ansible@control ~]$ ansible localhost -m debug -a 'var=hostvars["ansible1"]'
localhost | SUCCESS => {
"hostvars[\"ansible1\"]": {
"ansible_check_mode": false,
"ansible_diff_mode": false,
"ansible_facts": {},
"ansible_forks": 5,
"ansible_inventory_sources": [
"/home/ansible/inventory"
],
"ansible_playbook_python": "/usr/bin/python3.6",
"ansible_verbosity": 0,
"ansible_version": {
"full": "2.9.5",
"major": 2,
"minor": 9,
"revision": 5,
"string": "2.9.5"
},
"group_names": [
"ungrouped"
],
"groups": {
"all": [
"ansible1",
"ansible2"
],
"ungrouped": [
"ansible1",
"ansible2"
]
},
"inventory_dir": "/home/ansible",
"inventory_file": "/home/ansible/inventory",
"inventory_hostname": "ansible1",
"inventory_hostname_short": "ansible1",
"omit": "__omit_place_holder__38849508966537e44da5c665d4a784c3bc0060de",
"playbook_dir": "/home/ansible"
}
}1. Variables passed on the command line 2. Variables defined in or included from a playbook 3. Inventory variables
The result of commands can also be used as a variable byusing the register parameter in a task.
---
- name: test register
hosts: ansible1
tasks:
- shell: cat /etc/passwd
register: passwd_contents
- debug:
var: "passwd_contents"The cat /etc/passwd command is executed by the shell module. Notice that in this playbook no names are used for tasks. Using names for tasks is
not mandatory; it’s just recommended in more complex playbooks because this convention makes identification of the tasks easier. The entire contents of the command are next stored in the variable passwd_contents.
This variable contains the output of the command, stored in different keys. Table 6-7 provides an overview of the most
useful keys, and Listing 6-19 shows the partial result of the ansible-playbook listing618.yaml command.
Keys Used with register cmd
[ansible@control ~]$ ansible-playbook listing618.yaml
PLAY [test register] *******************************************************************
TASK [Gathering Facts] *****************************************************************
ok: [ansible2]
ok: [ansible1]
TASK [shell] ***************************************************************************
changed: [ansible2]
changed: [ansible1]
TASK [debug] ***************************************************************************
ok: [ansible1] => {
"passwd_contents": {
"changed": true,
"cmd": "cat /etc/passwd",
"delta": "0:00:00.004149",
"end": "2020-04-02 02:28:10.692306",
"failed": false,
"rc": 0,
"start": "2020-04-02 02:28:10.688157",
"stderr": "",
"stderr_lines": [],
"stdout": "root:x:0:0:root:/root:/bin/bash\nbin:x:1:1:bin:/bin:/sbin/nologin\ndaemon:x:2:2:daemon:/sbin:/sbin/nologin\nadm:x:3:4:adm:/var/adm:/sbin/nologin\nlp:x:4:7:lp:/var/spool/lpd:/sbin/nologin\nsync:x:5:0:sync:/sbin:/bin/sync\nshutdown:x:6:0:shutdown:/sbin:/sbin/shutdown\nhalt:x:7:0:halt:/sbin:/sbin/halt\nansible:x:1000:1000:ansible:/home/ansible:/bin/bash\napache:x:48:48:Apache:/usr/share/httpd:/sbin/nologin\nlinda:x:1002:1002::/home/linda:/bin/bash\nlisa:x:1003:1003::/home/lisa:/bin/bash",
"stdout_lines": [
"root:x:0:0:root:/root:/bin/bash",
"bin:x:1:1:bin:/bin:/sbin/nologin",
"daemon:x:2:2:daemon:/sbin:/sbin/nologin",
"adm:x:3:4:adm:/var/adm:/sbin/nologin",
"lp:x:4:7:lp:/var/spool/lpd:/sbin/nologin",
"sync:x:5:0:sync:/sbin:/bin/sync",
"shutdown:x:6:0:shutdown:/sbin:/sbin/shutdown",
"halt:x:7:0:halt:/sbin:/sbin/halt",
"ansible:x:1000:1000:ansible:/home/ansible:/bin/bash",
"apache:x:48:48:Apache:/usr/share/httpd:/sbin/nologin",
"linda:x:1002:1002::/home/linda:/bin/bash",
"lisa:x:1003:1003::/home/lisa:/bin/bash"
]
}
}Ensure that a task runs only if a command produces a specific result by using register with conditionals.
register shows the values that are returned by specific tasks. Tasks have common return values, but modules may have specific return values. That means you cannot assume, based on the result of an example using a specific module, that the return values you see are available for all modules. Consult the module documentation for more information about specific return values.

A shell is a program that takes commands and passes them to the operating system.^1^ This is done via terminal emulator with keyboard commands or by using scripts ran on the system. There are many shell programs that you can use on Linux. Almost all Linux distributions come with a shell called Bash. Some others include zsh, fsh, ksh, and Tcsh. (But not limited to)
Shells have different features such as built in commands, job control, alias definitions, history substitution, PATH searching, command completion, and more. Each shell has it’s own syntax, hotkeys, way of doing things. Most of them follow a standard called “POSIX” that help with script portability between shells.
You can see a list of more shells and a comparison of their features on this Wikipedia page.

I meant Terminal Emulators! Silly me..
The Current shell
Sub-shell (child shell)
There are two types of variables. Local variables are private variables to the shell that creates it. And they are only used by programs started in the shell that created them. Environment variables are passed to any sub-shells created by the current shell. As well as any programs ran in the current and sub shells.
- Value stored in an environment variable is accessible to the program, as well as any sub-programs that it spawns during its lifecycle.
- Any environment variable set in a sub-shell is lost when the sub-shell terminates.
- `env` or the `printenv` command to view predefined environment variables.
- Common predefined environment variables:
- **DISPLAY**
- Stores the hostname or IP address for graphical terminal sessions
- **HISTFILE**
- Defines the file for storing the history of executed commands
- **HISTSIZE**
- Defines the maximum size for the HISTFILE
- **HOME**
- Sets the home directory path LOGNAME Retains the login name
- **MAIL**
- Contains the path to the user mail directory
- **PATH**
- Directories to be searched when executing a command. Eliminates the need to specify the absolute path of a command to run it.
- **PPID**
- Holds the identifier number for the parent program
- **PS1**
- Defines the primary command prompt PS2 Defines the secondary command prompt
- **PWD**
- Stores the current directory location
- **SHELL**
- Holds the absolute path to the primary primary shell file
- **TERM**
- Holds the terminal type value
- **UID**
- Holds the logged-in user’s UID
- **USER**
- Retains the name of the logged-in user
export, unset, and echo to define and undefine environment variables[root@localhost ~]# env
SHELL=/bin/bash
HISTCONTROL=ignoredups
HISTSIZE=1000
HOSTNAME=localhost
PWD=/root
LOGNAME=root
XDG_SESSION_TYPE=tty
MOTD_SHOWN=pam
HOME=/root
LANG=en_US.UTF-8
LS_COLORS=rs=0:di=01;34:ln=01;36:mh=00:pi=40;33:so=01;35:do=01;35:bd=40;33;01:cd=40;33;01:or=40;31;01:mi=01;37;41:su=37;41:sg=30;43:ca=30;41:tw=30;42:ow=34;42:st=37;44:ex=01;32:*.tar=01;31:*.tgz=01;31:*.arc=01;31:*.arj=01;31:*.taz=01;31:*.lha=01;31:*.lz4=01;31:*.lzh=01;31:*.lzma=01;31:*.tlz=01;31:*.txz=01;31:*.tzo=01;31:*.t7z=01;31:*.zip=01;31:*.z=01;31:*.dz=01;31:*.gz=01;31:*.lrz=01;31:*.lz=01;31:*.lzo=01;31:*.xz=01;31:*.zst=01;31:*.tzst=01;31:*.bz2=01;31:*.bz=01;31:*.tbz=01;31:*.tbz2=01;31:*.tz=01;31:*.deb=01;31:*.rpm=01;31:*.jar=01;31:*.war=01;31:*.ear=01;31:*.sar=01;31:*.rar=01;31:*.alz=01;31:*.ace=01;31:*.zoo=01;31:*.cpio=01;31:*.7z=01;31:*.rz=01;31:*.cab=01;31:*.wim=01;31:*.swm=01;31:*.dwm=01;31:*.esd=01;31:*.jpg=01;35:*.jpeg=01;35:*.mjpg=01;35:*.mjpeg=01;35:*.gif=01;35:*.bmp=01;35:*.pbm=01;35:*.pgm=01;35:*.ppm=01;35:*.tga=01;35:*.xbm=01;35:*.xpm=01;35:*.tif=01;35:*.tiff=01;35:*.png=01;35:*.svg=01;35:*.svgz=01;35:*.mng=01;35:*.pcx=01;35:*.mov=01;35:*.mpg=01;35:*.mpeg=01;35:*.m2v=01;35:*.mkv=01;35:*.webm=01;35:*.webp=01;35:*.ogm=01;35:*.mp4=01;35:*.m4v=01;35:*.mp4v=01;35:*.vob=01;35:*.qt=01;35:*.nuv=01;35:*.wmv=01;35:*.asf=01;35:*.rm=01;35:*.rmvb=01;35:*.flc=01;35:*.avi=01;35:*.fli=01;35:*.flv=01;35:*.gl=01;35:*.dl=01;35:*.xcf=01;35:*.xwd=01;35:*.yuv=01;35:*.cgm=01;35:*.emf=01;35:*.ogv=01;35:*.ogx=01;35:*.aac=01;36:*.au=01;36:*.flac=01;36:*.m4a=01;36:*.mid=01;36:*.midi=01;36:*.mka=01;36:*.mp3=01;36:*.mpc=01;36:*.ogg=01;36:*.ra=01;36:*.wav=01;36:*.oga=01;36:*.opus=01;36:*.spx=01;36:*.xspf=01;36:
SSH_CONNECTION=192.168.0.233 56990 192.168.0.169 22
XDG_SESSION_CLASS=user
SELINUX_ROLE_REQUESTED=
TERM=xterm-256color
LESSOPEN=||/usr/bin/lesspipe.sh %s
USER=root
SELINUX_USE_CURRENT_RANGE=
SHLVL=1
XDG_SESSION_ID=1
XDG_RUNTIME_DIR=/run/user/0
SSH_CLIENT=192.168.0.233 56990 22
which_declare=declare -f
PATH=/root/.local/bin:/root/bin:/usr/local/sbin:/usr/local/bin:/usr/sbin:/usr/bin
SELINUX_LEVEL_REQUESTED=
DBUS_SESSION_BUS_ADDRESS=unix:path=/run/user/0/bus
MAIL=/var/spool/mail/root
SSH_TTY=/dev/pts/0
BASH_FUNC_which%%=() { ( alias;
eval ${which_declare} ) | /usr/bin/which --tty-only --read-alias --read-functions --show-tilde --show-dot $@
}
_=/usr/bin/env
OLDPWD=/dev/vg200hostname or parentheses $(hostname).set -o noclobber
set +o noclobber
[root@localhost ~]# vim test.txt
[root@localhost ~]# set -o noclobber
[root@localhost ~]# echo "Hello" > test.txt
-bash: test.txt: cannot overwrite existing file
[root@localhost ~]# set +o noclobber
[root@localhost ~]# echo "Hello" > test.txt
[root@localhost ~]# cat test.txt
Hellohistory commandset +o history
set -o history
[root@localhost ~]# set +o history
[root@localhost ~]# history | tail
126 ls
127 vim test.txt
128 set -o noclobber
129 echo "Hello" > test.txt
130 set +o noclobber
131 echo "Hello" > test.txt
132 cat test.txt
133 history | tail
134 set +0 history
135 set +o history
[root@localhost ~]# vim test2.txt
[root@localhost ~]# history | tail
126 ls
127 vim test.txt
128 set -o noclobber
129 echo "Hello" > test.txt
130 set +o noclobber
131 echo "Hello" > test.txt
132 cat test.txt
133 history | tail
134 set +0 history
135 set +o history
[root@localhost ~]# set -o history
[root@localhost ~]# vim test2.txt
[root@localhost ~]# history | tail
128 set -o noclobber
129 echo "Hello" > test.txt
130 set +o noclobber
131 echo "Hello" > test.txt
132 cat test.txt
133 history | tail
134 set +0 history
135 set +o history
136 vim test2.txt
137 history | tail Add timestamps to history output system wide:
echo "export HISTTIMEFORMAT='%F %T '" >> /etc/profile && source /etc/profile
~+ - refers to current directory
~- - Refers to previous working directory.
~USER - Refers to specific user’s home directory.
[root@localhost ~]# alias
alias cp='cp -i'
alias egrep='egrep --color=auto'
alias fgrep='fgrep --color=auto'
alias grep='grep --color=auto'
alias l.='ls -d .* --color=auto'
alias ll='ls -l --color=auto'
alias ls='ls --color=auto'
alias mv='mv -i'
alias rm='rm -i'
alias xzegrep='xzegrep --color=auto'
alias xzfgrep='xzfgrep --color=auto'
alias xzgrep='xzgrep --color=auto'
alias zegrep='zegrep --color=auto'
alias zfgrep='zfgrep --color=auto'
alias zgrep='zgrep --color=auto'[root@localhost ~]# alias frog='pwd'
[root@localhost ~]# frog
/root[root@localhost ~]# unalias frog
[root@localhost ~]# frog
-bash: frog: command not foundcaret (^)
period (.)
asterisk (*)
question mark (?)
pipe (|)
angle brackets (< >)
curly brackets ({})
square brackets ([])
parentheses (())
plus (+)
exclamation mark (!)
semicolon (;)
Backslash (\)
single quotation (‘’)
double quotation (“”)
grep commandFlags -i
-n
-v
-w
-E
-e
commands and control sequences for administering the jobs.
jobs
bg
Ctrl+z.fg
Ctrl+z
output plus sign (+) - indicates the current background job minus sign (-) - signifies the previous job. Stopped - currently suspended - can be signaled to continue their execution with bg or fg
env
printenvecho $PATHecho $HOMEecho $SHELLecho $TERMecho $PPIDecho $PS1echo $USERVR1=RHEL9echo $VR1echo $VR1exitexport VR1echo $VR1unset VR1VR2="I love RHEL 9"export VR3="I love RHEL 9"setexport PS1="< $LOGNAME on $HOSTNAME in \$PWD > " vim .bash_profilecat < /etc/redhat-releasels > ls.outls 1> ls.outset -o noclobber
ls > ls.outset +o noclobberls >> ls.out
or
ls 1>> ls.outfind / -name core -print 2> /dev/nullls /usr /cdr &> outerr.out
or
ls /usr /cdr 1> outerr.out 2>&1
\# means to redirect file descriptor 1 to file outerr.out as well as to file descriptor 2.ls /usr/cdr &>> outerr.outecho $HISTFILEecho $HISTSIZEecho $HISTFILESIZEhistoryhistory 10!15!ch!?grep?history -d 24!!echo ~echo ~+echo ~-echo ~user1cd ~user1
pwdcd ~/Documents/ls -ld ~root/Desktopsu - user1
aliasaliasalias search='find / -name core -exec ls -l {} \;'searchalias rm='rm -i'rm file1unalias search rmls /etc/ma*ls -d .*ls /var/log/*.logls -d /var/log/????ls /usr/bin/[yw]*ls -d /etc/systemd/system/[m-o]*ls -d /etc/systemd/system/[!m-o]*ls -l /etc | lesslast | nlls -l /proc | grep -v root | grep -iv dec | nl | tail -4rm \*echo '$LOGNAME'echo "$SHELL"
echo "\$PWD"
echo "'\'"grep operator /etc/passwdgrep 'aliases and functions' .bashrcgrep -nv nologin /etc/passwdgrep ^root /etc/passwdgrep bash$ /etc/passwdgrep -v ^$ /etc/login.defsgrep -i path /etc/bashrcgrep -w acce.. /etc/lvm/lvm.confls command output that include either (-E) the pattern “cron” or “ly”.ls -l /etc | grep -E 'cron|ly'sudo grep -ve ^$ -ve ^# /etc/ssh/sshd_configman 7 regexman grepjobs -lfg %1bg %1kill 31726head /etc/bashrchead /etc/profilels -l /etc/profile.d/cat ~/.bashrccat ~/.bash_profilevim ~/.bash_profile
export PS1='$USERNAME $PWD'ls command on /etc, /dvd, and /var. Have the output printed on the screen and the errors forwarded to file /tmp/ioerror.ls /etc /dvd /var 2> /tmp/ioerrorcat /tmp/ioerrorA group of Linux commands along with control structures and optional comments stored in a text file.
Can be executed directly at the Linux command prompt.
Do not need to be compiled as they are interpreted by the shell line by line.
Managing packages and users, administering partitions and file systems, monitoring file system utilization, trimming log files, archiving and compressing files, finding and removing unnecessary files, starting and stopping database services and applications, and producing reports.
Run by the shell one at a time in the order in which they are listed.
Each line is executed as if it is typed and run at the command prompt.
Control structures are utilized for creating and managing conditional and looping constructs.
Comments are also generally included to add information about the script such as the author name, creation date, previous modification dates, purpose, and usage.
If the script encounters an error during execution, the error message is printed on the screen.
Can use the nl command to enumerate the lines for troubleshooting.
Can store your scripts in the /usr/local/bin directory, which is included in the PATH of all users by default.
#!/bin/bash
echo "Display Basic System Information"
echo "=================================="
echo
echo "The hostname, hardware, and OS information is:"
/usr/bin/hostnamectl
echo
echo "The Following users are currently logged in:"
/usr/bin/whochmod +x /usr/local/bin/sys_info.sh
ll /usr/local/bin/sys_info.sh
-rwxr-xr-x. 1 root root 244 Jul 30 09:47 /usr/local/bin/sys_info.sh>)Let’s run the script and see what the output will look like:
$ sys_info.sh
Display Basic System Information
==================================
The hostname, hardware, and OS information is:
Static hostname: server30
Icon name: computer-vm
Chassis: vm 🖴
Machine ID: eaa6174e108d4a27bd619754…
Boot ID: 13d8b3c167b24757b3678e4f…
Virtualization: oracle
Operating System: Red Hat Enterprise Linux…
CPE OS Name: cpe:/o:redhat:enterprise…
Kernel: Linux 5.14.0-362.24.1.el…
Architecture: x86-64
Hardware Vendor: innotek GmbH
Hardware Model: VirtualBox
Firmware Version: VirtualBox
The Following users are currently logged in:
root pts/0 2024-07-30 07:22 (172.16.7.95)Can either append the -x option to the “#!/bin/bash” at the beginning of the script to look like “#!/bin/bash -x”, or execute the script as follows:
[root@server30 ~]# bash -x sys_info.sh
+ echo 'Display Basic System Information'
Display Basic System Information
+ echo ==================================
==================================
+ echo
+ echo 'The hostname, hardware, and OS information is:'
The hostname, hardware, and OS information is:
+ /usr/bin/hostnamectl
Static hostname: server30
Icon name: computer-vm
Chassis: vm 🖴
Machine ID: eaa6174e108d4a27bd6197548ce77270
Boot ID: 13d8b3c167b24757b3678e4fd3fe19ee
Virtualization: oracle
Operating System: Red Hat Enterprise Linux 9.3 (Plow)
CPE OS Name: cpe:/o:redhat:enterprise_linux:9::baseos
Kernel: Linux 5.14.0-362.24.1.el9_3.x86_64
Architecture: x86-64
Hardware Vendor: innotek GmbH
Hardware Model: VirtualBox
Firmware Version: VirtualBox
+ echo
+ echo 'The Following users are currently logged in:'
The Following users are currently logged in:
+ /usr/bin/who
root pts/0 2024-07-30 07:22 (172.16.7.95)Change one of the echo commands in the script to “iecho” and re-run the script in the debug mode to see the error:
[root@server30 ~]# bash -x sys_info.sh
+ echo 'Display Basic System Information'
Display Basic System Information
+ echo ==================================
==================================
+ iecho
/usr/local/bin/sys_info.sh: line 4: iecho: command not found
+ echo 'The hostname, hardware, and OS information is:'
The hostname, hardware, and OS information is:
+ /usr/bin/hostnamectl
Static hostname: server30
Icon name: computer-vm
Chassis: vm 🖴
Machine ID: eaa6174e108d4a27bd6197548ce77270
Boot ID: 13d8b3c167b24757b3678e4fd3fe19ee
Virtualization: oracle
Operating System: Red Hat Enterprise Linux 9.3 (Plow)
CPE OS Name: cpe:/o:redhat:enterprise_linux:9::baseos
Kernel: Linux 5.14.0-362.24.1.el9_3.x86_64
Architecture: x86-64
Hardware Vendor: innotek GmbH
Hardware Model: VirtualBox
Firmware Version: VirtualBox
+ echo
+ echo 'The Following users are currently logged in:'
The Following users are currently logged in:
+ /usr/bin/who
root pts/0 2024-07-30 07:22 (172.16.7.95)[root@server30 ~]# vim /usr/local/bin/use_var.sh
#!/bin/bash
echo "Setting a Local Variable"
echo "========================"
SYSNAME=server30.example.com
echo "The hostname of this system is $SYSNAME"[root@server30 ~]# chmod +x /usr/local/bin/use_var.sh
[root@server30 ~]# use_var.sh
Setting a Local Variable
========================
The hostname of this system is server30.example.comIf you run the echo command to see what is stored in the SYSNAME variable, you will get nothing:
[root@server30 ~]# echo $SYSNAMEThe following script called pre_env.sh will display the values of SHELL and LOGNAME environment variables:
[root@server30 ~]# vim /usr/local/bin/pre_env.sh
#!/bin/bash
echo "The location of my shell command is:"
echo $SHELL
echo "I am logged in as $LOGNAME"[root@server30 ~]# chmod +x /usr/local/bin/pre_env.sh
[root@server30 ~]# pre_env.sh
The location of my shell command is:
/bin/bash
I am logged in as rootCan use the command substitution feature of the bash shell and store the output generated by the command into a variable.
Two different ways to use command substitution: Backtics or subshell
#!/bin/bash
SYSNAME=$(hostname)
KERNVER=`uname -r`
echo "The hostname is $SYSNAME"
echo "The kernel version is $KERNVER"[root@server30 ~]# vim /usr/local/bin/cmd_out.sh
[root@server30 ~]# chmod +x /usr/local/bin/cmd_out.sh
[root@server30 ~]# cmd_out.sh
The hostname is server30
The kernel version is 5.14.0-362.24.1.el9_3.x86_64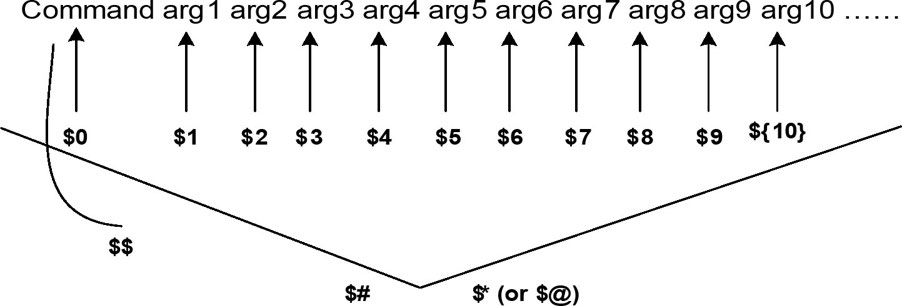
Create com_line_arg.sh to show the supplied arguments, total count, value of the first argument, and PID of the script:
[root@server30 ~]# vim /usr/local/bin/com_line_arg.sh
#!/bin/bash
echo "There are $# arguments specified at the command line"
echo "The arguments supplied are: $*"
echo "The first argument is: $1"
echo "The Process ID of the script is: $$" [root@server30 ~]# chmod +x /usr/local/bin/com_line_arg.sh
[root@server30 ~]# com_line_arg.sh
There are 0 arguments specified at the command line
The arguments supplied are:
The first argument is:
The Process ID of the script is: 1935
[root@server30 ~]# com_line_arg.sh the dog jumped over the frog
There are 6 arguments specified at the command line
The arguments supplied are: the dog jumped over the frog
The first argument is: the
The Process ID of the script is: 1936shift command
[root@server30 ~]# vim /usr/local/bin/com_line_arg_shift.sh
#!/bin/bash
echo "There are $# arguments specified at the command line"
echo "The arguments supplied are: $*"
echo "The first argument is: $1"
echo "The Process ID of the script is: $$"
shift
echo "The new first argument after the first shift is: $1"
shift
echo "The new first argument after the second shift is: $1"[root@server30 ~]# chmod +x /usr/local/bin/com_line_arg_shift.sh
[root@server30 ~]# com_line_arg_shift.sh
There are 0 arguments specified at the command line
The arguments supplied are:
The first argument is:
The Process ID of the script is: 1941
The new first argument after the first shift is:
The new first argument after the second shift is:
[root@server30 ~]# com_line_arg_shift.sh the dog jumped over the frog
There are 6 arguments specified at the command line
The arguments supplied are: the dog jumped over the frog
The first argument is: the
The Process ID of the script is: 1942
The new first argument after the first shift is: dog
The new first argument after the second shift is: jumpedThe shell offers two logical constructs: if-then-fi case
Exit Codes (exit values)
Let’s look at the following two examples to understand their usage:
[root@server30 ~]# pwd
/root
[root@server30 ~]# echo $?
0
[root@server30 ~]# man
What manual page do you want?
For example, try 'man man'.
[root@server30 ~]# echo $?
1Test Conditions
test command or by enclosing them within the square brackets [].man testOperation on Integer Value
integer1 -eq (-ne) integer2
integer1 -lt (-gt) integer2
integer1 -le (-ge) integer2
Operation on String Value
string1=(!=)string2
-l string or -z string
string or -n string
Operation on File
-b (-c) file
-d (-f) file
-e (-s) file
-L file
-r (-w) (-x) file
-u (-g) (-k) file
file1 -nt (-ot) file2
Logical Operators
!
-a or && (two ampersand characters)
[ -b file1 && -r file1 ]-o or || (two pipe characters)
[ (x == 1 -o y == 2) ]if and ends with a fi
The general syntax of this statement is as follows:
if condition > then > action > fi
Create if_then_fi.sh to determine the number of arguments and print an error message if there are none provided:
[root@server30 ~]# vim /usr/local/bin/if_then_fi.sh
#!/bin/bash
if [ $# -ne 2 ] # Ensure there is a space after [ and before ]
then
echo "Error: Invalid number of arguments supplied"
echo "Usage: $0 source_file destination_file"
exit 2
fi
echo "Script terminated"[root@server30 ~]# chmod +x /usr/local/bin/if_then_fi.sh
[root@server30 ~]# if_then_fi.sh
Error: Invalid number of arguments supplied
Usage: /usr/local/bin/if_then_fi.sh source_file destination_fileThis script will display the following messages on the screen if it is executed without exactly two arguments specified at the command line:
[root@server30 ~]# if_then_fi.sh
Error: Invalid number of arguments supplied
Usage: /usr/local/bin/if_then_fi.sh source_file destination_fileReturn code value reflects the exit code in the script .
[root@server30 ~]# echo $?
2Return code will be 0 if you supply a pair of arguments:
[root@server30 ~]# if_then_fi.sh a b
Script terminated
[root@server30 ~]# echo $?
0
The general syntax of this statement is as follows:
if condition > then > action1 > else > action2 > fi
Create a script called if_then_else_fi.sh that will accept an integer value as an argument and tell if the value is positive or negative:
vim /usr/local/bin/if_then_else_fi.sh#!/bin/bash
if [ $1 -gt 0 ]
then
echo "$1 is a positive integer value"
else
echo "$1 is a negative integer value"
fi[root@server30 ~]# chmod +x /usr/local/bin/if_then_else_fi.sh
[root@server30 ~]# if_then_else_fi.sh
/usr/local/bin/if_then_else_fi.sh: line 2: [: -gt: unary operator expected
is a negative integer value
[root@server30 ~]# if_then_else_fi.sh 3
3 is a positive integer value
[root@server30 ~]# if_then_else_fi.sh -3
-3 is a negative integer value[root@server30 ~]# if_then_else_fi.sh a
/usr/local/bin/if_then_else_fi.sh: line 2: [: a: integer expression expected
a is a negative integer value
[root@server30 ~]# echo $?
0
The general syntax of this statement is as follows:
if condition1 > then action1 > elif condition2 > then action2 > elif condition3 > then action3 > else > action(n) > fi
Create if_then_elif_fi.sh script to accept an integer value as an argument and tell if the integer is positive, negative, or zero. If a non-integer value or no argument is supplied, the script will complain. Employ the exit command after each action to help you identify where it exited.
[root@server30 ~]# vim /usr/local/bin/if_then_elif_fi.sh#!/bin/bash
if [ $1 -gt 0 ]
then
echo "$1 is a positive integer value"
exit 1
elif [ $1 -eq 0 ]
then
echo "$1 is a zero integer value"
exit 2
elif [ $1 -lt 0 ]
then
echo "$1 is a negative integer value"
exit 3
else
echo "$1 is not an integer value. Please supply an i
nteger."
exit 4
fi[root@server30 ~]# if_then_elif_fi.sh -0
-0 is a zero integer value
[root@server30 ~]# echo $?
2
[root@server30 ~]# if_then_elif_fi.sh -1
-1 is a negative integer value
[root@server30 ~]# echo $?
3
[root@server30 ~]# if_then_elif_fi.sh 10
10 is a positive integer value
[root@server30 ~]# echo $?
1
[root@server30 ~]# if_then_elif_fi.sh abd
/usr/local/bin/if_then_elif_fi.sh: line 2: [: abd: integer expression expected
/usr/local/bin/if_then_elif_fi.sh: line 6: [: abd: integer expression expected
/usr/local/bin/if_then_elif_fi.sh: line 10: [: abd: integer expression expected
abd is not an integer value. Please supply an i
nteger.>)
[root@server30 ~]# echo $?
4Create ex200_ex294.sh to display the name of the Red Hat exam RHCSA or RHCE in the output based on the input argument (ex200 or ex294). If a random or no argument is provided, it will print “Usage: Acceptable values are ex200 and ex294”. Add white spaces in the conditions.
[root@server30 ~]# vim /usr/local/bin/ex200_ex294.sh#!/bin/bash
if [ "$1" = ex200 ]
then
echo "RHCSA"
elif [ "$1" = ex294 ]
then
echo "RHCE"
else
echo "Usage: Acceptable values are ex200 and ex294"
fi[root@server30 ~]# chmod +x /usr/local/bin/ex200_ex294.sh
[root@server30 ~]# ex200_ex294.sh ex200
RHCSA
[root@server30 ~]# ex200_ex294.sh ex294
RHCE
[root@server30 ~]# ex200_ex294.sh frog
Usage: Acceptable values are ex200 and ex294pvcreate command on each disk one at a time manually or employ a loop to do it for you.Three looping constructs: for-do-done
let command
Operators used in test conditions
!
+ / – / * / /
%
< / <=
> / >=
=
== / !=

The general syntax of this construct is as follows:
for VAR in list > do > action > done
Create script for_do_done.sh script that initializes the variable COUNT to 0. The for loop will read each letter sequentially from the range placed within curly brackets (no spaces before the letter A and after the letter Z), assign it to another variable LETTER, and display the value on the screen. The expr command is an arithmetic processor, and it is used here to increment the COUNT by 1 at each loop iteration.
[root@server10 ~]# vim /usr/local/bin/for_do_done.sh#!/bin/bash
COUNT=0
for LETTER in {A..Z}
do
COUNT=`/usr/bin/expr $COUNT + 1`
echo "Letter $COUNT is [$LETTER]"
done[root@server10 ~]# chmod +x /usr/local/bin/for_do_done.sh[root@server10 ~]# for_do_done.sh
Letter 1 is [A]
Letter 2 is [B]
Letter 3 is [C]
Letter 4 is [D]
Letter 5 is [E]
Letter 6 is [F]
Letter 7 is [G]
Letter 8 is [H]
Letter 9 is [I]
Letter 10 is [J]
Letter 11 is [K]
Letter 12 is [L]
Letter 13 is [M]
Letter 14 is [N]
Letter 15 is [O]
Letter 16 is [P]
Letter 17 is [Q]
Letter 18 is [R]
Letter 19 is [S]
Letter 20 is [T]
Letter 21 is [U]
Letter 22 is [V]
Letter 23 is [W]
Letter 24 is [X]
Letter 25 is [Y]
Letter 26 is [Z]Create script create_user.sh script to create several Linux user accounts. As each account is created, the value of the variable ? is checked. If the value is 0, a message saying the account is created successfully will be displayed, otherwise the script will terminate. In case of a successful
account creation, the passwd command will be invoked to assign the user the same password as their username.
[root@server10 ~]# vim /usr/local/bin/create_user.sh#!/bin/bash
for USER in user{10..12}
do
echo "Create account for user $USER"
/usr/sbin/useradd $USER
if [ $? = 0 ]
then
echo $USER | /usr/bin/passwd --stdin $USER
echo "$USER is created successfully"
else
echo "Failed to create account $USER"
exit
fi
done[root@server10 ~]# chmod +x /usr/local/bin/create_user.sh
[root@server10 ~]# create_user.sh
Create account for user user10
Changing password for user user10.
passwd: all authentication tokens updated successfully.
user10 is created successfully
Create account for user user11
Changing password for user user11.
passwd: all authentication tokens updated successfully.
user11 is created successfully
Create account for user user12
Changing password for user user12.
passwd: all authentication tokens updated successfully.
user12 is created successfullyScript fails if ran again:
[root@server10 ~]# create_user.sh
Create account for user user10
useradd: user 'user10' already exists
Failed to create account user10pvcreate command. vim /usr/local/bin/lvscript.shvgscript and add both physical volumes to it. #!/bin/bash
for DEVICE in "/dev/sd"{b..c}
do
echo "Creating partition 1 with the size of 400MB on $DEVICE"
parted $DEVICE mklabel msdos
parted $DEVICE mkpart primary 1 401
pvcreate $DEVICE[1]
echo "Creating partition 2 with the size of 400MB on $DEVICE"
parted $DEVICE mkpart primary 402 802
pvcreate $DEVICE[2]
vgcreate vgscript $DEVICE[1] $DEVICE[2]
done
for LV in "lvscript"{1..3}
do
echo "Creating logical volume $LV in volume group vgscript with the size of 200MB"
lvcreate vgscript -L 200MB -n $LV
done vim /usr/local/bin/fsscript.sh [root@server40 ~]# chmod +x /usr/local/bin/fsscript.sh #!/bin/bash
for DEVICE in lvscript{1..3}
do
if [ "$DEVICE" = lvscript1 ]
then
echo "Creating xfs filesystem on logical volume lvscript1"
echo
mkfs.xfs /dev/vgscript/lvscript1
echo "Creating /mnt/xfs"
mkdir /mnt/xfs
echo "Mounting filesystem"
mount /dev/vgscript/lvscript1 /mnt/xfs
elif [ "$DEVICE" = lvscript2 ]
then
echo "Creating ext4 filesystem on logical volume lvscript2"
echo
mkfs.ext4 /dev/vgscript/lvscript2
echo "Creating /mnt/ext4"
mkdir /mnt/ext4
echo "Mounting filesystem"
mount /dev/vgscript/lvscript2 /mnt/ext4
elif [ "$DEVICE" = lvscript3 ]
then
echo "Creating vfat filesystem on logical volume lvscript3"
echo
mkfs.vfat /dev/vgscript/lvscript3
echo "Creating /mnt/vfat"
mkdir /mnt/vfat
echo "Mounting filesystem"
mount /dev/vgscript/lvscript3 /mnt/vfat
echo
echo
echo "Done!"
df -h
else
echo
fi
done [root@server40 ~]# fsscript.sh
Creating xfs filesystem on logical volume lvscript1
Filesystem should be larger than 300MB.
Log size should be at least 64MB.
Support for filesystems like this one is deprecated and they will not be supported in future releases.
meta-data=/dev/vgscript/lvscript1 isize=512 agcount=4, agsize=12800 blks
= sectsz=512 attr=2, projid32bit=1
= crc=1 finobt=1, sparse=1, rmapbt=0
= reflink=1 bigtime=1 inobtcount=1 nrext64=0
data = bsize=4096 blocks=51200, imaxpct=25
= sunit=0 swidth=0 blks
naming =version 2 bsize=4096 ascii-ci=0, ftype=1
log =internal log bsize=4096 blocks=1368, version=2
= sectsz=512 sunit=0 blks, lazy- count=1
realtime =none extsz=4096 blocks=0, rtextents=0
Creating /mnt/xfs
Mounting filesystem
Creating ext4 filesystem on logical volume lvscript2
mke2fs 1.46.5 (30-Dec-2021)
Creating filesystem with 204800 1k blocks and 51200 inodes
Filesystem UUID: b16383bf-7b65-4a00-bb6d-c297733f60b3
Superblock backups stored on blocks:
8193, 24577, 40961, 57345, 73729
Allocating group tables: done
Writing inode tables: done
Creating journal (4096 blocks): done
Writing superblocks and filesystem accounting information: done
Creating /mnt/ext4
Mounting filesystem
Creating vfat filesystem on logical volume lvscript3
mkfs.fat 4.2 (2021-01-31)
Creating /mnt/vfat
Mounting filesystem
Done! [root@server40 ~]# vim /usr/local/bin/network.sh #!/bin/bash
cp /etc/hosts /etc/hosts.bak &&
nmcli c a type Ethernet con-name enp0s9 ifname enp0s9 ip4 10.32.32.2/24 gw4 10.32.32.1
echo "10.32.33.14 frog.example.com frog" >> /etc/hosts [root@server40 ~]# chmod +x /usr/local/bin/network.sh
[root@server40 ~]# network.sh
Connection 'enp0s9' (5a342243-e77b-452e-88e2-8838d3ecea6d) successfully added. [root@server40 ~]# cat /etc/hosts
127.0.0.1 localhost localhost.localdomain localhost4 localhost4.localdomain4
::1 localhost localhost.localdomain localhost6 localhost6.localdomain6
10.32.33.14 frog.example.com frog [root@server40 ~]# ip a
enp0s9: <BROADCAST,MULTICAST,UP,LOWER_UP> mtu 1500 qdisc fq_codel state UP group default qlen 1000
link/ether 08:00:27:1d:f4:c1 brd ff:ff:ff:ff:ff:ff
inet 10.32.32.2/24 brd 10.32.32.255 scope global noprefixroute enp0s9
valid_lft forever preferred_lft forever
inet6 fe80::2c5d:31cc:1d79:6b43/64 scope link noprefixroute
valid_lft forever preferred_lft forever [root@server40 ~]# nmcli d s
DEVICE TYPE STATE CONNECTION
enp0s3 ethernet connected enp0s3
enp0s8 ethernet connected enp0s8
enp0s9 ethernet connected enp0s9
lo loopback connected (externally) lo handles
processes
services
application workloads.
collection of software components called modules
Some modules are static to the kernel and are integral to system functionality,
Some modules are loaded dynamically as needed
RHEL 8.0 and RHEL 8.2 are shipped with kernel version 4.18.0 (4.18.0-80 and 4.18.0-193 to be specific) for the 64-bit Intel/AMD processor architecture computers with single, multi-core, and multi-processor configurations.
uname -m shows the architecture of the system.
Kernel requires a rebuild when a new functionality is added or removed.
functionality may be introduced by:
existing functionality that is no longer needed may be removed to make the overall footprint of the kernel smaller for improved performance and reduced memory utilization.
tunable parameters are set that define a baseline for kernel functionality.
Some parameters must be tuned for some applications and database software to be installed smoothly and operate properly.
You can generate and store several custom kernels with varied configuration and required modules
only one of them can be active at a time.
different kernel may be loaded by interacting with GRUB2.
Core and some add-on kernel packages.
| Kernel Package | Description |
|---|---|
| kernel | Contains no files, but ensures other kernel packages are accurately installed |
| kernel-core | Includes a minimal number of modules to provide core functionality |
| kernel-devel | Includes support for building kernel modules |
| kernel-modules | Contains modules for common hardware devices |
| kernel-modules-extra | Contains modules for not-so-common hardware devices |
| kernel-headers | Includes files to support the interface between the kernel and userspace |
| kernel-tools-libs | Includes the libraries to support the kernel tools |
| libraries and programs kernel-tools | Includes tools to manipulate the kernel |
List kernel packages installed on the system:
dnf list installed kernel*Check the version of the kernel running on the system to check for compatibility with an application or database:
uname -r
5.14.0-362.24.1.el9_3.x86_645 - Major version 14 - Major revision 0 - Kernel patch version 362 - Red Hat version el9 - Enterprise Linux 9 x86_64 - Processor architecture
Kernel and its support files (noteworthy locations)
View the /boot filesystem:
ls -l /boot
/boot/efi/ and /boot/grub2/
List /boot/Grub2:
[root@localhost ~]# ls -l /boot/grub2
total 32
-rw-r--r--. 1 root root 64 Feb 25 05:13 device.map
drwxr-xr-x. 2 root root 25 Feb 25 05:13 fonts
-rw-------. 1 root root 7049 Mar 21 04:47 grub.cfg
-rw-------. 1 root root 1024 Mar 21 05:12 grubenv
drwxr-xr-x. 2 root root 8192 Feb 25 05:13 i386-pc
drwxr-xr-x. 2 root root 4096 Feb 25 05:13 locale/boot/loader
[root@localhost ~]# ls -l /boot/loader/entries/
total 12
-rw-r--r--. 1 root root 484 Feb 25 05:13 8215ac7e45d34823b4dce2e258c3cc47-0-rescue.conf
-rw-r--r--. 1 root root 460 Mar 16 06:17 8215ac7e45d34823b4dce2e258c3cc47-5.14.0-362.18.1.el9_3.x86_64.conf
-rw-r--r--. 1 root root 459 Mar 16 06:17 8215ac7e45d34823b4dce2e258c3cc47-5.14.0-362.24.1.el9_3.x86_64.confcontent of the kernel file:
[root@localhost entries]# cat /boot/loader/entries/8215ac7e45d34823b4dce2e258c3cc47-5.14.0- 362.18.1.el9_3.x86_64.conf
title Red Hat Enterprise Linux (5.14.0-362.18.1.el9_3.x86_64) 9.3 (Plow)
version 5.14.0-362.18.1.el9_3.x86_64
linux /vmlinuz-5.14.0-362.18.1.el9_3.x86_64
initrd /initramfs-5.14.0-362.18.1.el9_3.x86_64.img $tuned_initrd
options root=/dev/mapper/rhel-root ro crashkernel=1G-4G:192M,4G- 64G:256M,64G-:512M resume=/dev/mapper/rhel-swap rd.lvm.lv=rhel/root rd.lvm.lv=rhel/swap rhgb quiet $tuned_params
grub_users $grub_users
grub_arg --unrestricted
grub_class rhelList /proc:
ls -l /proc
Show selections from the cpuinfo and meminfo files that hold
processor and memory information:
cat/proc/cpuinfo && cat /proc/meminfo
Long listing of /usr/lib/modules/ shows two installed kernels:
[root@localhost entries]# ls -l /usr/lib/modules
total 8
drwxr-xr-x. 7 root root 4096 Mar 16 06:18 5.14.0-362.18.1.el9_3.x86_64
drwxr-xr-x. 8 root root 4096 Mar 16 06:18 5.14.0-362.24.1.el9_3.x86_64View /usr/lib/modules/5.14.0-362.18.1.el9_3.x86_64/:
ls -l /usr/lib/modules/5.14.0-362.18.1.el9_3.x86_64/lib/modules/4.18.0-80.el8.x86_64/kernel/drivers/
ls -l /usr/lib/modules/5.14.0-362.18.1.el9_3.x86_64/kernel/driversrequires extra care
could leave your system in an unbootable or undesirable state.
have the bootable medium handy prior to starting the kernel install process.
By default, the dnf command adds a new kernel to the system, leaving the existing kernel(s) intact. It does not replace or overwrite existing kernel files.
Always install a new version of the kernel instead of upgrading it.
The upgrade process removes any existing kernel and replaces it with a new one.
In case of a post-installation issue, you will not be able to revert to the old working kernel.
Newer version of the kernel is typically required:
new kernel
dnf is the preferred tool to install a kernel
it resolves and installs any required dependencies automatically.
rpm may be used but you must install any dependencies manually.
Kernel packages for RHEL are available to subscribers on Red Hat’s Customer Portal.
Multiple phases during the boot process.
The system accomplishes these phases one after the other while performing and attempting to complete the tasks identified in each phase.
firmware:
BIOS
UEFI
The primary job of the bootloader program is to
UEFI-based systems,
extracts the initial RAM disk (initrd) file system image found in the /boot file system into memory,
decompresses it
mounts it as read-only on /sysroot to serve as the temporary root file system
loads necessary modules from the initrd image to allow access to the physical disks and the partitions and file systems therein.
loads any required drivers to support the boot process.
Later, it unmounts the initrd image and mounts the actual physical root file system on / in read/write mode.
At this point, the necessary foundation has been built for the boot process to carry on and to start loading the enabled services.
kernel executes the systemd process with PID 1 and passes the control over to it.
fourth and the last phase in the boot process.
Systemd:
takes control from the kernel and continues the boot process.
is the default system initialization scheme used in RHEL 9.
starts all enabled userspace system and network services
Brings the system up to the preset boot target.
A boot target is an operational level that is achieved after a series of services have been started to get to that state.
system boot process is considered complete when all enabled services are operational for the boot target and users are able to log in to the system
edit mode,
Ctrl+x when done to boot.ESC to discard the changes and return to the main menu.grub> command prompt appears when you press Ctrl+c while in the edit windowc from the main menu./boot/grub2/grub.cfg
/etc/default/grub
grub2-mkconfig command in order to be reflected in grub.cfg.Default settings:
[root@localhost default]# nl /etc/default/grub
1 GRUB_TIMEOUT=5
2 GRUB_DISTRIBUTOR="$(sed 's, release .*$,,g' /etc/system-release)"
3 GRUB_DEFAULT=saved
4 GRUB_DISABLE_SUBMENU=true
5 GRUB_TERMINAL_OUTPUT="console"
6 GRUB_CMDLINE_LINUX="crashkernel=1G-4G:192M,4G-64G:256M,64G-:512M resume=/dev/mapper/rhel-swap rd.lvm.lv=rhel/root rd.lvm.lv=rhel/swap rhgb quiet"
7 GRUB_DISABLE_RECOVERY="true"
8 GRUB_ENABLE_BLSCFG=true| Directive | Description |
|---|---|
| GRUB_TIMEOUT | Wait time, in seconds, before booting off the default kernel. Default is 5. |
| GRUB_DISTRIBUTOR | Name of the Linux distribution |
| GRUB_DEFAULT | Boots the selected option from the previous system boot |
| GRUB_DISABLE_SUBMENU | Enables/disables the appearance of GRUB2 submenu |
| GRUB_TERMINAL_OUTPUT | Sets the default terminal |
| GRUB_CMDLINE_LINUX | Specifies the command line options to pass to the kernel at boot time |
| GRUB_DISABLE_RECOVERY | Lists/hides system recovery entries in the GRUB2 menu |
| GRUB_ENABLE_BLSCFG | Defines whether to use the new bootloader specification to manage bootloader configuration |
grub2-mkconfig utilitygrub2-mkconfig command
[root@localhost default]# ls -l /etc/grub.d
total 104
-rwxr-xr-x. 1 root root 9346 Jan 9 09:51 00_header
-rwxr-xr-x. 1 root root 1046 Aug 29 2023 00_tuned
-rwxr-xr-x. 1 root root 236 Jan 9 09:51 01_users
-rwxr-xr-x. 1 root root 835 Jan 9 09:51 08_fallback_counting
-rwxr-xr-x. 1 root root 19665 Jan 9 09:51 10_linux
-rwxr-xr-x. 1 root root 833 Jan 9 09:51 10_reset_boot_success
-rwxr-xr-x. 1 root root 892 Jan 9 09:51 12_menu_auto_hide
-rwxr-xr-x. 1 root root 410 Jan 9 09:51 14_menu_show_once
-rwxr-xr-x. 1 root root 13613 Jan 9 09:51 20_linux_xen
-rwxr-xr-x. 1 root root 2562 Jan 9 09:51 20_ppc_terminfo
-rwxr-xr-x. 1 root root 10869 Jan 9 09:51 30_os- prober
-rwxr-xr-x. 1 root root 1122 Jan 9 09:51 30_uefi- firmware
-rwxr-xr-x. 1 root root 218 Jan 9 09:51 40_custom
-rwxr-xr-x. 1 root root 219 Jan 9 09:51 41_custom
-rw-r--r--. 1 root root 483 Jan 9 09:51 README00_header
grub.cfg file
[root@localhost grub2]# cat grubenv
# GRUB Environment Block
# WARNING: Do not edit this file by tools other than grub-editenv!!!
saved_entry=8215ac7e45d34823b4dce2e258c3cc47-5.14.0- 362.24.1.el9_3.x86_64
menu_auto_hide=1
boot_success=0
boot_indeterminate=0
############################################################################
##################################################### #######################If a new kernel is installed:
Edit the /etc/default/grub file and change the setting as follows: `GRUB_TIMEOUT=8
Execute the grub2-mkconfig command to reproduce grub.cfg:
grub2-mkconfig -o /boot/grub2/grub.cfg3.Restart the system with sudo reboot and confirm the new timeout value when GRUB2 menu appears.
RHEL
boots into graphical target state by default if the Server with GUI software selection is made during installation.
can also be directed to boot into non-default but less capable operating targets from the GRUB2 menu.
offers emergency and rescue boot targets.
reboot when you are doneYou must know how to boot a RHEL 9 system into a specific target from the GRUB2 menu to modify the fstab file or reset an unknown root user password.
Append “emergency” to the kernel line entry:
Other options:
Reboot or reset server1, and interact with GRUB2 by pressing a key before the autoboot times out. Highlight the default kernel entry in the GRUB2 menu and press e to enter the edit mode. Scroll down to the line entry that begins with the keyword “linux” and press the End key to go to the end of that line:
Modify this kernel string and append “rd.break” to the end of the line.
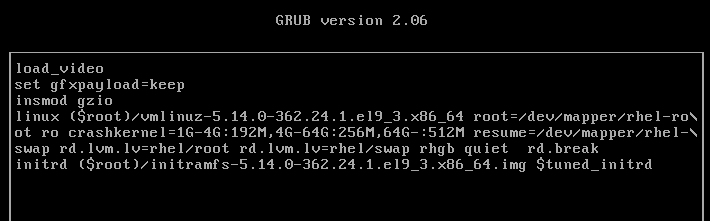
Press Ctrl+x when done to boot to the special shell. The system mounts the root file system read-only on the /sysroot directory. Make /sysroot appear as mounted on / using the chroot command:
chroot sysroot3. Remount the root file system in read/write mode for the passwd command to be able to modify the shadow file with a new password:
mount -o remount,rw / passwd touch .autorelabel exit
rebootLook into using init=/bin/bash for password recovery as a second method.
Check the version of the running kernel:
uname -r
List the kernel packages currently installed:
rpm -qa | grep kernel
Sign in to the Red Hat Customer Portaland click downloads.
Click “Red Hat Enterprise Linux 8” under “By Category”:
Click Packages and enter “kernel” in the Search bar to narrow the list of available packages:
Click “Download Latest” against the packages kernel, kernel-core, kernel-headers, kernel-modules, kernel-tools, and kernel-tools-libs to download them.
Once downloaded, move the packages to the /tmp directory using the mv command.
List the packages after moving them:
Install all the six packages at once using the dnf command:
dnf install /tmp/kernel* -y
Confirm the installation alongside the previous version:
sudo dnf list installed kernel*
The /boot/grub2/grubenv/ file now has the directive “saved_entry” set to the new kernel, which implies that this new kernel will boot up on the next system restart:
sudo cat /boot/grub2/grubenv
Reboot the system. You will see the new kernel entry in the GRUB2 boot list at the top. The system will autoboot this new default kernel.
Run the uname command once the system has been booted up to
confirm the loading of the new kernel:
uname -r
View the contents of the version and cmdline files under /proc to verify the active kernel: `cat /proc/version
Or just dnf install kernel
systemd (system daemon)
System initialization and service management mechanism.
Units and targets for initialization, service administration, and state changes
Has fast-tracked system initialization and state transitioning by introducing:
Supports snapshotting of system states.
Used to handle operational states of services
Boots the system into one of several predefined targets
Tracks processes using control groups
Automatically maintains mount points.
First process with PID 1 that spawns at boot
Last process that terminates at shutdown.
Spawns several processes during a service startup.
Places the processes in a private hierarchy composed of control groups (or cgroups for short) to organize processes for the purposes of monitoring and controlling system resources such as:
Limit, isolate, and prioritize process usage of resources.
Resources distributed among users, databases, and applications based on need and priority
Initiates distinct services concurrently, taking advantage of multiple CPU cores and other compute resources.
Creates sockets for all enabled services that support socket-based activation at the very beginning of the initialization process.
It passes them on to service daemon processes as they attempt to start in parallel.
This lets systemd handle inter-service order dependencies
Allows services to start without any delays.
Systemd creates sockets first, starts daemons next, and caches any client requests to daemons that have not yet started in the socket buffer.
Files the pending client requests when the daemons they were awaiting come online.
Socket
During the operational state, systemd:
D-Bus
on-demand activation
parallelization and on-demand activation
benefit of parallelism witnessed at system boot is
Units
systemd objects used for organizing boot and maintenance tasks, such as:
Unit configuration is stored in their respective configuration files
Config files are:
Units operational states:
Units can be enabled or disabled
Units have a name and a type, and they are
There are two types of unit configuration files:
View unit config file directories:
ls -l /usr/lib/systemd/system
ls -l /etc/systemd/user
pkg-config command:
View systemd unit config directory information:
pkg-config systemd --variable=systemdsystemunitdir
pkg-config systemd --variable=systemduserconfdir
additional system units that are created at runtime and destroyed when they are no longer needed.
runtime unit files take precedence over the system unit files
user unit files take priority over the runtime files.
Unit configuration files
11 unit types
| Unit Type | Description |
|---|---|
| Automount | automount capabilities for on-demand mounting of file systems |
| Device | Exposes kernel devices in systemd and may be used to implement device-based activation |
| Mount | Controls when and how to mount or unmount file systems |
| Path | Activates a service when monitored files or directories are accessed |
| Scope | Manages foreign processes instead of starting them |
| Service | Starts, stops, restarts, or reloads service daemons and the processes they are made up of |
| Slice | May be used to group units, which manage system processes in a tree-like structure for resource management |
| Socket | Encapsulates local inter-process communication or network sockets for use by matching service units |
| Swap | Encapsulates swap partitions |
| Target | Defines logical grouping of units |
| Timer | Useful for triggering activation of other units based on timers |
Unit files contain common and specific configuration elements. Common elements
Sample unit file for sshd.service from the /usr/lib/systemd/system/:
david@fedora:~$ cat /usr/lib/systemd/system/sshd.service
[Unit]
Description=OpenSSH server daemon
Documentation=man:sshd(8) man:sshd_config(5)
After=network.target sshd-keygen.target
Wants=sshd-keygen.target
# Migration for Fedora 38 change to remove group ownership for standard host keys
# See https://fedoraproject.org/wiki/Changes/SSHKeySignSuidBit
Wants=ssh-host-keys-migration.service
[Service]
Type=notify
EnvironmentFile=-/etc/sysconfig/sshd
ExecStart=/usr/sbin/sshd -D $OPTIONS
ExecReload=/bin/kill -HUP $MAINPID
KillMode=process
Restart=on-failure
RestartSec=42s
[Install]
WantedBy=multi-user.targetExample:
Wants
Run man systemd.unit for details on systemd unit files.
Targets
| Target | Description |
|---|---|
| halt | Shuts down and halts the system |
| poweroff | Shuts down and powers off the system |
| shutdown | Shuts down the system |
| rescue | Single-user target for running administrative and recovery functions. All local file systems are mounted. Some essential services are started, but networking remains disabled. |
| emergency | Runs an emergency shell. The root file system is mounted in read-only mode; other file systems are not mounted. Networking and other services remain disabled. |
| multi-user | Multi-user target with full network support, but without GUI |
| graphical | Multi-user target with full network support and GUI |
| reboot | Shuts down and reboots the system |
| default | A special soft link that points to the default system boot target (multi-user.target or graphical.target) |
| hibernate | Puts the system into hibernation by saving the running state of the system on the hard disk and powering it off. When powered up, the system restores from its saved state rather than booting up. |
Target unit files
Show the graphical target file (/usr/lib/systemd/system/graphical.target):
root@localhost ~]# cat /usr/lib/systemd/system/graphical.target
[Unit]
Description=Graphical Interface
Documentation=man:systemd.special(7)
Requires=multi-user.target
Wants=display-manager.service
Conflicts=rescue.service rescue.target
After=multi-user.target rescue.service rescue.target display-manager.service
AllowIsolate=yesRequires, Wants, Conflicts, and After suggests that the system must have already accomplished the rescue.service, rescue.target, multi-user.target, and display-manager.service levels in order to be declared running in the graphical target.
Run man systemd.targetfor details
| Subcommand | Description |
|---|---|
| daemon-reload | Re-reads and reloads all unit configuration files and recreates the entire user dependency tree. |
| enable (disable) | Activates (deactivates) a unit for autostart at system boot |
| get-default (set-default) | Shows (sets) the default boot target |
| get-property (set-property) | Returns (sets) the value of a property |
| is-active | Checks whether a unit is running |
| is-enabled | Displays whether a unit is set to autostart at system boot |
| is-failed | Checks whether a unit is in the failed state |
| isolate | Changes the running state of a system |
| kill | Terminates all processes for a unit |
| list-dependencies | Lists dependency tree for a unit |
| list-sockets | Lists units of type socket |
| list-unit-files | Lists installed unit files |
| list-units | Lists known units. This is the default behavior when systemctl is executed without any arguments. |
| mask (unmask) | Prohibits (permits) auto and manual activation of a unit to avoid potential conflict |
| reload | Forces a running unit to re-read its configuration file. This action does not change the PID of the running unit. |
| restart | Stops a running unit and restarts it |
| show | Shows unit properties |
| start (stop) | Starts (stops) a unit |
| status | Presents the unit status information |
List all units that are currently loaded in memory along with their status and description:
systemctl
Output: UNIT column
shows the name of the unit and its location in the tree LOAD column
reflects whether the unit configuration file was properly loaded (loaded, not found, bad setting, error, and masked) ACTIVE column
returns the high-level activation state ( active, reloading, inactive, failed, activating, and deactivating) SUB column
depicts the low-level unit activation state (reports unit-specific information) DESCRIPTION column
illustrates the unit’s content and functionality.
systemctl only lists active units by default
--all
List all active and inactive units of type socket:
systemctl -t socket --allList all units of type socket currently loaded in memory and the service they activate, sorted by the listening address:
systemctl list-socketsList all unit files (column 1) installed on the system and their current state (column 2):
systemctl list-unit-filesList all units that failed to start at the last system boot:
systemctl --failedList the hierarchy of all dependencies (required and wanted units) for the current default target:
systemctl list-dependenciesList the hierarchy of all dependencies (required and wanted units) for a specific unit such as atd.service:
systemctl list-dependencies atd.servicesystemctl subcommands to manage service units, including
Check the current operational status and other details for the atd service:
systemctl status atdOutput: service description
Disable the atd service from autostarting at the next system reboot:
sudo systemctl disable atdRe-enable atd to autostart at the next system reboot:
systemctl enable atdCheck whether atd is set to autostart at the next system reboot:
systemctl is-enabled atdCheck whether the atd service is running:
systemctl is-active atdStop and restart atd, run either of the following:
systemctl stop atd ; systemctl start atd systemctl restart atdShow the details of the atd service:
systemctl show atdProhibit atd from being enabled or disabled:
systemctl mask atdTry disabling or enabling atd and observe the effect of the previous command:
systemctl disable atdReverse the effect of the mask subcommand and try disable and enable operations:
systemctl unmask atd && systemctl disable atd && systemctl enable atdsystemctl can also manage target units.
View what units of type target are currently loaded and active:
systemctl -t targetoutput:
–all option to the above
Viewing and Setting Default Boot Target
Check the current default boot target:
Change the current default boot target from graphical.target to multi-user.target:
systemctl set-default multi-userrevert the default boot target to graphical:
systemctl set-default graphicalsystemctl to transition the running system from one target state into another.Switch into multi-user using the isolate subcommand:
systemctl isolate multi-userType in a username such as user1 and enter the password to log in:
Log in and return to the graphical target:
systemctl isolate graphicalShut down the system and power it off, use the following or simply run the poweroff command:
systemctl poweroff poweroffShut down and reboot the system:
systemctl reboot reboothalt, poweroff, and reboot are symbolic links to the systemctl command:
[root@localhost ~]# ls -l /usr/sbin/halt /usr/sbin/poweroff /usr/sbin/reboot
lrwxrwxrwx. 1 root root 16 Aug 22 2023 /usr/sbin/halt -> ../bin/systemctl
lrwxrwxrwx. 1 root root 16 Aug 22 2023 /usr/sbin/poweroff -> ../bin/systemctl
lrwxrwxrwx. 1 root root 16 Aug 22 2023 /usr/sbin/reboot -> ../bin/systemctlshutdown command options:
-H now
System logging (syslog for short)
rsyslogd daemon (rocket-fast system for log processing)
rsyslog service
rsyslogd daemon
can be stopped manually using systemctl stop rsyslog
start, restart, reload, and status options are also available
A PID is assigned to the daemon at startup
rsyslogd.pid file is created in the /run directory to save the PID.
PID is stored to prevent multiple instances of this daemon.
/etc/rsyslog.conf
View /etc/rsyslog.conf:
cat /etc/rsyslog.conf
Output: Three sections:
Modules, Global Directives, and Rules.
furnishes support for local system logging via the logger command imjournal module
allows access to the systemd journal.
Global Directives section
Rules section
If a lower priority is selected, the daemon logs all messages of the service at that and higher levels.
After modifying the syslog configuration file, Inspect it and set the verbosity:
rsyslogd -N 1 (-N inspect, 1 level 1)
Log location is defined in the rsyslog configuration file.
View the /var/log/ directory:
ls -l /var/log
systemd unit file called logrotate.timer under the /usr/lib/systemd/system directory invokes the logrotate service (/usr/lib/systemd/system/logrotate.service) on a daily basis. Here is what this file contains:
[root@localhost cron.daily]# systemctl cat logrotate.timer
# /usr/lib/systemd/system/logrotate.timer
[Unit]
Description=Daily rotation of log files
Documentation=man:logrotate(8) man:logrotate.conf(5)
[Timer]
OnCalendar=daily
AccuracySec=1h
Persistent=true
[Install]
WantedBy=timers.targetThe logrotate service runs rotations as per the schedule and other parameters defined in the /etc/logrotate.conf and additional log configuration files located in the /etc/logrotate.d directory.
grep -v ^$ /etc/logrotate.conf
# see "man logrotate" for details
# global options do not affect preceding include directives
# rotate log files weekly
weekly
# keep 4 weeks worth of backlogs
rotate 4
# create new (empty) log files after rotating old ones
create
# use date as a suffix of the rotated file
dateext
# uncomment this if you want your log files compressed
#compress
# packages drop log rotation information into this directory
include /etc/logrotate.d
# system-specific logs may be also be configured here.content:
default log rotation frequency (weekly).
period of time (4 weeks) to retain the rotated logs before deleting them.
Each time a log file is rotated:
script presents the option of compressing the rotated files using the gzip utility.
The /etc/logrotate.d/ directory includes additional configuration files for other service logs:
ls -l /etc/logrotate.d/Show the file content for btmp (records of failed user login attempts) that is used to control the rotation behavior for /var/log/btmp:
cat /etc/logrotate.d/btmp
```
- rotation is once a month.
- replacement file created will get read/write permission bits for the owner (*root*)
- owning group will be set to *utmp*
- rsyslog service will maintain one rotated copy of the *btmp* log file.
### The Boot Log File
Logs generated during the system startup:
- Display the service startup sequence.
- Status showing whether the service was started successfully.
- May help in any post-boot troubleshooting if required.
- /var/log/boot.log
View /var/log/boot.log:sudo head /var/log/boot.log
output:
- OK or FAILED
- indicates if the service was started successfully or not.
### The System Log File
/var/log/messages
- default location for storing most system activities, as defined in the *rsyslog.conf* file
- saves log information in plain text format
- may be viewed with any file display utility (*cat*, *more*, *pg*, *less*, *head*, or *tail*.)
- may be observed in real time using the *tail* command with the -f switch. The *messages* file
- captures:
- the date and time of the activity,
- hostname of the system,
- name and PID of the service
- short description of the event being logged.
View /var/log messages:
```bash
tail /var/log/messagesThe Modules section in the rsyslog.conf file
Add a note indicating the calling user has rebooted the system:
logger -i "System rebooted by $USER"observe the message recorded along with the timestamp, hostname, and PID:
tail -l /var/log/messages-p option
View logger man pages:
man logger
Systemd-based logging service for the collection and storage of logging data.
Implemented via the systemd-journald daemon.
Gather, store, and display logging events from a variety of sources such as:
stored in the binary format files
located in /run/log/journal/ (remember run is not a persistent directory)
structured and indexed for faster and easier searches
May be viewed and managed using the journalctl command.
Can enable persistent storage for the logs if desired.
RHEL runs both rsyslogd and systemd-journald concurrently.
data gathered by systemd-journald may be forwarded to rsyslogd for further processing and persistent storage in text format.
/etc/systemd/journald.conf
run journalctl without any options to see all the messages generated since the last system reboot:
journalctl
Display verbose output for each entry:
journalctl -o verboseView all events since the last system reboot:
journalctl -b-0 (default, since the last system reboot), -1 (the previous system reboot), -2 (two reboots before) 1 & 2 only work if there are logs persistently stored.
View only kernel-generated alerts since the last system reboot:
journalctl -kb0Limit the output to view 3 entries only:
journalctl -n3To show all alerts generated by a particular service, such as crond:
journalctl /usr/sbin/crondRetrieve all messages logged for a certain process, such as the PID associated with the chronyd service:
journalctl _PID=$(pgrep chronyd)Reveal all messages for a particular system unit, such as sshd.service:
journalctl _SYSTEMD_UNIT=sshd.serviceView all error messages logged between a date range, such as October 10, 2019 and October 16, 2019:
journalctl --since 2019-10-16 --until 2019-10-16 -p errGet all warning messages that have appeared today and display them in reverse chronological order:
journalctl --since today -p warning -r follow option
journalctl -f man journalctl man systemd-journaldThe systemd-journald service supports four options with the Storage directive to control how the logging data is handled.
| Option | Description |
|---|---|
| volatile | Stores data in memory only |
| persistent | Stores data permanently under /var/log/journal and falls back to memory-only option if this directory does not exist or has a permission or other issue. The service creates /var/log/journal in case of its non-existence. |
| auto | Similar to “persistent” but does not create /var/log/journal if it does not exist. This is the default option. |
| none | Disables both volatile and persistent storage options. Not recommended. |
create the /var/log/journal/ manually and use preferred “auto” option.
Run the necessary steps to enable and confirm persistent storage for the journals.
sudo mkdir /var/log/journal systemctl restart systemd-journald && systemctl status systemd- journald ll /var/log/journal && cat /etc/machine-idCheck the manual pages of journal.conf
man journald.confSystem tuning service
tunedtuned service
static behavior (default)
dynamic
Three groups: (1) Performance (2) Power consumption (3) Balanced
| Profile | Description |
|---|---|
| Performance | |
| Desktop | Based on the balanced profile for desktop systems. Offers improved throughput for interactive applications. |
| Latency-performance | For low-latency requirements |
| Network-latency | Based on the latency-performance for faster network throughput |
| Network-throughput | Based on the throughput-performance profile for maximum network throughput |
| Virtual-guest | Optimized for virtual machines |
| Virtual-host | Optimized for virtualized hosts |
| Power Saving | |
| Powersave | Saves maximum power at the cost of performance |
| Balanced/Max Profiles | |
| Balanced | Preferred choice for systems that require a balance between performance and power saving |
| Throughput-performance | Provides maximum performance and consumes maximum power |
Predefined profiles are located in /usr/lib/tuned/ in subdirectories matching their names.
View predefined profiles:
ls -l /usr/lib/tunedThe default active profile set on server1 and server2 is the virtual-guest profile, as the two systems are hosted in a VirtualBox virtualized environment.
View the man pages:
man tuned-adm dnf install tuned systemctl --now enable tuned systemctl status tuned tuned-adm list tuned-adm active tuned-adm profile powersave
tuned-adm active [root@localhost ~]# tuned-adm recommend
virtual-guest
[root@localhost ~]# tuned-adm profile virtual-guest
[root@localhost ~]# tuned-adm active
Current active profile: virtual-guest [root@localhost ~]# tuned-adm off
[root@localhost ~]# tuned-adm active
No current active profile. [root@localhost ~]# tuned-adm profile virtual-guest
[root@localhost ~]# tuned-adm active
Current active profile: virtual-guest systemctl set-default multi-usersystemctl and who commands after the reboot for validation. logger -i "This is $LOGNAME adding this marker on $(date)" tail -l /var/log/messages tuned-adm active tuned-adm list tuned-adm recommend tuned-adm profile balanced tuned-adm activeTraditional server/ application deployment:
Container Model:
Developers can now package their application alongside dependencies, shared library files, environment variables, and other specifics in a single image file and use that file to run the application in a unique, isolated “environment” called container.
A container is essentially a set of processes that runs in complete seclusion on a Linux system.
A single Linux system running on bare metal hardware or in a virtual machine may have tens or hundreds of containers running at a time.
The underlying hardware may be located either on the ground or in the cloud.
Each container is treated as a complete whole, which can be tagged, started, stopped, restarted, or even transported to another server without impacting other running containers.
Any conflicts that may exist among applications, within application components, or with the operating system can be evaded.
Applications encapsulated to run inside containers are called containerized applications.
Containerization is a growing trend for architecting and deploying applications, application components, and databases in real world environments.
Control Groups (cgroups)
Namespaces
Secure Computing Mode (seccomp) and SELinux
Containers
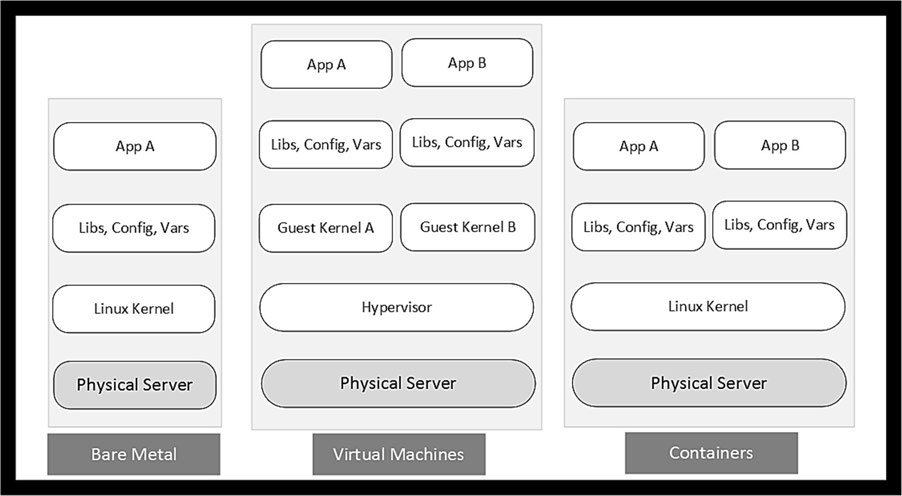
container image
Essentially a static file that is built with all necessary components (application binaries, library files, configuration settings, environment variables, static data files, etc.)
Required by an application to run smoothly, securely, and independently.
RHEL follows the open container initiative (OCI) to allow users to build images based on industry standard specifications that define the image format, host operating system metadata, and supported hardware architectures.
An OCI-compliant image can be executed and managed with OCI-compliant tools such as podman (pod manager) and Docker.
Images can be version-controlled giving users the suppleness to use the latest or any of the previous versions to launch their containers.
A single image can be used to run several containers at once.
Container images adhere to a standard naming convention for identification.
This is referred to as fully qualified image name (FQIN).
Images are stored and maintained in public or private registries;
They need to be downloaded and made locally available for consumption.
There are several registries available on the Internet.
The three Red Hat registries may be searched using the Red Hat Container Catalog at catalog.redhat.com/software/containers/search.
Additional registries may be added as required.
Private registries may also require authentication for access.
Containers can be launched with the root user privileges (sudo or directly as the root user).
This gives containers full access to perform administrative functions including the ability to map privileged network ports (1024 and below).
Launching containers with superuser rights opens a gate to potential unauthorized access to the container host if a container is compromised due to a vulnerability or misconfiguration.
To secure containers and the underlying operating system, containers should be launched and interacted with as normal Linux users.
Such containers are referred to as rootless containers.
Rootless containers allow regular, unprivileged users to run containers without the ability to perform tasks that require privileged access.
container-tools that consists of all the required components and commands.dnf command to install the package.1. Install the container-tools package:
root@server10 ~]# dnf install -y container-tools
Upgraded:
aardvark-dns-2:1.10.0-3.el9_4.x86_64
buildah-2:1.33.7-3.el9_4.x86_64
netavark-2:1.10.3-1.el9.x86_64
podman-4:4.9.4-6.el9_4.x86_64
Installed:
container-tools-1-14.el9.noarch
podman-docker-4:4.9.4-6.el9_4.noarch
podman-remote-4:4.9.4-6.el9_4.x86_64
python3-podman-3:4.9.0-1.el9.noarch
python3-pyxdg-0.27-3.el9.noarch
python3-tomli-2.0.1-5.el9.noarch
skopeo-2:1.14.3-3.el9_4.x86_64
toolbox-0.0.99.5-2.el9.x86_64
udica-0.2.8-1.el9.noarch 2. Verify the package installation:
[root@server10 ~]# dnf list container-tools
Updating Subscription Management repositories.
Last metadata expiration check: 14:53:32 ago on Wed 31 Jul 2024 05:45:56 PM MST.
Installed Packages
container-tools.noarch 1-14.el9 @rhel-9-for-x86_64-appstream-rpmspodman Commandbuild
images
inspect
login/logout
pull
rmi
search
--no-trunc option makes the command exhibit output without truncating it.--limit <number> option limits the displayed results to the specified number.tag
attach
exec
generate
--new option is important and is employed in later exercises.info
inspect
ps
rm
run
start/stop/restart
skopeo Commandinspect subcommand to examine the details of an image stored in a remote registry./etc/containers/registries.conf
[root@server10 ~]# grep -Ev '^#|^$' /etc/containers/registries.conf
unqualified-search-registries = ["registry.access.redhat.com", "registry.redhat.io", "docker.io"]
short-name-mode = "enforcing"podman command searches these registries for container images in the given order.Add a private registry called registry.private.myorg.io to be added with the highest priority:
[root@server10 ~]# vim /etc/containers/registries.conf unqualified-search-registries = \["registry.private.myorg.io",
"registry.access.redhat.com", "registry.redhat.io", "docker.io"\]If this private registry is the only one to be used, you can take the rest of the registry entries out of the list:
unqualified-search-registries = \["registry.private.myorg.io"\]EXAM TIP: As there is no Internet access provided during Red Hat exams, you may have to access a network-based registry to download images.
uname -rto obtain the kernel version, and so on.info subcommand shows all this information.Here is a sample when this command is executed as a normal user (user1):
[[user1@server10 root]$ podman info
ERRO[0000] XDG_RUNTIME_DIR directory "/run/user/0" is not owned by the current user](<[user1@server10 ~]$ podman info
host:
arch: amd64
buildahVersion: 1.33.8
cgroupControllers:
- memory
- pids
cgroupManager: systemd
cgroupVersion: v2
conmon:
...Re-run the command as root (preceded by sudo if running as user1) and compare the values for the settings “rootless” under host and “ConfigFile” and “ImageStore” under store.
The differences lie between where the root and rootless (normal) users store and obtain configuration data, the number of container images they have locally available, and so on.
[root@server10 ~]# podman info
host:
arch: amd64
buildahVersion: 1.33.8
cgroupControllers:
- cpuset
- cpu
- io
- memory
- hugetlb
- pids
- rdma
- misc
...Similarly, you can run the podman command as follows to check its version:
[root@server10 ~]# podman version
Client: Podman Engine
Version: 4.9.4-rhel
API Version: 4.9.4-rhel
Go Version: go1.21.11 (Red Hat 1.21.11-1.el9_4)
Built: Mon Jul 1 03:27:14 2024
OS/Arch: linux/amd64Container images
podman and skopeo—is employed for these operations.1. Log in to the specified Red Hat registry:
[user1@server10 ~]$ podman login registry.redhat.io2. Confirm a successful login:
[user1@server10 ~]$ podman login registry.redhat.io --get-login3. Find the mysql-80 image in the specified registry. Add the
--no-trunc option to view full output.
[user1@server10 ~]$ podman search registry.redhat.io/mysql-80 --no-trunc
NAME DESCRIPTION
registry.redhat.io/rhel8/mysql-80 This container image provides a containerized packaging of the MySQL mysqld daemon and client application. The mysqld server daemon accepts connections from clients and provides access to content from MySQL databases on behalf of the clients.
...4. Select the second image rhel9/mysql-80 for this exercise. Inspect the image without downloading it using skopeo inspect. A long output will be generated. The command uses the docker:// mechanism to access the image.
[user1@server10 ~]$ skopeo inspect docker://registry.redhat.io/rhel9/mysql-80
{
"Name": "registry.redhat.io/rhel9/mysql-80",
"Digest": "sha256:247903d2103a3c1db9401f6340ecdcd97c6244480b7a3419e6303dda650491dc",
"RepoTags": [
"1",
"1-190",
"1-190.1655192188",
"1-190.1655192188-source",
"1-190-source",
"1-197",
"1-197-source",
"1-206",
...Output:
Shows older versions under RepoTags
Creation time for the latest version
Build date of the image
description
other information.
It is a good practice to analyze the metadata of an image prior to downloading and consuming it.
5. Download the image by specifying the fully qualified image name using podman pull:
[user1@server10 ~]$ podman pull docker://registry.redhat.io/rhel9/mysql-80
Trying to pull registry.redhat.io/rhel9/mysql-80:latest...
Getting image source signatures
Checking if image destination supports signatures
Copying blob 846c0bdf4e30 done |
Copying blob cc296d75b612 done |
Copying blob db22e630b1c7 done |
Copying config b5782120a3 done |
Writing manifest to image destination
Storing signatures
b5782120a320e5915d86555e661c357cfa56dd8320ba4c54a58caa1e1c91925f6. List the image to confirm the retrieval using podman images:
[user1@server10 ~]$ podman images
REPOSITORY TAG IMAGE ID CREATED SIZE
registry.redhat.io/rhel9/mysql-80 latest b5782120a320 2 weeks ago 555 MB7. Display the image’s details using podman inspect:
[user1@server10 ~]$ podman inspect mysql-80
[
{
"Id": "b5782120a320e5915d86555e661c357cfa56dd8320ba4c54a58caa1e1c91925f",
"Digest": "sha256:247903d2103a3c1db9401f6340ecdcd97c6244480b7a3419e6303dda650491dc",
"RepoTags": [
"registry.redhat.io/rhel9/mysql-80:latest"
],8. Remove the mysql-80 image from local storage:
[user1@server10 ~]$ podman rmi mysql-80
Untagged: registry.redhat.io/rhel9/mysql-80:latest
Deleted: b5782120a320e5915d86555e661c357cfa56dd8320ba4c54a58caa1e1c91925f9. Confirm the removal:
[user1@server10 ~]$ podman images
REPOSITORY TAG IMAGE ID CREATED SIZEInstructions that may be utilized inside a Containerfile to perform specific functions during the build process:
CMD
COPY
ENV
EXPOSE
FROM
RUN
USER
WORKDIR
A sample container file is presented below:
[user1@server10 ~]$ vim containerfile # Use RHEL9 base image
FROM registry.redhat.io/ubi9/ubi
# Install Apache web server software
RUN dnf -y install httpd
# Copy the website
COPY ./index.html /var/www/html/
# Expose Port 80/tcp
EXPOSE 80
# Start Apache web server
CMD ["httpd"]1. Log in to the specified Red Hat registry:
[user1@server10 ~]$ podman login registry.redhat.io
Authenticating with existing credentials for registry.redhat.io
Existing credentials are valid. Already logged in to registry.redhat.io2. Confirm a successful login:
[user1@server10 ~]$ podman login registry.redhat.io --get-login3. Create a file called containerfile with the following code:
[user1@server10 ~]$ vim containerfile2 # Use RHEL9 base image
FROM registry.redhat.io/ubi9/ubi
# Count the number of characters
CMD echo "RHCSA exam is hands-on." | wc
# Copy a local file to /tmp
COPY ./testfile /tmp4. Create a file called testfile with some random text in it and place it in the same directory as the containerfile.
[user1@server10 ~]$ echo "boo bee doo bee doo" >> testfile
[user1@server10 ~]$ cat testfile
boo bee doo bee doo5. Build an image by specifying the containerfile name and an image tag such as ubi9-simple-image. The period character at the end represents the current directory and this is where both containerfile and testfile are located.
[user1@server10 ~]$ podman image build -f containerfile2 -t ubi9-simple-image .
STEP 1/3: FROM registry.redhat.io/ubi9/ubi
Trying to pull registry.redhat.io/ubi9/ubi:latest...
Getting image source signatures
Checking if image destination supports signatures
Copying blob cc296d75b612 done |
Copying config 159a1e6731 done |
Writing manifest to image destination
Storing signatures
STEP 2/3: CMD echo "RHCSA exam is hands-on." | wc
--> 4c005bfd0b34
STEP 3/3: COPY ./testfile /tmp
COMMIT ubi9-simple-image
--> a2797b06a129
Successfully tagged localhost/ubi9-simple-image:latest
a2797b06a1294ed06edab2ba1c21d2bddde3eb3af1d8ed286781837f629926226. Confirm image creation:
[user1@server10 ~]$ podman image ls
REPOSITORY TAG IMAGE ID CREATED SIZE
localhost/ubi9-simple-image latest a2797b06a129 2 minutes ago 220 MB
registry.redhat.io/ubi9/ubi latest 159a1e67312e 2 weeks ago 220 MBOutput:
downloaded image
new custom image along with their image IDs, creation time, and size.
Do not remove the custom image yet as you will be using it to launch a container in the next section.
1. Launch a container using ubi8 (RHEL 8). Name this container rhel8-base-os and open a terminal session for interaction:
[user1@server10 ~]$ podman run -ti --name rhel8-base-os ubi8
Resolved "ubi8" as an alias (/etc/containers/registries.conf.d/001-rhel-shortnames.conf)
Trying to pull registry.access.redhat.com/ubi8:latest...
Getting image source signatures
Checking if image destination supports signatures
Copying blob 8694db102e5b done |
Copying config 269749ad51 done |
Writing manifest to image destination
Storing signatures
[root@30c7cccd8490 /]# Downloaded the latest version of the specified image automatically even though no FQIN was provided.
Opened a terminal session inside the container as the root user to interact with the containerized RHEL 8 OS.
The container ID is reflected as the hostname in the container’s command prompt (last line in the output). This is an auto-generated ID.
If you encounter any permission issues, delete the /etc/docker directory (if it exists) and try again.
2. Run a few basic commands such as pwd, ls, cat, and date inside the container for verification:
[root@30c7cccd8490 /]# pwd
/
[root@30c7cccd8490 /]# ls
bin dev home lib64 media opt root sbin sys usr
boot etc lib lost+found mnt proc run srv tmp var
[root@30c7cccd8490 /]# cat /etc/redhat-release
Red Hat Enterprise Linux release 8.10 (Ootpa)
[root@30c7cccd8490 /]# date
Thu Aug 1 21:09:13 UTC 20243. Close the terminal session when done:
[root@30c7cccd8490 /]# exit
exit
[user1@server10 ~]$ 4. Delete the container using podman rm:
[user1@server10 ~]$ podman rm rhel8-base-os
rhel8-base-osConfirm the removal with podman ps.
[user1@server10 ~]$ podman ps
CONTAINER ID IMAGE COMMAND CREATED STATUS PORTS NAMES1. Start a container using ubi7 (RHEL 7) and run ls as an entry point command. Remove the container as soon as the entry point command has finished running.
[user1@server10 ~]$ podman run --rm ubi7 ls
Resolved "ubi7" as an alias (/etc/containers/registries.conf.d/001-rhel-shortnames.conf)
Trying to pull registry.access.redhat.com/ubi7:latest...
Getting image source signatures
Checking if image destination supports signatures
Copying blob 7f2c2c4492b6 done |
Copying config a084eb42a5 done |
Writing manifest to image destination
Storing signatures
bin
boot
dev
etc
home
...2. Confirm the container removal with podman ps:
podman ps
CONTAINER ID IMAGE COMMAND CREATED STATUS PORTS NAMESpodman command.EXAM TIP: As a normal user, you cannot map a host port below 1024 to a container port.
1. Search for an Apache web server image for RHEL 7 using podman search:
[user1@server30 ~]$ podman search registry.redhat.io/rhel7/httpd
NAME DESCRIPTION
registry.redhat.io/rhscl/httpd-24-rhel7 Apache HTTP 2.4 Server2. Log in to registry.redhat.io using the Red Hat credentials to access the image:
[user1@server30 ~]$ podman login registry.redhat.io
Username: tdavetech@gmail.com
Password:
Login Succeeded!3. Download the latest version of the Apache image using podman pull:
[user1@server30 ~]$ podman pull registry.redhat.io/rhscl/httpd-24- rhel7
Trying to pull registry.redhat.io/rhscl/httpd-24-rhel7:latest...
Getting image source signatures
Checking if image destination supports signatures
Copying blob fd77da0b900b done |
Copying blob 7f2c2c4492b6 done |
Copying blob ea092d7970b2 done |
Copying config 847db19d6c done |
Writing manifest to image destination
Storing signatures
847db19d6cbc726106c901a7713d30dccc9033031ec812037c4c458319a1b3284. Verify the download using podman images:
[user1@server30 ~]$ podman images
REPOSITORY TAG IMAGE ID CREATED SIZE
registry.redhat.io/rhscl/httpd-24-rhel7 latest 847db19d6cbc 2 months ago 332 MB5. Launch a container named rhel7-port-map in detached mode to run the containerized Apache web server with host port 10000 mapped to container port 8000.
[user1@server30 ~]$ podman run -dp 10000:8000 --name rhel7-port-map httpd-24-rhel7
cd063dff352dfbcd57dd417587513b12ca4033ed657f3baaa28d54df19d4df1c6. Verify that the container was launched successfully using podman ps:
[user1@server30 ~]$ podman ps
CONTAINER ID IMAGE COMMAND CREATED STATUS PORTS NAMES
cd063dff352d registry.redhat.io/rhscl/httpd-24-rhel7:latest /usr/bin/run-http... 36 seconds ago Up 36 seconds 0.0.0.0:10000- >8000/tcp rhel7-port-map7. You can also use podman port to view the mapping:
[user1@server30 ~]$ podman port rhel7-port-map
8000/tcp -> 0.0.0.0:10000podman subcommands and verify each transition.1. Verify the current operational state of the container rhel7-port-map:
[user1@server30 ~]$ podman ps
CONTAINER ID IMAGE COMMAND CREATED STATUS PORTS NAMES
cd063dff352d registry.redhat.io/rhscl/httpd-24-rhel7:latest /usr/bin/run-http... 3 minutes ago Up 3 minutes 0.0.0.0:10000- >8000/tcp rhel7-port-map2. Stop the container and confirm.
(the -a option with ps also includes the stopped containers in the output):
[user1@server30 ~]$ podman stop rhel7-port-map
rhel7-port-map
[user1@server30 ~]$ podman ps -a
CONTAINER ID IMAGE COMMAND CREATED STATUS PORTS NAMES
cd063dff352d registry.redhat.io/rhscl/httpd-24-rhel7:latest /usr/bin/run-http... 6 minutes ago Exited (0) 5 seconds ago 0.0.0.0:10000->8000/tcp rhel7-port-map3. Start the container and confirm:
[user1@server30 ~]$ podman start rhel7-port-map
rhel7-port-map
[user1@server30 ~]$ podman ps -a
CONTAINER ID IMAGE COMMAND CREATED STATUS PORTS NAMES
cd063dff352d registry.redhat.io/rhscl/httpd-24-rhel7:latest /usr/bin/run-http... 8 minutes ago Up 11 seconds 0.0.0.0:10000- >8000/tcp rhel7-port-map4. Stop the container and remove it:
[user1@server30 ~]$ podman rm rhel7-port-map
rhel7-port-map5. Confirm the removal:
[user1@server30 ~]$ podman ps -a
CONTAINER ID IMAGE COMMAND CREATED STATUS PORTS NAMESpodman command allows multiple variables to be passed or set with the -e option.EXAM TIP: Use the -e option with each variable that you want to pass or set.
1. Launch a container with an interactive terminal session and inject variables HISTSIZE and SECRET as directed. Use the specified container image.
[user1@server30 ~]$ podman run -it -e HISTSIZE -e SECRET="secret123" --name rhel9-env-vars ubi9
Resolved "ubi9" as an alias (/etc/containers/registries.conf.d/001- rhel-shortnames.conf)
Trying to pull registry.access.redhat.com/ubi9:latest...
Getting image source signatures
Checking if image destination supports signatures
Copying blob cc296d75b612 done |
Copying config 159a1e6731 done |
Writing manifest to image destination
Storing signatures
[root@b587355b8fc1 /]# 2. Verify both variables using the echo command:
[root@b587355b8fc1 /]# echo $HISTSIZE $SECRET
1000 secret123
[root@b587355b8fc1 /]# 3. Disconnect from the container, and stop and remove it:
[user1@server30 ~]$ podman stop rhel9-env-vars
rhel9-env-vars
[user1@server30 ~]$ podman rm rhel9-env-vars
rhel9-env-varsConfirm the deletion:
[user1@server30 ~]$ podman ps -a
CONTAINER ID IMAGE COMMAND CREATED STATUS PORTS NAMESEXAM TIP: Proper ownership, permissions, and SELinux file type must be set to ensure persistent storage is accessed and allows data writes without issues.
1. Create a directory called /host_data, set full permissions on it, and confirm:
[user1@server30 ~]$ sudo mkdir /host_data
[sudo] password for user1:
[user1@server30 ~]$ sudo chmod 777 /host_data/
[user1@server30 ~]$ ll -d /host_data/
drwxrwxrwx. 2 root root 6 Aug 1 22:59 /host_data/2. Launch a root container called rhel9-persistent-data in interactive mode using the latest ubi9 image. Specify the attachment point (/container_data) to be used inside the container for the host directory (/host_data) Ensure the SELinux type container_file_t is automatically set on the directory and files within.
[user1@server30 ~]$ sudo podman run --name rhel9-persistent-data -v /host_data:/container_data:Z -it ubi9
Resolved "ubi9" as an alias (/etc/containers/registries.conf.d/001- rhel-shortnames.conf)
Trying to pull registry.access.redhat.com/ubi9:latest...
Getting image source signatures
Checking if image destination supports signatures
Copying blob cc296d75b612 done |
Copying config 159a1e6731 done |
Writing manifest to image destination
Storing signatures3. Confirm the presence of the directory inside the container with ls on /container_data:
[root@e8711892370f /]# ls -ldZ /container_data
drwxrwxrwx. 2 root root system_u:object_r:container_file_t:s0:c376,c965 6 Aug 2 05:59 /container_data4. Create a file called testfile with the echo command under /container_data:
[root@e8711892370f /]# echo "This is persistent storage." > /container_data/testfile5. Verify the file creation and the SELinux type on it:
[root@e8711892370f /]# ls -lZ /container_data/
total 4
-rw-r--r--. 1 root root system_u:object_r:container_file_t:s0:c376,c965 28 Aug 2 06:03 testfile6. Exit out of the container and check the presence of the file in the host directory:
[root@e8711892370f /]# exit
exit
[user1@server30 ~]$ ls -lZ /host_data/
total 4
-rw-r--r--. 1 root root system_u:object_r:container_file_t:s0:c376,c965 28 Aug 1 23:03 testfile7. Stop and remove the container:
[user1@server30 ~]$ sudo podman stop rhel9-persistent-data
rhel9-persistent-data
[user1@server30 ~]$ sudo podman rm rhel9-persistent-data
rhel9-persistent-data8. Launch a new root container called rhel8-persistent-data in interactive mode using the latest ubi8 image from any of the defined registries. Specify the attachment point (/container_data2) to be used inside the container for the host directory (/host_data). Ensure the SELinux type container_file_t is automatically set on the directory and files within.
[user1@server30 ~]$ sudo podman run -it --name rhel8-persistent-data -v /host_data:/container_data2:Z ubi8
Resolved "ubi8" as an alias (/etc/containers/registries.conf.d/001- rhel-shortnames.conf)
Trying to pull registry.access.redhat.com/ubi8:latest...
Getting image source signatures
Checking if image destination supports signatures
Copying blob 8694db102e5b done |
Copying config 269749ad51 done |
Writing manifest to image destination
Storing signatures 9. Confirm the presence of the directory inside the container with ls on /container_data2:
[root@af6773299c7e /]# ls -ldZ /container_data2/
drwxrwxrwx. 2 root root system_u:object_r:container_file_t:s0:c198,c914 22 Aug 2 06:03 /container_data2/
[root@af6773299c7e /]# ls -lZ /container_data2/
total 4
-rw-r--r--. 1 root root system_u:object_r:container_file_t:s0:c198,c914 28 Aug 2 06:03 testfile
[root@af6773299c7e /]# cat /container_data2/testfile
This is persistent storage.10. Create a file called testfile2 with the echo command under /container_data2:
[root@af6773299c7e /]# echo "This is persistent storage2." > /container_data2/testfile2
[root@af6773299c7e /]# ls -lZ /container_data2/
total 8
-rw-r--r--. 1 root root system_u:object_r:container_file_t:s0:c198,c914 28 Aug 2 06:03 testfile
-rw-r--r--. 1 root root system_u:object_r:container_file_t:s0:c198,c914 29 Aug 2 06:10 testfile211. Exit out of the container and confirm the existence of both files in the host directory:
[root@af6773299c7e /]# exit
exit
[user1@server30 ~]$ ls -lZ /host_data/
total 8
-rw-r--r--. 1 root root system_u:object_r:container_file_t:s0:c198,c914 28 Aug 1 23:03 testfile
-rw-r--r--. 1 root root system_u:object_r:container_file_t:s0:c198,c914 29 Aug 1 23:10 testfile212. Stop and remove the container using the stop and rm subcommands:
[user1@server30 ~]$ sudo podman stop rhel8-persistent-data
rhel8-persistent-data
[user1@server30 ~]$ sudo podman rm rhel8-persistent-data
rhel8-persistent-data13. Re-check the presence of the files in the host directory:
[user1@server30 ~]$ ll /host_data
total 8
-rw-r--r--. 1 root root 28 Aug 1 23:03 testfile
-rw-r--r--. 1 root root 29 Aug 1 23:10 testfile2Multiple containers run on a single host and it becomes a challenging task to change their operational state or delete them manually.
In RHEL 9, these administrative functions can be automated via the systemd service
There are several steps that need to be completed to configure container state management via systemd.
These steps vary for rootful and rootless container setups and include the creation of service unit files and their storage in appropriate directory locations (~/.config/systemd/user for rootless containers and /etc/systemd/system for rootful containers).
Once setup and enabled, the containers will start and stop automatically as a systemd service with the host state transition or manually with the systemctl command.
The podman command to start and stop containers is no longer needed if the systemd setup is in place.
You may experience issues if you continue to use podman for container state transitioning alongside.
The start and stop behavior for rootless containers differs slightly from that of rootful containers.
For the rootless setup, the containers are started when the relevant user logs in to the host and stopped when that user logs off from all their open terminal sessions;
However, this default behavior can be altered by enabling lingering for that user with the loginctl command.
User lingering is a feature that, if enabled for a particular user, spawns a user manager for that user at system startup and keeps it running in the background to support long-running services configured for that user.
The user need not log in.
EXAM TIP: Make sure that you use a normal user to launch rootless containers and the root user (or sudo) for rootful containers.
systemctl command to verify the automatic container start, stop, and deletion.1. Launch a new container called rootful-container in detached mode using the latest ubi9:
[user1@server30 ~]$ sudo podman run -dt --name rootful-container ubi9
[sudo] password for user1:
0ed04dcedec418068acd14c864e95e78f56a38dd57d2349cf2c46b0de1a1bf1b2. Confirm the new container using podman ps. Note the container ID.
[user1@server30 ~]$ sudo podman ps
CONTAINER ID IMAGE COMMAND CREATED STATUS PORTS NAMES
0ed04dcedec4 registry.access.redhat.com/ubi9:latest /bin/bash 20 seconds ago Up 20 seconds rootful-container3. Create (generate) a service unit file called rootful-container.service under /etc/systemd/system while ensuring that the next new container that will be launched based on this configuration file will not require the source container to work. The tee command will show the generated file content on the screen as well as store it in the specified file.
[user1@server30 ~]$ sudo podman generate systemd --new --name rootful-container | sudo tee /etc/systemd/system/rootful-qcontainer.service
[Unit]
Description=Podman container-rootful-container.service
Documentation=man:podman-generate-systemd(1)
Wants=network-online.target
After=network-online.target
RequiresMountsFor=%t/containers
[Service]
Environment=PODMAN_SYSTEMD_UNIT=%n
Restart=on-failure
TimeoutStopSec=70
ExecStart=/usr/bin/podman run \
--cidfile=%t/%n.ctr-id \
--cgroups=no-conmon \
--rm \
--sdnotify=conmon \
--replace \
-dt \
--name rootful-container ubi9
ExecStop=/usr/bin/podman stop \
--ignore -t 10 \
--cidfile=%t/%n.ctr-id
ExecStopPost=/usr/bin/podman rm \
-f \
--ignore -t 10 \
--cidfile=%t/%n.ctr-id
Type=notify
NotifyAccess=all
[Install]
WantedBy=default.target4. Stop and delete the source container (rootful-container):
[user1@server30 ~]$ sudo podman stop rootful-container
[sudo] password for user1:
WARN[0010] StopSignal SIGTERM failed to stop container rootful- container in 10 seconds, resorting to SIGKILL
rootful-container
[user1@server30 ~]$ sudo podman rm rootful-container
rootful-containerVerify the removal by running sudo podman ps -a:
[user1@server30 ~]$ sudo podman ps -a
CONTAINER ID IMAGE COMMAND CREATED STATUS PORTS NAMES5. Update systemd to bring the new service under its control (reboot the system if required):
[user1@server30 ~]$ sudo systemctl daemon-reload6. Enable and start the container service:
[user1@server30 ~]$ sudo systemctl enable --now rootful-container
Created symlink /etc/systemd/system/default.target.wants/rootful- container.service → /etc/systemd/system/rootful-container.service.7. Check the running status of the new service:
[user1@server30 ~]$ sudo systemctl status rootful-container
rootful-container.service - Podman container-rootful-container.s>
Loaded: loaded (/etc/systemd/system/rootful-container.service>
Active: active (running)8. Verify the launch of a new container (compare the container ID with that of the source root container):
[user1@server30 ~]$ sudo podman ps
CONTAINER ID IMAGE COMMAND CREATED STATUS PORTS NAMES
440a57c26186 registry.access.redhat.com/ubi9:latest /bin/bash About a minute ago Up About a minute rootful-container9. Restart the container service using the systemctl command:
[user1@server30 ~]$ sudo systemctl restart rootful-container
sudo systemctl status rootful-
[user1@server30 ~]$ sudo systemctl status rootful-container
rootful-container.service - Podman container-rootful-container.s>
Loaded: loaded (/etc/systemd/system/rootful-container.service>
Active: active (running)10. Check the status of the container again. Observe the removal of the previous container and the launch of a new container (compare container IDs).
[user1@server30 ~]$ sudo podman ps
CONTAINER ID IMAGE COMMAND CREATED STATUS PORTS NAMES
0a980537b83a registry.access.redhat.com/ubi9:latest /bin/bash 59 seconds ago Up About a minute rootful-containersystemctl command as conuser1 to verify the automatic container start, stop, and deletion.1. Create a user account called conuser1 and assign a simple password:
[user1@server30 ~]$ sudo useradd conuser1
[user1@server30 ~]$ echo conuser1 | sudo passwd -- stdin conuser1
Changing password for user conuser1.
passwd: all authentication tokens updated successfully.2. Open a new terminal window on server20 and log in as conuser1. Create directory ~/.config/systemd/user to store a service unit file:
[conuser1@server30 ~]$ mkdir ~/.config/systemd/user -p3. Launch a new container called rootless-container in detached mode using the latest ubi8:
[conuser1@server30 ~]$ podman run -dt --name rootless-container ubi8
Resolved "ubi8" as an alias (/etc/containers/registries.conf.d/001-rhel- shortnames.conf)
Trying to pull registry.access.redhat.com/ubi8:latest...
Getting image source signatures
Checking if image destination supports signatures
Copying blob 8694db102e5b done |
Copying config 269749ad51 done |
Writing manifest to image destination
Storing signatures
381d46ae9a3e11723c3bde35090782129e6937c461f8c2621bc9725f6b9efc274. Confirm the new container using podman ps. Note the container ID.
[conuser1@server30 ~]$ podman ps
CONTAINER ID IMAGE COMMAND CREATED STATUS PORTS NAMES
381d46ae9a3e registry.access.redhat.com/ubi8:latest /bin/bash 27 seconds ago Up 27 seconds rootless-container5. Create (generate) a service unit file called rootless-container.service under ~/.config/systemd/user while ensuring that the next new container that will be launched based on this configuration will not require the source container to work:
[conuser1@server30 ~]$ podman generate systemd --new --name rootless-container > ~/.config/systemd/user/rootless-container.service
DEPRECATED command:
It is recommended to use Quadlets for running containers and pods under systemd.
Please refer to podman-systemd.unit(5) for details.6. Display the content of the unit file:
[conuser1@server30 ~]$ cat ~/.config/systemd/user/rootless-container.service
# container-rootless-container.service
# autogenerated by Podman 4.9.4-rhel
# Thu Aug 1 23:42:11 MST 2024
[Unit]
Description=Podman container-rootless- container.service
Documentation=man:podman-generate-systemd(1)
Wants=network-online.target
After=network-online.target
RequiresMountsFor=%t/containers
[Service]
Environment=PODMAN_SYSTEMD_UNIT=%n
Restart=on-failure
TimeoutStopSec=70
ExecStart=/usr/bin/podman run \
--cidfile=%t/%n.ctr-id \
--cgroups=no-conmon \
--rm \
--sdnotify=conmon \
--replace \
-dt \
--name rootless-container ubi8
ExecStop=/usr/bin/podman stop \
--ignore -t 10 \
--cidfile=%t/%n.ctr-id
ExecStopPost=/usr/bin/podman rm \
-f \
--ignore -t 10 \
--cidfile=%t/%n.ctr-id
Type=notify
NotifyAccess=all
[Install]
WantedBy=default.target7. Stop and delete the source container rootless-container using the stop and rm subcommands:
[conuser1@server30 ~]$ podman stop rootless-container
rootless-container
[conuser1@server30 ~]$ podman rm rootless-container
rootless-containerVerify the removal by running podman ps -a:
[conuser1@server30 ~]$ podman ps -a
CONTAINER ID IMAGE COMMAND CREATED STATUS PORTS NAMES8. Update systemd to bring the new service to its control
[conuser1@server30 ~]$ systemctl --user daemon-reload9. Enable and start the container service:
[conuser1@server30 ~]$ systemctl --user enable --now rootless-container.service
Created symlink /home/conuser1/.config/systemd/user/default.target.wa nts/rootless-container.service → /home/conuser1/.config/systemd/user/rootless- container.service.10. Check the running status of the new service:
conuser1@server30 ~]$ systemctl --user status rootless-container
rootless-container.service - Podman container- rootless-container>
Loaded: loaded (/home/conuser1/.config/systemd/user/rootless->
Active: active (running)11. Verify the launch of a new container (compare the container ID with that of the source rootless container):
[conuser1@server30 ~]$ podman ps
CONTAINER ID IMAGE COMMAND CREATED STATUS PORTS NAMES
57f946085605 registry.access.redhat.com/ubi8:latest /bin/bash About a minute ago Up About a minute rootless-container12. Enable the container service to start and stop with host transition using the loginctl command (systemd login manager) and confirm:
[conuser1@server30 ~]$ loginctl enable-linger
[conuser1@server30 ~]$ loginctl show-user conuser1 | grep -i linger
Linger=yes13. Restart the container service using the systemctl command:
[conuser1@server30 ~]$ systemctl --user restart rootless-container
[conuser1@server30 ~]$ systemctl --user status rootless-container
rootless-container.service - Podman container- rootless-container>
Loaded: loaded (/home/conuser1/.config/systemd/user/rootless->
Active: active (running)14. Check the status of the container again. Observe the removal of the previous container and the launch of a new container (compare container IDs).
[conuser1@server30 ~]$ podman ps
CONTAINER ID IMAGE COMMAND CREATED STATUS PORTS NAMES
4dec33db41b5 registry.access.redhat.com/ubi8:latest /bin/bash 41 seconds ago Up 41 seconds rootless-container [root@se
-bash: 3: command not found
rver30 ~]# adduser conadm
[root@server30 ~]# visudo conadm ALL=(ALL) ALL [root@server30 ~]# dnf install container-tools
[root@server30 ~]# podman login registry.redhat.io
[conuser1@server30 ~]$ podman pull ubi9
Resolved "ubi9" as an alias (/etc/containers/registries.conf.d/001-rhel- shortnames.conf)
Trying to pull registry.access.redhat.com/ubi9:latest...
Getting image source signatures
Checking if image destination supports signatures
Copying blob cc296d75b612 done |
Copying config 159a1e6731 done |
Writing manifest to image destination
Storing signatures 159a1e67312ef50059357047ebe2a365afea904504fca9561abb3 85ecd942d62
[conuser1@server30 ~]$ podman inspect ubi9 sudo podman run -it --name rootful-cont-port -p 80:8080 ubi9ls, pwd, df, cat /etc/redhat-release, and os-release while in the container. [root@349163a6e431 /]# ls
afs boot etc lib lost+found mnt proc run srv tmp var
bin dev home lib64 media opt root sbin sys usr
[root@349163a6e431 /]# pwd
/
[root@349163a6e431 /]# df -hT
Filesystem Type Size Used Avail Use% Mounted on
overlay overlay 17G 4.3G 13G 26% /
tmpfs tmpfs 64M 0 64M 0% /dev
shm tmpfs 63M 0 63M 0% /dev/shm
tmpfs tmpfs 356M 6.0M 350M 2% /etc/hosts
devtmpfs devtmpfs 4.0M 0 4.0M 0% /proc/keys
[root@349163a6e431 /]# cat /etc/redhat-release
Red Hat Enterprise Linux release 9.4 (Plow) [conadm@server30 ~]$ sudo podman port rootful-cont- port
8080/tcp -> 0.0.0.0:80 [conadm@server30 ~]$ podman run -d -e VAR1="lab1" -e VAR2="lab2" --name variables8 ubi8 [root@803642faea28 /]# echo $VAR1
lab1
[root@803642faea28 /]# echo $VAR2
lab2 [conadm@server30 ~]$ sudo mkdir /host_perm1
[sudo] password for conadm:
[conadm@server30 ~]$ sudo chmod 777 /host_perm1
[conadm@server30 ~]$ sudo touch /host_perm1/str1 [conadm@server30 ~]$ sudo podman run --name rootless-cont-str -v /host_perm1:/cont_perm1:Z -it ubi8
[root@a1326200eae1 /]# [root@a1326200eae1 /]# ls /cont_perm1
str1 [root@a1326200eae1 cont_perm1]# mkdir permdir2
[root@a1326200eae1 cont_perm1]# ls
permdir2 str1
[root@a1326200eae1 cont_perm1]# exit
exit
[conadm@server30 ~]$ [conadm@server30 ~]$ sudo ls /host_perm1
permdir2 str1 [conadm@server30 ~]$ podman stop rootless-cont-str
rootless-cont-str
[conadm@server30 ~]$ podman rm rootless-cont-str
rootless-cont-str [conadm@server30 ~]$ sudo rm -r /host_perm1 [conadm@server30 ~]$ podman run --name rootless-cont-adv -v ~/host_perm2:/cont_perm2:Z -e HISTSIZE="100" -e MYNAME="RedHat" -p 9000:8080 -it --replace ubi8
[root@79e965cd1436 /]# [root@79e965cd1436 /]# echo $HISTSIZE
100
[root@79e965cd1436 /]# echo $MYNAME
RedHat
[root@79e965cd1436 /]# ls -ld /cont_perm2
drwxrwxrwx. 2 root root 6 Aug 4 02:16 /cont_perm2
[conadm@server30 ~]$ podman port rootless-cont-adv
8080/tcp -> 0.0.0.0:9000 [root@5d510a1b2293 /]# exit
exit
[conadm@server30 ~]$ [conadm@server30 ~]$ podman run --name rootless-cont-adv -v ~/host_perm2:/cont_perm2:Z -e HISTSIZE="100" -e MYNAME="RedHat" -p 9000:8080 -dt --replace ubi8
da8faf434813242985b8e332dc06b0e6da78e7125bc36579ffc8d82b0bcafb8e
[conadm@server30 ~]$ podman generate systemd --new --name rootless-cont-adv > ~/.config/systemd/user/rootless-container.service
DEPRECATED command:
It is recommended to use Quadlets for running containers and pods under systemd.
Please refer to podman-systemd.unit(5) for details. [conadm@server30 ~]$ podman stop rootless-cont-adv
rootless-cont-adv
[conadm@server30 ~]$ podman rm rootless-cont-adv
rootless-cont-adv [conadm@server30 ~]$ systemctl --user daemon-reload
[conadm@server30 user]$ systemctl --user enable -- now rootless-container.service
Created symlink /home/conadm/.config/systemd/user/default.target.want s/rootless-container.service → /home/conadm/.config/systemd/user/rootless- container.service. [conadm@server30 user]$ loginctl enable-linger
[conadm@server30 user]$ loginctl show-user conadm | grep -i linger
Linger=yes[root@rhcsa3 ~]# systemctl --user --machine=conadm@ list-units --type=service
UNIT LOAD ACTIVE SUB DESCRIPTION >
dbus-broker.service loaded active running D-Bus User Message Bus
rootless-cont-adv.service loaded active running Podman container-rootl>
systemd-tmpfiles-setup.service loaded active exited Create User's Volatile>
LOAD = Reflects whether the unit definition was properly loaded.
ACTIVE = The high-level unit activation state, i.e. generalization of SUB.
SUB = The low-level unit activation state, values depend on unit type.
3 loaded units listed. Pass --all to see loaded but inactive units, too.
To show all installed unit files use 'systemctl list-unit-files'.
[root@rhcsa3 ~]# sudo -i -u conadm podman ps -a
CONTAINER ID IMAGE COMMAND CREATED STATUS PORTS NAMES
a48fd2c25be4 registry.access.redhat.com/ubi9:latest /bin/bash 10 minutes ago Up 10 minutes 0.0.0.0:9000->8080/tcp rootless-cont-adv [root@server30 ~]# podman generate systemd --new -- name rootful-cont-port | tee /etc/systemd/system/rootful-cont-port.service
DEPRECATED command:
It is recommended to use Quadlets for running containers and pods under systemd.
Please refer to podman-systemd.unit(5) for details.
# container-rootful-cont-port.service
# autogenerated by Podman 4.9.4-rhel
# Sat Aug 3 20:49:32 MST 2024
[Unit]
Description=Podman container-rootful-cont- port.service
Documentation=man:podman-generate-systemd(1)
Wants=network-online.target
After=network-online.target
RequiresMountsFor=%t/containers
[Service]
Environment=PODMAN_SYSTEMD_UNIT=%n
Restart=on-failure
TimeoutStopSec=70
ExecStart=/usr/bin/podman run \
--cidfile=%t/%n.ctr-id \
--cgroups=no-conmon \
--rm \
--sdnotify=conmon \
-d \
--replace \
-it \
--name rootful-cont-port \
-p 80:8080 ubi9
ExecStop=/usr/bin/podman stop \
--ignore -t 10 \
--cidfile=%t/%n.ctr-id
ExecStopPost=/usr/bin/podman rm \
-f \
--ignore -t 10 \
--cidfile=%t/%n.ctr-id
Type=notify
NotifyAccess=all
[Install]
WantedBy=default.target [root@server30 ~]# podman stop rootful-cont-port
WARN[0010] StopSignal SIGTERM failed to stop container rootful-cont-port in 10 seconds, resorting to SIGKILL
rootful-cont-port
[root@server30 ~]# podman ps
CONTAINER ID IMAGE COMMAND CREATED STATUS PORTS NAMES
fe0d07718dda registry.access.redhat.com/ubi9:latest /bin/bash 16 minutes ago Up 16 minutes rootful-container
[root@server30 ~]# podman rm rootfil-cont-port
Error: no container with ID or name "rootfil-cont- port" found: no such container
[root@server30 ~]# podman rm rootful-cont-port
rootful-cont-port [root@server30 ~]# systemctl daemon-reload
[root@server30 ~]# systemctl enable --now rootful- cont-port
Created symlink /etc/systemd/system/default.target.wants/rootful- cont-port.service → /etc/systemd/system/rootful-cont- port.service. [root@server30 ~]# reboot
[root@server30 ~]# podman ps
CONTAINER ID IMAGE COMMAND CREATED STATUS PORTS NAMES
5c030407a7d6 registry.access.redhat.com/ubi9:latest /bin/bash About a minute ago Up About a minute 0.0.0.0:80- >8080/tcp rootful-cont-port
9d1e8a429ac6 registry.access.redhat.com/ubi9:latest /bin/bash About a minute ago Up About a minute rootful-container
[root@server30 ~]# [conadm@server30 ~]$ vim containerfile FROM registry.access.redhat.com/ubi8/ubi:latest
RUN useradd -ms /bin/bash -u 1001 user-in-container
USER 1001 [conadm@server30 ~]$ podman image build -f containerfile --no-cache -t ubi8-user .
STEP 1/3: FROM registry.access.redhat.com/ubi8/ubi:latest
STEP 2/3: RUN useradd -ms /bin/bash -u 1001 user-in- container
--> b330095e91eb
STEP 3/3: USER 1001
COMMIT ubi8-user
--> e8cde30fc020
Successfully tagged localhost/ubi8-user:latest
e8cde30fc020051caa2a4e2f58aaaf90f088709462a1314b936fd608facfdb5e [conadm@server30 ~]$ podman run -ti --name test12 ubi8-user
[user-in-container@30558ffcb227 /]$The confusing world of SELinux
Firewalld stuff mostly
OpenSSH, system access, file transfer
Implementation of the Mandatory Access Control (MAC) architecture
MAC controls
SELinux decisions are stored in a special cache area called Access Vector Cache (AVC).
This cache area is checked for each access attempt by a process to determine whether the access attempt was previously allowed.
With this mechanism in place, SELinux does not have to check the policy ruleset repeatedly, thus improving performance.
SELinux is enabled by default
Subject
Object
Access
Policy
Context (label)
Labeling
SELinux User
su and sudo commands or the programs located in their home directories if they are mapped to the SELinux user user_u.Role
Type Enforcement (TE)
Type
Domain
Rules
Level
Use the id command with the -Z option to view the context set on Linux users:
[root@server30 ~]# id -Z
unconfined_u:unconfined_r:unconfined_t:s0-s0:c0.c1023Output:
Mapped to the SELinux unconfined_u user
No SELinux restrictions placed on this user.
All Linux users, including root, run unconfined by default, (full system access)
Seven confined user identities with restricted access to objects.
Use the seinfo query command to list the SELinux users; however, the setools-console software package must be installed before doing so.
[root@server30 ~]# seinfo -u
Users: 8
guest_u
root
staff_u
sysadm_u
system_u
unconfined_u
user_u
xguest_uUse the semanage command to view the mapping between Linux and SELinux users:
[root@server30 ~]# semanage login -l
Login Name SELinux User MLS/MCS Range Service
__default__ unconfined_u s0-s0:c0.c1023 *
root unconfined_u s0-s0:c0.c1023 *MLS/MCS Range
__default__, which is mapped to the unconfined_u user in the policy.Determine the context for processes using the ps command with the -Z flag:
[root@server30 ~]# ps -eZ | head -2
LABEL PID TTY TIME CMD
system_u:system_r:init_t:s0 1 ? 00:00:02 systemdOutput:
The subject system_u is a SELinux username (mapped to Linux user root)
Object is system_r
Domain init_t reveals the type of protection applied to the process.
Level of security s0
A process that is unprotected will run in the unconfined_t domain.
ls -Z
Show the four attributes set on the /etc/passwd file:
[root@server30 ~]# ls -lZ /etc/passwd
-rw-r--r--. 1 root root system_u:object_r:passwd_file_t:s0 2806 Jul 19 21:54 /etc/passwdpasswd_file_ts0 for the passwd file./etc/selinux/targeted/contexts/files/file_contexts /etc/selinux/targeted/contexts/files/file_contexts.local
semanage command.Rules for copy move and archive:
If a file is copied to a different directory, the destination file will receive the destination directory’s context, unless the --preserve=context switch is specified with the cp command to retain the source file’s original context.
If a copy operation overwrites the destination file in the same or different directory, the file being copied will receive the context of the overwritten file, unless the --preserve=context switch is specified with the cp command to preserve the source file’s original context.
If a file is moved to the same or different directory, the SELinux context will remain intact, which may differ from the destination directory’s context.
If a file is archived with the tar command, use the --selinux option to preserve the context.
View attributes for network ports with the semanage command:
[root@server30 ~]# semanage port -l | head -7
SELinux Port Type Proto Port Number
afs3_callback_port_t tcp 7001
afs3_callback_port_t udp 7001
afs_bos_port_t udp 7007
afs_fs_port_t tcp 2040
afs_fs_port_t udp 7000, 7005Example:
What happens when a Linux user attempts to change their password using the /usr/bin/passwd command.
The passwd command is labeled with the passwd_exec_t type:
[root@server30 ~]# ls -lZ /usr/bin/passwd
-rwsr-xr-x. 1 root root system_u:object_r:passwd_exec_t:s0 32648 Aug 10 2021 /usr/bin/passwdThe passwd command requires access to the /etc/shadow file in order to modify a user password. The shadow file has a different type set on it
(shadow_t):
**[root@server30 ~]# ls -lZ /etc/shadow
----------. 1 root root system_u:object_r:shadow_t:s0 2756 Jul 19 21:54 /etc/shadowpasswd command to switch into the passwd_t domain and update the shadow file.Open two terminal windows. In window 1, issue the passwd command as user1 and wait at the prompt:
[user1@server30 root]$ passwd
Changing password for user user1.
Current password: In window 2, run the ps command:
[root@server30 ~]# ps -eZ | grep passwd
unconfined_u:unconfined_r:passwd_t:s0-s0:c0.c1023 13001 pts/1 00:00:00 passwdpasswd command (process) transitioned into the passwd_t domain to change the user password.A sample listing of this directory is provided below:
[root@server30 ~]# ls -l /sys/fs/selinux/booleans/ | head -7
total 0
-rw-r--r--. 1 root root 0 Jul 23 04:44 abrt_anon_write
-rw-r--r--. 1 root root 0 Jul 23 04:44 abrt_handle_event
-rw-r--r--. 1 root root 0 Jul 23 04:44 abrt_upload_watch_anon_write
-rw-r--r--. 1 root root 0 Jul 23 04:44 antivirus_can_scan_system
-rw-r--r--. 1 root root 0 Jul 23 04:44 antivirus_use_jit
-rw-r--r--. 1 root root 0 Jul 23 04:44 auditadm_exec_contentThe manual pages of the Booleans are available through the selinux-policy-doc package.
Once installed, use the -K option with the man command to bring the pages up for a specific Boolean.
For instance, issue man -K abrt_anon_write to view the manual pages for the abrt_anon_write Boolean.
Can be viewed, and flipped temporarily or for permanence.
New value takes effect right away.
Temporary changes are stored as a “1” or “0” in the corresponding Boolean file in the /sys/fs/selinux/booleans/
Permanent changes are saved in the policy database.
Utilities and the commands they provide
libselinux-utils
getenforcegetseboolpolicycoreutils
sestatussetseboolrestoreconpolicycoreutils-python-utils
semanagesetools-console
seinfosesearchSELinux Alert Browser
Graphical tool for viewing alerts and debugging SELinux issues.
Part of the setroubleshoot-server package.
In order to fully manage SELinux, you need to ensure that all these packages are installed on the system.
SELinux delivers a variety of commands for effective administration. Table 20-1 lists and describes the commands mentioned above plus a few more under various management categories.
Mode Management
getenforce
grubby
sestatus
setenforce
Context Management
chcon
restorecon
semanage
fcontext subcommand (changes survive file system relabeling)Policy Management
seinfo
semanage
sesearch
Boolean Management
getsebool
setsebool
semanage
booleansubcommand.Troubleshooting
sealert
/etc/selinux/config
The default content of the file is displayed below:
[root@server30 ~]# cat /etc/selinux/config
# This file controls the state of SELinux on the system.
# SELINUX= can take one of these three values:
# enforcing - SELinux security policy is enforced.
# permissive - SELinux prints warnings instead of enforcing.
# disabled - No SELinux policy is loaded.
# See also:
# https://access.redhat.com/documentation/en-us/red_hat_enterprise_linux/9/html/using_selinux/changing-selinux-states-and-modes_using-selinux#changing-selinux-modes-at-boot-time_changing-selinux-states-and-modes
#
# NOTE: Up to RHEL 8 release included, SELINUX=disabled would also
# fully disable SELinux during boot. If you need a system with SELinux
# fully disabled instead of SELinux running with no policy loaded, you
# need to pass selinux=0 to the kernel command line. You can use grubby
# to persistently set the bootloader to boot with selinux=0:
#
# grubby --update-kernel ALL --args selinux=0
#
# To revert back to SELinux enabled:
#
# grubby --update-kernel ALL --remove-args selinux
#
SELINUX=enforcing
# SELINUXTYPE= can take one of these three values:
# targeted - Targeted processes are protected,
# minimum - Modification of targeted policy. Only selected processes are protected.
# mls - Multi Level Security protection.
SELINUXTYPE=targetedDirectives:
SELINUX
SELINUXTYPE
Determine the current operating mode:
getenforce
Change the state to permissive and verify:
[root@server30 ~]# setenforce permissive
[root@server30 ~]# getenforce
PermissiveEXAM TIP: You may switch SELinux to permissive for troubleshooting a non-functioning service. Don’t forget to change it back to enforcing when the issue is resolved.
Disable SELinux persistently:
grubby --update-kernel ALL --args selinux=0
cat /boot/loader/entries/dcb323fab47049e8b89dae2ae00d41e8-5.14.0-427.26.1.el9_4.x86_64.conf Revert the above:
grubby --update-kernel ALL --remove-args selinux=0
sestatus Command
[root@server30 ~]# sestatus
SELinux status: enabled
SELinuxfs mount: /sys/fs/selinux
SELinux root directory: /etc/selinux
Loaded policy name: targeted
Current mode: permissive
Mode from config file: enforcing
Policy MLS status: enabled
Policy deny_unknown status: allowed
Memory protection checking: actual (secure)
Max kernel policy version: 33-v
[root@server30 ~]# cat /etc/sestatus.conf
[files]
/etc/passwd
/etc/shadow
/bin/bash
/bin/login
/bin/sh
/sbin/agetty
/sbin/init
/sbin/mingetty
/usr/sbin/sshd
/lib/libc.so.6
/lib/ld-linux.so.2
/lib/ld.so.1
[process]
/sbin/mingetty
/sbin/agetty
/usr/sbin/sshd[root@server30 ~]# sestatus -v
SELinux status: enabled
SELinuxfs mount: /sys/fs/selinux
SELinux root directory: /etc/selinux
Loaded policy name: targeted
Current mode: permissive
Mode from config file: enforcing
Policy MLS status: enabled
Policy deny_unknown status: allowed
Memory protection checking: actual (secure)
Max kernel policy version: 33
Process contexts:
Current context: unconfined_u:unconfined_r:unconfined_t:s0-s0:c0.c1023
Init context: system_u:system_r:init_t:s0
/sbin/agetty system_u:system_r:getty_t:s0-s0:c0.c1023
/usr/sbin/sshd system_u:system_r:sshd_t:s0-s0:c0.c1023
File contexts:
Controlling terminal: unconfined_u:object_r:user_devpts_t:s0
/etc/passwd system_u:object_r:passwd_file_t:s0
/etc/shadow system_u:object_r:shadow_t:s0
/bin/bash system_u:object_r:shell_exec_t:s0
/bin/login system_u:object_r:login_exec_t:s0
/bin/sh system_u:object_r:bin_t:s0 -> system_u:object_r:shell_exec_t:s0
/sbin/agetty system_u:object_r:getty_exec_t:s0
/sbin/init system_u:object_r:bin_t:s0 -> system_u:object_r:init_exec_t:s0
/usr/sbin/sshd system_u:object_r:sshd_exec_t:s01. Create the hierarchy sedir1/sefile1 under /tmp:
[root@server30 ~]# cd /tmp
[root@server30 tmp]# mkdir sedir1
[root@server30 tmp]# touch sedir1/sefile12. Determine the context on the new directory and file:
[root@server30 tmp]# ls -ldZ sedir1
drwxr-xr-x. 2 root root unconfined_u:object_r:user_tmp_t:s0 21 Jul 28 15:12 sedir1 [root@server30 tmp]# ls -ldZ sedir1/sefile1
-rw-r--r--. 1 root root unconfined_u:object_r:user_tmp_t:s0 0 Jul 28 15:12 sedir1/sefile13. Modify the SELinux user (-u) on the directory to user_u and type
(-t) to public_content_t recursively (-R) with the chcon command:
[root@server30 tmp]# chcon -vu user_u -t public_content_t sedir1 -R
changing security context of 'sedir1/sefile1'
changing security context of 'sedir1'4. Validate the new context:
[root@server30 tmp]# ls -ldZ sedir1
drwxr-xr-x. 2 root root user_u:object_r:public_content_t:s0 21 Jul 28 15:12 sedir1 [root@server30 tmp]# ls -ldZ sedir1/sefile1
-rw-r--r--. 1 root root user_u:object_r:public_content_t:s0 0 Jul 28 15:12 sedir1/sefile1 [root@server30 tmp]# ls -ldZ sedir1
drwxr-xr-x. 2 root root user_u:object_r:public_content_t:s0 21 Jul 28 15:12 sedir1 [root@server30 tmp]# ls -ldZ sedir1/sefile1
-rw-r--r--. 1 root root user_u:object_r:public_content_t:s0 0 Jul 28 15:12 sedir1/sefile1semanage command with the fcontext subcommand: [root@server30 tmp]# semanage fcontext -a -s user_u -t public_content_t "/tmp/sedir1(/.*)?"The above command added the context to the /etc/selinux/targeted/contexts/files/file_contexts.local file.
[root@server30 tmp]# semanage fcontext -Cl | grep sedir
/tmp/sedir1(/.*)? all files user_u:object_r:public_content_t:s0 chcon command: root@server30 tmp]# chcon -vu staff_u -t etc_t sedir1 -R
changing security context of 'sedir1/sefile1'
changing security context of 'sedir1'ls command: [root@server30 tmp]# ls -ldZ sedir1 ; ls -lZ sedir1/sefile1
drwxr-xr-x. 2 root root staff_u:object_r:etc_t:s0 21 Jul 28 15:12 sedir1
-rw-r--r--. 1 root root staff_u:object_r:etc_t:s0 0 Jul 28 15:12 sedir1/sefile1-R) as stored in the policy database using the restorecon command: (-F option will update all attributes, only does type by default. )$ restorecon -R -v -F sedir1
Relabeled /tmp/sedir1 from unconfined_u:object_r:public_content_t:s0 to user_u:object_r:public_content_t:s0
Relabeled /tmp/sedir1/sefile1 from unconfined_u:object_r:public_content_t:s0 to user_u:object_r:public_content_t:s0-l) the ports for the httpd service as defined in the SELinux policy database: [root@server10 ~]# semanage port -l | grep ^http_port
http_port_t tcp 80, 81, 443, 488, 8008, 8009, 8443, 9000The output reveals eight network ports the httpd process is currently allowed to listen on.
http_port_t and protocol tcp to the policy: [root@server10 ~]# semanage port -at http_port_t -p tcp 8010 [root@server10 ~]# semanage port -l | grep ^http_port
http_port_t tcp 8010, 80, 81, 443, 488, 8008, 8009, 8443, 90008010 from the policy and confirm: [root@server10 ~]# semanage port -dp tcp 8010
[root@server10 ~]# semanage port -l | grep ^http_port
http_port_t tcp 80, 81, 443, 488, 8008, 8009, 8443, 9000EXAM TIP: Any non-standard port you want to use for any service, make certain to add it to the SELinux policy database with the correct type.
1. Create file sefile2 under /tmp and show context:
[root@server10 ~]# touch /tmp/sefile2
[root@server10 ~]# ls -lZ /tmp/sefile2
-rw-r--r--. 1 root root unconfined_u:object_r:user_tmp_t:s0 0 Jul 29 08:44 /tmp/sefile22. Copy this file to the /etc/default directory, and check the context again:
[root@server10 ~]# cp /tmp/sefile2 /etc/default/
[root@server10 ~]# ls -lZ /etc/default/sefile2
-rw-r--r--. 1 root root unconfined_u:object_r:etc_t:s0 0 Jul 29 08:45 /etc/default/sefile23. Erase the /etc/default/sefile2 file, and copy it again with the --preserve=context option:
[root@server10 ~]# rm /etc/default/sefile2
[root@server10 ~]# cp --preserve=context /tmp/sefile2 /etc/default4. List the file to view the context:
[root@server10 ~]# ls -lZ /etc/default/sefile2
-rw-r--r--. 1 root root unconfined_u:object_r:user_tmp_t:s0 0 Jul 29 08:49 /etc/default/sefile2nfs_export_all_rw.1. Display the current setting of the Boolean nfs_export_all_rw using three different commands—getsebool, sestatus, and semanage:
[root@server10 ~]# getsebool -a | grep nfs_export_all_rw
nfs_export_all_rw --> on
[root@server10 ~]# sestatus -b | grep nfs_export_all_rw
nfs_export_all_rw on
[root@server10 ~]# semanage boolean -l | grep nfs_export_all_rw
nfs_export_all_rw (on , on) Allow nfs to export all rw
[root@server10 ~]# 2. Turn off the value of nfs_export_all_rw using the setsebool command by simply furnishing “off” or “0” with it and confirm:
[root@server10 ~]# setsebool nfs_export_all_rw 0
[root@server10 ~]# getsebool -a | grep nfs_export_all_rw
nfs_export_all_rw --> off3. Reboot the system and rerun the getsebool command to check the Boolean state:
[root@server10 ~]# getsebool -a | grep nfs_export_all_rw
nfs_export_all_rw --> on4. Set the value of the Boolean persistently (-P or -m as needed) using either of the following:
[root@server10 ~]# setsebool -P nfs_export_all_rw off
[root@server10 ~]# semanage boolean -m -0 nfs_export_all_rw5. Validate the new value using the getsebool, sestatus, or semanage command:
[root@server10 ~]# sestatus -b | grep nfs_export_all_rw
nfs_export_all_rw off
[root@server10 ~]# semanage boolean -l | grep nfs_export_all_rw
nfs_export_all_rw (off , off) Allow nfs to export all rw
[root@server10 ~]# semanage boolean -l | grep nfs_export_all_rw
nfs_export_all_rw (off , off) Allow nfs to export all rwSELinux generates alerts for system activities when it runs in enforcing or permissive mode.
It writes the alerts to /var/log/audit/audit.logif the auditd daemon is running, or to /var/log/messages via the rsyslog daemon in the absence of auditd.
SELinux also logs the alerts that are generated due to denial of an action, and identifies them with a type tag AVC (Access Vector Cache) in the audit.log file.
It also writes the rejection in the messages file with a message ID, and how to view the message details.
SELinux denial messages are analyzed, and the audit data is examined to identify the potential cause of the rejection.
The results of the analysis are recorded with recommendations on how to fix it.
These results can be reviewed to aid in troubleshooting, and recommended actions taken to address the issue.
SELinux runs a service daemon called setroubleshootd that performs this analysis and examination in the background.
This service also has a client interface called SELinux Troubleshooter (the sealert command) that reads the data and displays it for assessment.
The client tool has both text and graphical interfaces.
The server and client components are part of the setroubleshoot-server software package that must be installed on the system prior to using this service.
How SELinux handles an incoming access request (from a subject) to a target object:
Subject (eg: a process) makes an Action request (eg: read) > SELinux Security Server checks the SELinux Policy Database > if permission is not granted the AVC Denied Message is diaplayed. If Permission is granted, then access to object (eg: a file) is granted.
su to root from user1 and view the log:
[root@server10 ~]# cat /var/log/audit/audit.log | tail -10
...
type=USER_START msg=audit(1722274070.748:90): pid=1394 uid=1000 auid=0 ses=1 subj=unconfined_u:unconfined_r:unconfined_t:s0- s0:c0.c1023 msg='op=PAM:session_open grantors=pam_keyinit,pam_limits,pam_systemd,pam_unix, pam_umask,pam_xauth acct="root" exe="/usr/bin/su" hostname=? addr=? terminal=/dev/pts/0 res=success'UID="user1" AUID="root"WIll show avc denied if denied.
passwd command as user1 to modify the password.restorecon /etc/shadow. ' [root@server10 ~]# chcon -vt etc_t /etc/shadow
changing security context of '/etc/shadow'passwd command as user1 to modify the password: [root@server10 ~]# su user1
[user1@server10 root]$ passwd
Changing password for user user1.
Current password:
roopasswd: Authentication token manipulation errorThe following is a sample denial record from the same file in raw format:

passwd command (comm)scontext) unconfined_u:unconfined_r:passwd_t:s0-s0:c0.c1023system_u:object_r:etc_t:s0permissive=0.passwd command from updating the user’s password.Use sealert to analyze (-a) all AVC records in the audit.log file. This command produces a formatted report with all relevant details:
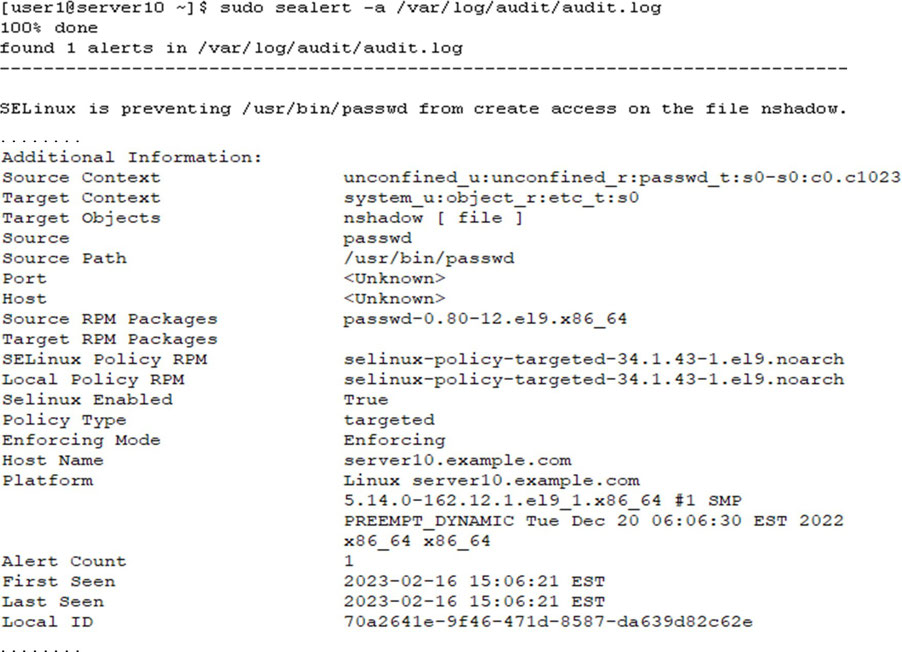
[root@server30 ~]# getenforce
Enforcing [root@server30 ~]# vim /etc/selinux/config
SELINUX=disabled [root@server30 ~]# rebootsudo getenforce to confirm the change when the system is up. [root@server30 ~]# getenforce
Disabled [root@server30 ~]# vim /etc/selinux/config
SELINUX=enforcing
[root@server30 ~]# rebootsudo getenforce to confirm the mode when the system is up. [root@server30 ~]# getenforce
Enforcing mkdir -p /tmp/d1/d2 [root@server30 d1]# ls -ldZ /tmp/d1
drwxr-xr-x. 3 root root unconfined_u:object_r:user_tmp_t:s0 16 Jul 29 13:17 /tmp/d1
[root@server30 d1]# ls -ldZ /tmp/d1/d2
drwxr-xr-x. 2 root root unconfined_u:object_r:user_tmp_t:s0 6 Jul 29 13:17 /tmp/d1/d2etc_t recursively with the chcon command and confirm. [root@server30 tmp]# chcon -Rv -t etc_t /tmp/d1
changing security context of '/tmp/d1/d2'
changing security context of '/tmp/d1'
[root@server30 tmp]# ls -ldZ /tmp/d1
drwxr-xr-x. 3 root root unconfined_u:object_r:etc_t:s0 16 Jul 29 13:17 /tmp/d1
[root@server30 tmp]# ls -ldZ /tmp/d1/d2
drwxr-xr-x. 2 root root unconfined_u:object_r:etc_t:s0 6 Jul 29 13:17 /tmp/d1/d2semanage command to ensure the new context is persistent on the directory hierarchy. [root@server30 tmp]# semanage fcontext -a -t etc_t /tmp/d1
[root@server30 tmp]# reboot
[root@server30 ~]# ls -ldZ /tmp/d1
drwxr-xr-x. 3 root root unconfined_u:object_r:etc_t:s0 16 Jul 29 13:17 /tmp/d1
[root@server30 ~]# ls -ldZ /tmp/d1/d2
drwxr-xr-x. 2 root root unconfined_u:object_r:etc_t:s0 6 Jul 29 13:17 /tmp/d1/d2 [root@server30 ~]# semanage port -l | grep ^http_port
http_port_t tcp 80, 81, 443, 488, 8008, 8009, 8443, 9000
[root@server30 ~]# semanage port -at http_port_t -p tcp 9005 [root@server30 ~]# semanage port -l | grep ^http_port
http_port_t tcp 9005, 80, 81, 443, 488, 8008, 8009, 8443, 9000 [root@server30 ~]# touch /tmp/sef1 [root@server30 ~]# cp /tmp/sef1 /usr/local [root@server30 ~]# ls -lZ /tmp/sef1
-rw-r--r--. 1 root root unconfined_u:object_r:user_tmp_t:s0 0 Jul 29 13:33 /tmp/sef1
[root@server30 ~]# ls -lZ /usr/local/sef1
-rw-r--r--. 1 root root unconfined_u:object_r:usr_t:s0 0 Jul 29 13:33 /usr/local/sef1--preserve=context option with the cp command. [root@server30 ~]# touch /tmp/sef2
[root@server30 ~]# cp --preserve=context /tmp/sef2 /var/local/ [root@server30 ~]# ls -lZ /tmp/sef2 /var/local/sef2
-rw-r--r--. 1 root root unconfined_u:object_r:user_tmp_t:s0 0 Jul 29 13:35 /tmp/sef2
-rw-r--r--. 1 root root unconfined_u:object_r:user_tmp_t:s0 0 Jul 29 13:36 /var/local/sef2ssh_use_tcpd using the getsebool and sestatus commands. [root@server30 ~]# getsebool -a | grep ssh_use_tcpd
ssh_use_tcpd --> offsetsebool command and toggle the value of the directive. [root@server30 ~]# setsebool ssh_use_tcpd 1 getsebool, semanage, or sestatus command. [root@server30 ~]# getsebool -a | grep ssh_use_tcpd
ssh_use_tcpd --> on
[root@server30 ~]# sestatus -b | grep ssh_use_tcpd
ssh_use_tcpd on
[root@server30 ~]# semanage boolean -l | grep ssh_use_tcpd
ssh_use_tcpd (on , off) Allow ssh to use tcpdfirewalld Zonesfirewalldfirewall-cmd command, graphically using the web console, or manually by editing rules files.Match source ip to zone that matches address > match based on zone the interface is in > matches default zone
firewalld inspects each incoming packet to determine the source IP address and applies the rules of the zone that has a match for the address.
In the event no zone configuration matches the address, it associates the packet with the zone that has the network connection defined, and applies the rules of that zone.
If neither works, firewalld associates the packet with the default zone, and enforces the rules of the default zone on the packet.
Several predefined zone files that may be selected or customized.
These files include templates for traffic that must be blocked or dropped, and for traffic that is:
public zone is the default zone, and it is activated by default when the firewalld service is started.
Predefined zones sorted based on the trust level from trusted to untrusted:
trusted
internal
home
work
dmz
external
public
block
drop
Drop all incoming traffic without responding with ICMP errors.
Intended for use in highly secure places.
For all the predefined zones, outgoing traffic is allowed by default.
firewalld stores zone rules in XML format at two locations
can copy the required zone file to the /etc/firewalld/zones directory manually, and make the necessary changes.
The firewalld service reads the files saved in this location, and applies the rules defined in them.
View the system Zones:
[root@server30 ~]# ll /usr/lib/firewalld/zones
total 40
-rw-r--r--. 1 root root 312 Nov 6 2023 block.xml
-rw-r--r--. 1 root root 306 Nov 6 2023 dmz.xml
-rw-r--r--. 1 root root 304 Nov 6 2023 drop.xml
-rw-r--r--. 1 root root 317 Nov 6 2023 external.xml
-rw-r--r--. 1 root root 410 Nov 6 2023 home.xml
-rw-r--r--. 1 root root 425 Nov 6 2023 internal.xml
-rw-r--r--. 1 root root 729 Feb 21 23:44 nm-shared.xml
-rw-r--r--. 1 root root 356 Nov 6 2023 public.xml
-rw-r--r--. 1 root root 175 Nov 6 2023 trusted.xml
-rw-r--r--. 1 root root 352 Nov 6 2023 work.xmlView the public zone:
[root@server30 ~]# cat /usr/lib/firewalld/zones/public.xml
<?xml version="1.0" encoding="utf-8"?>
<zone>
<short>Public</short>
<description>For use in public areas. You do not trust the other computers on networks to not harm your computer. Only selected incoming connections are accepted.</description>
<service name="ssh"/>
<service name="dhcpv6-client"/>
<service name="cockpit"/>
<forward/>
</zone>A listing of the system service files is presented below:
root@server30 ~]# ll /usr/lib/firewalld/services
total 884
-rw-r--r--. 1 root root 352 Nov 6 2023 afp.xml
-rw-r--r--. 1 root root 399 Nov 6 2023 amanda-client.xml
-rw-r--r--. 1 root root 427 Nov 6 2023 amanda-k5-client.xml
-rw-r--r--. 1 root root 283 Nov 6 2023 amqps.xml
-rw-r--r--. 1 root root 273 Nov 6 2023 amqp.xml
-rw-r--r--. 1 root root 285 Nov 6 2023 apcupsd.xml
-rw-r--r--. 1 root root 301 Nov 6 2023 audit.xml
-rw-r--r--. 1 root root 436 Nov 6 2023 ausweisapp2.xml
-rw-r--r--. 1 root root 320 Nov 6 2023 bacula-client.xml
-rw-r--r--. 1 root root 346 Nov 6 2023 bacula.xml
-rw-r--r--. 1 root root 390 Nov 6 2023 bareos-director.xml
...
...Shows the content of the ssh service file:
[root@server30 ~]# cat /usr/lib/firewalld/services/ssh.xml
<?xml version="1.0" encoding="utf-8"?>
<service>
<short>SSH</short>
<description>Secure Shell (SSH) is a protocol for logging into and executing commands on remote machines. It provides secure encrypted communications. If you plan on accessing your machine remotely via SSH over a firewalled interface, enable this option. You need the openssh-server package installed for this option to be useful.</description>
<port protocol="tcp" port="22"/>
</service>firewall-cmdfirewall-cmd Command--state
--reload
--permanent
--get-default-zone
--set-default-zone
--get-zones
–get-active-zones
--list-all
--list-all-zones
–zone
--get-services
--list-services
--add-service
--remove-service
--query-service
--list-ports
--add-port
--remove-port
--query-port
--list-interfaces
--add-interface
--change-interface
--remove-interface
--list-sources
--add-source
--change-source
--remove-source
--add and --remove options
Check the running status of the firewalld service using either the systemctl or the firewall-cmd command.
[root@server20 ~]# firewall-cmd --state
running
[root@server20 ~]# systemctl status firewalld -l --no-pager
● firewalld.service - firewalld - dynamic firewall daemon
Loaded: loaded (/usr/lib/systemd/system/firewalld.service; enabled; preset: enabled)
Active: active (running) since Thu 2024-07-25 13:25:21 MST; 44min ago
Docs: man:firewalld(1)
Main PID: 829 (firewalld)
Tasks: 2 (limit: 11108)
Memory: 43.9M
CPU: 599ms
CGroup: /system.slice/firewalld.service
└─829 /usr/bin/python3 -s /usr/sbin/firewalld --nofork --nopid
Jul 25 13:25:21 server20 systemd[1]: Starting firewalld - dynamic firewall daemon...
Jul 25 13:25:21 server20 systemd[1]: Started firewalld - dynamic firewall daemon.1. Determine the name of the current default zone:
[root@server20 ~]# firewall-cmd --get-default-zone
public2. Add a permanent rule to allow HTTP traffic on its default port:
[root@server20 ~]# firewall-cmd --permanent --add-service http
successThe command made a copy of the public.xml file from /usr/lib/firewalld/zones directory into the /etc/firewalld/zones directory, and added the rule for the HTTP service.
3. Activate the new rule:
[root@server20 zones]# firewall-cmd --reload
success4. Confirm the activation of the new rule:
[root@server20 zones]# firewall-cmd --list-services
cockpit dhcpv6-client http nfs ssh5. Display the content of the default zone file to confirm the addition of the permanent rule:
[root@server20 zones]# cat /etc/firewalld/zones/public.xml
<?xml version="1.0" encoding="utf-8"?>
<zone>
<short>Public</short>
<description>For use in public areas. You do not trust the other computers on networks to not harm your computer. Only selected incoming connections are accepted. </description>
<service name="ssh"/>
<service name="dhcpv6-client"/>
<service name="cockpit"/>
<service name="nfs"/>
<service name="http"/>
<forward/>
</zone>6. Add a runtime rule to allow traffic on TCP port 443 and verify:
[root@server20 zones]# firewall-cmd --add-port 443/tcp
success
[root@server20 zones]# firewall-cmd --list-ports
443/tcp7. Add a permanent rule to the internal zone for TCP port range 5901 to 5910:
[root@server20 zones]# firewall-cmd --add-port 5901-5910/tcp --permanent --zone internal
success8. Display the content of the internal zone file to confirm the addition of the permanent rule:
[root@server20 zones]# cat /etc/firewalld/zones/internal.xml
<?xml version="1.0" encoding="utf-8"?>
<zone>
<short>Internal</short>
<description>For use on internal networks. You mostly trust the other computers on the networks to not harm your computer. Only selected incoming connections are accepted. </description>
<service name="ssh"/>
<service name="mdns"/>
<service name="samba-client"/>
<service name="dhcpv6-client"/>
<service name="cockpit"/>
<port port="5901-5910" protocol="tcp"/>
<forward/>
</zone>9. Switch the default zone to internal and confirm:
[root@server20 zones]# firewall-cmd --set-default-zone internal
success [root@server20 zones]# firewall-cmd --get-default-zone
internal10. Activate the rules defined in the internal zone and list the port range added earlier:
[root@server20 zones]# firewall-cmd --list-ports
5901-5910/tcp1. Remove the permanent rule for HTTP from the public zone:
[root@server20 zones]# firewall-cmd --remove-service=http --zone public --permanent
success2. Remove the permanent rule for ports 5901 to 5910 from the internal zone:
[root@server20 zones]# firewall-cmd --remove-port 5901- 5910/tcp --permanent
success3. Switch the default zone to public and validate:
[root@server20 zones]# firewall-cmd --set-default- zone=public
success
[root@server20 zones]# firewall-cmd --get-default-zone
public4. Activate the public zone rules, and list the current services:
[root@server20 zones]# firewall-cmd --reload
success
[root@server20 zones]# firewall-cmd --list-services
cockpit dhcpv6-client nfs ssh1. Remove the rule for the sshd service on server20:
[root@server20 zones]# firewall-cmd --remove-service ssh
success2. Issue the ssh command on server10 to access server20:
[root@server10 ~]# ssh 192.168.0.37
ssh: connect to host 192.168.0.37 port 22: No route to host3. Add the rule back for sshd on server20:
[root@server20 zones]# firewall-cmd --add-service ssh
success4. Issue the ssh command on server10 to access server20. Enter “yes” if prompted and the password for user1.
[root@server10 ~]# ssh 192.168.0.37
The authenticity of host '192.168.0.37 (192.168.0.37)' can't be established.
ED25519 key fingerprint is SHA256:Z8nFu0Jj1ASZeXByiy3aAWHpUhGhUmDCr+Omu/iWTjs.
This key is not known by any other names
Are you sure you want to continue connecting (yes/no/[fingerprint])? yes
Warning: Permanently added '192.168.0.37' (ED25519) to the list of known hosts.
root@192.168.0.37's password:
Web console: https://server20:9090/ or https://192.168.0.37:9090/
Register this system with Red Hat Insights: insights- client --register
Create an account or view all your systems at https://red.ht/insights-dashboard
Last login: Thu Jul 25 13:37:47 2024 from 192.168.0.21/ [root@server20 ~]# firewall-cmd --add-service https --permanent
success
[root@server20 ~]# firewall-cmd --reload
successfirewall-cmd command. [root@server20 ~]# cat /etc/firewalld/zones/public.xml
<?xml version="1.0" encoding="utf-8"?>
<zone>
<short>Public</short>
<description>For use in public areas. You do not trust the other computers on networks to not harm your computer. Only selected incoming connections are accepted.</description>
<service name="ssh"/>
<service name="dhcpv6-client"/>
<service name="cockpit"/>
<service name="nfs"/>
<service name="https"/>
<forward/>
</zone>
[root@server20 ~]# firewall-cmd --list-services
cockpit dhcpv6-client https nfs ssh [root@server20 ~]# firewall-cmd --add-port 8000- 8005/udp --zone trusted --permanent
success
[root@server20 ~]# firewall-cmd --reload
successfirewall-cmd command. [root@server20 ~]# firewall-cmd --list-ports -- zone trusted
8000-8005/udp
[root@server20 ~]# cat /etc/firewalld/zones/trusted.xml
<?xml version="1.0" encoding="utf-8"?>
<zone target="ACCEPT">
<short>Trusted</short>
<description>All network connections are accepted.</description>
<port port="8000-8005" protocol="udp"/>
<forward/>
</zone>Secure Shell (SSH)
ssh and sftp for remote users to log in, transfer files, and execute commands securely.Symmetric Technique
Asymmetric Technique
GSSAPI-Based Authentication
Host-Based Authentication
Private/Public Key-Based Authentication
Challenge-Response Authentication
Password-Based Authentication
RSA (Rivest-Shamir-Adleman)
DSA and ECDSA (Digital Signature Algorithm and Elliptic Curve Digital Signature Algorithm)
openssh
ssh-keygen command and some library routinesopenssh-clients
sftp, ssh, and ssh-copy-id, and a client configuration file /etc/ssh/ssh_configopenssh-server
sshd
Preconfigured and operational on new RHEL installations
Allows remote users to log in to the system using an ssh client program such as PuTTY or the ssh command.
Daemon listens on TCP port 22
Use sftp instead of scp do to scp security flaws.
sftp
ssh
ssh-copy-id
ssh-keygen
/etc/ssh/sshd_config
/var/log/secure
View directives listed in /etc/ssh/sshd_config:
[root@server30 tmp]# cat /etc/ssh/sshd_configPort
Protocol
ListenAddress
SyslogFacility
LogLevel
Identifies the level of criticality for the messages to be logged. Default is INFO.
PermitRootLogin
Allows or disallows the root user to log in directly to the system. Default is yes.
PubKeyAuthentication
Enables or disables public key-based authentication. Default is yes.
AuthorizedKeysFile
Sets the name and location of the file containing a user’s authorized keys. Default is ~/.ssh/authorized_keys.
PasswordAuthentication
Enables or disables local password authentication. Default is yes.
PermitEmptyPasswords
Allows or disallows the use of null passwords. Default is no.
ChallengeResponseAuthentication
Enables or disables challenge-response authentication mechanism. Default is yes.
UsePAM
Enables or disables user authentication via PAM. If enabled, only root will be able to run the sshd daemon. Default is yes.
X11Forwarding
Allows or disallows remote access to graphical applications. Default is yes.
/etc/ssh/ssh_config
View the default directive settings:
[root@server30 tmp]# cat /etc/ssh/sshd_config
Host
ForwardX11
PasswordAuthentication
StrictHostKeyChecking
Whether to add host keys (host fingerprints) to ~/.ssh/known_hosts when accessing a host for the first time
What to do when the keys of a previously accessed host mismatch with what is stored in ~/.ssh/known_hosts.
no:
yes:
accept-new:
ask (default):
IdentityFile
Port
Sets the port number to listen on. Default is 22.
Protocol
Specifies the default protocol version to use
~/.ssh/
ssh-keygen command for the first time to generate a key pair1. Issue the ssh command as user1 on server10:
[user1@server30 tmp]$ ssh server202. Issue the basic Linux commands whoami, hostname, and pwd to confirm that you are logged in as user1 on server20 and placed in the correct home directory:
[user1@server40 ~]$ whoami
user1
[user1@server40 ~]$ hostname
server40
[user1@server40 ~]$ pwd
/home/user13. Run the logout or the exit command or simply press the key combination Ctrl+d to log off server20 and return to server10:
[user1@server40 ~]$ exit
logout
Connection to server40 closed.If you wish to log on as a different user such as user2 (assuming user2 exists on the target server server20), you may run the ssh command in either of the following ways:
[user1@server30 tmp]$ ssh -l user2 server40
[user1@server30 tmp]$ ssh user2@server40
1. Log on to server10 as user1.
2. Generate RSA keys without a password (-N) and without detailed output (-q). Press Enter when prompted to provide the filename to store the private key.
[user1@server30 tmp]$ ssh-keygen -N "" -q
Enter file in which to save the key (/home/user1/.ssh/id_rsa): View the private key:
[user1@server30 tmp]$ cat ~/.ssh/id_rsa
View the public key:
[user1@server30 tmp]$ cat ~/.ssh/id_rsa.pub
3. Copy the public key file to server20 under /home/user1/.ssh directory.
user1@server30 tmp]$ ssh-copy-id server40
/usr/bin/ssh-copy-id: INFO: Source of key(s) to be installed: "/home/user1/.ssh/id_rsa.pub"
/usr/bin/ssh-copy-id: INFO: attempting to log in with the new key(s), to filter out any that are already installed
/usr/bin/ssh-copy-id: INFO: 1 key(s) remain to be installed -- if you are prompted now it is to install the new keys
user1@server40's password:
Number of key(s) added: 1
Now try logging into the machine, with: "ssh 'server40'"
and check to make sure that only the key(s) you wanted were added.[user1@server30 tmp]$ cat ~/.ssh/known_hosts
4. On server10, run the ssh command as user1 to connect to server20. You will not be prompted for a password because there was none assigned to the ssh keys.
[user1@server30 tmp]$ ssh server40
Register this system with Red Hat Insights: insights-client --register
Create an account or view all your systems at https://red.ht/insights-dashboard
Last login: Sun Jul 21 01:20:17 2024 from 192.168.0.30View this login attempt in the /var/log/secure file on server20:
[user1@server40 ~]$ sudo tail /var/log/secure
ssh command to run programs without remoting in:Execute the hostname command on server20:
[user1@server30 tmp]$ ssh server40 hostname
server40Run the nmcli command on server20 to show (s) active network connections(c):
[user1@server30 tmp]$ ssh server40 nmcli c s
NAME UUID TYPE DEVICE
enp0s3 1c391bb6-20a3-4eb4-b717-1e458877dbe4 ethernet enp0s3
lo 175f8a4c-1907-4006-b838-eb43438d847b loopback lo On server10, to connect to server20:
[user1@server30 tmp]$ sftp server40
Connected to server40.
sftp> Type ? at the prompt to list available commands along with a short description:
[user1@server30 tmp]$ sftp server40
Connected to server40.
sftp> ?
Available commands:
bye Quit sftp
cd path Change remote directory to 'path'
chgrp [-h] grp path Change group of file 'path' to 'grp'
chmod [-h] mode path Change permissions of file 'path' to 'mode'
chown [-h] own path Change owner of file 'path' to 'own'
df [-hi] [path] Display statistics for current directory or
filesystem containing 'path'
exit Quit sftp
get [-afpR] remote [local] Download file
help Display this help text
lcd path Change local directory to 'path'
lls [ls-options [path]] Display local directory listing
lmkdir path Create local directory
ln [-s] oldpath newpath Link remote file (-s for symlink)
lpwd Print local working directory
ls [-1afhlnrSt] [path] Display remote directory listing
lumask umask Set local umask to 'umask'
mkdir path Create remote directory
progress Toggle display of progress meter
put [-afpR] local [remote] Upload file
pwd Display remote working directory
quit Quit sftp
reget [-fpR] remote [local] Resume download file
rename oldpath newpath Rename remote file
reput [-fpR] local [remote] Resume upload file
rm path Delete remote file
rmdir path Remove remote directory
symlink oldpath newpath Symlink remote file
version Show SFTP version
!command Execute 'command' in local shell
! Escape to local shell
? Synonym for helpExample:
sftp> ls
sftp> mkdir /tmp/dir10-20
sftp> cd /tmp/dir10-20
sftp> pwd
Remote working directory: /tmp/dir10-20
sftp> put /etc/group
Uploading /etc/group to /tmp/dir10-20/group
group 100% 1118 1.0MB/s 00:00
sftp> ls -l
-rw-r--r-- 1 user1 user1 1118 Jul 21 01:41 group
sftp> cd ..
sftp> pwd
Remote working directory: /tmp
sftp> cd /home/user1
sftp> get /usr/bin/gzip
Fetching /usr/bin/gzip to gzip
gzip 100% 90KB 23.0MB/s 00:00
sftp> lcd, lls, lpwd, and lmkdir are run on the source server.Type quit at the sftp> prompt to exit the program when you’re done:
sftp> quit
[user1@server30 tmp]$ [root@server40 ~]# adduser user20
[root@server40 ~]# passwd user20
Changing password for user user20.
New password:
BAD PASSWORD: The password is shorter than 8 characters
Retype new password:
passwd: all authentication tokens updated successfully.[user20@server40 ~]# ssh-keygen -N "" -q
Enter file in which to save the key (/root/.ssh/id_rsa): [user20@server40 ~]# ssh-copy-id server30[user20@server40 ~]# ssh server30
Activate the web console with: systemctl enable --now cockpit.socket
Register this system with Red Hat Insights: insights-client --register
Create an account or view all your systems at https://red.ht/insights-dashboard
Last login: Fri Jul 19 14:09:22 2024
[user20@server30 ~]# As user1 with sudo on server30, edit the /etc/ssh/sshd_config file and change the value of the directive PermitRootLogin to “no”.
[user1@server30 ~]$ sudo vim /etc/ssh/sshd_config
Use the systemctl command to activate the change.
[user1@server30 ~]$ systemctl restart sshd
==== AUTHENTICATING FOR org.freedesktop.systemd1.manage-units ====
Authentication is required to restart 'sshd.service'.
Authenticating as: root
Password:
==== AUTHENTICATION COMPLETE ====(this didn’t work, I think it’s because I configured passwordless authentication on here)
New Fedora Build Using Ansible
Learning touch typing
My Fedora Setup
Fedora Silverblue
sudo dnf -y install vim
### Make vim default sudoer editor
echo "Defaults editor=/usr/bin/vim" | sudo tee /etc/sudoers.d/99_custom_editor
### remove password prompts when using sudo
sudo sed -i 's/^#\s*%wheel\s\+ALL=(ALL)\s\+NOPASSWD: ALL/%wheel ALL=(ALL) NOPASSWD: ALL/' /etc/sudoers
sudo sed -i 's/^%wheel\s\+ALL=(ALL)\s\+ALL/# %wheel ALL=(ALL) ALL/' /etc/sudoers
sudo dnf -y install https://mirrors.rpmfusion.org/free/fedora/rpmfusion-free-release-$(rpm -E %fedora).noarch.rpm \
https://mirrors.rpmfusion.org/nonfree/fedora/rpmfusion-nonfree-release-$(rpm -E %fedora).noarch.rpm
sudo dnf5 install 'dnf5-command(groupinstall)'
sudo dnf -y groupinstall \
"Development Tools"
/bin/bash -c "$(curl -fsSL https://raw.githubusercontent.com/Homebrew/install/HEAD/install.sh)"
echo 'eval "$(/home/linuxbrew/.linuxbrew/bin/brew shellenv)"' >> ~/.bash_profile
eval "$(/home/linuxbrew/.linuxbrew/bin/brew shellenv)"
sudo dnf -y install ansibleansible setup
vim setup.yml
---
- name: Setup Development Environment
hosts: localhost
become: yes
tasks:
# Install Flatpak applications
- name: Install Flatpak applications
flatpak:
name: "{{ item }}"
state: present
loop:
- com.bitwarden.desktop
- com.brave.Browser
- org.gimp.GIMP
- org.gnome.Snapshot
- org.libreoffice.LibreOffice
- org.remmina.Remmina
- com.termius.Termius
- com.slack.Slack
- org.keepassxc.KeePassXC
- md.obsidian.Obsidian
- com.calibre_ebook.calibre
- org.mozilla.Thunderbird
- us.zoom.Zoom
- org.wireshark.Wireshark
- com.google.Chrome
- io.github.shiftey.Desktop
- io.github.dvlv.boxbuddyrs
- com.github.tchx84.Flatseal
- io.github.flattool.Warehouse
- io.missioncenter.MissionCenter
- com.github.rafostar.Clapper
- com.mattjakeman.ExtensionManager
- com.jgraph.drawio.desktop
- org.adishatz.Screenshot
- com.github.finefindus.eyedropper
- com.github.johnfactotum.Foliate
- com.obsproject.Studio
- com.vivaldi.Vivaldi
- com.vscodium.codium
- io.podman_desktop.PodmanDesktop
- org.kde.kdenlive
- org.virt_manager.virt-manager
- io.github.input_leap.input-leap
- com.nextcloud.desktopclient.nextcloud
# Install Development Tools group using dnf
- name: Install Development Tools group
dnf:
name: "@Development Tools"
state: present
- name: Install @virtualization group package
dnf:
name: '@virtualization'
state: present
# Update dnf configuration
- name: Update dnf configuration for fastestmirror and parallel downloads
block:
- lineinfile:
path: /etc/dnf/dnf.conf
line: "fastestmirror=True"
- lineinfile:
path: /etc/dnf/dnf.conf
line: "max_parallel_downloads=10"
- lineinfile:
path: /etc/dnf/dnf.conf
line: "defaultyes=True"
- lineinfile:
path: /etc/dnf/dnf.conf
line: "keepcache=True"
# Perform DNF update and install required packages
- name: Update DNF and install required packages
dnf:
name:
- gnome-screenshot
- wireguard-tools
- gnome-tweaks
- gnome-themes-extra
- telnet
- nmap
state: present
# Set GNOME theme (using gsettings directly)
- name: Set GNOME theme to Adwaita-dark
shell: gsettings set org.gnome.desktop.interface gtk-theme "Adwaita-dark"
become_user: "davidt"
- name: Enable experimental Mutter features
shell: gsettings set org.gnome.mutter experimental-features "['scale-monitor-framebuffer']"
become_user: "davidt"
# Install Go programming language
- name: Install Go
dnf:
name: go
state: present
- name: Add Go to the PATH in .bashrc
lineinfile:
path: "/home/davidt/.bashrc"
line: 'export PATH=$PATH:/usr/local/go/bin'
state: present
become_user: "davidt"
- name: Source .bashrc
shell: source /home/davidt/.bashrc
become_user: "davidt"
- name: Install pip using yum
yum:
name: python-pip
state: present
run the playbook:
ansible-playbook setup.yml
Then reboot…
Then sign into nextcloud and begin sync.
brew install hugo
Install gnome extentions:
pip install --user gnome-extensions-cli
gext install "appindicatorsupport@rgcjonas.gmail.com"
gext enable "appindicatorsupport@rgcjonas.gmail.com"
gext install "legacyschemeautoswitcher@joshimukul29.gmail.com"
gext install "blur-my-shell@aunetx"
gext install "dash-to-dock@micxgx.gmail.com"
gext install "gsconnect@andyholmes.github.io"
gext install "logomenu@aryan_k"
gext install "search-light@icedman.github.com"Restore remmina connections
cp ~/Nextcloud/remmina/* ~/.var/app/org.remmina.Remmina/data/remmina/
Restore vimrc
cat ~/Nextcloud/Documents/dotfiles/vimrc.bak > ~/.vimrc
Restore ~/.bashrc: (if username is the same)
cat ~/Nextcloud/Documents/dotfiles/bashrc.bak > ~/.bashrc
Git config
git config --global user.email "tdavetech@gmail.com"
git config --global user.name "linuxreader"
# Store git credentials (from inside a git directory):
git config credential.helper storeInstall:
sudo dnf -y install onedrive
Start:
onedrive
Display config:
onedrive --display-configSync and prefer local copy:
onedrive --sync --local-first
Enable the user level service: `onedrive –user enable –now onedrive
Force local to the cloud onedrive –synchronize –force
Restore files from cloud onedrive –synchronize –resync
Add foce option to top of the user service file to ignore big delete flag.
systemctl --user edit onedrive
[Service]
ExecStart=
ExecStart=/usr/bin/onedrive --monitor --verbose --forceUsing Monkey Type to get my first speedtest results:
02/24/2025 55 WPM Learning to type with: https://www.typing.com/ https://www.typingclub.com/
Going to be practicing on these sites: https://10fastfingers.com/ https://www.keybr.com/ https://play.typeracer.com/
try ctrl+backspace to delete entire word
Day 1 (1 hour) Typing club Lessons 1-41
Day 2 (1 hour) Typing club Lessons 1-41
Day 3 (1 hour) Typing club Lessons 1-50
Day 4 (1 hour) Typing club Lessons 2-55
Day 5 (1 hour) Typing club Lessons 2-62
Day 6 (1 hour) Typing club Lessons 25-46 Lessons 2-10 Above 50 WPM at 100% Hands very cold and lack of sleep today.
Day 7 (1 hour) Typing Club Lessons 53 - 81
Day 8 (skipped) Busy with sick child
Day 9 (1.5 hours) Typing Club Lessons 55-107
Day 10 (30 minutes) Typing Club Lessons 108-119
Day 11 (1 hour) Typing Club Lessons 120-141
Day 12 (30 minutes) Typing Club Lessons 142-151
Day 13 (30 minutes) Typing Club Lessons 151-164
When you first download Fedora Workstation, it’s going to be a little hard to figure out how to make it usable. Especially if you’ve never tinkered with Linux before.
This is because Fedora with Gnome desktop is a blank canvas. The point is to let you customize it to your needs. When I first install Fedora, I pull my justfile to install most of the programs I use:
`curl -sL https://raw.githubusercontent.com/linuxreader/dotfiles/main/dot_justfile -o ~/.justfile`
To run the just file, I then install the just program and run it on the justfile:
dnf install just
just first-install
This is my current .justfile:
first-install:
# Install flatpacks
flatpak install --noninteractive \
flathub com.bitwarden.desktop \
flathub com.brave.Browser \
flathub org.gimp.GIMP \
flathub org.gnome.Snapshot \
flathub org.libreoffice.LibreOffice \
flathub org.remmina.Remmina \
flathub com.termius.Termius \
flathub com.slack.Slack \
flathub org.keepassxc.KeePassXC \
flathub md.obsidian.Obsidian \
flathub com.calibre_ebook.calibre \
flathub org.mozilla.Thunderbird \
flathub us.zoom.Zoom \
flathub org.wireshark.Wireshark \
flathub com.nextcloud.desktopclient.nextcloud \
flathub com.google.Chrome \
flathub io.github.shiftey.Desktop \
flathub io.github.dvlv.boxbuddyrs \
flathub com.github.tchx84.Flatseal \
flathub io.github.flattool.Warehouse \
flathub io.missioncenter.MissionCenter \
flathub org.gnome.World.PikaBackup \
flathub com.github.rafostar.Clapper \
flathub com.mattjakeman.ExtensionManager \
flathub com.jgraph.drawio.desktop \
flathub org.adishatz.Screenshot \
flatpak com.github.finefindus.eyedropper \
flatpak com.github.johnfactotum.Foliate \
flatpak com.usebottles.bottles \
flatpak com.obsproject.Studio \
flatpak net.lutris.Lutris \
flatpak com.vivaldi.Vivaldi \
flatpak com.vscodium.codium \
flatpak io.podman_desktop.PodmanDesktop \
flatpak org.kde.kdenlive
# Install Homebrew
sudo dnf -y groupinstall \
"Development Tools"
/bin/bash -c "$(curl -fsSL https://raw.githubusercontent.com/Homebrew/install/HEAD/install.sh)"
echo 'eval "$(/home/linuxbrew/.linuxbrew/bin/brew shellenv)"' >> ~/.bash_profile
eval "$(/home/linuxbrew/.linuxbrew/bin/brew shellenv)"
# Configure dnf for faster speeds
sudo bash -c 'echo "fastestmirror=True" >> /etc/dnf/dnf.conf'
sudo bash -c 'echo "max_parallel_downloads=10" >> /etc/dnf/dnf.conf'
sudo bash -c 'echo "defaultyes=True" >> /etc/dnf/dnf.conf'
sudo bash -c 'echo "keepcache=True" >> /etc/dnf/dnf.conf'
# Other software, updates, etc.
sudo dnf -y update
sudo dnf install -y gnome-screenshot
sudo dnf -y groupupdate core
sudo flatpak remote-add --if-not-exists flathub https://flathub.org/repo/flathub.flatpakrepo
sudo dnf install -y wireguard-tools
sudo dnf install gnome-tweaks
sudo dnf -y install https://mirrors.rpmfusion.org/free/fedora/rpmfusion-free-release-$(rpm -E %fedora).noarch.rpm \
https://mirrors.rpmfusion.org/nonfree/fedora/rpmfusion-nonfree-release-$(rpm -E %fedora).noarch.rpm
sudo dnf -y update
sudo dnf install gnome-themes-extra
gsettings set org.gnome.desktop.interface gtk-theme "Adwaita-dark"
sudo dnf install -y go
echo 'export PATH=$PATH:/usr/local/go/bin' >> ~/.bashrc
source ~/.bashrc
gsettings set org.gnome.mutter experimental-features "['scale-monitor-framebuffer']"
homebrew:
brew install \
chezmoi \
hugo \
virt-managerthen run just homebrew after a reboot to install packages with brew
Add to /etc/sudoers to make Vim default for visudo
Defaults editor=/usr/bin/vim
sudo dnf install @virtualizationsudo vi /etc/libvirt/libvirtd.confUncomment the line: unix_sock_group = "libvirt"
Adjust the UNIX socket permissions for the R/W socket:
unix_sock_rw_perms = "0770"
Start the service:
systemctl enable --now libvirtd
Add user to group:
sudo usermod -a -G libvirt $(whoami) && sudo usermod -a -G kvm $(whoami)use the Tweaks app to set the appearance of Legacy Applications to ‘adwaita-dark’.
Howdy is a tool for using an IR webcam for authentication:
sudo dnf copr enable principis/howdy
sudo dnf --refresh install -y howdyhttps://copr.fedorainfracloud.org/coprs/principis/howdy/ https://github.com/boltgolt/howdy
I was using this to fix the Login Keyring error that is common with Fedora, but it no longer works.
sudo dnf -y install seahorse && seahorse
Applications > Passwords and Keys > Passwords > Right-click Login > Change Password to blank.
Chezmoi let’s you easy sync your dotfiles with Github and your other computers. Just init Chezmoi and add your Github username. This assumes your dotfiles in Github are saved in the proper format. `chezmoi init –apply linuxreader
If you need to use username with the format firstname.lastname, use the badname flag with the adduser command. You will have to create a normal user first, because you can’t do this during the initial install:
$ adduser --badname firstname.lastname
$ sudo usermod -aG wheel username
# uncomment this line in the visudo file
$ sudo visudo
%wheel ALL=(ALL) ALLDelete the other user:
$ userdel username
Clear cache (do this occasionally):
sudo dnf clean dbcache
or sudo dnf clean all
Update DNF:
sudo dnf -y update
Additional DNF commands: https://docs.fedoraproject.org/en-US/fedora/latest/system-administrators-guide/package-management/DNF/
RPM Fusion give you more accessibility to various software packages.
Install:
sudo dnf -y install https://mirrors.rpmfusion.org/free/fedora/rpmfusion-free-release-$(rpm -E %fedora).noarch.rpm https://mirrors.rpmfusion.org/nonfree/fedora/rpmfusion-nonfree-release-$(rpm -E %fedora).noarch.rpmUse AppStream to enable users to install packages using Gnome Software/KDE Discover:
sudo dnf -y groupupdate coreTo enable Flatpaks (this may no longer be needed:
flatpak remote-add --if-not-exists flathub https://flathub.org/repo/flathub.flatpakrepohttps://flatpak.org/setup/Fedora
Set a hostname for the system. This will show after next reboot:
sudo hostnamectl set-hostname "New_Custom_Name"
Here is some other stuff I install from the software center.
Input Leap let’s you share a mouse and keyboard between two workstations.

I don’t know what this is or why it is here: installing Git and a bunch of other stuff?
sudo dnf install git cmake make gcc-c++ xorg-x11-server-devel \
libcurl-devel avahi-compat-libdns_sd-devel \
libXtst-devel qt5-qtbase qt5-qtbase-devel \
qt5-qttools-devel libICE-devel libSM-devel \
openssl-devel libXrandr-devel libXinerama-develThe best way to manage VMs on desktop.

For managing containers.

Managing installed applications.

Task Manager like application.

For backing up your desktop.

Video player.

And some extensions installed through Extension Manager:

Install Gnome Screenshot tool:
Install the extention: https://extensions.gnome.org/extension/1112/screenshot-tool/
You also need to install from DNF for some reason:
dnf install -y gnome-screenshot
If you ever have the issue where Airpods won’t pair. Remove them from the pairing list, force them in pairing mode, and pair them back. This can be made easy with bluetoothctl:
Just in case, restart the bluetooth service:
sudo systemctl restart bluetooth
systemctl status bluetooth Show devices:
# bluetoothctl
[bluetooth] $ devices
Device 42:42:42:42:42:42 My AirPods <-- grab the name here
[bluetooth] $ remove 42:42:42:42:42:42 Now, make sure your Airpods are in the charging case, close the lid, wait 15 seconds, then open the lid. Press and hold the setup button on the case for up to 10 seconds. The status light should flash white, which means that your Airpods are ready to connect.
Pair them back:
[bluetooth] $ pair 42:42:42:42:42:42This lets you change display scaling in smaller increments. You’ll need to make sure Wayland is turned on.
Turn on the feature then reboot:
gsettings set org.gnome.mutter experimental-features "['scale-monitor-framebuffer']"
reboot
Kept having pasted format characters ^ mess up my groove. Here’s the fix.
Open your inputrc file and add the line below:
vim ~/.inputrc
"\C-v": ""sudo dnf install gimp
enable in screenshot tool after install for gimp {f}
Install Arrows https://graphicdesign.stackexchange.com/questions/44797/how-do-i-insert-arrows-into-a-picture-in-gimp
Go to your home folder
Go to .config/GIMP
Go to the folder with a version number (2.10 for me)
Go to scripts
Download the arrow.scm file and place it here. Don't forget to unzip.
Open GIMP and draw a pathFrom Tools menu, select Arrow
= h.265 main 10 profile media codec error =
See distrobox
GitHub - romkatv/zsh4humans: A turnkey configuration for Zsh
https://www.youtube.com/watch?v=eefsL9K2w4k
I am just running off of built in AMD graphics. So we just need to install support for Vulkan API
sudo dnf install vulkan-loader vulkan-loader.i686
Install Wine
$ sudo dnf -y install wine
Install Lutris Install the Flatpak version in software center.
Close Terminal shift + c + q
Previous Tab c + Page Up
Next Tab c + Page Down
Move to Specific Tab Alt + #
Full Screen F11
New Window Shift + Ctrl + t
Close Tab Shift + Ctrl + w
Run a command super + F2
Switch Between Applications Alt + Esc
Move Window to Left Monitor Shift + Super + <-
Move Window to Right Monitor Shift + Super + ->
Minimize Current Window Super + H
Close Current Appllication Ctrl + Q
Switch Between Tabs Ctrl + Tab
Switch Between Tabs in Reverse Ctrl + Shift + Tab
https://addons.mozilla.org/en-US/firefox/addon/detach-tab/
Detach Tab Ctrl _ Shift _ Space
Reattach Tab Ctrl + Shift + v
Installing via package manager because of screen sharing issue.
Upgrade dnf and download the slack rpm from the website.
Screen Sharing in Slack:
vim /usr/share/applications/slack.desktopUpdate the exec line to:
Exec=/usr/bin/slack --enable-features=WebRTCPipeWireCapturer %Uhttps://github.com/actualbudget/actual
add Defaults editor=/usr/bin/vim to top of visudo file.su
Automated setup https://universal-blue.org/
You get all the benefits of using containers Separates system level packages from applications.
System Level
- gnome shell extensions
- distrobox
Uses rpm-ostree? https://coreos.github.io/rpm-ostree/administrator-handbook/
Flatpacks
Remove fedora flatpack stuff and use flathub repos instead https://flatpak.org/setup/Fedora
Systemd unit for automatic flatpack updates
Update every 4 hours to mirror ubuntu
flatseal adjust permissions of flatpacks
check out apps.gnome.org
Rebase onto the “unsigned” image then reboot:
rpm-ostree rebase ostree-unverified-registry:ghcr.io/ublue-os/silverblue-main:39 and
Then the signed image and reboot:
rpm-ostree rebase ostree-image-signed:docker://ghcr.io/ublue-os/silverblue-main:39
Then do we you do after install, open the app store and install stuff via GUI or we
have a .justfile to install all flatpak/ homebrew packages https://universal-blue.discourse.group/t/introduction-to-just/42 https://just.systems/man/en/chapter_1.html
My justfile
import "/usr/share/ublue-os/justfile"
# You can add your own commands here! For documentation, see: [https://ublue.it/guide/just/](https://ublue.it/guide/just/)
first-install:
flatpak install \
flathub com.bitwarden.desktop \
flathub com.brave.Browser \
flathub com.discordapp.Discord \
flathub net.cozic.joplin_desktop \
flathub org.gimp.GIMP \
flathub org.gnome.Snapshot \
flathub org.libreoffice.LibreOffice \
flathub org.remmina.Remmina \
flathub com.termius.Termius \
flathub net.devolutions.RDM \
flathub com.slack.Slack \
flathub org.keepassxc.KeePassXC \
flathub md.obsidian.Obsidian \
flathub com.calibre_ebook.calibre \
flathub com.logseq.Logseq \
flathub org.mozilla.Thunderbird \
flathub us.zoom.Zoom \
flathub org.wireshark.Wireshark \
flathub com.nextcloud.desktopclient.nextcloud \
flathub com.google.Chrome
brew install \
ansible \
chezmoi \
neovim \
onedrive \
wireguard-toolsSet up github dotfiles repo
Install chezmoi and initialize:
chezmoi init
Sync with Chezmoi: https://www.chezmoi.io/quick-start/
Add dotfiles
chezmoi add ~/.bashrc
Edit a dotfile
chezmoi edit ~/.bashrc
See changes
chezmoi diff
Apply changes
chezmoi -v apply
to sync chezmoi with git:
chezmoi cd
git remote add origin https://github.com/$GITHUB_USERNAME/dotfiles.git
$ git push -u origin main
$ exitFor subsequent git pushes:
git commit -a -m "commit" && git push
Install all dotfiles with a single command:
chezmoi init --apply https://github.com/$GITHUB_USERNAME/dotfiles.git
If you use GitHub and your dotfiles repo is called dotfiles then this can be shortened to:
$ chezmoi init --apply $GITHUB_USERNAME
See a list of full commands:
chezmoi help
Or you can initialize and choose what you want:
chezmoi init https://github.com/$GITHUB_USERNAME/dotfiles.git
See what changes are awaiting:
chezmoi diff
Apply changes:
chezmoi apply -v
can also edit a file before applying:
chezmoi edit $FILE
Or merge the current file with new file:
chezmoi merge $FILE
From any machine, you can pull and apply changes from your repo:
chezmoi update -v
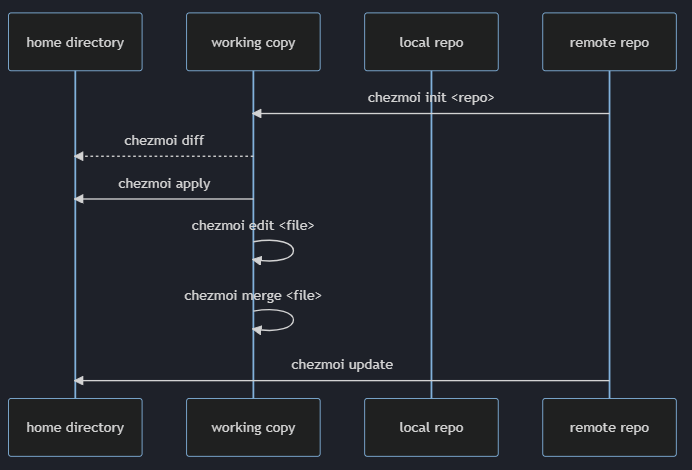
Add the justfile:
chezmoi add .justfile
Download from website
Install java
rpm-ostree install java
Runn the connect tunnel install script
Commands located in /var/usrlocal/Aventail must be ran as root `sudo ./startctui.sh
File permissions, ACLs, and finding things
File types, linking, viewing, and archiving files.
Permission classes
Permission types
chmod commandFlags chmod -v ::: Verbose.
Three-digit numbering system ranging from 0 to 7. 0 — 1 –x 2 -w- 3 -wx 4 r– 5 r-x 6 rw- 7 rwx
Defaults
Options
Setting a default ACL on a directory allows content sharing among user’s without having to modify access on each new file and subdirectory.
Extra permissions that can be set on files and directories.
Define permissions for named user and named groups.
Configured the same way on both files and directories.
Named Users
2 different groups of ACLs. Default ACLs and Access ACLs.
A “+” at the end of ls -l listing indicates ACL is set
getfacl
setfaclu:UID:perms
g:GID:perms
o:perms
m:perms
Switches
| Switch | Description |
|---|---|
| -b | Remove all Access ACLs |
| -d | Applies to default ACLs |
| -k | Removes all default ACLs |
| -m | Sets or modifies ACLs |
| -n | Prevent auto mask recalculation |
| -R | Apply Recursively to directory |
| -x | Remove Access ACL |
| -c | Display output without header |
[vagrant@server1 ~]$ sudo touch /root/file10
[vagrant@server1 ~]$ sudo find / -name file10 -print
/root/file10[vagrant@server1 ~]$ find /dev -iname usb*
/dev/usbmon0[vagrant@server1 etc]$ find ~ -size -1M[vagrant@server1 etc]$ sudo find /usr -size +40M
/usr/share/GeoIP/GeoLite2-City.b[vagrant@server1 etc]$ sudo find / -user daemon -not -group user1[vagrant@server1 etc]$ sudo find /usr -maxdepth 2 -type d -name src
/usr/local/src
/usr/src[vagrant@server1 etc]$ sudo find /usr -mindepth 3 -type d -name src
/usr/src/kernels/4.18.0-425.3.1.el8.x86_64/drivers/gpu/drm//display/dmub/src
/usr/src/kernels/4.18.0-425.3.1.el8.x86_64/tools/usb/usbip/src[vagrant@server1 etc]$ sudo find /etc -mtime +2000
/etc/libuser.conf
/etc/xattr.conf
/etc/whois.conf[vagrant@server1 etc]$ sudo find /etc -mtime 12[vagrant@server1 etc]$ sudo find /var/log -mmin -100
/var/log/rhsm/rhsmcertd.log
/var/log/rhsm/rhsm.log
/var/log/audit/audit.log
/var/log/dnf.librepo.log
/var/log/dnf.rpm.log
/var/log/sa
/var/log/sa/sa16
/var/log/sa/sar15
/var/log/dnf.log
/var/log/hawkey.log
/var/log/cron
/var/log/messages
/var/log/secure[vagrant@server1 etc]$ sudo find /var/log -mmin 25[vagrant@server1 etc]$ sudo find /dev -type b -perm 660
/dev/dm-1
/dev/dm-0
/dev/sda2
/dev/sda1
/dev/sda[vagrant@server1 etc]$ sudo find /dev -type c -perm -222[vagrant@server1 etc]$ sudo find /etc/systemd -perm /110 sudo find /usr -type l -perm -ug=rw [vagrant@server1 etc]$ sudo find / -name core -exec ls -ld {} \; sudo find /etc/sysconfig -name '*.conf' -ok cp {} /tmp \; cd /tmp
touch aclfile1
getfacl aclfile1 setfacl -m u:user1:rw,m:r aclfile1 setfacl -m m:rw aclfile1
getfacl -c aclfile1 su - user1
cd /tmp
touch acluser1 ls -l acluser1
getfacl acluser1 -c setfacl -m u:user100:6 acluser1 ls -l acluser1
getfacl -c acluser1Open another terminal as user100 and open the file and edit it.
Add user200 with full rwx permissions to acluser1 using the symbolic notation and then show the updated ACL settings:
setfacl -m u:user200:rwx acluser1
getfacl -c acluser1 setfacl -x u:user200 acluser1
getfacl acluser1 -c setfacl -b acluser1 ls -l acluser1
getfacl acluser1 -c groupadd -g 8000 aclgroup1 su - user1
cd /tmp
mkdir projects getfacl -c projects setfacl -dm u:user100:7,u:user200:rwx projects/
getfacl -c projects/ mkdir prjdir1
getfacl -c prjdir1 touch prjfile1
getfacl -c prjfilel su - user100
cd /tmp/projects
vim prjfile1
ls -l prjfile1
cd prjdir1
touch file100
pwd exit
su - user1
cd /tmp
setfacl -k projects
getfacl -c projects [vagrant@server1 ~]$ chmod u+x permfile1 -v
mode of 'permfile1' changed from 0444 (r--r--r--) to 0544 (r-xr--r--)
[vagrant@server1 ~]$ chmod -v go+w permfile1
mode of 'permfile1' changed from 0544 (r-xr--r--) to 0566 (r-xrw-rw-) [vagrant@server1 ~]$ chmod -v o-w permfile1
mode of 'permfile1' changed from 0566 (r-xrw-rw-) to 0564 (r-xrw-r--)
[vagrant@server1 ~]$ chmod -v a=rwx permfile1
mode of 'permfile1' changed from 0564 (r-xrw-r--) to 0777 (rwxrwxrwx) [vagrant@server1 ~]$ chmod g-w,o-wx permfile1 -v
mode of 'permfile1' changed from 0777 (rwxrwxrwx) to 0754 (rwxr-xr--) [vagrant@server1 ~]$ touch permfile2
[vagrant@server1 ~]$ chmod 444 permfile2
[vagrant@server1 ~]$ ls -l permfile2
-r--r--r--. 1 vagrant vagrant 0 Feb 4 12:22 permfile2 [vagrant@server1 ~]$ chmod -v 544 permfile2
mode of 'permfile2' changed from 0444 (r--r--r--) to 0544 (r-xr--r--) [vagrant@server1 ~]$ chmod -v 566 permfile2
mode of 'permfile2' changed from 0544 (r-xr--r--) to 0566 (r-xrw-rw-) [vagrant@server1 ~]$ chmod -v 564 permfile2
mode of 'permfile2' changed from 0566 (r-xrw-rw-) to 0564 (r-xrw-r--) [vagrant@server1 ~]$ chmod -v 777 permfile2
mode of 'permfile2' changed from 0564 (r-xrw-r--) to 0777 (rwxrwxrwx) [vagrant@server1 ~]$ umask
0002 [vagrant@server1 ~]$ umask -S
u=rwx,g=rwx,o=rx umask 027
umask u=rwx,g=rx,o= [vagrant@server1 ~]$ touch tempfile1
[vagrant@server1 ~]$ ls -l tempfile1
-rw-r-----. 1 vagrant vagrant 0 Feb 5 12:09 tempfile1
[vagrant@server1 ~]$ mkdir tempdir1
[vagrant@server1 ~]$ ls -ld tempdir1
drwxr-x---. 2 vagrant vagrant 6 Feb 5 12:10 tempdir1 [vagrant@server1 ~]$ ls -l /usr/bin/su
-rwsr-xr-x. 1 root root 50152 Aug 22 10:08 /usr/bin/su [vagrant@server1 ~]$ su - user1
Password:
Last login: Sun Feb 5 12:37:12 UTC 2023 on pts/1 sudo su - root chmod -v u-s /usr/bin/su ctrl+d [user1@server1 ~]$ su - root
Password:
su: Authentication failure [vagrant@server1 ~]$ sudo chmod -v +4000 /usr/bin/su
mode of '/usr/bin/su' changed from 0755 (rwxr-xr-x) to 4755 (rwsr-xr-x)Log into two terminals T1 root T2 user1 Opened with ssh
T2 list users currently logged in
whowrite rootchmod g-s /usr/bin/write -v[user1@server1 ~]$ write root
write: effective gid does not match group of /dev/pts/0[root@server1 ~]# sudo chmod -v +2000 /usr/bin/write
mode of '/usr/bin/write' changed from 0755 (rwxr-xr-x) to 2755 (rwxr-sr-x)write root [root@server1 ~]# adduser user100
[root@server1 ~]# adduser user200 [root@server1 ~]# groupadd -g 9999 sgrp [root@server1 ~]# usermod -aG sgrp user100
[root@server1 ~]# usermod -aG sgrp user200 [root@server1 ~]# mkdir /sdir [root@server1 ~]# chown root:sgrp /sdir [vagrant@server1 ~]$ sudo chmod g+s /sdir [root@server1 ~]# chmod g+w,o-rx /sdir [root@server1 ~]# ls -ld /sdir
drwxrws---. 2 root sgrp 6 Feb 13 15:49 /sdir [root@server1 ~]# su - user100
[user100@server1 ~]$ cd /sdir [user100@server1 sdir]$ touch file100
[user100@server1 sdir]$ ls -l file100
-rw-rw-r--. 1 user100 sgrp 0 Feb 10 22:41 file100 [root@server1 ~]# su - user200
[user200@server1 ~]$ cd /sdir [user200@server1 sdir]$ touch file200
[user200@server1 sdir]$ ls -l file200
-rw-rw-r--. 1 user200 sgrp 0 Feb 13 16:01 file200 [user200@server1 sdir]$ ls -l /tmp /var/tmp -d
drwxrwxrwt. 8 root root 185 Feb 13 16:12 /tmp
drwxrwxrwt. 4 root root 113 Feb 13 16:00 /var/tmp[user100@server1 sdir]$ cd /tmp[user100@server1 tmp]$ touch stickyfile[user200@server1 tmp]$ rm stickyfile
rm: remove write-protected regular empty file 'stickyfile'? y
rm: cannot remove 'stickyfile': Operation not permitted[vagrant@server1 ~]$ sudo chmod o-t /tmp
[vagrant@server1 ~]$ ls -ld /tmp
drwxrwxrwx. 8 root root 4096 Feb 13 22:00 /tmprm stickyfilesudo chmod -v +1000 /tmp touch file11
mkdir dir11 umask umask g=r,0=w touch file22
mkdir dir22 ls -l chmod g-w,o-r,o+w file11 chmod g-wx,o-rx,o+w dir11 mkdir /sdir
groupadd sgrp
adduser user1000 && adduser user2000
usermod -a -G sgrp user1000
usermod -a -G sgrp user2000 chgrp sgrp sdir
chmod g=rwx,o=--- sdir
chmod o+t sdir
chmod g+s sdir su - user1000
cd /sdir
touch testfile su - user200
cd /sdir
vim testfile
cat testfile rm testfile find /sdir -mtime -300 -exec file {} \; find / -type p
find / -type s find /usr -type f -mtime +100 -size -5M -user root touch /tmp/testfile adduser user2000
adduser user3000
adduser user4000 setfacl -m u:user2000:7 testfile
setfacl -m u:user3000:6 testfile
setfacl -m u:user4000:4 testfile setfacl -x user2000 testfile
getfacl testfile setfacl -b testfile
getfacl testfileCommands
ls -l /dev/sdals -l /dev/sdals -l /usr/sbin/vigr
lrwxrwxrwx. 1 root root 4 Jul 21 14:36 /usr/sbin/vigr -> vipwtar and star are identical.flags tar -c :: Create tarball. tar -f :: Specify tarball name. tar -p :: Preserve file permissions. Default for the root user. Specify this if you create an archive as a normal user. tar -r :: Append files to the end of an existing uncompressed tarball. tar -t :: List contents of a tarball. tar -u :: Append files to the end of an existing uncompressed tarball provided the specified files being added are newer. -z -j -C
tar -cvf /tmp/home.tar /hometar -cvf /tmp/files.tar /etc/passwd /etc/yum.conftar -rvf /tmp/files.tar /etc/yum.repos.dtar -tvf /tmp/files.tartar -xf /tmp/files.tar etc/yum.conf
ls -l etc/yum.conftar -xf /tmp/files.tar
lstar -czf /tmp/home.tar.gz /homesudo tar -cjf /tmp/home.tar.bz2 /hometar -tf /tmp/home.tar.gztar -xf /tmp/home.tar.gztar -xf /tmp/home.tar.bz2 -C /tmpFlags
cp /etc/fstab .
ls -l fstabgzip fstab
ls -l fstab.gzgzip -l fstab.gzgunzip fstab.gz
ls -l fstabbzip2 (bunzip2) commandbzip2 fstab
ls -l fstab.bz2bunzip2 fstab.bz2
ls -l fstabFlags
touch -d 2019-09-20 file1touch -m file1flags
mkdir dir1 -vmkdir -vp dir2/perl/perl5Flags
cat > catfile1less /usr/bin/znewhead /etc/profilehead -3 /etc/profileFlags
tail /etc/profiletail -3 /etc/profilesudo tail -f /var/log/messagesFlags
wc /etc/profile
85 294 2123 /etc/profilewc -m /etc/profilealias cp='cp -i'Flags
cp file1 newfile1cp file1 dir1cp file1 dir1 -i
cp: overwrite 'dir1/file1'? ycp -r dir1 dir2
ls -l dir2 -Rcp -p file1 /tmpalias—“alias mv=’mv -i’""Flags
mv -i file1 dir1mv newfile1 newfile2mv dir1 dir2mv dir2 dir20Flags
rm -i newfile2 rm -dv emptydirrm -r dir20Flags
rmdir emptydir -vtouch file10
ln file10 file20
ls -liln -s file10 soft10Copying
Linking
touch file1
ls -lfile file1stat file1touch /tmp/hard1
ls -li /tmp/hard1ln /tmp/hard1 /tmp/hard2
ln /tmp/hard1 /tmp/hard3
ls -li /tmp/hard*vim /tmp/hard2
ls -li /tmp/hard*rm -f /tmp/hard1 /tmp/hard3
ls -li /tmp/hard*sudo ln -s /tmp/hard2 /root/soft1
ls -li /tmp/hard2 /root/soft1
sudo ls -li /tmp/hard2 /root/soft12.Edit soft1 and display the long listing again:
sudo vim /root/soft1
sudo ls -li /tmp/hard2 /root/soft13.Remove hard2 and display the long listing:
sudo ls -li /tmp/hard2 /root/soft1remove the soft link
rm -f /root/soft1.Create a gzip-compressed archive of the /etc directory.
tar -czf etc.tar.gz /etcCreate a bzip2-compressed archive of the /etc directory.
sudo tar -cjf etc.tar.bz2 /etcCompare the file sizes of the two archives.
ls -l etc*Run the tar command and uncompress and restore both archives without specifying the compression tool used.
sudo tar -xf etc.tar.bz2 ; sudo tar -xf etc.tar.gzAs user1 on server1, create a file called vipractice in the home directory using vim. Type (do not copy and paste) each sentence from Lab 3-1 on a separate line (do not worry about line wrapping). Save the file and quit the editor.
:set number!
#then
yy and p3m0:r ~/.bashrc:%s/profile/pro file/gi:5,8dProvide a count of lines, words, and characters in the vipractice file using the wc command.
wc vipracticeAs user1 on server1, create one file and one directory in the home directory.
touch file3
mkdir dir5List the file and directory and observe the permissions, ownership, and owning group.
ls -l file3
ls -l dir5
ls -ld dir5Try to move the file and the directory to the /var/log directory and notice what happens.
mv dir5 /var/log
mv file3 /var/logTry again to move them to the /tmp directory.
mv dir5 /tmp
ls /tmpDuplicate the file with the cp command, and then rename the duplicated file using any name.
cp /tmp/file3 file4
ls /tmp
lsErase the file and directory created for this lab.
rm -d /tmp/dir5; rm file4How to console into an MX80 router from linux
DNS Stuff
Guide to how you should approach studying for the CCNA exam
Juniper Basics
Notes I took for a multitude of CCNA resources
Hostname, IP addressing, network protocols, network manager, tools, etc.
Resources for passing the CCNA exam
NTP, Chrony, etc.
How to toggle PoE on a Juniper switch.
What you should learn after taking the CCNA exam
Plug console cable in
find out what your serial line name is:
$ dmesg | grep -i FTDIOpen putty > change to serial > change the tty line name
Make sure your serial settings are correct
Press open > when terminal appears press enter
Juniper Password recovery
ttps://www.juniper.net/documentation/en_US/junos/topics/task/configuration/authentication-root-password-recovering-mx80.html
accidentally deleted the wrong line in Juniper.conf file ? failing over to juniper.conf
https://www.juniper.net/documentation/en_US/junos/topics/concept/junos-configuration-files.html
A DNS system or nameserver can be a
Primary server
Secondary server
Client
Key directives
domain
nameserver
search
Directive Description
domain
nameserver
search
Sample entry
domain example.com
search example.net example.org example.edu example.gov
nameserver 192.168.0.1 8.8.8.8 8.8.4.4Variation
domain example.com
search example.net example.org example.edu example.gov
nameserver 192.168.0.1
nameserver 8.8.8.8
nameserver 8.8.4.4[root@server30 tmp]# cat /etc/resolv.conf
# Generated by NetworkManager
nameserver 2001:578:3f::30
nameserver 2001:578:3f:1::30/etc/nsswitch.conf
Directs the lookup utilities to the correct source to get hostname information.
Also identifies the order in which to consult source and an action to be taken next.
Four keywords oversee this behavior
Keyword Meaning Default Action
success
notfound
unavail
tryagain
Example shows two sources for name resolution: files (/etc/hosts) and DNS (/etc/resolv.conf).
hosts:files dnsInstruct the lookup programs to return if the requested information is not found there:
hosts:files [notfound=return] dnsdighostnslookupgetentTo get the IP for redhat.com using the nameserver listed in the resolv.conf file:
[root@server10 ~]# dig redhat.com
; <<>> DiG 9.16.23-RH <<>> redhat.com
;; global options: +cmd
;; Got answer:
;; ->>HEADER<<- opcode: QUERY, status: NOERROR, id: 9017
;; flags: qr rd ra; QUERY: 1, ANSWER: 2, AUTHORITY: 0, ADDITIONAL: 1
;; OPT PSEUDOSECTION:
; EDNS: version: 0, flags:; udp: 4000
;; QUESTION SECTION:
;redhat.com. IN A
;; ANSWER SECTION:
redhat.com. 3599 IN A 52.200.142.250
redhat.com. 3599 IN A 34.235.198.240
;; Query time: 94 msec
;; SERVER: 172.16.10.150#53(172.16.10.150)
;; WHEN: Fri Jul 19 13:12:13 MST 2024
;; MSG SIZE rcvd: 71To perform a reverse lookup on the redhat.com IP (52.200.142.250), use the -x option with the command:
[root@server10 ~]# dig -x 52.200.142.250
; <<>> DiG 9.16.23-RH <<>> -x 52.200.142.250
;; global options: +cmd
;; Got answer:
;; ->>HEADER<<- opcode: QUERY, status: NOERROR, id: 23057
;; flags: qr rd ra; QUERY: 1, ANSWER: 1, AUTHORITY: 0, ADDITIONAL: 1
;; OPT PSEUDOSECTION:
; EDNS: version: 0, flags:; udp: 4000
;; QUESTION SECTION:
;250.142.200.52.in-addr.arpa. IN PTR
;; ANSWER SECTION:
250.142.200.52.in-addr.arpa. 299 IN PTR ec2-52-200-142-250.compute-1.amazonaws.com.
;; Query time: 421 msec
;; SERVER: 172.16.10.150#53(172.16.10.150)
;; WHEN: Fri Jul 19 14:22:52 MST 2024
;; MSG SIZE rcvd: 112dig command in terms of nameserver determination.Perform a lookup on redhat.com:
[root@server10 ~]# host redhat.com
redhat.com has address 34.235.198.240
redhat.com has address 52.200.142.250
redhat.com mail is handled by 10 us-smtp-inbound-2.mimecast.com.
redhat.com mail is handled by 10 us-smtp-inbound-1.mimecast.com.Rerun with -v added:
[root@server10 ~]# host -v redhat.com
Trying "redhat.com"
;; ->>HEADER<<- opcode: QUERY, status: NOERROR, id: 28687
;; flags: qr rd ra; QUERY: 1, ANSWER: 2, AUTHORITY: 0, ADDITIONAL: 0
;; QUESTION SECTION:
;redhat.com. IN A
;; ANSWER SECTION:
redhat.com. 3127 IN A 52.200.142.250
redhat.com. 3127 IN A 34.235.198.240
Received 60 bytes from 172.16.1.19#53 in 8 ms
Trying "redhat.com"
;; ->>HEADER<<- opcode: QUERY, status: NOERROR, id: 47268
;; flags: qr rd ra; QUERY: 1, ANSWER: 0, AUTHORITY: 1, ADDITIONAL: 0
;; QUESTION SECTION:
;redhat.com. IN AAAA
;; AUTHORITY SECTION:
redhat.com. 869 IN SOA dns1.p01.nsone.net. hostmaster.nsone.net. 1684376201 200 7200 1209600 3600
Received 93 bytes from 172.16.1.19#53 in 5 ms
Trying "redhat.com"
;; ->>HEADER<<- opcode: QUERY, status: NOERROR, id: 61563
;; flags: qr rd ra; QUERY: 1, ANSWER: 2, AUTHORITY: 0, ADDITIONAL: 12
;; QUESTION SECTION:
;redhat.com. IN MX
;; ANSWER SECTION:
redhat.com. 3570 IN MX 10 us-smtp-inbound-1.mimecast.com.
redhat.com. 3570 IN MX 10 us-smtp-inbound-2.mimecast.com.
;; ADDITIONAL SECTION:
us-smtp-inbound-1.mimecast.com. 270 IN A 205.139.110.242
us-smtp-inbound-1.mimecast.com. 270 IN A 170.10.128.242
us-smtp-inbound-1.mimecast.com. 270 IN A 170.10.128.221
us-smtp-inbound-1.mimecast.com. 270 IN A 170.10.128.141
us-smtp-inbound-1.mimecast.com. 270 IN A 205.139.110.221
us-smtp-inbound-1.mimecast.com. 270 IN A 205.139.110.141
us-smtp-inbound-2.mimecast.com. 270 IN A 170.10.128.221
us-smtp-inbound-2.mimecast.com. 270 IN A 205.139.110.141
us-smtp-inbound-2.mimecast.com. 270 IN A 205.139.110.221
us-smtp-inbound-2.mimecast.com. 270 IN A 205.139.110.242
us-smtp-inbound-2.mimecast.com. 270 IN A 170.10.128.141
us-smtp-inbound-2.mimecast.com. 270 IN A 170.10.128.242
Received 297 bytes from 172.16.10.150#53 in 12 msPerform a reverse lookup on the IP of redhat.com with verbosity:
[root@server10 ~]# host -v 52.200.142.250
Trying "250.142.200.52.in-addr.arpa"
;; ->>HEADER<<- opcode: QUERY, status: NOERROR, id: 62219
;; flags: qr rd ra; QUERY: 1, ANSWER: 1, AUTHORITY: 0, ADDITIONAL: 0
;; QUESTION SECTION:
;250.142.200.52.in-addr.arpa. IN PTR
;; ANSWER SECTION:
250.142.200.52.in-addr.arpa. 300 IN PTR ec2-52-200-142-250.compute-1.amazonaws.com.
Received 101 bytes from 172.16.10.150#53 in 430 msGet the IP for redhat.com using nameserver 8.8.8.8 instead of the nameserver defined in resolv.conf:
[root@server10 ~]# nslookup redhat.com 8.8.8.8
Server: 8.8.8.8
Address: 8.8.8.8#53
Non-authoritative answer:
Name: redhat.com
Address: 34.235.198.240
Name: redhat.com
Address: 52.200.142.250Perform a reverse lookup on the IP of redhat.com using the nameserver from the resolver configuration file:
[root@server10 ~]# nslookup 52.200.142.250
250.142.200.52.in-addr.arpa name = ec2-52-200-142-250.compute-1.amazonaws.com.
Authoritative answers can be found from:getent will attempt to resolve the specified hostname or IP address.Run the following for forward and reverse lookups:
[root@server10 ~]# getent hosts redhat.com
34.235.198.240 redhat.com
52.200.142.250 redhat.com[root@server10 ~]# getent hosts 34.235.198.240
34.235.198.240 ec2-34-235-198-240.compute-1.amazonaws.comhostname, hostnamectl, uname, and nmcli, as well as by displaying the content of the /etc/hostname file.View the hostname:
hostnamectl --statichostnameuname -ncat /etc/hostnameServer1
sudo systemctl restart systemd-hostnamedhostnameserver2
sudo hostnamectl set-hostname server21.example.comLog out and back in for the prompt to update
Change the hostname using nmcli
nmcli general hostname server20.example.com
It took me a whopping 2 years to finish my CCNA! I kept giving up and quitting my studies for months at a time. Why? Because I couldn’t remember the massive amount of content covered in the CCNA. It felt hopeless. I could have done it in 6 month (or faster) if I knew how to study.
I hadn’t taken a test in 10 years before this. So I had completely forgotten how to learn. This post is about the mistakes I made studying for the CCNA and how to avoid them.
You will also learn, as I did, about spaced repetition. I’ve also included a 6 month CCNA spaced repetition calendar.
I wish I would have started flashcards from day 1. This would have helped a crap ton. Remembering all of the little details is not only useful for taking the test. It embeds the concepts in your brain and keeps you processing how things work .
If there is anything you take from this list. You should definitely be doing some flashcards every day.
While studying the OCG and video courses. I did some labs. But I also skipped a ton of labs because it wasn’t convenient at the time. Then I was forced to lab every single topic in the final 30 days. A lot of cramming was done..
Make sure to do all of the labs as you go. Make up your own labs as well. This is very important to building job worthy skills.
When your plan consists of, “just read everything and watch the videos and take the test when you feel ready”, you tend to procrastinate and put things off. Make a study schedule and a solid plan. (See below)
Having a set date for when you will take the test was pretty motivating. I did not find this out until about 30 days until my test.
If you are using Anki flashcards for your studies, you may already be using spaced repetition. Spaced repetition is repeatedly reviewing with the time in between reviews getting longer each time you review it.
Here is an excellent article about our learning curves and why spaced repetition helps us remember things https://fs.blog/spacing-effect/
Step 1. Plan how long your studies will take
Figure out how long you need. It usually takes around 240 hours of studying for CCNA. (Depending on experience). Then figure out how many hours per day that you can spend on studying. This example is based on a 6 month study calendar.
You can use this 6 month excel calendar to plan and track your progress. You. can still use this method If you have already been studying CCNA. Just edit your calendar for how much time you have left.
The calendar is also based on Wendel Odom’s Official Cert Guide. You will also want to mix your other resources into your reviews.
Decide what your review sessions will be
Plan to review each chapter 3-4 times. here is what I did for review sessions to pass the exam.
Review 1 Read and highlight (and flashcards)
Review 2 Copy highlights over to OneNote (keep doing flashcards)
Review 3 Labs and Highlight your notes (and flashcards)
Review 4 Practice questions and review
I HIGHLY recommend Boson ExSim for your final 30 days of studying. ExSim comes with 3 exams (A,B, and C). Start with exam A in test simulation mode. Leave about a week in between each practice exam so you can go over your answers and Boson’s explanations for each answer.
One week before your test, (after you’ve completed exams A,B, and C). Do a random exam. Make sure you do the timed version that don’t show your score as you go.
You should be scoring above 900 by your 3rd and 4th exam if you have been reviewing Boson’s answer explanations.
Schedule your exam
Pearson view didn’t let me schedule the exam past 30 days out from when I wanted to take it. I’m not sure if this is the case all the time. But by the time you are 30 days out you should have your test scheduled. This will light the fire under you. Great motivation for the home stretch.
If your exam is around June during Cisco Live, Cisco usually offers a 50% discount for an exam voucher. You probably won’t find any other discounts unless you pay for Cisco’s specific CCNA training.
You can technically pass the CCNA without doing many labs. But this will leave you at a HUGE disadvantage in the job market. Labs are crucial for really understanding networking. Knowing your way around the CLI and being able to troubleshoot networking issues will make you stand out from those who crammed for the exam.
If you’ve made it this far I really appreciate you taking the time to read this post. I really hope it helps at least one person.
User: root
No password
Ethernet management interface
Cannot route traffic and is used for management purposes only.
Logging for the First Time
• Nonroot users are placed into the CLI automatically
• Root user SSH login requires explicit config
router (ttyu0)
Serial console
login :
user
Password:
configure
Configure mode . New candidate config file
Configure mode with a private candidate file
Other users logged in will not make changes to this file
Private Files comitted are merged into active config
Whoever commits last wins if there are matching commands
Can’t commit until you are at the top of the configuration (in private mode)
Locks config database
Can be killed by admin
No other user can edit config while you are in this mode
Goes back to the top of the configuration tree
Candidate Config Files
Turns candidate config file into active
Warning will show if candidate config is already being edited
Commiting Configurations
Rollback files are last three Active configurations and stored in /config/(the current active are stored here as well)
4-49 are stores in /var/config/
Shows timestamp for the last time the file was active
Places rollback file one into the candidate config, must commit to make it active
CLI Help, Auto complete
Can type ? To show available commands
#> Show version brief
Show version info, hostname, and model
#>Configure
goes into configure mode
set’s hostname
deletes set hostname
edit routing options mode
exit
Junos will let you know that config hasn’t been committed and ask if you want to commit
throwaway all changes to active candidate
#> help topic routing-options static
shows info page for topic specified
#> help references routing-options static
syntax and hierarchy of commands
Keyboard Shortcuts
Command completion
Space
auto complete commands built into system, Does not autocomplete things you named
tab
autocomplete user defined commands in the system
?
will show user defined options for autocomplete as well
Navigating Configuration Mode
When you go into config mode the running config is copied into a candidate file that you will be working on
if in configure mode, displays the entire candidate configuration
similar to cd
goes to the protocols/ospf heirarchy config mode
if you run show commend it will show the contents of hierarchy from wherever you are.
goes to the top of the hierarchy. Like cd to / in Linux
must be at the top to commit changes
selects which part of the hierarchy to show
will only see this if you are above the option you want to show in the hierarchy
can bypass this with:
same thing happens with the edit command
same fix
Editing, Renaming, and Comparing Configuration
moves up one level in the hierarchy
there is a protion in this video wioth vlan and interface configuration, come back if this isn’t covered elsewhere
jump up 2 levels
shows all the rollback files on the system
run is like “do” in cisco, can run command from anywhere
rolls config back to rollback 1 file
show things to be removed added with - or +
Also brings you to the top of config file
Replace, Copy, or annotate Configuration
makes a copy of the config
Edit interfaces mode
#(int) replace pattern 0.101 with 200.102
Replaces the pattern of the ip address
#(int) replace pattern /24 with /25
Replace mask
If using replace commands don’t commit the config without running the #top show | compare command to verify. You may have run the compare command from one place.
Go into ospf edit
Remove interface from ospf
C style programming comment
Load merge Configuration
ls -l basically
Display contents of top-int-config
cli
top
delete
configure
load set terminal
ctrl+shift +D to exit
commit check
commit and-quitCommands
clock set > set date
reload > request system reboot
show history > show cli history
show logging > show log messages | last
show processes > show system processes
show running config > show configuration
show users > show system users
show version > show version | show chassis hardware
trace > traceroute
show ethernet-switching interfaces
show spanning-tree > show spanning-tree bridge
show mac address-table > show ethernet-switching table
show ip ospf database > show ospf database
show ip ospf interface > show ospf interface
show ip ospf neighbor > show ospf neighbor
clear arp-cache > clear arp
show arp > show arp
show ip route > show route
show ip route summary > show route summary
show route-map > show policy | policy-name
show tcp > show system connections
clear counters > clear interface statistics
show interfaces > show interfaces
show interfaces detail > show interfaces extensive
show ip interface brief > show interfaces terse
The formatting and images of all of my networking notes go destroyed when migrating away from OneNote. But they still come in handy all of the time.
See my networking notes:
hostname, hostnamectl, uname, and nmcli, as well as by displaying the content of the /etc/hostname file.View the hostname:
hostnamectl --statichostnameuname -ncat /etc/hostnameServer1
server10.example.comsystemd-hostnamed service daemonsudo systemctl restart systemd-hostnamedhostnameserver2
sudo hostnamectl set-hostname server21.example.comLog out and back in for the prompt to update
Change the hostname using nmcli
nmcli general hostname server20.example.comList all network interfaces with their ethernet addresses:
ip addr | grep etherView current ipv4 address:
ip addrSee Classful ipv4
See ipv6
The ip addr command also shows IPv6 addresses for the interfaces:
[root@server200 ~]# ip addr
1: lo: <LOOPBACK,UP,LOWER_UP> mtu 65536 qdisc noqueue state UNKNOWN group default qlen 1000
link/loopback 00:00:00:00:00:00 brd 00:00:00:00:00:00
inet 127.0.0.1/8 scope host lo
valid_lft forever preferred_lft forever
inet6 ::1/128 scope host
valid_lft forever preferred_lft forever
2: enp0s3: <BROADCAST,MULTICAST,UP,LOWER_UP> mtu 1500 qdisc fq_codel state UP group default qlen 1000
link/ether 08:00:27:b9:4e:ef brd ff:ff:ff:ff:ff:ff
inet 172.16.1.155/20 brd 172.16.15.255 scope global dynamic noprefixroute enp0s3
valid_lft 79061sec preferred_lft 79061sec
inet6 fe80::a00:27ff:feb9:4eef/64 scope link noprefixroute
valid_lft forever preferred_lft foreverTools:
ping6traceroute6tracepath6cat /etc/protocols
See IP Transport and Applications and tcp_ip_basic
Send two pings to server 20
ping -c2 192.168.0.120Ping the server’s loopback interface:
ping 127.0.0.1Send a traceroute to server 20
traceroute 192.168.0.120Or:
tracepath 192.168.0.120Ping and ipv6 address:
ping6 Trace a route to an IPv6 address:
tracepath6traceroute6Show IPv6 addresses:
ip addr | grep inet6Default service in RHEL for network:
NetworkManager daemon
nmclinmtui (text-based)nm-connection-editor (GUI)Configuration file on each interface that defines IP assignments and other relevant parameters for it.
The networking subsystem reads this file and applies the settings at the time the connection is activated.
Connection configuration files (or connection profiles) are stored in a central location under the /etc/NetworkManager/system-connections directory.
The filenames are identified by the interface connection names with nmconnection as the extension.
Some instances of connection profiles are: enp0s3.nmconnection, ens160.nmconnection, and em1.nmconnection.
On server10 and server20, the device name for the first interface is enp0s3 with connection name enp0s3 and relevant connection information stored in the enp0s3.nmconnection file.
This connection was established at the time of RHEL installation. The current content of the file from server10 are presented below:
[root@server200 system-connections]# cat /etc/NetworkManager/system-connections/enp0s3.nmconnection
[connection]
id=enp0s3
uuid=45d6a8ea-6bd7-38e0-8219-8c7a1b90afde
type=ethernet
autoconnect-priority=-999
interface-name=enp0s3
timestamp=1710367323
[ethernet]
[ipv4]
method=auto
[ipv6]
addr-gen-mode=eui64
method=auto
[proxy]Directives
id
uuid
type
autoconnect-priority
interface_name
timestamp
address1/method
addr-gen-mode/method
View additional directives:
man nm-settingsNaming rules for devices are governed by udevd service based on:
See DNS and Time Synchronization
/etc/hosts file
Each row in the file contains an IP address in column 1 followed by the official (or canonical) hostname in column 2, and one or more optional aliases thereafter.
EXAM TIP: In the presence of an active DNS with all hostnames resolvable, there is no need to worry about updating the hosts file.
As expressed above, the use of the hosts file is common on small networks, and it should be updated on each individual system to reflect any changes for best inter-system connectivity experience.
192.168.0.110 server10.example.com server10 <-- This is an alias
192.168.0.120 server20.example.com server20
172.10.10.110 server10s8.example.com server10s8
172.10.10.120 server20s8.example.com server20s8ping -c2 192.168.0.120ping -c2 server20ip a and verify the addition of the new interface.nmcli command and assign IP 192.168.0.40/24 and gateway 192.168.0.1[root@server40 ~]# nmcli c a type Ethernet ifname enp0s8 con-name enp0s8 ip4 192.168.0.40/24 gw4 192.168.0.1[root@server40 ~]# nmcli c d enp0s8
Connection 'enp0s8' successfully deactivated (D-Bus active path: /org/freedesktop/NetworkManager/ActiveConnection/3)
[root@server40 ~]# nmcli c s
NAME UUID TYPE DEVICE
enp0s3 6e75a5e4-869b-3ed1-bdc4-c55d2d268285 ethernet enp0s3
lo 66809437-d3fa-4104-9777-7c3364b943a9 loopback lo
enp0s8 9a32e279-84c2-4bba-b5c5-82a04f40a7df ethernet --
[root@server40 ~]# nmcli c u enp0s8
Connection successfully activated (D-Bus active path: /org/freedesktop/NetworkManager/ActiveConnection/4)
[root@server40 ~]# nmcli c s
NAME UUID TYPE DEVICE
enp0s3 6e75a5e4-869b-3ed1-bdc4-c55d2d268285 ethernet enp0s3
enp0s8 9a32e279-84c2-4bba-b5c5-82a04f40a7df ethernet enp0s8
lo 66809437-d3fa-4104-9777-7c3364b943a9 loopback lo [root@server30 ~]# vim /etc/hosts
[root@server30 ~]# ping server40
PING server40.example.com (192.168.0.40) 56(84) bytes of data.
64 bytes from server40.example.com (192.168.0.40): icmp_seq=1 ttl=64 time=3.20 ms
64 bytes from server40.example.com (192.168.0.40): icmp_seq=2 ttl=64 time=0.628 ms
64 bytes from server40.example.com (192.168.0.40): icmp_seq=3 ttl=64 time=0.717 ms
^C
--- server40.example.com ping statistics ---
3 packets transmitted, 3 received, 0% packet loss, time 2009ms
rtt min/avg/max/mdev = 0.628/1.516/3.204/1.193 msAdd a third network interface to RHEL9server30 in VirtualBox.
run ip a and verify the addition of the new interface.
Use the nmcli command and assign IP 192.168.0.30/24 and gateway 192.168.0.1
nmcli c a type Ethernet ifname enp0s8 con-name enp0s8 ip4 192.168.0.30/24 gw4 192.168.0.1Deactivate and reactivate this connection manually. Add entry server30 to the hosts table of server 40
[root@server30 system-connections]# nmcli c d enp0s8
Connection 'enp0s8' successfully deactivated (D-Bus active path: /org/freedesktop/NetworkManager/ActiveConnection/3)
[root@server30 system-connections]# nmcli c u enp0s8
Connection successfully activated (D-Bus active path: /org/freedesktop/NetworkManager/ActiveConnection/4)
/etc/hosts
192.168.0.30 server30.example.com server30ping tests to server30 from server 40
[root@server40 ~]# ping server30
PING server30.example.com (192.168.0.30) 56(84) bytes of data.
64 bytes from server30.example.com (192.168.0.30): icmp_seq=1 ttl=64 time=1.59 ms
64 bytes from server30.example.com (192.168.0.30): icmp_seq=2 ttl=64 time=0.474 ms
^C
--- server30.example.com ping statistics ---
2 packets transmitted, 2 received, 0% packet loss, time 999ms
rtt min/avg/max/mdev = 0.474/1.032/1.590/0.558 msOr create the profile manually and restart network manager:
[connection]
id=enp0s8
type=ethernet
interface-name=enp0s8
uuid=92db4c65-2f13-4952-b81f-2779b1d24a49
[ethernet]
[ipv4]
method=manual
address1=10.1.13.3/24,10.1.13.1
[ipv6]
addr-gen-mode=default
method=auto
[proxy]ip
ifup
ifdown
nmcli
nmcli commandOperates on 7 different object categories.
[root@server200 system-connections]# nmcli --help
Usage: nmcli [OPTIONS] OBJECT { COMMAND | help }
OPTIONS
-a, --ask ask for missing parameters
-c, --colors auto|yes|no whether to use colors in output
-e, --escape yes|no escape columns separators in values
-f, --fields <field,...>|all|common specify fields to output
-g, --get-values <field,...>|all|common shortcut for -m tabular -t -f
-h, --help print this help
-m, --mode tabular|multiline output mode
-o, --overview overview mode
-p, --pretty pretty output
-s, --show-secrets allow displaying passwords
-t, --terse terse output
-v, --version show program version
-w, --wait <seconds> set timeout waiting for finishing operations
OBJECT
g[eneral] NetworkManager\'s general status and operations
n[etworking] overall networking control
r[adio] NetworkManager radio switches
c[onnection] NetworkManager\'s connections
d[evice] devices managed by NetworkManager
a[gent] NetworkManager secret agent or polkit agent
m[onitor] monitor NetworkManager changesOptions:
show (list connections)up/down (Brings connection up or down)add(a) (adds a connection)edit (edit connection or add a new one)modify (modify properties of a connection)delete(d) (delete a connection)reload (re-read all connection profiles)load (re-read a connection profile)Options:
status (Displays device status)show (Displays info about device(s)Show all connections, inactive or active:
nmcli c sDeactivate the connection enp0s8:
sudo nmcli c down enp0s8Note:
The connection profile gets detached from the device, disabling the connection.Activate the connection enp0s8:
$ sudo nmcli c up enp0s8
# connection profile re-attaches to the device.Display the status of all network devices:
nmcli d ssudo shutdown nowSelect machine > settings > Network > Adapter 2 > Enable Network Adapter > Internal Network > okip anmcli d status | grep enpsudo nmcli c a type Ethernet ifname enp0s8 con-name enp0s8 ip4 172.10.10.120/24 gw4 172.10.10.1nmcli d status | grep enpip acat /etc/NetworkManager/system-connections/enp0s8.nmconnectionThere are a lot of great CCNA resources out there. This list does not include all of them. Only the ones that I personally used to pass the CCNA 200-301 exam.
Materials for CCNA are generally separated into 5 categories:
To me, this is the king of CCNA study materials. Some people do not like reading but this will give you more depth than any other resource on this list. Link.
Yes, I read both the OCG and Todd Lammle books cover to cover. No, I do not recommend doing this. Todd has a great way of adding humor into networking. If you need to build up your networking from the ground up. These books are great. Link.
Jeremy Ciara makes learning networking so much fun. This was a great course but is not enough for you to pass the exam on it’s own. Also, a CBT nuggets monthly subscription will set you back $59 per month. Link.
Jermey’s IT lab course was the most informative for me. Jeremy is really great at explaining the more complex topics. Jeremy’s course also includes Packet Tracer labs and and in depth Anki flashcard deck for free. Link.
These labs will really make you think. Although they do steer off the exam objectives a bit. Link.
These were my favorite labs by far. Very easy to set up with clear instructions and video explanations. Link.
I can’t stress this enough. if there is one resource that you invest some money into. it’s the Boson practice exams. This is a test simulator that is very close to what the actual test will be like. Exsim comes with 3 exams.
After taking one of these practice tests you will get a breakdown of your scores per category. You will also get to go through all of your questions and see detailed explantations for why each answer is right or wrong.
These practice exams were crucial for me to understand where my knowledge gaps were. Link.
You can learn subnetting pretty good. Then forget some of the steps a month later and have to learn all over again. It was very helpful to go over some of these subnetting questions once in a while. Link.
These are the only flashcards I used. It is very nice not to have to create your own flashcards. Having the Anki app on your phone is very convenient. You can study whenever you have a few minutes of downtime.
Anki also used spaced-repetition. It will give you harder flashcards more often based on how you rate their difficulty.
This particular deck goes along with the OCG. You can filter by chapter and add more as you get through the book.
I will be using Anki flashcards for every exam in the future. Link.
Be careful not to use too many resources. You may get a bit overwhelmed. Especially if this is your first certification like it was for me. You will be building study habits and learning how to read questions correctly. So focus on quality over quantity.
If I had to study for the CCNA again, I would use these three resources:
If you like these posts, please let me know so i can keep making more like them!
Chrony is the RHEL implementation of NTP. And it operates on UDP port 123. If you enable it, it starts at system boot and continuously monitors system time and keeps in in sync.
The common sources of time employed on computer networks are:
local system clock
Public time server
The official ntp.org site also provides a common pool called pool.ntp.org for vendors and organizations to register their own NTP servers voluntarily for public use. Examples:
Under these sub-pools, the owners maintain multiple time servers with enumerated hostnames such as 0.rhel.pool.ntp.org, 1.rhel.pool.ntp.org, 2.rhel.pool.ntp.org, and so on.
Radio clock
Primary server
secondary server
peer
client
Time sources are categorized hierarchically into several levels that are referred to as stratum levels based on their distance from the reference clocks (atomic, radio, and GPS).
The reference clocks operate at stratum level 0 and are the most accurate provider of time with little to no delay.
Besides stratum 0, there are fifteen additional levels that range from 1 to 15.
Of these, servers operating at stratum 1 are considered perfect, as they get time updates directly from a stratum 0 device.
A stratum 0 device cannot be used on the network directly. It is attached to a computer, which is then configured to operate at stratum 1.
Servers functioning at stratum 1 are called time servers and they can be set up to deliver time to stratum 2 servers.
Similarly, a stratum 3 server can be configured to synchronize its time with a stratum 2 server and deliver time to the next lower-level servers, and so on.
Servers sharing the same stratum can be configured as peers to exchange time updates with one another.
There are numerous public NTP servers available for free that synchronize time. They normally operate at higher stratum levels such as 2 and 3.
/etc/chrony.conf
driftfile
logdir
pool
server
server
peer
man chrony.conf for details.
The Chrony service has a command line program called chronyc.
sources
tracking
1. Install the Chrony package using the dnf command:
[root@server10 ~]# sudo dnf -y install chrony2. Ensure that preconfigured public time server entries are present in the /etc/chrony.conf file:
[root@server1 ~]# grep -E 'pool|server' /etc/chrony.conf | grep -v ^#
pool 2.rhel.pool.ntp.org iburstThere is a single pool entry set in the file by default. This pool name is backed by multiple NTP servers behind the scenes.
3. Start the Chrony service and set it to autostart at reboots:
sudo systemctl --now enable chronyd
4. Examine the operational status of Chrony:
sudo systemctl status chronyd --no-pager -l
5. Inspect the binding status using the sources subcommand with chronyc:
[root@server1 ~]# chronyc sources
MS Name/IP address Stratum Poll Reach LastRx Last sample
===============================================================================
^+ ntp7-2.mattnordhoffdns.n> 2 8 377 324 -3641us[-3641us] +/- 53ms
^* 2600:1700:4e60:b983::123 1 8 377 430 +581us[ +84us] +/- 36ms
^- 2600:1700:5a0f:ee00::314> 2 8 377 58 -1226us[-1226us] +/- 50ms
^- 2603:c020:6:b900:ed2f:b4> 2 9 377 320 +142us[ +142us] +/- 73ms^ means the source is a server * implies current association with the source.
Poll
6. Display the clock performance using the tracking subcommand with chronyc:
[root@server1 ~]# chronyc tracking
Reference ID : 2EA39303 (2600:1700:4e60:b983::123)
Stratum : 2
Ref time (UTC) : Sun Jun 16 12:05:45 2024
System time : 286930.187500000 seconds slow of NTP time
Last offset : -0.000297195 seconds
RMS offset : 2486.306152344 seconds
Frequency : 3.435 ppm slow
Residual freq : -0.034 ppm
Skew : 0.998 ppm
Root delay : 0.064471066 seconds
Root dispersion : 0.003769779 seconds
Update interval : 517.9 seconds
Leap status : NormalEXAM TIP: You will not have access to the outside network during the exam. You will need to point your system to an NTP server available on the exam network. Simply comment the default server/pool directive(s) and add a single directive “server <hostname>” to the file. Replace <hostname> with the NTP server name or its IP address as provided.
timedatectl command.[root@server10 ~]# timedatectl
Local time: Mon 2024-07-22 10:55:11 MST
Universal time: Mon 2024-07-22 17:55:11 UTC
RTC time: Mon 2024-07-22 17:55:10
Time zone: America/Phoenix (MST, -0700)
System clock synchronized: yes
NTP service: active
RTC in local TZ: noTurn off NTP and verify:
[root@server10 ~]# timedatectl set-ntp false
[root@server10 ~]# timedatectl | grep NTP
NTP service: inactiveModify the current date and confirm:
[root@server10 ~]# timedatectl set-time 2024-07-22
[root@server10 ~]# timedatectl
Local time: Mon 2024-07-22 00:00:30 MST
Universal time: Mon 2024-07-22 07:00:30 UTC
RTC time: Mon 2024-07-22 07:00:30
Time zone: America/Phoenix (MST, -0700)
System clock synchronized: no
NTP service: inactive
RTC in local TZ: noChange both date and time in one go:
[root@server10 ~]# timedatectl set-time "2024-07-22 11:00"
[root@server10 ~]# timedatectl
Local time: Mon 2024-07-22 11:00:06 MST
Universal time: Mon 2024-07-22 18:00:06 UTC
RTC time: Mon 2024-07-22 18:00:06
Time zone: America/Phoenix (MST, -0700)
System clock synchronized: no
NTP service: inactive
RTC in local TZ: noReactivate NTP:
[root@server10 ~]# timedatectl set-ntp true
[root@server10 ~]# timedatectl | grep NTP
NTP service: activedate commandView current date and time:
[root@server10 ~]# date
Mon Jul 22 11:03:00 AM MST 2024Change the date and time:
[root@server10 ~]# date --set "2024-07-22 11:05"
Mon Jul 22 11:05:00 AM MST 2024Return the system to the current date and time:
[root@server10 ~]# timedatectl set-ntp false
[root@server10 ~]# timedatectl set-ntp trueInstall Chrony and mark the service for autostart on reboots.
systemctl enable --now chronyd
Edit the Chrony configuration file and comment all line entries that begin with “pool” or “server”.
[root@server10 ~]# vim /etc/chrony.confGo to the end of the file, and add a new line “server 127.127.1.0”.
Start the Chrony service and run chronyc sources to confirm the binding.
[root@server10 ~]# systemctl restart chronyd
[root@server10 ~]# chronyc sources
MS Name/IP address Stratum Poll Reach LastRx Last sample
===============================================================================
^? 127.127.1.0 0 6 0 - +0ns[ +0ns] +/- 0ns[root@server10 ~]# date
Mon Jul 22 11:37:54 AM MST 2024
[root@server10 ~]# timedatectl
Local time: Mon 2024-07-22 11:37:59 MST
Universal time: Mon 2024-07-22 18:37:59 UTC
RTC time: Mon 2024-07-22 18:37:59
Time zone: America/Phoenix (MST, -0700)
System clock synchronized: no
NTP service: active
RTC in local TZ: noIdentify the distinctions between the two outputs.
Use timedatectl and change the system date to a future date.
[root@server10 ~]# timedatectl set-time 2024-07-23
Failed to set time: Automatic time synchronization is enabled
[root@server10 ~]# timedatectl set-ntp false
[root@server10 ~]# timedatectl set-time "2024-07-23"date command and change the system time to one hour ahead of the current time.[root@server10 ~]# date -s "2024-07-22 12:41"
Mon Jul 22 12:41:00 PM MST 2024[root@server10 ~]# date -s "2024-07-22 12:41"
Mon Jul 22 12:41:00 PM MST 2024
[root@server10 ~]# date
Mon Jul 22 12:41:39 PM MST 2024
[root@server10 ~]# timedatectl
Local time: Mon 2024-07-22 12:41:41 MST
Universal time: Mon 2024-07-22 19:41:41 UTC
RTC time: Tue 2024-07-23 07:01:41
Time zone: America/Phoenix (MST, -0700)
System clock synchronized: no
NTP service: inactive
RTC in local TZ: notimedatectl command.[root@server10 ~]# timedatectl set-ntp trueConfigure
set poe interface ge-0/0/0 disable
commit
rollback 1
commitIt’s easy to get overwhelmed with options after completing your CCNA. What do you learn next? If you are trying to get a job as a Network Engineer, you will want to check this out.
I went through dozens of job listings that mentioned CCNA. Then, tallied up the main devices/vendors, certifications, and technologies mentioned. And left out anything that wasn’t mentioned more than twice.
Core CCNA technologies such as LAN, WAN, OSPF, Spanning Tree, VLANs, etc. have been left out. The point here is to target the most sought after technologies and skills by employers. I also left out soft skills and any job that wasn’t a networking specific role.
Palo Alto is huge! I’m not suprised by this. Depending on the company, a network engineer may be responsible for firewall configuration and troubleshooting. It also looks like Network Engineers with a wide variety of skills are saught after.
| Device/Vendor | Times Mentioned |
|---|---|
| Palo Alto | 9 |
| Cisco ASA | 6 |
| Juniper | 6 |
| Office 365 | 5 |
| Meraki | 4 |
| Vmware | 4 |
| Linux | 4 |
| Ansible | 4 |
| AWS | 3 |
| Wireshark | 3 |
Firewall comes in first again. Followed closely by VPN skills. Every interview I had for a Network Engineer position asked if I knew how to configure and troubleshoot VPNs.
| Technology | Times Mentioned |
|---|---|
| Firewall | 19 |
| VPN | 16 |
| Wireless | 12 |
| BGP | 12 |
| Security | 12 |
| MPLS | 10 |
| Load balancers | 8 |
| Ipsec | 7 |
| ISE | 6 |
| DNS | 5 |
| SDWAN | 5 |
| Cloud | 4 |
| TACACS+ | 4 |
| ACL | 4 |
| SIEM | 4 |
| IDS/IPS | 4 |
| RADIUS | 3 |
| ITIL | 3 |
| Ipam | 3 |
| VOIP | 3 |
| EIGRP | 3 |
| Python | 3 |
CCNP blew every other cert out of the water. Companies will be very interested if you are working towards this cert. Security + comes highly recommended as well.
| Certification | Times Mentioned |
|---|---|
| CCNP | 18 |
| Security+ | 6 |
| JNCIA | 4 |
| JNCIP | 4 |
| Network + | 4 |
| CCIE | 4 |
| PCNSA | 3 |
It depends…
Are you trying to get a new job ASAP? Are there opportunities at your current role that you can use your new skills to leverage? Do you have some study time before you are ready to take the next step?
CCNP Enterprise is a good bet if you really want to stand out in Network Engineering interviews.
Continue to build a good base of IT skills. This will open you up to a larger variety of jobs and open skill paths that you need a good foundation to unlock.
Core skills include:
A good Linux certification like the RHCSA would be great to learn more about Linux, scripting, and operating systems. Security + would be good if you want to get a solid foundation of cyber security. And Python skills will give you a gold star in any IT interview.
Pick something that interests you and go for it. That is the only way to get it right. Doing what you enjoy is better than not doing anything at all because you can’t decide the best path.
Hopefully we can revisit this post after learning Python to get a much bigger sample size.
Managing package groups, application streams, modules, and DNF
RPM and package integrity and credibility
environment groups available in RHEL 9:
Package groups include:
List, install, query, and remove packages.
sudo dnf repoquery sudo dnf repoquery --repo "BaseOS"For example, to find whether the BaseOS repo includes the zsh package.
sudo dnf repoquery --repo BaseOS | grep zsh sudo dnf list installedThree columns: - package name - package version - repo it was installed from. - @anaconda means the package was installed at the time of RHEL installation.
List all installed packages and all packages available for installation from all enabled repositories:
sudo dnf listList all packages available from all enabled repositories that should be able to update:
sudo dnf list updatesList whether a package (bc, for instance) is installed or available for installation from any enabled repository:
sudo dnf list bcList all installed packages whose names begin with the string “gnome” followed by any number of characters:
sudo dnf list installed ^gnome*List recently added packages:
sudo dnf list recentRefer to the repoquery and list subsections of the dnf command manual pages for more options and examples.
Installing a package:
Attempt to install a package called ypbind, proceed to update if it detects the presence of an older version:
sudo dnf install ypbindInstall or update a package called dcraw located locally at /mnt/AppStream/Packages/
sudo dnf localinstall /mnt/AppStream/Packages/dcraw*Update an installed package (autofs, for example) to the latest available version. Dnf will fail if the specified package is not already installed:
sudo dnf update autofsUpdate all installed packages to the latest available versions:
sudo dnf -y updateRefer to the install and update subsections of the dnf command manual pages for more options and examples.
Show:
dnf info subcommand
View information about a package called autofs:
dnf info autofsRefer to the info subsection of the dnf command manual pages.
Removing a package:
Remove a package called ypbind:
sudo dnf remove ypbindOutput
Refer to the remove subsection of the dnf command manual pages for more options and examples available for removing packages.
Perform management operations on a package called cifs-utils. Determine if this package is already installed and if it is available for installation. Display its information before installing it. Install the package and exhibit its information. Erase the package along with
its dependencies and confirm the removal.
dnf list installed | grep cifs-utils dnf repoquery cifs-utils dnf info cifs-utils dnf install -y cifs-utils dnf info cifs-utils dnf remove -y cifs-utils dnf list installed | grep cifSearch for packages that contain a specific file such as /etc/passwd/, use the provides or the whatprovides subcommand with dnf:
dnf provides /etc/passwdIndicates file is part of a package called setup, installed during RHEL installation.
Second instance, setup package is part of the BaseOS repository.
Can also use a wildcard character for filename expansion.
List all packages that contain filenames beginning with “system-config” followed by any number of characters:
dnf whatprovides /usr/bin/system-config*To search for all the packages that match the specified string in their name or summary:
dnf search system-configgroup subcommandgroup list subcommand:
List all available and installed package groups from all repositories:
dnf group listoutput:
Environment group:
Package group
Display the number of installed and available package groups:
sudo dnf group summaryList all installed and available package groups including those that are hidden:
sudo dnf group list hiddenTry group list with --installed and --available options to narrow down the output list.
sudo dnf group list --installedList all packages that a specific package group such as Base contains:
sudo dnf group info Base-v option with the group info subcommand for more information.
Review group list and group info subsections of the dnf man pages.
Install a package group called Emacs. Update if it detects an older version.
sudo dnf -y groupinstall emacsUpdate the smart card support package group to the latest version:
dnf groupupdate "Smart Card Support"Refer to the group install and group update subsections of the dnf command manual pages for more details.
Erase the smart card support package group that was installed:
sudo dnf -y groupremove 'smart card support'Refer to the remove subsection of the dnf command manual pages for more details.
Perform management operations on a package group called system tools. Determine if this group is already installed and if it is available for installation. List the packages it contains and install it. Remove the group along with its dependencies and confirm the removal.
dnf group list installed dnf group list availableThe group name is exhibited at the bottom of the list under the available groups.
dnf group info 'system tools' sudo dnf group install 'system tools' sudo dnf group remove 'system tools' -y dnf group list installedApplication Streams
module
BaseOS repository
AppStream repository
Why separate BaseOS components from other applications?
(1) Separates application components from the core operating system elements.
(2) Allows publishers to deliver and administrators to apply application updates more frequently.
In previous RHEL versions, an OS update would update all installed components including the kernel, service, and application components to the latest versions by default.
This could result in an unstable system or a misbehaving application due to an unwanted upgrade of one or more packages.
By detaching the base OS components from the applications, either of the two can be updated independent of the other.
This provides enhanced flexibility in tailoring the system components and application workloads without impacting the underlying stability of the system.
enabled stream
Modules are special package groups usually representing an application, a language runtime, or a set of tools. They are available in one or multiple streams which usually represent a major version of a piece of software, They are available in one or multiple streams which give you an option to choose what versions of packages you want to consume. https://docs.fedoraproject.org/en-US/modularity/using-modules/
Modules are a way to deliver different versions of software (such as programming languages, databases, or web servers) independently of the base operating system’s release cycle.
Each module can contain multiple streams, representing different versions or configurations of the software. For example, a module for Python might have streams for Python 2 and Python 3.
module dnf subcommand
List all modules along with their stream, profile, and summary information available from all configured repos:
dnf module listLimit the output to a list of modules available from a specific repo such as AppStream by adding --repo AppStream:
dnf module list --repo AppStreamOutput:
List all the streams for a specific module such as ruby and display their status:
dnf module list rubyModify the above and list only the specified stream 3.3 for the module ruby
dnf module list ruby:3.3List all enabled module streams:
dnf module list --enabledSimilarly, you can use the --installed and --disabled options with dnf module list to output only the installed or the disabled streams.
Refer to the module list subsection of the dnf command manual pages.
Installing a module
Install the perl module using its default stream and default profile:
sudo dnf -y module install perlUpdate a module called squid to the latest version:
sudo dnf module update squid -yInstall the profile “common” with stream “rhel9” for the container-tools module: (module:stream/profile)
sudo dnf module install container-tools:rhel9/commonList all profiles available for the module ruby:
dnf module info --profile rubyLimit the output to a particular stream such as 3.1:
dnf module info --profile ruby:3.1Refer to the module info subsection of the dnf command manual pages for more details.
Removing a module will:
Remove the ruby module with “3.1” stream:
sudo dnf module remove ruby:3.1Refer to the module remove subsection of the dnf command manual pages:
dnf module list postgresql dnf module info postgresql:15 sudo dnf -y module install --profile postgresql:15 dnf module info postgresql:15 dnf module remove -y postgresql:15 dnf module info postgresql:15process:
uninstall the existing version provided by a stream alongside any dependencies that it has,
switch to the other stream
install the desired version.
Installing a module from a stream automatically enables the stream if it was previously disabled
you can manually enable or disable it with the dnf command.
Only one stream of a given module enabled at a time.
Attempting to enable another one for the same module automatically disables the current enabled stream.
dnf module list and dnf module info expose the enable/disable status of the module stream.
ruby 3.3 and dnf module list perl sudo dnf module remove perl -y dnf module list ruby sudo dnf module reset ruby–allowerasing
sudo dnf module install ruby:3.1 --allowerasing dnf module list perlyum is a soft link to the dnf utility.Subscription Management* (RHSM) service
Available in the Red Hat Customer Portal
Offers access to official Red Hat software repositories.
Other web-based repositories that host packages are available
You can also set up a local, custom repository on your system and add packages of your choice to it.
Primary benefit of using dnf over rpm:
Resolve dependencies automatically
With multiple repositories set up, dnf extracts the software from wherever it finds it.
Perform abundant software administration tasks.
Invokes the rpm utility in the background
Can perform a number of operations on individual packages, package groups, and modules:
Software handling tasks that dnf can perform on packages:
| Subcommand | Description |
|---|---|
| check-update | Checks if updates are available for installed packages |
| clean | Removes cached data |
| history | Display previous dnf activities as recorded in /var/lib/dnf/history/ |
| info | Show details for a package |
| install | Install or update a package |
| list | List installed and available packages |
| provides | Search for packages that contain the specified file or feature |
| reinstall | Reinstall the exact version of an installed package |
| remove | Remove a package and its dependencies |
| repolist | List enabled repositories |
| repoquery | Runs queries on available packages |
| search | Searches package metadata for the specified string |
| upgrade | Updates each installed package to the latest version |
dnf subcommands that are intended for operations on package groups and modules:
| Subcommand | Description |
|---|---|
| group install | Install or updates a package group |
| group info | Return details for a package group |
| group list | List available package groups |
| group remove | Remove a package group |
| module disable | Disable a module along with all the streams it contains |
| module enable | Enable a module along with all the streams it contains |
| module install | Install a module profile including its packages |
| module info | Show details for a module |
| module list | Lists all available module streams along with their profiles and status |
| module remove | Removes a module profile including its packages |
| module reset | Resets a module so that it is neither in enable nor in disable state |
| module update | Updates packages in a module profile |
For labs, you’ll need to create a definition file and configure access to the two repositories available on the RHEL 8 ISO image.
Set up access to the two dnf repositories that are available on RHEL 9 image. (You should have already configured an automatic mounting of RHEL 9 image on /mnt.) Create a definition file for the repositories and confirm.
df -h | grep mnt [BaseOS]
name=BaseOS
baseurl=file:///mnt/BaseOS
gpgcheck=0
[AppStream]
name=AppStream
baseurl=file:///mnt/AppStream
gpgcheck=0 sudo dnf repolist dnf repository (yum repository or a repo)
Digital library for storing software packages
Repository is accessed for package retrieval, query, update, and installation
The two repositories
Number of other repositories available on the Internet that are maintained by software publishers such as Red Hat and CentOS.
Can build private custom repositories for internal IT use for stocking and delivering software.
Can also be used to store in-house developed packages.
It is important to obtain software packages from authentic and reliable sources such as Red Hat to prevent potential damage to your system and to circumvent possible software corruption.
There is a process to create repositories and to access preconfigured repositories.
There are two pre-set repositories available on the RHEL 9 image. You will configure access to them via a definition file to support the exercises and lab environment.
Sample repo definition file and key directives:
[BaseOS_RHEL_9]
name= RHEL 9 base operating system components
baseurl=file://*mnt*BaseOS
enabled=1
gpgcheck=0EXAM TIP:
Five lines from a sample repo file: Line 1 defines an exclusive ID within the square brackets. Line 2 is a brief description of the repo with the “name” directive. Line 3 is the location of the repodata directory with the “baseurl” directive. Line 4 shows whether this repository is active. Line 5 shows if packages are to be GPGchecked for authenticity.
Each repository definition file must have:
The baseurl directive for a local directory path is defined as file:///local_path
rpm command is limited to managing one package at a time.dnf has an associated configuration file that can define settings to control its behavior.Default content of this configuration file:
cat /etc/dnf/dnf.conf [main]
gpgcheck=1
installonly_limit=3
clean_requirements_on_remove=True
best=True
skip_if_unavailable=FalseThe above and a few other directives that you may define in the file:
| Directive | Description |
|---|---|
| best | Whether to install (or upgrade to) the latest available version. |
| clean_requirements_on_remove | Whether to remove dependencies during a package removal process that are no longer in use. |
| debuglevel | Sets debug from 1 (minimum) and 10 (maximum). Default is 2. A value of 0 disables this feature. |
| gpgcheck | Whether to check the GPG signature for package authenticity. Default is 1 (enabled). |
| installonly_limit | Count of packages that can be installed concurrently. Default is 3. |
| keepcache | Defines whether to store the package and header cache following a successful installation. Default is 0 (disabled). |
| logdir | Sets the directory location to store the log files. Default is /var/log/ |
| obsoletes | Checks and removes any obsolete dependent packages during installs and updates. Default is 1 (enabled). |
For other directives: man 5 dnf.conf
vim /etc/yum.repos.d/local.repo [BaseOS]
name=BaseOS
baseurl=file:///mnt/BaseOS
gpgcheck=0
[AppStrean]
name=AppStream
baseurl=file:///mnt/AppStream
gpgcheck=0 dnf repolist -v dnf list --available && dnf list --installed dnf provides /etc/group dnf -y install httpd dnf history dnf info httpd dnf repoquery --requires httpd dnf remove httpd dnf group list available && dnf group list installed dnf group install 'Security Tools' dnf history dnf group info 'Scientific Support' && dnf group remove 'Scientific Support' dnf module list dnf module install php && dnf module list dnf module remove php dnf module list postgresql dnf module reset postgresql dnf module install postgresql:15Binary packages
5 parts to a package name: 1. Name 2. Version 3. release (revision or build) 4. Linux version 5. Processor Architecture - noarch - platform independant - src - Source code packages
rpm package management tasks: - query - install - upgrade - freshen - overwrite - remove - extract - validate - verify
Query and display packages
-q (--query)
List all installed packages
-qa (--query --all)
List config files in a package
-qc (--query --config-files)
List documentation files in a package
-qd (--query --docfiles)
Exhibit what package a file comes from
-qf (--query --file)
Show installed package info (Version, Size, Installation status, Date, Signature, Description, etc.)
-qi (--query --info)
Show installable package info (Version, Size, Installation status, Date, Signature, Description, etc.)
-qip (--query --info --package)
List all files in a package.
-ql (--query --list)
List files and packages a package depends on.
-qR (--query --requires)
List packages that provide the specified package or file.
-q --whatprovides
List packages that require the specified package or file.
-q --whatrequires
Remove a package
-e (--erase)
Upgrades installed package. Or loads if not installed.
-U (--upgrade)
Display detailed information
-v (--verbose or -vv)
Verify integrity of a package or package files
-V (--verify)
Query packages in the package database or at a specified location.
rpm2cpio command--nosignature
-K
rpmkeys commandrpm -q gpg-pubkey-i option
-V option
-Vf
Go to the VirtualBox VM Manager and make sure that the RHEL 8 image is attached to RHEL9-VM1 as depicted below:
Open the /etc/fstab file in the vim editor (or another editor of your choice) and add the following line entry at the end of the file to mount the DVD image (/dev/sr0) in read-only (ro) mode on the /mnt directory.
/dev/sr0 /mnt iso9660 ro 0 0Note: sr0 represents the first instance of the optical device and iso9660 is the standard format for optical file systems.
Mount the file system as per the configuration defined in the /etc/fstab file using the mount command with the -a (all) option:
sudo mount -aVerify the mount using the df command:
df -h | grep mntNote: The image and the packages therein can now be accessed via the /mnt directory just like any other local directory on the system.
List the two directories—/mnt/BaseOS/Packages and /mnt/AppStream/Packages—that contain all the software packages (directory names are case sensitive):
ls -l /mnt/BaseOS/Packages | morequery all installed packages:
rpm -qa
query whether the perl package is installed:
rpm -q perl
list all files in a package:
rpm -ql iproute
list only the documentation files in a package:
rpm -qd audit
list only the configuration files in a package:
rpm -qc cups
identify which package owns the specified file:
rpm -qf /etc/passwd
display information about an installed package including version, release, installation status, installation date, size, signatures, description, and so on:
rpm -qi setup
list all file and package dependencies for a given package:
rpm -qR chrony
query an installable package for metadata information (version, release, architecture, description, size, signatures, etc.):
rpm -qip /mnt/BaseOS/Packages/zsh-5.5.1-6.el8.x86_64.rpm
determine what packages require the specified package in order to operate properly:
rpm -q --whatrequires lvm2
sudo rpm -ivh /mnt/BaseOS/Packages/zsh-5.5.1-6.el8.x86_64.rpmsudo rpm -Uvh /mnt/AppStream/Packages/sushi-3.28.3-1.el8.x86_64.rpmsudo rpm -Fvh /mnt/AppStream/Packages/sushi-3.28.3-1.el8.x86_64.rpmsudo rpm -ivh --replacepkgs /mnt/BaseOS/Packages/zsh-5.5.1-6.el8.x86_64sudo rpm sushi -veYou have lost /etc/crony.conf. Determine what package this file comes from:
rpm -qf /etc/chrony.conf
Extract all files from the crony package to /tmp and create the directory structure:
[root@server30 mnt]# cd /tmp
[sudo rpm2cpio /mnt/BaseOS/Packages/chrony-3.3-3.el8.x86_64.rpm | cpio -imd
1066 blocks](<[root@server30 tmp]# rpm2cpio /mnt/BaseOS/Packages/chrony-4.3-1.el9.x86_64.rpm | cpio -imd
1253 blocks>)Use find to locate the crony.conf file:
sudo find . -name chrony.conf
Copy the file to /etc:
rpm -K /mnt/BaseOS/Packages/zsh-5.5.1-6.el8.x86_64.rpm --nosignaturesudo rpmkeys --import /etc/pki/rpm-gpg/RPM-GPG-KEY-redhat-release
sudo rpmkeys -K /mnt/BaseOS/Packages/zsh-5.5.1-6.el8.x86_64.rpmrpm -q gpg-pubkeyrpm -qi gpg-pubkey-fd431d51-4ae0493bRun a check on the at program:
sudo rpm -V at
Change permissions of one of the files and run the check again:
ls -l /etc/sysconfig/atd
sudo chmod -v 770 /etc/sysconfig/atd
sudo rpm -V atRun the check directly on the file:
sudo rpm -Vf /etc/sysconfig/atd
Reset the value and check the file again:
sudo chmod -v 644 /etc/sysconfig/atd
sudo rpm -V atls command on the /mnt/AppStream/Packages directory to confirm that the rmt package is available:[root@server30 tmp]# ls -l /mnt/BaseOS/Packages/rmt*
-r--r--r--. 1 root root 49582 Nov 20 2021 /mnt/BaseOS/Packages/rmt-1.6-6.el9.x86_64.rpm[root@server30 tmp]# rpmkeys -K /mnt/BaseOS/Packages/rmt-1.6-6.el9.x86_64.rpm
/mnt/BaseOS/Packages/rmt-1.6-6.el9.x86_64.rpm: digests signatures OK[root@server30 tmp]# rpmkeys -K /mnt/BaseOS/Packages/rmt-1.6-6.el9.x86_64.rpm
/mnt/BaseOS/Packages/rmt-1.6-6.el9.x86_64.rpm: digests signatures OK
[root@server30 tmp]# rpm -ivh /mnt/BaseOS/Packages/rmt-1.6-6.el9.x86_64.rpm
Verifying... ################################# [100%])
Preparing... ################################# [100%])
Updating / installing...
1:rmt-2:1.6-6.el9 ################################# [100%])[root@server30 tmp]# rpm -qi rmt
Name : rmt
Epoch : 2
Version : 1.6
Release : 6.el9
Architecture: x86_64
Install Date: Sat 13 Jul 2024 09:02:08 PM MST
Group : Unspecified
Size : 88810
License : CDDL
Signature : RSA/SHA256, Sat 20 Nov 2021 08:46:44 AM MST, Key ID 199e2f91fd431d51
Source RPM : star-1.6-6.el9.src.rpm
Build Date : Tue 10 Aug 2021 03:13:47 PM MST
Build Host : x86-vm-55.build.eng.bos.redhat.com
Packager : Red Hat, Inc. <http://bugzilla.redhat.com/bugzilla>
Vendor : Red Hat, Inc.
URL : http://freecode.com/projects/star
Summary : Provides certain programs with access to remote tape devices
Description :
The rmt utility provides remote access to tape devices for programs
like dump (a filesystem backup program), restore (a program for
restoring files from a backup), and tar (an archiving program).[root@server30 tmp]# rpm -ql rmt
/etc/default/rmt
/etc/rmt
/usr/lib/.build-id
/usr/lib/.build-id/c2
/usr/lib/.build-id/c2/6a51ea96fc4b4367afe7d44d16f1405c3c7ec9
/usr/sbin/rmt
/usr/share/doc/star
/usr/share/doc/star/CDDL.Schily.txt
/usr/share/doc/star/COPYING
/usr/share/man/man1/rmt.1.gz[root@server30 tmp]# rpm -qd rmt
/usr/share/doc/star/CDDL.Schily.txt
/usr/share/doc/star/COPYING
/usr/share/man/man1/rmt.1.gz[root@server30 tmp]# rpm -vV rmt
......... c /etc/default/rmt
......... /etc/rmt
......... a /usr/lib/.build-id
......... a /usr/lib/.build-id/c2
......... a /usr/lib/.build-id/c2/6a51ea96fc4b4367afe7d44d16f1405c3c7ec9
......... /usr/sbin/rmt
......... /usr/share/doc/star
......... d /usr/share/doc/star/CDDL.Schily.txt
......... d /usr/share/doc/star/COPYING
......... d /usr/share/man/man1/rmt.1.gz[root@server30 tmp]# rpm -ve rmt
Preparing packages...
rmt-2:1.6-6.el9.x86_64As user1 with sudo on server3,
[root@server30 Packages]# rpm -ivh /mnt/BaseOS/Packages/zsh-5.8-9.el9.x86_64.rpm
Verifying... ################################# [100%])
Preparing... ################################# [100%])
package zsh-5.8-9.el9.x86_64 is already installed[root@server30 Packages]# rpm -qi zsh
Name : zsh
Version : 5.8
Release : 9.el9
Architecture: x86_64
Install Date: Sat 13 Jul 2024 06:49:40 PM MST
Group : Unspecified
Size : 8018363
License : MIT
Signature : RSA/SHA256, Thu 24 Feb 2022 08:59:15 AM MST, Key ID 199e2f91fd431d51
Source RPM : zsh-5.8-9.el9.src.rpm
Build Date : Wed 23 Feb 2022 07:10:14 AM MST
Build Host : x86-vm-56.build.eng.bos.redhat.com
Packager : Red Hat, Inc. <http://bugzilla.redhat.com/bugzilla>
Vendor : Red Hat, Inc.
URL : http://zsh.sourceforge.net/
Summary : Powerful interactive shell
Description :
The zsh shell is a command interpreter usable as an interactive login
shell and as a shell script command processor. Zsh resembles the ksh
shell (the Korn shell), but includes many enhancements. Zsh supports
command line editing, built-in spelling correction, programmable
command completion, shell functions (with autoloading), a history
mechanism, and more.[root@server30 Packages]# rpm -K zsh-5.8-9.el9.x86_64.rpm
zsh-5.8-9.el9.x86_64.rpm: digests signatures OK[root@server30 Packages]# rpm -V zshAs user1 with sudo on server3,
[root@server30 Packages]# rpm -q setup
setup-2.13.7-10.el9.noarch[root@server30 Packages]# rpm -qc setup
/etc/aliases
/etc/bashrc
/etc/csh.cshrc
/etc/csh.login
/etc/environment
/etc/ethertypes
/etc/exports
/etc/filesystems
/etc/fstab
/etc/group
/etc/gshadow
/etc/host.conf
/etc/hosts
/etc/inputrc
/etc/motd
/etc/networks
/etc/passwd
/etc/printcap
/etc/profile
/etc/profile.d/csh.local
/etc/profile.d/sh.local
/etc/protocols
/etc/services
/etc/shadow
/etc/shells
/etc/subgid
/etc/subuid
/run/motd
/usr/lib/motd[root@server30 Packages]# rpm -qi ./zlib-devel-1.2.11-40.el9.x86_64.rpm
Name : zlib-devel
Version : 1.2.11
Release : 40.el9
Architecture: x86_64
Install Date: (not installed)
Group : Unspecified
Size : 141092
License : zlib and Boost
Signature : RSA/SHA256, Tue 09 May 2023 05:31:02 AM MST, Key ID 199e2f91fd431d51
Source RPM : zlib-1.2.11-40.el9.src.rpm
Build Date : Tue 09 May 2023 03:51:20 AM MST
Build Host : x86-64-03.build.eng.rdu2.redhat.com
Packager : Red Hat, Inc. <http://bugzilla.redhat.com/bugzilla>
Vendor : Red Hat, Inc.
URL : https://www.zlib.net/
Summary : Header files and libraries for Zlib development
Description :
The zlib-devel package contains the header files and libraries needed
to develop programs that use the zlib compression and decompression
library.[root@server30 Packages]# rpm -hv --reinstall ./zsh-5.8-9.el9.x86_64.rpm
Verifying... ################################# [100%])
Preparing... ################################# [100%])
Updating / installing...
1:zsh-5.8-9.el9 ################################# [ 50%])
Cleaning up / removing...
2:zsh-5.8-9.el9 ################################# [100%])[root@server30 Packages]# rpm -e zshManaging AutoFS
Local file systems and swap
Managing NFS and AutoFS
Partitions and their management.
Remove a filesystem from a partition.
Thin provisioning and LVM
/etc/autofs.conf/ preset Directives: master_map_name=auto.master timeout = 300 negative_timeout = 60 mount_nfs_default_protocol = 4 logging = none
master_map_name
Name of the master map. Default is /etc/auto.master timeout
Time in second to unmount a share. negative_timeout
Timeout (in seconds) value for failed mount attempts. (1 minute default) mount_nfs_default_protocol
Sets the NFS version used to mount shares. logging
Logging level (none, verbose, debug)
Default is none (disabled)
Normally left to their default values.
Map Types:
Master Map
Define entries for indirect and direct maps.
Map entry format examples:
/- /etc/auto.master.d/auto.direct \# Line 1
/misc /etc/auto.misc \# Line 2/- /etc/auto.master.d/auto.direct <-- defines direct map and points to auto.direct for detailsMount shares on unrelated mount points
/misc /etc/auto.misc <-- indirect map and points to auto.misc for detailsAutomount removable filesystems
sudo dnf install -y autofssudo mkdir /autodir/- /etc/auto.master.d/auto.dir/autodir server20:/commonsudo systemctl enable --now autofssudo systemctl status autofs -l --no-pagerls /autodir
mount | grep autodirmount | grep autodirNote that /common is already mounted on the /local mount point via the fstab file and it is also configured via a direct map for automounting on /autodir. There should occur no conflict in configuration or functionality among the three.
1. Install the autofs software package if it is not already there:
2. Confirm the entry for the indirect map /misc in the /etc/auto.master file exists:
[root@server30 common]# grep ^/misc /etc/auto.master
/misc /etc/auto.misc3. Edit the /etc/auto.misc file and add the mount point, NFS server, and share information to it:
autoindir server30:/common4. Start the AutoFS service now and set it to autostart at system reboots:
[root@server40 /]# systemctl enable --now autofs5. Verify the operational status of the AutoFS service. Use the -l and --no-pager options to show full details without piping the output to a pager program (the pg command in this case):
[root@server40 /]# systemctl status autofs -l --no-pager
6. Run the ls command on the mount point /misc/autoindir and then grep for both auto.misc and autoindir on the mount command output to verify that the share is automounted and accessible:
[root@server40 /]# ls /misc/autoindir
test.text[root@server40 /]# mount | egrep 'auto.misc|autoindir'
/etc/auto.misc on /misc type autofs (rw,relatime,fd=7,pgrp=3321,timeout=300,minproto=5,maxproto=5,indirect,pipe_ino=31779)
server30:/common on /misc/autoindir type nfs4 (rw,relatime,vers=4.2,rsize=262144,wsize=262144,namlen=255,hard,proto=tcp,timeo=600,retrans=2,sec=sys,clientaddr=192.168.0.40,local_lock=none,addr=192.168.0.30)AutoFS allows us to automount user home directories by exploiting two special characters in indirect maps.
asterisk (*)
ampersand (&)
Substitutes the references to NFS servers and shared subdirectories.
With user home directories located under /home, on one or more NFS servers, the AutoFS service will connect with all of them simultaneously when a user attempts to log on to a client.
The service will mount only that specific user’s home directory rather than the entire /home.
The indirect map entry for this type of substitution is defined in an indirect map, such as /etc/auto.master.d/auto.home.
* -rw &:/home/&
With this entry in place, there is no need to update any AutoFS configuration files if additional NFS servers with /home shared are added or removed.
If user home directories are added or deleted, there will be no impact on the functionality of AutoFS.
If there is only one NFS server sharing the home directories, you can simply specify its name in lieu of the first & symbol in the above entry.
There are two portions for this exercise. The first portion should be done on server20 (NFS server) and the second portion on server10 (NFS client) as user1 with sudo where required.
first portion
second portion
On NFS server server20:
1. Create a user account called user30 with UID 3000 (-u) and assign password “password1”:
[root@server30 common]# useradd -u 3000 user30
[root@server30 common]# echo password1 | sudo passwd --stdin user30
Changing password for user user30.
passwd: all authentication tokens updated successfully.2. Edit the /etc/exports file and add an entry for /home (do not modify or remove the previous entry):
/home server40(rw)
3. Export all the shares listed in the /etc/exports file:
[root@server30 common]# sudo exportfs -avr
exporting server40.example.com:/home
exporting server40.example.com:/commonOn NFS client server10:
1. Install the autofs software package if it is not already there:
dnf install autofs
2. Create a user account called user30 with UID 3000 (-u), base home directory location /nfshome (-b), no home directory (-M), and password “password1”:
[root@server40 misc]# sudo useradd -u 3000 -b /nfshome -M user30
[root@server40 misc]# echo password1 | sudo passwd --stdin user30This is to ensure that the UID for the user is consistent on the server and the client to avoid access issues.
3. Create the umbrella mount point /nfshome to automount the user’s home directory:
sudo mkdir /nfshome4. Edit the /etc/auto.master file and add the mount point and indirect map location to it:
/nfshome /etc/auto.master.d/auto.home
5. Create the /etc/auto.master.d/auto.home file and add the following information to it:
* -rw server30:/home/&
For multiple user setup, you can replace “user30” with the & character, but ensure that those users exist on both the server and the client with consistent UIDs.
6. Start the AutoFS service now and set it to autostart at system reboots. This step is not required if AutoFS is already running and enabled.
systemctl enable --now autofs
7. Verify the operational status of the AutoFS service. Use the -l and --no-pager options to show full details without piping the output to a pager program (the pg command):
systemctl status autofs -l --no-pager
8. Log in as user30 and run the pwd, ls, and df commands for verification:
[root@server40 nfshome]# su - user30
[user30@server40 ~]$ ls
user30.txt
[user30@server40 ~]$ pwd
/nfshome/user30
[user30@server40 ~]$ df -h
Filesystem Size Used Avail Use% Mounted on
devtmpfs 4.0M 0 4.0M 0% /dev
tmpfs 888M 0 888M 0% /dev/shm
tmpfs 356M 5.1M 351M 2% /run
/dev/mapper/rhel-root 17G 2.2G 15G 13% /
/dev/sda1 960M 344M 617M 36% /boot
tmpfs 178M 0 178M 0% /run/user/0
server30:/common 17G 2.2G 15G 13% /local
server30:/home/user30 17G 2.2G 15G 13% /nfshome/user30EXAM TIP: You may need to configure AutoFS for mounting a remote user home directory.
[root@server30 /]# mkdir /sharenfs
[root@server30 /]# chmod 777 /sharenfs
[root@server30 /]# vim /etc/exports
# Add -> /sharenfs server40(rw)
[root@server30 /]# dnf -y install nfs-utils
[root@server30 /]# firewall-cmd --permanent --add-service nfs
[root@server30 /]# firewall-cmd --reload
success
[root@server30 /]# systemctl --now enable nfs-server
[root@server30 /]# exportfs -av
exporting server40.example.com:/sharenfs[root@server40 nfshome]# dnf -y install autofs[root@server40 ~]# vim /etc/auto.master
/- /etc/auto.master.d/auto.dir
[root@server40 ~]# vim /etc/auto.master.d/auto.dir
/mntauto server30:/sharenfs
[root@server40 /]# mkdir /mntauto
[root@server40 ~]# systemctl enable --now autofs[root@server40 /]# mount | grep mntauto
/etc/auto.master.d/auto.dir on /mntauto type autofs (rw,relatime,fd=10,pgrp=6211,timeout=300,minproto=5,maxproto=5,direct,pipe_ino=40247)
server30:/sharenfs on /mntauto type nfs4 (rw,relatime,vers=4.2,rsize=262144,wsize=262144,namlen=255,hard,proto=tcp,timeo=600,retrans=2,sec=sys,clientaddr=192.168.0.40,local_lock=none,addr=192.168.0.30)df -h to confirm.[root@server40 /]# df -h | grep mntauto
server30:/sharenfs 17G 2.2G 15G 13% /mntauto[root@server40 /]# mkdir /autoindir
[root@server40 etc]# vim /etc/auto.master
/autoindir /etc/auto.misc
[root@server40 etc]# vim /etc/auto.misc
sharenfs server30:/common
[root@server40 etc]# systemctl restart autofs[root@server40 etc]# ls /autoindir/sharenfs
test.textdf -h to confirm.[root@server40 etc]# df -h
Filesystem Size Used Avail Use% Mounted on
devtmpfs 4.0M 0 4.0M 0% /dev
tmpfs 888M 0 888M 0% /dev/shm
tmpfs 356M 5.1M 351M 2% /run
/dev/mapper/rhel-root 17G 2.2G 15G 13% /
/dev/sda1 960M 344M 617M 36% /boot
tmpfs 178M 0 178M 0% /run/user/0
server30:/common 17G 2.2G 15G 13% /autoindir/sharenfsFile systems
Storing disparate data in distinct file systems versus storing all data in a single file system offers the following advantages:
3 types of file systems:
Disk-based
Network-based
Memory-based
Ext3
Ext4
XFS
VFAT
ISO9660
NFS - (Network File System.)
AutoFS (Auto File System)
journaling
Supported by Ext3 and Ext4
Recover swiftly after a system crash.
keep track of recent changes in their metadata in a journal (or log).
Each metadata update is written in its entirety to the journal after completion.
The system peruses the journal of each extended file system following the reboot after a crash to determine if there are any errors
Lets the system recover the file system rapidly using the latest metadata information stored in its journal.
Ext3 that supports file systems up to 16TiB and files up to 2TiB,
Ext4 supports very large file systems up to 1EiB (ExbiByte) and files up to 16TiB (TebiByte).
xfs_repair utility to manually fix any issues.e2label
tune2fs
xfs_admin
xfs_growfs
xfs_info
blkid
df
du
fsadm
lvresize command is run with the -r switch.lsblk
mkfs
-t option and specify ext3, ext4, vfat, or xfs file system type.mount
umount
Use the mount command to view information about xfs mounted file systems:
[root@server2 ~]# mount -t xfs
/dev/mapper/rhel-root on / type xfs (rw,relatime,seclabel,attr2,inode64,logbufs=8,logbsize=32k,noquota)
/dev/sda1 on /boot type xfs (rw,relatime,seclabel,attr2,inode64,logbufs=8,logbsize=32k,noquota)-t option
auto (noauto)
-a option is specifieddefaults
_netdev
remount
ro (rw)
Extended and XFS file systems have a 128-bit (32 hexadecimal characters) UUID (Universally Unique IDentifier) assigned to it at the time of its creation.
UUIDs assigned to vfat file systems are 32-bit (8 hexadecimal characters) in length.
Assigning a UUID makes the file system unique among many other file systems that potentially exist on the system.
Persistent across system reboots.
Used by default in RHEL 9 in the /etc/fstab file for any file system that is created by the system in a standard partition.
RHEL attempts to mount all file systems listed in the /etc/fstab file at reboots.
Each file system has an associated device file and UUID, but may or may not have a corresponding label.
The system checks for the presence of each file system’s device file, UUID, or label, and then attempts to mount it.
Determine the UUID of /boot
[root@server2 ~]# lsblk | grep boot
├─sda1 8:1 0 1G 0 part /boot[root@server2 ~]# sudo xfs_admin -u /dev/sda1
UUID = 630568e1-608f-4603-9b97-e27f82c7d4b4
[root@server2 ~]# sudo blkid /dev/sda1
/dev/sda1: UUID="630568e1-608f-4603-9b97-e27f82c7d4b4" TYPE="xfs" PARTUUID="7dcb43e4-01"
[root@server2 ~]# sudo lsblk -f /dev/sda1
NAME FSTYPE FSVER LABEL UUID FSAVAIL FSUSE% MOUNTPOINTS
sda1 xfs 630568e1-608f-4603-9b97-e27f82c7d4b4 616.1M 36% /bootFor extended file systems, you can use the tune2fs, blkid, or lsblk commands to determine the UUID.
A UUID is also assigned to a file system that is created in a VDO or LVM volume; however, it need not be used in the fstab file, as the device files associated with the logical volumes are always unique and persistent.
The /boot file system is located in the /dev/sda1 partition and its type is XFS. You can use the xfs_admin or the lsblk command as follows to
determine its label:
[root@server2 ~]# sudo xfs_admin -l /dev/sda1
label = ""
[root@server2 ~]# sudo lsblk -f /dev/sda1
NAME FSTYPE FSVER LABEL UUID FSAVAIL FSUSE% MOUNTPOINTS
sda1 xfs 630568e1-608f-4603-9b97-e27f82c7d4b4 616.1M 36% /bootxfs_admin command with the -L option.unmount /boot, set the label “bootfs” on its device file, and remount it:
[root@server2 ~]# sudo umount /boot
[root@server2 ~]# sudo xfs_admin -L bootfs /dev/sda1
writing all SBs
new label = "bootfs"Confirm the new label by executing sudo xfs_admin -l /dev/sda1 or sudo lsblk -f /dev/sda1.
For extended file systems, you can use the e2label command to apply a label and the tune2fs, blkid, and lsblk commands to view and verify.
Now you can replace the UUID=\"22d05484-6ae1-4ef8-a37d-abab674a5e35" for /boot in the fstab file with LABEL=bootfs, and unmount and remount /boot as demonstrated above for confirmation.
[root@server2 ~]# mount /boot
mount: (hint) your fstab has been modified, but systemd still uses
the old version; use 'systemctl daemon-reload' to reload.A label may also be applied to a file system created in a logical volume; however, it is not recommended for use in the fstab file, as the device files for logical volumes are always unique and remain persistent across system reboots.
mount command obtains the rest of the information from this file.umount command to detach it from the directory hierarchy.[root@server2 ~]# cat /etc/fstab
#
# /etc/fstab
# Created by anaconda on Sun Feb 25 12:11:47 2024
#
# Accessible filesystems, by reference, are maintained under '/dev/disk/'.
# See man pages fstab(5), findfs(8), mount(8) and/or blkid(8) for more info.
#
# After editing this file, run 'systemctl daemon-reload' to update systemd
# units generated from this file.
#
/dev/mapper/rhel-root / xfs defaults 0 0
LABEL=bootfs /boot xfs defaults 0 0
/dev/mapper/rhel-swap none swap defaults 0 0EXAM TIP: Any missing or invalid entry in this file may render the system unbootable. You will have to boot the system in emergency mode to fix this file. Ensure that you understand each field in the file for both file system and swap entries.
The format of this file is such that each row is broken out into six columns to identify the required attributes for each file system to be successfully mounted. Here is what the columns contain:
Column 1:
Column 2:
Column 3:
Column 4:
mount command or the fstab file for additional options and details.Column 5:
Column 6:
Sequence number in which to run the e2fsck (file system check and repair utility for Extended file system types) utility on the file system at system boot.
By default, 0 is used for memory-based, remote, and removable file systems, 1 for /, and 2 for /boot and other physical file systems. 0 can also be used for /, /boot, and other physical file systems you don’t want to be checked or repaired.
Applicable only on Extended file systems;
XFS does not use it.
0 in columns 5 and 6 for XFS, virtual, remote, and removable file system types has no meaning. You do not need to add them for these file system types.
1. Apply the label “msdos” to the sdb disk using the parted command:
[root@server20 ~]# sudo parted /dev/sdb mklabel msdos
Warning: The existing disk label on /dev/sdb will be destroyed and all data on this disk will be
lost. Do you want to continue?
Yes/No? y
Information: You may need to update /etc/fstab.2. Create 2 x 100MB primary partitions on sdb with the parted command:
[root@server20 ~]# sudo parted /dev/sdb mkpart primary 1 101m
Information: You may need to update /etc/fstab.
[root@server20 ~]# sudo parted /dev/sdb mkpart primary 102 201m
Information: You may need to update /etc/fstab.3. Initialize the first partition (sdb1) with Ext4 file system type using the mkfs command:
[root@server20 ~]# sudo mkfs -t ext4 /dev/sdb1
mke2fs 1.46.5 (30-Dec-2021)
/dev/sdb1 contains a LVM2_member file system
Proceed anyway? (y,N) y
Creating filesystem with 97280 1k blocks and 24288 inodes
Filesystem UUID: 73db0582-7183-42aa-951d-2f48b7712597
Superblock backups stored on blocks:
8193, 24577, 40961, 57345, 73729
Allocating group tables: done
Writing inode tables: done
Creating journal (4096 blocks): done
Writing superblocks and filesystem accounting information: done 4. Initialize the second partition (sdb2) with VFAT file system type using the mkfs command:
[root@server20 ~]# sudo mkfs -t vfat /dev/sdb2
mkfs.fat 4.2 (2021-01-31)5. Initialize the whole disk (sdc) with the XFS file system type using the mkfs.xfs command. Add the -f flag to force the removal of any old partitioning or labeling information from the disk.
[root@server20 ~]# sudo mkfs.xfs /dev/sdc -f
Filesystem should be larger than 300MB.
Log size should be at least 64MB.
Support for filesystems like this one is deprecated and they will not be supported in future releases.
meta-data=/dev/sdc isize=512 agcount=4, agsize=16000 blks
= sectsz=512 attr=2, projid32bit=1
= crc=1 finobt=1, sparse=1, rmapbt=0
= reflink=1 bigtime=1 inobtcount=1 nrext64=0
data = bsize=4096 blocks=64000, imaxpct=25
= sunit=0 swidth=0 blks
naming =version 2 bsize=4096 ascii-ci=0, ftype=1
log =internal log bsize=4096 blocks=1368, version=2
= sectsz=512 sunit=0 blks, lazy-count=1
realtime =none extsz=4096 blocks=0, rtextents=06. Determine the UUIDs for all three file systems using the lsblk command:
[root@server2 ~]# lsblk -f /dev/sdb /dev/sdc
NAME FSTYPE FSVER LABEL UUID FSAVAIL FSUSE% MOUNTPOINTS
sdb
├─sdb1 ext4 1.0 0bdd22d0-db53-40bb-8cc7-36efc9184196
└─sdb2 vfat FAT16 FB3A-6572
sdc xfs 91884326-9686-4569-96fa-9adb02c1f6f4>)7. Open the /etc/fstab file, go to the end of the file, and append entries for the file systems for persistence using their UUIDs:
UUID=0bdd22d0-db53-40bb-8cc7-36efc9184196 /ext4fs1 ext4 defaults 0 0
UUID=FB3A-6572 /vfatfs1 vfat defaults 0 0
UUID=91884326-9686-4569-96fa-9adb02c1f6f4 /xfsfs1 xfs defaults 0 08. Create mount points /ext4fs1, /vfatfs1, and /xfsfs1 for the three
file systems using the mkdir command:
[root@server2 ~]# sudo mkdir /ext4fs1 /vfatfs1 /xfsfs1
9. Mount the new file systems using the mount command. This command will fail if there are any invalid or missing information in the file.
[root@server2 ~]# sudo mount -a
mount: (hint) your fstab has been modified, but systemd still uses
the old version; use 'systemctl daemon-reload' to reload.10. View the mount and availability status as well as the types of all three file systems using the df command:
[root@server2 ~]# df -hT
Filesystem Type Size Used Avail Use% Mounted on
devtmpfs devtmpfs 4.0M 0 4.0M 0% /dev
tmpfs tmpfs 888M 0 888M 0% /dev/shm
tmpfs tmpfs 356M 5.1M 351M 2% /run
/dev/mapper/rhel-root xfs 17G 2.0G 15G 12% /
/dev/sda1 xfs 960M 344M 617M 36% /boot
tmpfs tmpfs 178M 0 178M 0% /run/user/0
/dev/sdb1 ext4 84M 14K 77M 1% /ext4fs1
/dev/sdb2 vfat 95M 0 95M 0% /vfatfs1
/dev/sdc xfs 245M 15M 231M 6% /xfsfs11. Create a 172MB partition on the sdd disk using the parted command:
[root@server2 ~]# sudo parted /dev/sdd mkpart pri 1 172m
Information: You may need to update /etc/fstab.2. Initialize the sdd1 partition for use in LVM using the pvcreate command:
[root@server2 ~]# sudo pvcreate /dev/sdd1
Device /dev/sdb2 has updated name (devices file /dev/sdd2)
Device /dev/sdb1 has no PVID (devices file brKVLFEG3AoBzhWoso0Sa1gLYHgNZ4vL)
Physical volume "/dev/sdd1" successfully created.3. Create the volume group vgfs with a PE size of 16MB using the physical volume sdd1:
[root@server2 ~]# sudo vgcreate -s 16 vgfs /dev/sdd1
Volume group "vgfs" successfully createdThe PE size is not easy to alter after a volume group creation, so ensure it is defined as required at creation.
4. Create two logical volumes ext4vol and xfsvol of size 80MB each in vgfs using the lvcreate command:
[root@server2 ~]# sudo lvcreate -n ext4vol -L 80 vgfs
Logical volume "ext4vol" created.
[root@server2 ~]# sudo lvcreate -n xfsvol -L 80 vgfs
Logical volume "xfsvol" created.5. Format the ext4vol logical volume with the Ext4 file system type using the mkfs.ext4 command:
[root@server2 ~]# sudo mkfs.ext4 /dev/vgfs/ext4vol
mke2fs 1.46.5 (30-Dec-2021)
Creating filesystem with 81920 1k blocks and 20480 inodes
Filesystem UUID: 4ed1fef7-2164-485b-8035-7f627cd59419
Superblock backups stored on blocks:
8193, 24577, 40961, 57345, 73729
Allocating group tables: done
Writing inode tables: done
Creating journal (4096 blocks): done
Writing superblocks and filesystem accounting information: doneYou can also use sudo mkfs -t ext4 /dev/vgfs/ext4vol.
6. Format the xfsvol logical volume with the XFS file system type using the mkfs.xfs command:
[root@server2 ~]# sudo mkfs.xfs /dev/vgfs/xfsvol
Filesystem should be larger than 300MB.
Log size should be at least 64MB.
Support for filesystems like this one is deprecated and they will not be supported in future releases.
meta-data=/dev/vgfs/xfsvol isize=512 agcount=4, agsize=5120 blks
= sectsz=512 attr=2, projid32bit=1
= crc=1 finobt=1, sparse=1, rmapbt=0
= reflink=1 bigtime=1 inobtcount=1 nrext64=0
data = bsize=4096 blocks=20480, imaxpct=25
= sunit=0 swidth=0 blks
naming =version 2 bsize=4096 ascii-ci=0, ftype=1
log =internal log bsize=4096 blocks=1368, version=2
= sectsz=512 sunit=0 blks, lazy-count=1
realtime =none extsz=4096 blocks=0, rtextents=0You may also use sudo mkfs -t xfs /dev/vgfs/xfsvol instead.
7. Open the /etc/fstab file, go to the end of the file, and append entries for the file systems for persistence using their device files:
/dev/vgfs/ext4vol /ext4fs2 ext4 defaults 0 0
/dev/vgfs/xfsvol /xfsfs2 xfs defaults 0 08. Create mount points /ext4fs2 and /xfsfs2 using the mkdir command:
[root@server2 ~]# sudo mkdir /ext4fs2 /xfsfs2
9. Mount the new file systems using the mount command. This command will fail if there is any invalid or missing information in the file.
[root@server2 ~]# sudo mount -a
mount: (hint) your fstab has been modified, but systemd still uses
the old version; use 'systemctl daemon-reload' to reload.10. View the mount and availability status as well as the types of the new LVM file systems using the lsblk and df commands:
[root@server2 ~]# lsblk /dev/sdd
NAME MAJ:MIN RM SIZE RO TYPE MOUNTPOINTS
sdd 8:48 0 250M 0 disk
└─sdd1 8:49 0 163M 0 part
├─vgfs-ext4vol 253:2 0 80M 0 lvm /ext4fs2
└─vgfs-xfsvol 253:3 0 80M 0 lvm /xfsfs2
[root@server2 ~]# df -hT | grep fs2
/dev/mapper/vgfs-ext4vol ext4 70M 14K 64M 1% /ext4fs2
/dev/mapper/vgfs-xfsvol xfs 75M 4.8M 70M 7% /xfsfs21. Initialize the sde disk and add it to the vgfs volume group:
sde had a gpt partition table with no partitions ran the following to reset it:
[root@server2 ~]# dd if=/dev/zero of=/dev/sde bs=1M count=2 conv=fsync
2+0 records in
2+0 records out
2097152 bytes (2.1 MB, 2.0 MiB) copied, 0.0102036 s, 206 MB/s
[root@server2 ~]# sudo partprobe /dev/sde
[root@server2 ~]# sudo pvcreate /dev/sde
Physical volume "/dev/sde" successfully created.[root@server2 ~]# sudo pvcreate /dev/sde
Physical volume "/dev/sde" successfully created.
[root@server2 ~]# sudo vgextend vgfs /dev/sde
Volume group "vgfs" successfully extended2. Confirm the new size of vgfs using the vgs and vgdisplay commands:
[root@server2 ~]# sudo vgs
VG #PV #LV #SN Attr VSize VFree
rhel 1 2 0 wz--n- <19.00g 0
vgfs 2 2 0 wz--n- 400.00m 240.00m[root@server2 ~]# vgdisplay vgfs
Devices file sys_wwid t10.ATA_VBOX_HARDDISK_VBa5e3cbf7-10921e08 PVID qeP9dCevNnTy422I8p18NxDKQ2WyDodU last seen on /dev/sdf1 not found.
--- Volume group ---
VG Name vgfs
System ID
Format lvm2
Metadata Areas 2
Metadata Sequence No 4
VG Access read/write
VG Status resizable
MAX LV 0
Cur LV 2
Open LV 2
Max PV 0
Cur PV 2
Act PV 2
VG Size 400.00 MiB
PE Size 16.00 MiB
Total PE 25
Alloc PE / Size 10 / 160.00 MiB
Free PE / Size 15 / 240.00 MiB
VG UUID amDADJ-I4dH-jQUF-RFcE-58iL-jItl-5ti6LSThere are now two physical volumes in the volume group and the total size increased to 400MiB.
3. Grow the logical volume ext4vol and the file system it holds by 40MB using the lvextend and fsadm command pair. Make sure to use an uppercase L to specify the size. The default unit is MiB. The plus sign (+) signifies an addition to the current size.
[root@server2 ~]# sudo lvextend -L +40 /dev/vgfs/ext4vol
Rounding size to boundary between physical extents: 48.00 MiB.
Size of logical volume vgfs/ext4vol changed from 80.00 MiB (5 extents) to 128.00 MiB (8 extents).
Logical volume vgfs/ext4vol successfully resized.
[root@server2 ~]# sudo fsadm resize /dev/vgfs/ext4vol
resize2fs 1.46.5 (30-Dec-2021)
Filesystem at /dev/mapper/vgfs-ext4vol is mounted on /ext4fs2; on-line resizing required
old_desc_blocks = 1, new_desc_blocks = 1
The filesystem on /dev/mapper/vgfs-ext4vol is now 131072 (1k) blocks long.The resize subcommand instructs the fsadm command to grow the file system to the full length of the specified logical volume.
4. Grow the logical volume xfsvol and the file system (-r) it holds by (+) 40MB using the lvresize command:
[root@server2 ~]# sudo lvresize -r -L +40 /dev/vgfs/xfsvol
Rounding size to boundary between physical extents: 48.00 MiB.
Size of logical volume vgfs/xfsvol changed from 80.00 MiB (5 extents) to 128.00 MiB (8 extents).
File system xfs found on vgfs/xfsvol mounted at /xfsfs2.
Extending file system xfs to 128.00 MiB (134217728 bytes) on vgfs/xfsvol...
xfs_growfs /dev/vgfs/xfsvol
meta-data=/dev/mapper/vgfs-xfsvol isize=512 agcount=4, agsize=5120 blks
= sectsz=512 attr=2, projid32bit=1
= crc=1 finobt=1, sparse=1, rmapbt=0
= reflink=1 bigtime=1 inobtcount=1 nrext64=0
data = bsize=4096 blocks=20480, imaxpct=25
= sunit=0 swidth=0 blks
naming =version 2 bsize=4096 ascii-ci=0, ftype=1
log =internal log bsize=4096 blocks=1368, version=2
= sectsz=512 sunit=0 blks, lazy-count=1
realtime =none extsz=4096 blocks=0, rtextents=0
data blocks changed from 20480 to 32768
xfs_growfs done
Extended file system xfs on vgfs/xfsvol.
Logical volume vgfs/xfsvol successfully resized.5. Verify the new extensions to both logical volumes using the lvs command. You may also issue the lvdisplay or vgdisplay command instead.
[root@server2 ~]# sudo lvs | grep vol
Devices file sys_wwid t10.ATA_VBOX_HARDDISK_VBa5e3cbf7-10921e08 PVID qeP9dCevNnTy422I8p18NxDKQ2WyDodU last seen on /dev/sdf1 not found.
ext4vol vgfs -wi-ao---- 128.00m
xfsvol vgfs -wi-ao---- 128.00m 6. Check the new sizes and the current mount status for both file systems using the df and lsblk commands:
[root@server2 ~]# df -hT | grep -E 'ext4vol|xfsvol'
/dev/mapper/vgfs-xfsvol xfs 123M 5.4M 118M 5% /xfsfs2
/dev/mapper/vgfs-ext4vol ext4 115M 14K 107M 1% /ext4fs2[root@server2 ~]# lsblk /dev/sdd /dev/sde
NAME MAJ:MIN RM SIZE RO TYPE MOUNTPOINTS
sdd 8:48 0 250M 0 disk
└─sdd1 8:49 0 163M 0 part
├─vgfs-ext4vol 253:2 0 128M 0 lvm /ext4fs2
└─vgfs-xfsvol 253:3 0 128M 0 lvm /xfsfs2
sde 8:64 0 250M 0 disk
├─vgfs-ext4vol 253:2 0 128M 0 lvm /ext4fs2
└─vgfs-xfsvol 253:3 0 128M 0 lvm /xfsfs21. Initialize the sdf disk using the pvcreate command:
[root@server2 ~]# sudo pvcreate /dev/sdf
WARNING: adding device /dev/sdf with idname t10.ATA_VBOX_HARDDISK_VBa5e3cbf7-10921e08 which is already used for missing device.
Physical volume "/dev/sdf" successfully created.2. Create vgvdo1 volume group using the vgcreate command:
[root@server2 ~]# sudo vgcreate vgvdo1 /dev/sdf
WARNING: adding device /dev/sdf with idname t10.ATA_VBOX_HARDDISK_VBa5e3cbf7-10921e08 which is already used for missing device.
Volume group "vgvdo1" successfully created3. Display basic information about the volume group:
root@server2 ~]# sudo vgdisplay vgvdo1
Devices file sys_wwid t10.ATA_VBOX_HARDDISK_VBa5e3cbf7-10921e08 PVID qeP9dCevNnTy422I8p18NxDKQ2WyDodU last seen on /dev/sdf1 not found.
--- Volume group ---
VG Name vgvdo1
System ID
Format lvm2
Metadata Areas 1
Metadata Sequence No 1
VG Access read/write
VG Status resizable
MAX LV 0
Cur LV 0
Open LV 0
Max PV 0
Cur PV 1
Act PV 1
VG Size <5.00 GiB
PE Size 4.00 MiB
Total PE 1279
Alloc PE / Size 0 / 0
Free PE / Size 1279 / <5.00 GiB
VG UUID b9u8Ng-m3BF-Jz2b-sBu8-gEG1-bBGQ-sBgrt04. Create a VDO volume called lvvdo1 using the lvcreate command. Use the -l option to specify the number of logical extents (1279) to be allocated and the -V option for the amount of virtual space (20GB).
[root@server2 ~]# sudo lvcreate -n lvvdo -l 1279 -V 20G --type vdo vgvdo1
WARNING: vdo signature detected on /dev/vgvdo1/vpool0 at offset 0. Wipe it? [y/n]: y
Wiping vdo signature on /dev/vgvdo1/vpool0.
The VDO volume can address 2 GB in 1 data slab.
It can grow to address at most 16 TB of physical storage in 8192 slabs.
If a larger maximum size might be needed, use bigger slabs.
Logical volume "lvvdo" created.5. Display detailed information about the volume group including the logical volume and the physical volume:
[root@server2 ~]# sudo vgdisplay -v vgvdo1
Devices file sys_wwid t10.ATA_VBOX_HARDDISK_VBa5e3cbf7-10921e08 PVID qeP9dCevNnTy422I8p18NxDKQ2WyDodU last seen on /dev/sdf1 not found.
--- Volume group ---
VG Name vgvdo1
System ID
Format lvm2
Metadata Areas 1
Metadata Sequence No 3
VG Access read/write
VG Status resizable
MAX LV 0
Cur LV 2
Open LV 0
Max PV 0
Cur PV 1
Act PV 1
VG Size <5.00 GiB
PE Size 4.00 MiB
Total PE 1279
Alloc PE / Size 1279 / <5.00 GiB
Free PE / Size 0 / 0
VG UUID b9u8Ng-m3BF-Jz2b-sBu8-gEG1-bBGQ-sBgrt0
--- Logical volume ---
LV Path /dev/vgvdo1/vpool0
LV Name vpool0
VG Name vgvdo1
LV UUID nTPKtv-3yTW-J7Cy-HVP1-Aujs-cXZ6-gdS2fI
LV Write Access read/write
LV Creation host, time server2, 2024-07-01 12:57:56 -0700
LV VDO Pool data vpool0_vdata
LV VDO Pool usage 60.00%
LV VDO Pool saving 100.00%
LV VDO Operating mode normal
LV VDO Index state online
LV VDO Compression st online
LV VDO Used size <3.00 GiB
LV Status NOT available
LV Size <5.00 GiB
Current LE 1279
Segments 1
Allocation inherit
Read ahead sectors auto
--- Logical volume ---
LV Path /dev/vgvdo1/lvvdo
LV Name lvvdo
VG Name vgvdo1
LV UUID Z09BdK-ETJk-Gi53-m8Cg-mnTd-RYug-Z9nV0L
LV Write Access read/write
LV Creation host, time server2, 2024-07-01 12:58:02 -0700
LV VDO Pool name vpool0
LV Status available
# open 0
LV Size 20.00 GiB
Current LE 5120
Segments 1
Allocation inherit
Read ahead sectors auto
- currently set to 8192
Block device 253:6
--- Physical volumes ---
PV Name /dev/sdf
PV UUID WKc956-Xp66-L8v9-VA6S-KWM5-5e3X-kx1v0V
PV Status allocatable
Total PE / Free PE 1279 / 06. Display the new VDO volume creation using the lsblk command:
[root@server2 ~]# sudo lsblk /dev/sdf
NAME MAJ:MIN RM SIZE RO TYPE MOUNTPOINTS
sdf 8:80 0 5G 0 disk
└─vgvdo1-vpool0_vdata 253:4 0 5G 0 lvm
└─vgvdo1-vpool0-vpool 253:5 0 20G 0 lvm
└─vgvdo1-lvvdo 253:6 0 20G 0 lvm The output shows the virtual volume size (20GB) and the underlying disk size (5GB).
7. Initialize the VDO volume with the XFS file system type using the mkfs.xfs command. The VDO volume device file is
/dev/mapper/vgvdo1-lvvdo as indicated in the above output. Add the -f flag to force the removal of any old partitioning or labeling information from the disk.
[root@server2 mapper]# sudo mkfs.xfs /dev/mapper/vgvdo1-lvvdo
meta-data=/dev/mapper/vgvdo1-lvvdo isize=512 agcount=4, agsize=1310720 blks
= sectsz=4096 attr=2, projid32bit=1
= crc=1 finobt=1, sparse=1, rmapbt=0
= reflink=1 bigtime=1 inobtcount=1 nrext64=0
data = bsize=4096 blocks=5242880, imaxpct=25
= sunit=0 swidth=0 blks
naming =version 2 bsize=4096 ascii-ci=0, ftype=1
log =internal log bsize=4096 blocks=16384, version=2
= sectsz=4096 sunit=1 blks, lazy-count=1
realtime =none extsz=4096 blocks=0, rtextents=0
Discarding blocks...Done.(lab said vgvdo1-lvvdo1 but it didn’t exist for me.)
8. Open the /etc/fstab file, go to the end of the file, and append the following entry for the file system for persistent mounts using its device file:
/dev/mapper/vgvdo1-lvvdo /xfsvdo1 xfs defaults 0 0 9. Create the mount point /xfsvdo1 using the mkdir command:
[root@server2 mapper]# sudo mkdir /xfsvdo110. Mount the new file system using the mount command. This command will fail if there are any invalid or missing information in the file.
[root@server2 mapper]# sudo mount -a
mount: (hint) your fstab has been modified, but systemd still uses
the old version; use 'systemctl daemon-reload' to reload.The mount command with the -a flag is a validation test for the fstab file. It should always be executed after updating this file and before rebooting the server to avoid landing the system in an unbootable state.
11. View the mount and availability status as well as the type of the VDO file system using the lsblk and df commands:
[root@server2 mapper]# lsblk /dev/sdf
NAME MAJ:MIN RM SIZE RO TYPE MOUNTPOINTS
sdf 8:80 0 5G 0 disk
└─vgvdo1-vpool0_vdata 253:4 0 5G 0 lvm
└─vgvdo1-vpool0-vpool 253:5 0 20G 0 lvm
└─vgvdo1-lvvdo 253:6 0 20G 0 lvm /xfsvdo1
[root@server2 mapper]# df -hT /xfsvdo1
Filesystem Type Size Used Avail Use% Mounted on
/dev/mapper/vgvdo1-lvvdo xfs 20G 175M 20G 1% /xfsvdo1Let’s run this command with the -h option on server2:
[root@server2 ~]# df -h
Filesystem Size Used Avail Use% Mounted on
devtmpfs 4.0M 0 4.0M 0% /dev
tmpfs 888M 0 888M 0% /dev/shm
tmpfs 356M 5.1M 351M 2% /run
/dev/mapper/rhel-root 17G 2.0G 15G 12% /
tmpfs 178M 0 178M 0% /run/user/0
/dev/sda1 960M 344M 617M 36% /bootColumn 1:
Columns 2, 3, 4, 5, 6
Useful flags
-T
-x
-t
-i
Run this command on the /usr/bin directory to view the usage summary:
[root@server2 ~]# du -sh /usr/bin
151M /usr/binAdd a “total” row to the output and with numbers displayed in KBs:
[root@server2 ~]# du -sc /usr/bin
154444 /usr/bin
154444 total[root@server2 ~]# du -sch /usr/bin
151M /usr/bin
151M totalTry this command with different options on the /usr/sbin/lvm file and observe the results.
Move pages of idle data between physical memory and swap.
Swap areas act as extensions to the physical memory.
May be activated or deactivated independent of swap spaces located in other partitions and volumes.
The system splits the physical memory into small logical chunks called pages and maps their physical locations to virtual locations on the swap to facilitate access by system processors.
This physical-to-virtual mapping of pages is stored in a data structure called page table, and it is maintained by the kernel.
When a program or process is spawned, it requires space in the physical memory to run and be processed.
Although many programs can run concurrently, the physical memory cannot hold all of them at once.
The kernel monitors the memory usage.
As long as the free memory remains above a high threshold, nothing happens.
When the free memory falls below that threshold, the system starts moving selected idle pages of data from physical memory to the swap space to make room to accommodate other programs.
This piece in the process is referred to as page out.
Since the system CPU performs the process execution in around-robin fashion, when the system needs this paged-out data for execution, the CPU looks for that data in the physical memory and a pagefault occurs, resulting in moving the pages back to the physical memory from the swap.
This return of data to the physical memory is referred to as page in.
The entire process of paging data out and in is known as demand paging.
RHEL systems with less physical memory but high memory requirements can become over busy with paging out and in.
When this happens, they do not have enough cycles to carry out other useful tasks, resulting in degraded system performance.
The excessive amount of paging that affects the system performance is called thrashing.
When thrashing begins, or when the free physical memory falls below a low threshold, the system deactivates idle processes and prevents new processes from being launched.
The idle processes are only reactivated, and new processes are only allowed to be started when the system discovers that the available physical memory has climbed above the threshold level and thrashing has ceased.
free command-h
-k
-m
-g
-t
[root@server2 mapper]# free -ht
total used free shared buff/cache available
Mem: 1.7Gi 783Mi 714Mi 5.0Mi 440Mi 991Mi
Swap: 2.0Gi 0B 2.0Gi
Total: 3.7Gi 783Mi 2.7GiTry free -hts 3 and free -htc 2 to refresh the output every three seconds (-s) and to display the output twice (-c).
free. Here are the relevant fields from this file:[root@server2 mapper]# cat /proc/meminfo | grep -E 'Mem|Swap'
MemTotal: 1818080 kB
MemFree: 731724 kB
MemAvailable: 1015336 kB
SwapCached: 0 kB
SwapTotal: 2097148 kB
SwapFree: 2097148 kBmkswap, swapon, and swapoff commands are available.mkswap to initialize a partition for use as a swap space.mkswap command.EXAM TIP: Use the lsblk command to determine available disk space.
1. Use parted print on the sdb disk and the vgs command on the vgfs volume group to determine available space for a new 40MB partition and a 144MB logical volume:
[root@server2 mapper]# sudo parted /dev/sdb print
Model: ATA VBOX HARDDISK (scsi)
Disk /dev/sdb: 262MB
Sector size (logical/physical): 512B/512B
Partition Table: msdos
Disk Flags:
Number Start End Size Type File system Flags
1 1049kB 101MB 99.6MB primary ext4
2 102MB 201MB 99.6MB primary fat16
[root@server2 mapper]# sudo vgs vgfs
Devices file sys_wwid t10.ATA_VBOX_HARDDISK_VBa5e3cbf7-10921e08 PVID qeP9dCevNnTy422I8p18NxDKQ2WyDodU last seen on /dev/sdf1 not found.
VG #PV #LV #SN Attr VSize VFree
vgfs 2 2 0 wz--n- 400.00m 144.00mThe outputs show 49MB (250MB minus 201MB) free space on the sdb disk and 144MB free space in the volume group.
2. Create a partition called sdb3 of size 40MB using the parted command:
[root@server2 mapper]# sudo parted /dev/sdb mkpart primary 202 242
Information: You may need to update /etc/fstab.3. Create logical volume swapvol of size 144MB in vgs using the lvcreate command:
[root@server2 mapper]# sudo lvcreate -L 144 -n swapvol vgfs
Logical volume "swapvol" created.4. Construct swap structures in sdb3 and swapvol using the mkswap command:
[root@server2 mapper]# sudo mkswap /dev/sdb3
Setting up swapspace version 1, size = 38 MiB (39841792 bytes)
no label, UUID=a796e0df-b1c3-4c30-bdde-dd522bba4fff
[root@server2 mapper]# sudo mkswap /dev/vgfs/swapvol
Setting up swapspace version 1, size = 144 MiB (150990848 bytes)
no label, UUID=88196e73-feaf-4137-8743-f9340296aeec5. Edit the fstab file and add entries for both swap areas for auto-activation on reboots. Obtain the UUID for partition swap with
lsblk -f /dev/sdb3 and use the device file for logical volume. Specify their priorities.
UUID=a796e0df-b1c3-4c30-bdde-dd522bba4fff swap swap pri=1 0 0
/dev/vgfs/swapvol swap swap pri=2 0 0 EXAM TIP: You will not be given any credit for this work if you forget to add entries to the fstab file.
6. Determine the current amount of swap space on the system using the swapon command:
[root@server2]# sudo swapon
NAME TYPE SIZE USED PRIO
/dev/dm-1 partition 2G 0B -2There is one 2GB swap area on the system and it is configured at the default priority of -2.
7. Activate the new swap regions using the swapon command:
[root@server2]# sudo swapon -a8. Confirm the activation using the swapon command or by viewing the /proc/swaps file:
[root@server2 mapper]# sudo swapon
NAME TYPE SIZE USED PRIO
/dev/dm-1 partition 2G 0B -2
/dev/sdb3 partition 38M 0B 1
/dev/dm-7 partition 144M 0B 2[root@server2 mapper]# cat /proc/swaps
Filename Type Size Used Priority
/dev/dm-1 partition 2097148 0 -2
/dev/sdb3 partition 38908 0 1
/dev/dm-7 partition 147452 0 2
#dm is device mapper9. Issue the free command to view the reflection of swap numbers on the Swap and Total lines:
[root@server2 mapper]# free -ht
total used free shared buff/cache available
Mem: 1.7Gi 793Mi 706Mi 5.0Mi 438Mi 981Mi
Swap: 2.2Gi 0B 2.2Gi
Total: 3.9Gi 793Mi 2.9Gi[root@server2 mapper]# parted /dev/sdc mklabel msdos
Information: You may need to update /etc/fstab.
[root@server2 mapper]# parted /dev/sdc mkpart primary 1 70m
Information: You may need to update /etc/fstab.
root@server2 mapper]# parted /dev/sdb print
Model: ATA VBOX HARDDISK (scsi)
Disk /dev/sdb: 262MB
Sector size (logical/physical): 512B/512B
Partition Table: msdos
Disk Flags:
Number Start End Size Type File system Flags
1 1049kB 70.3MB 69.2MB primaryparted) mkpart primary 71MB 140MB
Warning: The resulting partition is not properly aligned for best performance: 138671s % 2048s != 0s
Ignore/Cancel?
Ignore/Cancel? ignore
(parted) mkpart primary 140MB 210MB
Warning: The resulting partition is not properly aligned for best performance: 273438s % 2048s != 0s
Ignore/Cancel? ignore
(parted) print
Model: ATA VBOX HARDDISK (scsi)
Disk /dev/sdb: 262MB
Sector size (logical/physical): 512B/512B
Partition Table: msdos
Disk Flags:
Number Start End Size Type File system Flags
1 1049kB 70.3MB 69.2MB primary
2 71.0MB 140MB 69.0MB primary
3 140MB 210MB 70.0MB primary[root@server2 mapper]# sudo mkfs -t vfat /dev/sdc1
mkfs.fat 4.2 (2021-01-31)
[root@server2 mapper]# sudo mkfs -t ext4 /dev/sdc2
mke2fs 1.46.5 (30-Dec-2021)
Creating filesystem with 67380 1k blocks and 16848 inodes
Filesystem UUID: 43b590ff-3330-4b88-aef9-c3a97d8cf51e
Superblock backups stored on blocks:
8193, 24577, 40961, 57345
Allocating group tables: done
Writing inode tables: done
Creating journal (4096 blocks): done
Writing superblocks and filesystem accounting information: done
[root@server2 mapper]# sudo mkfs -t xfs /dev/sdc3
Filesystem should be larger than 300MB.
Log size should be at least 64MB.
Support for filesystems like this one is deprecated and they will not be supported in future releases.
meta-data=/dev/sdb3 isize=512 agcount=4, agsize=4273 blks
= sectsz=512 attr=2, projid32bit=1
= crc=1 finobt=1, sparse=1, rmapbt=0
= reflink=1 bigtime=1 inobtcount=1 nrext64=0
data = bsize=4096 blocks=17089, imaxpct=25
= sunit=0 swidth=0 blks
naming =version 2 bsize=4096 ascii-ci=0, ftype=1
log =internal log bsize=4096 blocks=1368, version=2
= sectsz=512 sunit=0 blks, lazy-count=1
realtime =none extsz=4096 blocks=0, rtextents=0[root@server2 mapper]# mkdir /vfatfs5 /ext4fs5 /xfsfs5
[root@server2 mapper]# mount /dev/sdc1 /vfatfs5
mount: (hint) your fstab has been modified, but systemd still uses
the old version; use 'systemctl daemon-reload' to reload.
[root@server2 mapper]# mount /dev/sdc2 /ext4fs5
mount: (hint) your fstab has been modified, but systemd still uses
the old version; use 'systemctl daemon-reload' to reload.
[root@server2 mapper]# mount /dev/sdc3 /xfsfs5
mount: (hint) your fstab has been modified, but systemd still uses
the old version; use 'systemctl daemon-reload' to reload.
[root@server2 mapper]# mount
/dev/sdb1 on /vfatfs5 type vfat (rw,relatime,fmask=0022,dmask=0022,codepage=437,iocharset=ascii,shortname=mixed,errors=remount-ro)
/dev/sdb2 on /ext4fs5 type ext4 (rw,relatime,seclabel)
/dev/sdb3 on /xfsfs5 type xfs (rw,relatime,seclabel,attr2,inode64,logbufs=8,logbsize=32k,noquota)[root@server2 mapper]# blkid /dev/sdc1 /dev/sdc2 /dev/sdc3 >> /etc/fstab
[root@server2 mapper]# vim /etc/fstabmount -a to mount them all.
umount /dev/sdb1 /dev/sdb2 /dev/sdb3df -h for verification.Ensure that VDO software is installed.
sudo dnf install kmod-kvdo
Create a volume vdo5 with a logical size 20GB on a 5GB disk (lsblk) using the lvcreate command.
[root@server2 ~]# sudo lvcreate -n vdo5 -l 1279 -V 20G --type vdo vgvdo1
WARNING: vdo signature detected on /dev/vgvdo1/vpool0 at offset 0. Wipe it? [y/n]: y
Wiping vdo signature on /dev/vgvdo1/vpool0.
The VDO volume can address 2 GB in 1 data slab.
It can grow to address at most 16 TB of physical storage in 8192 slabs.
If a larger maximum size might be needed, use bigger slabs.
Logical volume "vdo5" created.[root@server2 mapper]# sudo mkfs.xfs /dev/mapper/vgvdo1-vdo5
meta-data=/dev/mapper/vgvdo1-vdo5 isize=512 agcount=4, agsize=1310720 blks
= sectsz=4096 attr=2, projid32bit=1
= crc=1 finobt=1, sparse=1, rmapbt=0
= reflink=1 bigtime=1 inobtcount=1 nrext64=0
data = bsize=4096 blocks=5242880, imaxpct=25
= sunit=0 swidth=0 blks
naming =version 2 bsize=4096 ascii-ci=0, ftype=1
log =internal log bsize=4096 blocks=16384, version=2
= sectsz=4096 sunit=1 blks, lazy-count=1
realtime =none extsz=4096 blocks=0, rtextents=0
Discarding blocks...Done.[root@server2 mapper]# mkdir /vdofs5
[root@server2 mapper]#mount /dev/mapper/vgvdo1-vdo5 /vdofs5)/etc/fstab
[root@server2 mapper]# umount /dev/mapper/vgvdo1-vdo5mount -a to mount it back.[root@server2 mapper]# blkid /dev/mapper/vgvdo1-vdo5 >> /etc/fstab
[root@server2 mapper]# vim /etc/fstabdf -h to confirm.[root@server2 mapper]# parted /dev/sdc mklabel msdos
Warning: The existing disk label on /dev/sdc will be destroyed and all data on
this disk will be lost. Do you want to continue?
Yes/No? y
Information: You may need to update /etc/fstab.
[root@server2 mapper]# parted /dev/sdc mkpart primary 1 100%
Information: You may need to update /etc/fstab.[root@server2 ~]# sudo pvcreate /dev/sdc1
Devices file /dev/sdc is excluded: device is partitioned.
WARNING: adding device /dev/sdc1 with idname t10.ATA_VBOX_HARDDISK_VB6894bac4-590d5546 which is already used for /dev/sdc.
Physical volume "/dev/sdc1" successfully created.
[root@server2 ~]# vgcreate -s 8 vg /dev/sdc1
Devices file /dev/sdc is excluded: device is partitioned.
WARNING: adding device /dev/sdc1 with idname t10.ATA_VBOX_HARDDISK_VB6894bac4-590d5546 which is already used for /dev/sdc.
Volume group "vg" successfully created[root@server2 ~]# lvcreate -n lv200 -L 120 vg
Devices file /dev/sdc is excluded: device is partitioned.
Logical volume "lv200" created.
[root@server2 ~]# lvcreate -n lv300 -L 100 vg
Rounding up size to full physical extent 104.00 MiB
Logical volume "lv300" created.vgs, pvs, lvs, and vgdisplay commands for verification.[root@server2 ~]# mkfs.ext4 /dev/vg/lv200
mke2fs 1.46.5 (30-Dec-2021)
Creating filesystem with 122880 1k blocks and 30720 inodes
Filesystem UUID: 52eac2ee-b5bd-4025-9e40-356b38d21996
Superblock backups stored on blocks:
8193, 24577, 40961, 57345, 73729
Allocating group tables: done
Writing inode tables: done
Creating journal (4096 blocks): done
Writing superblocks and filesystem accounting information: done
[root@server2 ~]# mkfs.xfs /dev/vg/lv300
Filesystem should be larger than 300MB.
Log size should be at least 64MB.
Support for filesystems like this one is deprecated and they will not be supported in future releases.
meta-data=/dev/vg/lv300 isize=512 agcount=4, agsize=6656 blks
= sectsz=512 attr=2, projid32bit=1
= crc=1 finobt=1, sparse=1, rmapbt=0
= reflink=1 bigtime=1 inobtcount=1 nrext64=0
data = bsize=4096 blocks=26624, imaxpct=25
= sunit=0 swidth=0 blks
naming =version 2 bsize=4096 ascii-ci=0, ftype=1
log =internal log bsize=4096 blocks=1368, version=2
= sectsz=512 sunit=0 blks, lazy-count=1
realtime =none extsz=4096 blocks=0, rtextents=0[root@server2 ~]# mkdir /lvmfs5 /lvmfs6
[root@server2 ~]# mount /dev/vg/lv200 /lvmfs5
mount: (hint) your fstab has been modified, but systemd still uses
the old version; use 'systemctl daemon-reload' to reload.
[root@server2 ~]# mount /dev/vg/lv300 /lvmfs6
mount: (hint) your fstab has been modified, but systemd still uses
the old version; use 'systemctl daemon-reload' to reload.[root@server2 ~]# blkid /dev/vg/lv200 >> /etc/fstab
[root@server2 ~]# blkid /dev/vg/lv300 >> /etc/fstab
[root@server2 ~]# vim /etc/fstabdf -h to confirm.[root@server2 ~]# umount /dev/vg/lv200 /dev/vg/lv300
[root@server2 ~]# mount -a[root@server2 ~]# pvcreate /dev/sdb
Devices file /dev/sdc is excluded: device is partitioned.
WARNING: dos signature detected on /dev/sdb at offset 510. Wipe it? [y/n]: y
Wiping dos signature on /dev/sdb.
WARNING: adding device /dev/sdb with idname t10.ATA_VBOX_HARDDISK_VB428913dd-446a194f which is already used for missing device.
Physical volume "/dev/sdb" successfully created.[root@server2 ~]# vgextend vg /dev/sdb
Devices file /dev/sdc is excluded: device is partitioned.
WARNING: adding device /dev/sdb with idname t10.ATA_VBOX_HARDDISK_VB428913dd-446a194f which is already used for missing device.
Volume group "vg" successfully extended[root@server2 ~]# lvextend -L 200m /dev/vg/lv200
Size of logical volume vg/lv200 changed from 120.00 MiB (15 extents) to 200.00 MiB (25 extents).
Logical volume vg/lv200 successfully resized.
[root@server2 ~]# lvextend -L 250m /dev/vg/lv200
Rounding size to boundary between physical extents: 256.00 MiB.
Size of logical volume vg/lv200 changed from 200.00 MiB (25 extents) to 256.00 MiB (32 extents).
Logical volume vg/lv200 successfully resized.vgs, pvs, lvs, vgdisplay, and df commands for verification.[root@localhost ~]# parted /dev/sdd mklabel msdos
Information: You may need to update /etc/fstab.
[root@localhost ~]# parted /dev/sdd mkpart primary 1 100MB
Information: You may need to update /etc/fstab.
[root@localhost ~]# parted /dev/sdd mkpart primary 101 201
Information: You may need to update /etc/fstab.[root@localhost ~]# sudo mkswap /dev/sdd1
Setting up swapspace version 1, size = 94 MiB (98562048 bytes)
no label, UUID=40eea6c2-b80c-4b25-ad76-611071db52d5[root@localhost ~]# swaplabel -L swappart /dev/sdd1
[root@localhost ~]# blkid /dev/sdd1 >> /etc/fstab
[root@localhost ~]# vim /etc/fstab
UUID="40eea6c2-b80c-4b25-ad76-611071db52d5" swap swap pri=1 0 0Execute swapon -a to activate it.
Run swapon -s to confirm activation.
Initialize the other partition for use in LVM.
[root@localhost ~]# pvcreate /dev/sdd2
Physical volume "/dev/sdd2" successfully created.[root@localhost ~]# vgextend vg /dev/sdd2
Volume group "vg200" successfully extended[root@localhost ~]# lvcreate -L 180 -n swapvol vg
Logical volume "swapvol" created.vgs, pvs, lvs, and vgdisplay commands for verification.[root@localhost vg200]# mkswap /dev/vg/swapvol
Setting up swapspace version 1, size = 180 MiB (188739584 bytes)
no label, UUID=a4b939d0-4b53-4e73-bee5-4c402aff6f9b[root@localhost vg200]# vim /etc/fstab
/dev/vg200/swapvol swap swap pri=2 0 0swapon -a to activate it.swapon -s to confirm activation.Same tools for mounting and unmounting a filesystem.
exportfs commandmount and add the filesystem to the fstab file. sudo dnf -y install nfs-utils sudo mkdir /common sudo chmod 777 /commonsudo firewall-cmd --permanent --add-service nfs
sudo firewall-cmd --reloadsudo systemctl --now enable nfs-serversudo systemctl status nfs-server/common server10(rw)sudo exportfs -avsudo exportfs -u server10:/commonsudo exportfs -avsudo dnf -y install nfs-utilssudo mkdir /localsudo mount server20:/common /localmount | grep localdf -h | grep localserver20:/common /local nfs _netdev 0 0Note:
_netdev option makes system wait for networking to come up before trying to mount the share. sudo umount /local
sudo mount -adf -htouch /local/nfsfile
ls -l /localls -l /common/Resides on the first sector of the boot disk.
was the preferred choice for saving partition table information on x86-based computers.
with the arrival of bigger and larger hard drives, a new firmware specification (UEFI) was introduced.
still widely used, but its use is diminishing in favor of UEFI.
allows the creation of three types of partition on a single disk.
primary, extended, and logical
only primary and logical can be used for data storage
extended is a mere enclosure for holding the logical partitions and it is not meant for data storage.
supports the creation of up to four primary partitions numbered 1 through 4 at a time.
In case additional partitions are required, one of the primary partitions must be deleted and replaced with an extended partition to be able to add logical partitions (up to 11) within that extended partition.
Numbering for logical partitions begins at 5.
supports a maximum of 14 usable partitions (3 primary and 11 logical) on a single disk.
Cannot address storage space beyond 2TB due to its 32-bit nature and its 512-byte disk sector size.
non-redundant; the record it contains is not replicated, resulting in an unbootable system in the event of corruption.
If your disk is smaller than 2TB and you don’t intend to build more than 14 usable partitions, you can use MBR without issues.
parted (partition editor)
print
Displays the partition table that includes disk geometry and partition number, start and end, size, type, file system type, and relevant flags.
mklabel
Applies a label to the disk. Common labels are gpt and msdos.
mkpart
Makes a new partition
name
Assigns a name to a partition
rm
Removes the specified partition
print subcommand to ensure you created what you wanted.1. Execute parted on /dev/sdb to view the current partition information:
[root@server2 ~]# sudo parted /dev/sdb print
Error: /dev/sdb: unrecognised disk label
Model: ATA VBOX HARDDISK (scsi)
Disk /dev/sdb: 262MB
Sector size (logical/physical): 512B/512B
Partition Table: unknown
Disk Flags: There is an error on line 1 of the output, indicating an unrecognized label. disk must be labeled before it can be partitioned.
2. Assign disk label “msdos” to the disk with mklabel. This operation is performed only once on a disk.
[root@server2 ~]# sudo parted /dev/sdb mklabel msdos
Information: You may need to update /etc/fstab.[root@server2 ~]# sudo parted /dev/sdb print
Model: ATA VBOX HARDDISK (scsi)
Disk /dev/sdb: 262MB
Sector size (logical/physical): 512B/512B
Partition Table: msdos
Disk Flags:
Number Start End Size Type File system FlagsTo use the GPT partition table type, run “sudo parted /dev/sdb mklabel gpt” instead.
3. Create a 100MB primary partition starting at 1MB (beginning of the disk) using mkpart:
[root@server2 ~]# sudo parted /dev/sdb mkpart primary 1 101m
Information: You may need to update /etc/fstab.4. Verify the new partition with print:
[root@server2 ~]# sudo parted /dev/sdb print
Model: ATA VBOX HARDDISK (scsi)
Disk /dev/sdb: 262MB
Sector size (logical/physical): 512B/512B
Partition Table: msdos
Disk Flags:
Number Start End Size Type File system Flags
1 1049kB 101MB 99.6MB primaryPartition numbering begins at 1 by default.
5. Confirm the new partition with the lsblk command:
[root@server2 ~]# lsblk /dev/sdb
NAME MAJ:MIN RM SIZE RO TYPE MOUNTPOINTS
sdb 8:16 0 250M 0 disk
└─sdb1 8:17 0 95M 0 part The device file for the first partition on the sdb disk is sdb1 as identified on the bottom line. The partition size is 95MB.
Different tools will have variance in reporting partition sizes. ignore minor differences.
6. Check the /proc/partitions file also:
[root@server2 ~]# cat /proc/partitions | grep sdb
8 16 256000 sdb
8 17 97280 sdb1delete the sdb1 partition that was created in Exercise 13-2 confirm the deletion.
1. Execute parted on /dev/sdb with the rm subcommand to remove partition number 1:
[root@server2 ~]# sudo parted /dev/sdb rm 1
Information: You may need to update /etc/fstab.2. Confirm the partition deletion with print:
[root@server2 ~]# sudo parted /dev/sdb print
Model: ATA VBOX HARDDISK (scsi)
Disk /dev/sdb: 262MB
Sector size (logical/physical): 512B/512B
Partition Table: msdos
Disk Flags:
Number Start End Size Type File system Flags3. Check the /proc/partitions file:
[root@server2 ~]# cat /proc/partitions | grep sdb
8 16 256000 sdbcan also run the lsblk command for further verification. T
EXAM TIP: Knowing either parted or gdisk for the exam is enough.
gdisk (GPT disk) Commandpartitions disks using the GPT format.
text-based, menu-driven program
show, add, verify, modify, and delete partitions
can create up to 128 partitions on a single disk on systems with UEFI firmware.
Main interface of gdisk can be invoked by specifying a disk device name such as /dev/sdc with the command.
Type help or ? (question mark) at the prompt to view available subcommands.
[root@server2 ~]# sudo gdisk /dev/sdc
GPT fdisk (gdisk) version 1.0.7
Partition table scan:
MBR: not present
BSD: not present
APM: not present
GPT: not present
Creating new GPT entries in memory.
Command (? for help): ?
b back up GPT data to a file
c change a partition's name
d delete a partition
i show detailed information on a partition
l list known partition types
n add a new partition
o create a new empty GUID partition table (GPT)
p print the partition table
q quit without saving changes
r recovery and transformation options (experts only)
s sort partitions
t change a partition's type code
v verify disk
w write table to disk and exit
x extra functionality (experts only)
? print this menu
Command (? for help): 1. Execute gdisk on /dev/sdc to view the current partition information:
[root@server2 ~]# sudo gdisk /dev/sdc
GPT fdisk (gdisk) version 1.0.7
Partition table scan:
MBR: not present
BSD: not present
APM: not present
GPT: not present
Creating new GPT entries in memory.
Command (? for help):The disk currently does not have any partition table on it.
2. Assign “gpt” as the partition table type to the disk using the o subcommand. Enter “y” for confirmation to proceed. This operation is performed only once on a disk.
Command (? for help): o
This option deletes all partitions and creates a new protective MBR.
Proceed? (Y/N): y3. Run the p subcommand to view disk information and confirm the GUID partition table creation:
Command (? for help): p
Disk /dev/sdc: 512000 sectors, 250.0 MiB
Model: VBOX HARDDISK
Sector size (logical/physical): 512/512 bytes
Disk identifier (GUID): 9446222A-28AC-4F96-816F-518510F95019
Partition table holds up to 128 entries
Main partition table begins at sector 2 and ends at sector 33
First usable sector is 34, last usable sector is 511966
Partitions will be aligned on 2048-sector boundaries
Total free space is 511933 sectors (250.0 MiB)
Number Start (sector) End (sector) Size Code NameThe output returns the assigned GUID and states that the partition table can hold up to 128 partition entries.
4. Create the first partition of size 200MB starting at the default sector with default type “Linux filesystem” using the n subcommand:
Command (? for help): n
Partition number (1-128, default 1):
First sector (34-511966, default = 2048) or {+-}size{KMGTP}:
Last sector (2048-511966, default = 511966) or {+-}size{KMGTP}: +200M
Current type is 8300 (Linux filesystem)
Hex code or GUID (L to show codes, Enter = 8300):
Changed type of partition to 'Linux filesystem'5. Verify the new partition with p:
Command (? for help): p
Disk /dev/sdc: 512000 sectors, 250.0 MiB
Model: VBOX HARDDISK
Sector size (logical/physical): 512/512 bytes
Disk identifier (GUID): 9446222A-28AC-4F96-816F-518510F95019
Partition table holds up to 128 entries
Main partition table begins at sector 2 and ends at sector 33
First usable sector is 34, last usable sector is 511966
Partitions will be aligned on 2048-sector boundaries
Total free space is 102333 sectors (50.0 MiB)
Number Start (sector) End (sector) Size Code Name
1 2048 411647 200.0 MiB 8300 Linux filesystem6. Run w to write the partition information to the partition table and exit out of the interface. Enter “y” to confirm when prompted.
Command (? for help): w
Final checks complete. About to write GPT data. THIS WILL OVERWRITE EXISTING
PARTITIONS!!
Do you want to proceed? (Y/N): y
OK; writing new GUID partition table (GPT) to /dev/sdc.
The operation has completed successfully.You may need to run the partprobe command after exiting the gdisk utility to inform the kernel of partition table changes.
7. Verify the new partition by issuing either of the following at the command prompt:
[root@server2 ~]# grep sdc /proc/partitions
8 32 256000 sdc
8 33 204800 sdc1
[root@server2 ~]# lsblk /dev/sdc
NAME MAJ:MIN RM SIZE RO TYPE MOUNTPOINTS
sdc 8:32 0 250M 0 disk
└─sdc1 8:33 0 200M 0 part 1. Execute gdisk on /dev/sdc and run d1 at the utility’s prompt to delete partition number 1:
[root@server2 ~]# gdisk /dev/sdc
GPT fdisk (gdisk) version 1.0.7
Partition table scan:
MBR: protective
BSD: not present
APM: not present
GPT: present
Found valid GPT with protective MBR; using GPT.
Command (? for help): d1
Using 12. Confirm the partition deletion with p:
Command (? for help): p
Disk /dev/sdc: 512000 sectors, 250.0 MiB
Model: VBOX HARDDISK
Sector size (logical/physical): 512/512 bytes
Disk identifier (GUID): 9446222A-28AC-4F96-816F-518510F95019
Partition table holds up to 128 entries
Main partition table begins at sector 2 and ends at sector 33
First usable sector is 34, last usable sector is 511966
Partitions will be aligned on 2048-sector boundaries
Total free space is 511933 sectors (250.0 MiB)
Number Start (sector) End (sector) Size Code Name3. Write the updated partition information to the disk with w and quit gdisk:
Command (? for help): w
Final checks complete. About to write GPT data. THIS WILL OVERWRITE EXISTING
PARTITIONS!!
Do you want to proceed? (Y/N): y
OK; writing new GUID partition table (GPT) to /dev/sdc.
The operation has completed successfully.4. Verify the partition deletion by issuing either of the following at the command prompt:
[root@server2 ~]# grep sdc /proc/partitions
8 32 256000 sdc
[root@server2 ~]# lsblk /dev/sdc
NAME MAJ:MIN RM SIZE RO TYPE MOUNTPOINTS
sdc 8:32 0 250M 0 disk Use lsblk to list disk and partition information.
[root@server1 ~]# lsblk
NAME MAJ:MIN RM SIZE RO TYPE MOUNTPOINTS
sda 8:0 0 10G 0 disk
├─sda1 8:1 0 1G 0 part /boot
└─sda2 8:2 0 9G 0 part
├─rhel-root 253:0 0 8G 0 lvm /
└─rhel-swap 253:1 0 1G 0 lvm [SWAP]
sr0 11:0 1 9.8G 0 rom /mntsr0 represents the ISO image mounted as an optical medium:
[root@server1 ~]# sudo fdisk -l
Disk /dev/sda: 10 GiB, 10737418240 bytes, 20971520 sectors
Disk model: VBOX HARDDISK
Units: sectors of 1 * 512 = 512 bytes
Sector size (logical/physical): 512 bytes / 512 bytes
I/O size (minimum/optimal): 512 bytes / 512 bytes
Disklabel type: dos
Disk identifier: 0xfc8b3804
Device Boot Start End Sectors Size Id Type
/dev/sda1 * 2048 2099199 2097152 1G 83 Linux
/dev/sda2 2099200 20971519 18872320 9G 8e Linux LVM
Disk /dev/mapper/rhel-root: 8 GiB, 8585740288 bytes, 16769024 sectors
Units: sectors of 1 * 512 = 512 bytes
Sector size (logical/physical): 512 bytes / 512 bytes
I/O size (minimum/optimal): 512 bytes / 512 bytes
Disk /dev/mapper/rhel-swap: 1 GiB, 1073741824 bytes, 2097152 sectors
Units: sectors of 1 * 512 = 512 bytes
Sector size (logical/physical): 512 bytes / 512 bytes
I/O size (minimum/optimal): 512 bytes / 512 bytesidentifiers 83 and 8e are hexadecimal values for the partition types
parted, gdisk, and LVM
Partitions created with a combination of most of these tools and toolsets can coexist on the same disk.
parted
understands both MBR and GPT formats.
gdisk
LVM
To delete a filesystem, partition, raid and disk labels from the disk. Use wipefs -a /dev/sdb1 May also use wipefs -a /dev/sdb? to delete sub partitions? (I need to verify this)
Make sure the filesystem is unmounted first.
[root@server2 mapper]# lsblk
NAME MAJ:MIN RM SIZE RO TYPE MOUNTPOINTS
sda 8:0 0 20G 0 disk
├─sda1 8:1 0 1G 0 part
└─sda2 8:2 0 19G 0 part
├─rhel-root 253:0 0 17G 0 lvm /
└─rhel-swap 253:1 0 2G 0 lvm [SWAP]
sdb 8:16 0 250M 0 disk
├─sdb1 8:17 0 95M 0 part
├─sdb2 8:18 0 95M 0 part
└─sdb3 8:19 0 38M 0 part [SWAP]
sdc 8:32 0 250M 0 disk
sdd 8:48 0 250M 0 disk
└─sdd1 8:49 0 163M 0 part
├─vgfs-ext4vol 253:2 0 128M 0 lvm
└─vgfs-xfsvol 253:3 0 128M 0 lvm
sde 8:64 0 250M 0 disk
├─vgfs-ext4vol 253:2 0 128M 0 lvm
├─vgfs-xfsvol 253:3 0 128M 0 lvm
└─vgfs-swapvol 253:7 0 144M 0 lvm [SWAP]
sdf 8:80 0 5G 0 disk
└─vgvdo1-vpool0_vdata 253:4 0 5G 0 lvm
└─vgvdo1-vpool0-vpool 253:5 0 20G 0 lvm
└─vgvdo1-lvvdo 253:6 0 20G 0 lvm
sr0 11:0 1 9.8G 0 rom [root@server2 mapper]# wipefs -a /dev/sdb1
/dev/sdb1: 2 bytes were erased at offset 0x00000438 (ext4): 53 ef
[root@server2 mapper]# wipefs -a /dev/sdb2
/dev/sdb2: 8 bytes were erased at offset 0x00000036 (vfat): 46 41 54 31 36 20 20 20
/dev/sdb2: 1 byte was erased at offset 0x00000000 (vfat): eb
/dev/sdb2: 2 bytes were erased at offset 0x000001fe (vfat): 55 aa
[root@server2 mapper]# wipefs -a /dev/sdb3
wipefs: error: /dev/sdb3: probing initialization failed: Device or resource busy
[root@server2 mapper]# wipefs -a /dev/sdb
wipefs: error: /dev/sdb: probing initialization failed: Device or resource busy
[root@server2 mapper]# swapoff /dev/sdb3
[root@server2 mapper]# wipefs -a /dev/sdb3
/dev/sdb3: 10 bytes were erased at offset 0x00000ff6 (swap): 53 57 41 50 53 50 41 43 45 32
[root@server2 mapper]# wipefs -a /dev/sdb
/dev/sdb: 2 bytes were erased at offset 0x000001fe (dos): 55 aa
/dev/sdb: calling ioctl to re-read partition table: Success
[root@server2 mapper]# lsblk
NAME MAJ:MIN RM SIZE RO TYPE MOUNTPOINTS
sda 8:0 0 20G 0 disk
├─sda1 8:1 0 1G 0 part
└─sda2 8:2 0 19G 0 part
├─rhel-root 253:0 0 17G 0 lvm /
└─rhel-swap 253:1 0 2G 0 lvm [SWAP]
sdb 8:16 0 250M 0 disk
sdc 8:32 0 250M 0 disk
sdd 8:48 0 250M 0 disk
└─sdd1 8:49 0 163M 0 part
├─vgfs-ext4vol 253:2 0 128M 0 lvm
└─vgfs-xfsvol 253:3 0 128M 0 lvm
sde 8:64 0 250M 0 disk
├─vgfs-ext4vol 253:2 0 128M 0 lvm
├─vgfs-xfsvol 253:3 0 128M 0 lvm
└─vgfs-swapvol 253:7 0 144M 0 lvm [SWAP]
sdf 8:80 0 5G 0 disk
└─vgvdo1-vpool0_vdata 253:4 0 5G 0 lvm
└─vgvdo1-vpool0-vpool 253:5 0 20G 0 lvm
└─vgvdo1-lvvdo 253:6 0 20G 0 lvm
sr0 11:0 1 9.8G 0 rom I could not use this on a disk used in an LV. Remove the LVs: lvremove lvvdo vgfs
[root@server2 mapper]# lsblk
NAME MAJ:MIN RM SIZE RO TYPE MOUNTPOINTS
sda 8:0 0 20G 0 disk
├─sda1 8:1 0 1G 0 part
└─sda2 8:2 0 19G 0 part
├─rhel-root 253:0 0 17G 0 lvm /
└─rhel-swap 253:1 0 2G 0 lvm [SWAP]
sdb 8:16 0 250M 0 disk
sdc 8:32 0 250M 0 disk
sdd 8:48 0 250M 0 disk
└─sdd1 8:49 0 163M 0 part
sde 8:64 0 250M 0 disk
└─vgfs-swapvol 253:7 0 144M 0 lvm [SWAP]
sdf 8:80 0 5G 0 disk
sr0 11:0 1 9.8G 0 rom Need to remove swapvol from swap:
[root@server2 mapper]# swapoff /dev/mapper/vgfs-swapvolRemove the LV:
[root@server2 mapper]# lvremove /dev/mapper/vgfs-swapvol
Do you really want to remove active logical volume vgfs/swapvol? [y/n]: y
Logical volume "swapvol" successfully removed.Wipe sdd:
[root@server2 mapper]# wipefs -a /dev/sdd
/dev/sdd: 2 bytes were erased at offset 0x000001fe (dos): 55 aa
/dev/sdd: calling ioctl to re-read partition table: Success
[root@server2 mapper]# lsblk
NAME MAJ:MIN RM SIZE RO TYPE MOUNTPOINTS
sda 8:0 0 20G 0 disk
├─sda1 8:1 0 1G 0 part
└─sda2 8:2 0 19G 0 part
├─rhel-root 253:0 0 17G 0 lvm /
└─rhel-swap 253:1 0 2G 0 lvm [SWAP]
sdb 8:16 0 250M 0 disk
sdc 8:32 0 250M 0 disk
sdd 8:48 0 250M 0 disk
sde 8:64 0 250M 0 disk
sdf 8:80 0 5G 0 disk
sr0 11:0 1 9.8G 0 rom 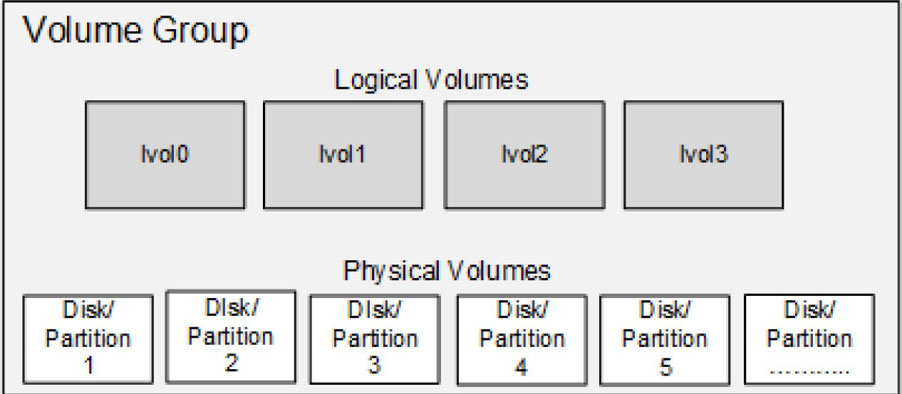
Physical Volume(PV)
You can use an LVM command called pvs (physical volume scan or summary) to scan and list available physical volumes on server2:
[root@server2 ~]# sudo pvs
PV VG Fmt Attr PSize PFree
/dev/sda2 rhel lvm2 a-- <19.00g 0Try running this command again with the -v flag to view more information about the physical volume.
Volume Group
Use vgs (volume group scan or summary) to scan and list available volume groups on server2:
[root@server2 ~]# sudo vgs
VG #PV #LV #SN Attr VSize VFree
rhel 1 2 0 wz--n- <19.00g 0Try running this command again with the -v flag to view more information about the volume group.
Use vgdisplay (volume group display) on server2 and grep for ‘PE Size’ to view the PE size used in the rhel volume group:
[root@server2 ~]# sudo vgdisplay rhel | grep 'PE Size'
PE Size 4.00 MiBThe default naming convention used for logical volumes is lvol0, lvol1, lvol2, and so on you may assign custom names to them.
Use lvs (logical volume scan or summary) to scan and list available logical volumes on server2:
[root@server2 ~]# sudo lvs
LV VG Attr LSize Pool Origin Data% Meta% Move Log Cpy%Sync Convert
root rhel -wi-ao---- <17.00g
swap rhel -wi-ao---- 2.00gTry running this command again with the -v flag to view more information about the logical volumes.
Use lvdisplay (logical volume display) on server2 to view information about the root logical volume in the rhel volume group.
[root@server30 ~]# lvdisplay /dev/rhel/root
--- Logical volume ---
LV Path /dev/rhel/root
LV Name root
VG Name rhel
LV UUID DhHyeI-VgwM-w75t-vRcC-5irj-AuHC-neryQf
LV Write Access read/write
LV Creation host, time localhost.localdomain, 2024-07-08 17:32:18 -0700
LV Status available
# open 1
LV Size <17.00 GiB
Current LE 4351
Segments 1
Allocation inherit
Read ahead sectors auto
- currently set to 8192
Block device 253:0pvcreate/pvremove
vgcreate/vgremove
lvcreate/lvremove
vgextend/vgreduce
lvextend/lvreduce
lvresize
-r option, this command calls the fsadm command to resize the underlying file system as well.vgrename
lvrename
pvs/pvdisplay
vgs/vgdisplay lvs/lvdisplay
Lists/displays volume group information Lists/displays logical volume information
All the tools accept the -v switch to support verbosity.
1. Create a partition of size 90MB on sdd using the parted command and confirm. You need to label the disk first, as it is a new disk.
[root@server2 ~]# sudo parted /dev/sdd mklabel msdos
Information: You may need to update /etc/fstab.
[root@server2 ~]# sudo parted /dev/sdd mkpart primary 1 91m
Information: You may need to update /etc/fstab.
[root@server2 ~]# sudo parted /dev/sdd print
Model: ATA VBOX HARDDISK (scsi)
Disk /dev/sdd: 262MB
Sector size (logical/physical): 512B/512B
Partition Table: msdos
Disk Flags:
Number Start End Size Type File system Flags
1 1049kB 91.2MB 90.2MB primary2. Initialize the sdd1 partition and the sde disk using the pvcreate command. Note that there is no need to apply a disk label on sde with parted as LVM does not require it.
[root@server2 ~]# sudo pvcreate /dev/sdd1 /dev/sde -v
Wiping signatures on new PV /dev/sdd1.
Wiping signatures on new PV /dev/sde.
Set up physical volume for "/dev/sdd1" with 176128 available sectors.
Zeroing start of device /dev/sdd1.
Writing physical volume data to disk "/dev/sdd1".
Physical volume "/dev/sdd1" successfully created.
Set up physical volume for "/dev/sde" with 512000 available sectors.
Zeroing start of device /dev/sde.
Writing physical volume data to disk "/dev/sde".
Physical volume "/dev/sde" successfully created.3. Create vgbook volume group using the vgcreate command and add the two physical volumes to it. Use the -s option to specify the PE size in
MBs.
[root@server2 ~]# sudo vgcreate -vs 16 vgbook /dev/sdd1 /dev/sde
Wiping signatures on new PV /dev/sdd1.
Wiping signatures on new PV /dev/sde.
Adding physical volume '/dev/sdd1' to volume group 'vgbook'
Adding physical volume '/dev/sde' to volume group 'vgbook'
Creating volume group backup "/etc/lvm/backup/vgbook" (seqno 1).
Volume group "vgbook" successfully created4. List the volume group information:
[root@server2 ~]# sudo vgs vgbook
VG #PV #LV #SN Attr VSize VFree
vgbook 2 0 0 wz--n- 320.00m 320.00m5. Display detailed information about the volume group and the physical volumes it contains:
[root@server2 ~]# sudo vgdisplay -v vgbook
--- Volume group ---
VG Name vgbook
System ID
Format lvm2
Metadata Areas 2
Metadata Sequence No 1
VG Access read/write
VG Status resizable
MAX LV 0
Cur LV 0
Open LV 0
Max PV 0
Cur PV 2
Act PV 2
VG Size 320.00 MiB
PE Size 16.00 MiB
Total PE 20
Alloc PE / Size 0 / 0
Free PE / Size 20 / 320.00 MiB
VG UUID zRu1d2-ZgDL-bnzV-I9U1-0IFo-uM4x-w4bX0Q
--- Physical volumes ---
PV Name /dev/sdd1
PV UUID 8x8IgZ-3z5T-ODA8-dofQ-xk5s-QN7I-KwpQ1e
PV Status allocatable
Total PE / Free PE 5 / 5
PV Name /dev/sde
PV UUID xJU0Hh-W5k9-FyKO-d6Ha-1ofW-ajvh-hJSo8R
PV Status allocatable
Total PE / Free PE 15 / 156. List the physical volume information:
[root@server2 ~]# sudo pvs
PV VG Fmt Attr PSize PFree
/dev/sda2 rhel lvm2 a-- <19.00g 0
/dev/sdd1 vgbook lvm2 a-- 80.00m 80.00m
/dev/sde vgbook lvm2 a-- 240.00m 240.00m7. Display detailed information about the physical volumes:
[root@server2 ~]# sudo pvdisplay /dev/sdd1
--- Physical volume ---
PV Name /dev/sdd1
VG Name vgbook
PV Size 86.00 MiB / not usable 6.00 MiB
Allocatable yes
PE Size 16.00 MiB
Total PE 5
Free PE 5
Allocated PE 0
PV UUID 8x8IgZ-3z5T-ODA8-dofQ-xk5s-QN7I-KwpQ1e1. Create a logical volume with the default name lvol0 using the lvcreate command. Use the -L option to specify the logical volume size, 120MB. You may use the -v, -vv, or -vvv option with the command for verbosity.
root@server2 ~]# sudo lvcreate -vL 120 vgbook
Rounding up size to full physical extent 128.00 MiB
Creating logical volume lvol0
Archiving volume group "vgbook" metadata (seqno 1).
Activating logical volume vgbook/lvol0.
activation/volume_list configuration setting not defined: Checking only host tags for vgbook/lvol0.
Creating vgbook-lvol0
Loading table for vgbook-lvol0 (253:2).
Resuming vgbook-lvol0 (253:2).
Wiping known signatures on logical volume vgbook/lvol0.
Initializing 4.00 KiB of logical volume vgbook/lvol0 with value 0.
Logical volume "lvol0" created.
Creating volume group backup "/etc/lvm/backup/vgbook" (seqno 2).Size for the logical volume may be specified in units such as MBs, GBs, TBs, or as a count of LEs
MB is the default if no unit is specified
The size of a logical volume is always in multiples of the PE size. For instance, logical volumes created in vgbook with the PE size set at 16MB can be 16MB, 32MB, 48MB, 64MB, and so on.
2. Create lvbook1 of size 192MB (16x12) using the lvcreate command. Use the -l switch to specify the size in logical extents and -n for the custom name.
[root@server2 ~]# sudo lvcreate -l 12 -n lvbook1 vgbook
Logical volume "lvbook1" created.3. List the logical volume information:
[root@server2 ~]# sudo lvs
LV VG Attr LSize Pool Origin Data% Meta% Move Log Cpy%Sync Convert
root rhel -wi-ao---- <17.00g
swap rhel -wi-ao---- 2.00g
lvbook1 vgbook -wi-a----- 192.00m
lvol0 vgbook -wi-a----- 128.00m 4. Display detailed information about the volume group including the logical volumes and the physical volumes:
[root@server2 ~]# sudo vgdisplay -v vgbook
--- Volume group ---
VG Name vgbook
System ID
Format lvm2
Metadata Areas 2
Metadata Sequence No 3
VG Access read/write
VG Status resizable
MAX LV 0
Cur LV 2
Open LV 0
Max PV 0
Cur PV 2
Act PV 2
VG Size 320.00 MiB
PE Size 16.00 MiB
Total PE 20
Alloc PE / Size 20 / 320.00 MiB
Free PE / Size 0 / 0
VG UUID zRu1d2-ZgDL-bnzV-I9U1-0IFo-uM4x-w4bX0Q
--- Logical volume ---
LV Path /dev/vgbook/lvol0
LV Name lvol0
VG Name vgbook
LV UUID 9M9ahf-1L3y-c0yk-3Z2O-UzjH-0Amt-QLi4p5
LV Write Access read/write
LV Creation host, time server2, 2024-06-12 02:42:51 -0700
LV Status available
open 0
LV Size 128.00 MiB
Current LE 8
Segments 1
Allocation inherit
Read ahead sectors auto
- currently set to 8192
Block device 253:2
--- Logical volume ---
LV Path /dev/vgbook/lvbook1
LV Name lvbook1
VG Name vgbook
LV UUID pgd8qR-YXXK-3Idv-qmpW-w8Az-WGLR-g2d8Yn
LV Write Access read/write
LV Creation host, time server2, 2024-06-12 02:45:31 -0700
LV Status available
# open 0
LV Size 192.00 MiB
Current LE 12
Segments 2
Allocation inherit
Read ahead sectors auto
- currently set to 8192
Block device 253:3
--- Physical volumes ---
PV Name /dev/sdd1
PV UUID 8x8IgZ-3z5T-ODA8-dofQ-xk5s-QN7I-KwpQ1e
PV Status allocatable
Total PE / Free PE 5 / 0
PV Name /dev/sde
PV UUID xJU0Hh-W5k9-FyKO-d6Ha-1ofW-ajvh-hJSo8R
PV Status allocatable
Total PE / Free PE 15 / 0Alternatively, you can run the following to view only the logical volume details:
[root@server2 ~]# sudo lvdisplay /dev/vgbook/lvol0
--- Logical volume ---
LV Path /dev/vgbook/lvol0
LV Name lvol0
VG Name vgbook
LV UUID 9M9ahf-1L3y-c0yk-3Z2O-UzjH-0Amt-QLi4p5
LV Write Access read/write
LV Creation host, time server2, 2024-06-12 02:42:51 -0700
LV Status available
# open 0
LV Size 128.00 MiB
Current LE 8
Segments 1
Allocation inherit
Read ahead sectors auto
- currently set to 8192
Block device 253:2[root@server2 ~]# sudo lvdisplay /dev/vgbook/lvbook1
--- Logical volume ---
LV Path /dev/vgbook/lvbook1
LV Name lvbook1
VG Name vgbook
LV UUID pgd8qR-YXXK-3Idv-qmpW-w8Az-WGLR-g2d8Yn
LV Write Access read/write
LV Creation host, time server2, 2024-06-12 02:45:31 -0700
LV Status available
# open 0
LV Size 192.00 MiB
Current LE 12
Segments 2
Allocation inherit
Read ahead sectors auto
- currently set to 8192
Block device 253:31. Create a partition of size 158MB on sdd using the parted command. Display the new partition to confirm the partition number and size.
[root@server20 ~]# parted /dev/sdd mkpart primary 91 250
[root@server2 ~]# sudo parted /dev/sdd print
Model: ATA VBOX HARDDISK (scsi)
Disk /dev/sdd: 262MB
Sector size (logical/physical): 512B/512B
Partition Table: msdos
Disk Flags:
Number Start End Size Type File system Flags
1 1049kB 91.2MB 90.2MB primary
2 92.3MB 250MB 157MB primary lvm2. Initialize sdd2 using the pvcreate command:
[root@server2 ~]# sudo pvcreate /dev/sdd2
Physical volume "/dev/sdd2" successfully created.3. Extend vgbook by adding the new physical volume to it:
[root@server2 ~]# sudo vgextend vgbook /dev/sdd2
Volume group "vgbook" successfully extended4. List the volume group:
[root@server2 ~]# sudo vgs
VG #PV #LV #SN Attr VSize VFree
rhel 1 2 0 wz--n- <19.00g 0
vgbook 3 2 0 wz--n- 464.00m 144.00m5. Extend the size of lvbook1 to 340MB by adding 144MB using the lvextend command:
[root@server2 ~]# sudo lvextend -L +144 /dev/vgbook/lvbook1
Size of logical volume vgbook/lvbook1 changed from 192.00 MiB (12 extents) to 336.00 MiB (21 extents).
Logical volume vgbook/lvbook1 successfully resized.EXAM TIP: Make sure the expansion of a logical volume does not affect the file system and the data it contains.
6. Issue vgdisplay on vgbook with the -v switch for the updated details:
[root@server2 ~]# sudo vgdisplay -v vgbook
--- Volume group ---
VG Name vgbook
System ID
Format lvm2
Metadata Areas 3
Metadata Sequence No 5
VG Access read/write
VG Status resizable
MAX LV 0
Cur LV 2
Open LV 0
Max PV 0
Cur PV 3
Act PV 3
VG Size 464.00 MiB
PE Size 16.00 MiB
Total PE 29
Alloc PE / Size 29 / 464.00 MiB
Free PE / Size 0 / 0
VG UUID zRu1d2-ZgDL-bnzV-I9U1-0IFo-uM4x-w4bX0Q
--- Logical volume ---
LV Path /dev/vgbook/lvol0
LV Name lvol0
VG Name vgbook
LV UUID 9M9ahf-1L3y-c0yk-3Z2O-UzjH-0Amt-QLi4p5
LV Write Access read/write
LV Creation host, time server2, 2024-06-12 02:42:51 -0700
LV Status available
open 0
LV Size 128.00 MiB
Current LE 8
Segments 1
Allocation inherit
Read ahead sectors auto
- currently set to 8192
Block device 253:2
--- Logical volume ---
LV Path /dev/vgbook/lvbook1
LV Name lvbook1
VG Name vgbook
LV UUID pgd8qR-YXXK-3Idv-qmpW-w8Az-WGLR-g2d8Yn
LV Write Access read/write
LV Creation host, time server2, 2024-06-12 02:45:31 -0700
LV Status available
# open 0
LV Size 336.00 MiB
Current LE 21
Segments 3
Allocation inherit
Read ahead sectors auto
- currently set to 8192
Block device 253:3
--- Physical volumes ---
PV Name /dev/sdd1
PV UUID 8x8IgZ-3z5T-ODA8-dofQ-xk5s-QN7I-KwpQ1e
PV Status allocatable
Total PE / Free PE 5 / 0
PV Name /dev/sde
PV UUID xJU0Hh-W5k9-FyKO-d6Ha-1ofW-ajvh-hJSo8R
PV Status allocatable
Total PE / Free PE 15 / 0
PV Name /dev/sdd2
PV UUID 1olOnk-o8FH-uJRD-2pJf-8GCy-3K0M-gcf3pF
PV Status allocatable
Total PE / Free PE 9 / 07. View a summary of the physical volumes:
root@server2 ~]# sudo pvs
PV VG Fmt Attr PSize PFree
/dev/sda2 rhel lvm2 a-- <19.00g 0
/dev/sdd1 vgbook lvm2 a-- 80.00m 0
/dev/sdd2 vgbook lvm2 a-- 144.00m 0
/dev/sde vgbook lvm2 a-- 240.00m 08. View a summary of the logical volumes:
[root@server2 ~]# sudo lvs
LV VG Attr LSize Pool Origin Data% Meta% Move Log Cpy%Sync Convert
root rhel -wi-ao---- <17.00g
swap rhel -wi-ao---- 2.00g
lvbook1 vgbook -wi-a----- 336.00m
lvol0 vgbook -wi-a----- 128.00m lvreduce commandlvresize command.1. Rename lvol0 to lvbook2 using the lvrename command and confirm with
lvs:
[root@server2 ~]# sudo lvrename vgbook lvol0 lvbook2
Renamed "lvol0" to "lvbook2" in volume group "vgbook"2. Reduce the size of lvbook2 to 50MB with the lvreduce command. Specify the absolute desired size for the logical volume. Answer “Do you really want to reduce vgbook/lvbook2?” in the affirmative.
[root@server2 ~]# sudo lvreduce -L 50 /dev/vgbook/lvbook2
Rounding size to boundary between physical extents: 64.00 MiB.
No file system found on /dev/vgbook/lvbook2.
Size of logical volume vgbook/lvbook2 changed from 128.00 MiB (8 extents) to 64.00 MiB (4 extents).
Logical volume vgbook/lvbook2 successfully resized.3. Add 32MB to lvbook2 with the lvresize command:
[root@server2 ~]# sudo lvresize -L +32 /dev/vgbook/lvbook2
Size of logical volume vgbook/lvbook2 changed from 64.00 MiB (4 extents) to 96.00 MiB (6 extents).
Logical volume vgbook/lvbook2 successfully resized.4. Use the pvs, lvs, vgs, and vgdisplay commands to view the updated allocation.
[root@server2 ~]# pvs
PV VG Fmt Attr PSize PFree
/dev/sda2 rhel lvm2 a-- <19.00g 0
/dev/sdd1 vgbook lvm2 a-- 80.00m 0
/dev/sdd2 vgbook lvm2 a-- 144.00m 0
/dev/sde vgbook lvm2 a-- 240.00m 32.00m
[root@server2 ~]# lvs
LV VG Attr LSize Pool Origin Data% Meta% Move Log Cpy%Sync Convert
root rhel -wi-ao---- <17.00g
swap rhel -wi-ao---- 2.00g
lvbook1 vgbook -wi-a----- 336.00m
lvbook2 vgbook -wi-a----- 96.00m
[root@server2 ~]# vgs
VG #PV #LV #SN Attr VSize VFree
rhel 1 2 0 wz--n- <19.00g 0
vgbook 3 2 0 wz--n- 464.00m 32.00m
[root@server2 ~]# vgdisplay
--- Volume group ---
VG Name vgbook
System ID
Format lvm2
Metadata Areas 3
Metadata Sequence No 8
VG Access read/write
VG Status resizable
MAX LV 0
Cur LV 2
Open LV 0
Max PV 0
Cur PV 3
Act PV 3
VG Size 464.00 MiB
PE Size 16.00 MiB
Total PE 29
Alloc PE / Size 27 / 432.00 MiB
Free PE / Size 2 / 32.00 MiB
VG UUID zRu1d2-ZgDL-bnzV-I9U1-0IFo-uM4x-w4bX0Q
--- Volume group ---
VG Name rhel
System ID
Format lvm2
Metadata Areas 1
Metadata Sequence No 3
VG Access read/write
VG Status resizable
MAX LV 0
Cur LV 2
Open LV 2
Max PV 0
Cur PV 1
Act PV 1
VG Size <19.00 GiB
PE Size 4.00 MiB
Total PE 4863
Alloc PE / Size 4863 / <19.00 GiB
Free PE / Size 0 / 0
VG UUID UiK3fy-FGOc-2fnP-C1Y6-JS0l-irEe-Sq3c4h5. Remove both lvbook1 and lvbook2 logical volumes using the lvremove
command. Use the -f option to suppress the “Do you really want to remove
active logical volume” message.
[root@server2 ~]# sudo lvremove /dev/vgbook/lvbook1 -f
Logical volume "lvbook1" successfully removed.
[root@server2 ~]# sudo lvremove /dev/vgbook/lvbook2 -f
Logical volume "lvbook2" successfully removed.unmount the file system or disable swap in the logical volume.
vgdisplay command and grep for “Cur LV” to see the number of logical volumes currently available in vgbook. It should show 0, as you have removed both logical volumes.[root@server2 ~]# sudo vgdisplay vgbook | grep 'Cur LV'
Cur LV 0\
1. Remove sdd1 and sde physical volumes from vgbook by issuing the vgreduce command:
[root@server2 ~]# sudo vgreduce vgbook /dev/sdd1 /dev/sde
Removed "/dev/sdd1" from volume group "vgbook"
Removed "/dev/sde" from volume group "vgbook"2. Remove the volume group using the vgremove command. This will also remove the last physical volume, sdd2, from it.
[root@server2 ~]# sudo vgremove vgbook
Volume group "vgbook" successfully removed-f option with the vgremove command to force the volume group removal even if it contains any number of logical and physical volumes in it.3. Execute the vgs and lvs commands for confirmation:
[root@server2 ~]# sudo vgs
VG #PV #LV #SN Attr VSize VFree
rhel 1 2 0 wz--n- <19.00g 0
[root@server2 ~]# sudo lvs
LV VG Attr LSize Pool Origin Data% Meta% Move Log Cpy%Sync Convert
root rhel -wi-ao---- <17.00g
swap rhel -wi-ao---- 2.00g pvs command for confirmation.1. Remove the LVM structures from sdd1, sdd2, and sde using the pvremove command:
[root@server2 ~]# sudo pvremove /dev/sdd1 /dev/sdd2 /dev/sde
Labels on physical volume "/dev/sdd1" successfully wiped.
Labels on physical volume "/dev/sdd2" successfully wiped.
Labels on physical volume "/dev/sde" successfully wiped.2. Confirm the removal using the pvs command:
[root@server2 ~]# sudo pvs
PV VG Fmt Attr PSize PFree
/dev/sda2 rhel lvm2 a-- <19.00g 0 The partitions and the disk are now back to their raw state and can be repurposed.
3. Remove the partitions from sdd using the parted command:
[root@server2 ~]# sudo parted /dev/sdd rm 1 ; sudo parted /dev/sdd rm 2
Information: You may need to update /etc/fstab.
Information: You may need to update /etc/fstab. 4. Verify that all disks used in previous exercises have returned to their original raw state using the lsblk command:
[root@server2 ~]# lsblk
NAME MAJ:MIN RM SIZE RO TYPE MOUNTPOINTS
sda 8:0 0 20G 0 disk
├─sda1 8:1 0 1G 0 part /boot
└─sda2 8:2 0 19G 0 part
├─rhel-root 253:0 0 17G 0 lvm /
└─rhel-swap 253:1 0 2G 0 lvm [SWAP]
sdb 8:16 0 250M 0 disk
sdc 8:32 0 250M 0 disk
sdd 8:48 0 250M 0 disk
sde 8:64 0 250M 0 disk
sdf 8:80 0 5G 0 disk
sr0 11:0 1 9.8G 0 rom Stage 1

Stage 2
Stage 3
vdo and kmod-kvdo Commandsvdo
kmod-kvdo
1. Initialize the sdf disk using the pvcreate command:
[root@server2 ~]# sudo pvcreate /dev/sdf
Physical volume "/dev/sdf" successfully created.2. Create vgvdo volume group using the vgcreate command:
[root@server2 ~]# sudo vgcreate vgvdo /dev/sdf
Volume group "vgvdo" successfully created3. Display basic information about the volume group:
[root@server2 ~]# sudo vgdisplay vgvdo
Devices file sys_wwid t10.ATA_VBOX_HARDDISK_VB428913dd-446a194f PVID none last seen on /dev/sdd1 not found.
Devices file sys_wwid t10.ATA_VBOX_HARDDISK_VB428913dd-446a194f PVID none last seen on /dev/sdd2 not found.
--- Volume group ---
VG Name vgvdo
System ID
Format lvm2
Metadata Areas 1
Metadata Sequence No 1
VG Access read/write
VG Status resizable
MAX LV 0
Cur LV 0
Open LV 0
Max PV 0
Cur PV 1
Act PV 1
VG Size <5.00 GiB
PE Size 4.00 MiB
Total PE 1279
Alloc PE / Size 0 / 0
Free PE / Size 1279 / <5.00 GiB
VG UUID tED1vC-Ylec-fpeR-KM8F-8FzP-eaQ4-AsFrgc4. Create a VDO volume called lvvdo using the lvcreate command. Use the -l option to specify the number of logical extents (1279) to be allocated and the -V option for the amount of virtual space.
[root@server2 ~]# sudo dnf install kmod-kvdo
[root@server2 ~]# sudo lvcreate --type vdo -l 1279 -n lvvdo -V 20G vgvdo
The VDO volume can address 2 GB in 1 data slab.
It can grow to address at most 16 TB of physical storage in 8192 slabs.
If a larger maximum size might be needed, use bigger slabs.
Logical volume "lvvdo" created.5. Display detailed information about the volume group including the logical volume and the physical volume:
[root@server2 ~]# sudo vgdisplay -v vgvdo
Devices file sys_wwid t10.ATA_VBOX_HARDDISK_VB428913dd-446a194f PVID none last seen on /dev/sdd1 not found.
Devices file sys_wwid t10.ATA_VBOX_HARDDISK_VB428913dd-446a194f PVID none last seen on /dev/sdd2 not found.
--- Volume group ---
VG Name vgvdo
System ID
Format lvm2
Metadata Areas 1
Metadata Sequence No 3
VG Access read/write
VG Status resizable
MAX LV 0
Cur LV 2
Open LV 0
Max PV 0
Cur PV 1
Act PV 1
VG Size <5.00 GiB
PE Size 4.00 MiB
Total PE 1279
Alloc PE / Size 1279 / <5.00 GiB
Free PE / Size 0 / 0
VG UUID tED1vC-Ylec-fpeR-KM8F-8FzP-eaQ4-AsFrgc
--- Logical volume ---
LV Path /dev/vgvdo/vpool0
LV Name vpool0
VG Name vgvdo
LV UUID yGAsK2-MruI-QGy2-Q1IF-CDDC-XPNT-qkjJ9t
LV Write Access read/write
LV Creation host, time server2, 2024-06-16 09:35:46 -0700
LV VDO Pool data vpool0_vdata
LV VDO Pool usage 60.00%
LV VDO Pool saving 100.00%
LV VDO Operating mode normal
LV VDO Index state online
LV VDO Compression st online
LV VDO Used size <3.00 GiB
LV Status NOT available
LV Size <5.00 GiB
Current LE 1279
Segments 1
Allocation inherit
Read ahead sectors auto
--- Logical volume ---
LV Path /dev/vgvdo/lvvdo
LV Name lvvdo
VG Name vgvdo
LV UUID nnGTW5-tVFa-T3Cy-9nHj-sozF-2KpP-rVfnSq
LV Write Access read/write
LV Creation host, time server2, 2024-06-16 09:35:47 -0700
LV VDO Pool name vpool0
LV Status available
# open 0
LV Size 20.00 GiB
Current LE 5120
Segments 1
Allocation inherit
Read ahead sectors auto
- currently set to 8192
Block device 253:4
--- Physical volumes ---
PV Name /dev/sdf
PV UUID 0oAXHG-C4ub-Myou-5vZf-QxIX-KVT3-ipMZCp
PV Status allocatable
Total PE / Free PE 1279 / 0The output reflects the creation of two logical volumes: a pool called /dev/vgvdo/vpool0 and a volume called /dev/vgvdo/lvvdo.
1. Remove the volume group along with the VDO volumes using the vgremove command:
[root@server2 ~]# sudo vgremove vgvdo -f
Logical volume "lvvdo" successfully removed.
Volume group "vgvdo" successfully removedRemember to proceed with caution whenever you perform erase operations.
2. Execute sudo vgs and sudo lvs commands for confirmation.
[root@server2 ~]# sudo vgs
Devices file sys_wwid t10.ATA_VBOX_HARDDISK_VB428913dd-446a194f PVID none last seen on /dev/sdd1 not found.
Devices file sys_wwid t10.ATA_VBOX_HARDDISK_VB428913dd-446a194f PVID none last seen on /dev/sdd2 not found.
VG #PV #LV #SN Attr VSize VFree
rhel 1 2 0 wz--n- <19.00g 0
[root@server2 ~]# sudo lvs
Devices file sys_wwid t10.ATA_VBOX_HARDDISK_VB428913dd-446a194f PVID none last seen on /dev/sdd1 not found.
Devices file sys_wwid t10.ATA_VBOX_HARDDISK_VB428913dd-446a194f PVID none last seen on /dev/sdd2 not found.
LV VG Attr LSize Pool Origin Data% Meta% Move Log Cpy%Sync Convert
root rhel -wi-ao---- <17.00g
swap rhel -wi-ao---- 2.00g 3. Remove the LVM structures from sdf using the pvremove command:
[root@server2 ~]# sudo pvremove /dev/sdf
Labels on physical volume "/dev/sdf" successfully wiped.4. Confirm the removal by running sudo pvs.
[root@server2 ~]# sudo pvs
Devices file sys_wwid t10.ATA_VBOX_HARDDISK_VB428913dd-446a194f PVID none last seen on /dev/sdd1 not found.
Devices file sys_wwid t10.ATA_VBOX_HARDDISK_VB428913dd-446a194f PVID none last seen on /dev/sdd2 not found.
PV VG Fmt Attr PSize PFree
/dev/sda2 rhel lvm2 a-- <19.00g 0 The disk is now back to its raw state and can be repurposed.
5. Verify that the sdf disk used in the previous exercises has returned to its original raw state using the lsblk command:
[root@server2 ~]# lsblk
NAME MAJ:MIN RM SIZE RO TYPE MOUNTPOINTS
sda 8:0 0 20G 0 disk
├─sda1 8:1 0 1G 0 part /boot
└─sda2 8:2 0 19G 0 part
├─rhel-root 253:0 0 17G 0 lvm /
└─rhel-swap 253:1 0 2G 0 lvm [SWAP]
sdb 8:16 0 250M 0 disk
sdc 8:32 0 250M 0 disk
sdd 8:48 0 250M 0 disk
sde 8:64 0 250M 0 disk
sdf 8:80 0 5G 0 disk
sr0 11:0 1 9.8G 0 rom This brings the exercise to an end.
Create a 100MB primary partition on one of the available 250MB disks (lsblk) by invoking the parted utility directly at the command prompt. Apply label “msdos” if the disk is new.
[root@server20 ~]# sudo parted /dev/sdb mklabel msdos
Warning: The existing disk label on /dev/sdb will be destroyed and all data on this disk will be lost. Do you want to
continue?
Yes/No? yes
Information: You may need to update /etc/fstab.
[root@server20 ~]# sudo parted /dev/sdb mkpart primary 1 101m
Information: You may need to update /etc/fstab.Create another 100MB partition by running parted interactively while ensuring that the second partition won’t overlap the first.
[root@server20 ~]# parted /dev/sdb
GNU Parted 3.5
Using /dev/sdb
Welcome to GNU Parted! Type 'help' to view a list of commands.
(parted) mkpart primary 101 201m Verify the label and the partitions.
(parted) print
Model: ATA VBOX HARDDISK (scsi)
Disk /dev/sdb: 262MB
Sector size (logical/physical): 512B/512B
Partition Table: msdos
Disk Flags:
Number Start End Size Type File system Flags
1 1049kB 101MB 99.6MB primary
2 101MB 201MB 101MB primaryRemove both partitions at the command prompt.
[root@server20 ~]# sudo parted /dev/sdb rm 1 rm 2Create two 80MB partitions on one of the 250MB disks (lsblk) using the gdisk utility. Make sure the partitions won’t overlap.
Command (? for help): o
This option deletes all partitions and creates a new protective MBR.
Proceed? (Y/N): y
Command (? for help): p
Disk /dev/sdb: 512000 sectors, 250.0 MiB
Model: VBOX HARDDISK
Sector size (logical/physical): 512/512 bytes
Disk identifier (GUID): 226F7476-7F8C-4445-9025-53B6737AD1E4
Partition table holds up to 128 entries
Main partition table begins at sector 2 and ends at sector 33
First usable sector is 34, last usable sector is 511966
Partitions will be aligned on 2048-sector boundaries
Total free space is 511933 sectors (250.0 MiB)
Number Start (sector) End (sector) Size Code Name
Command (? for help): n
Partition number (1-128, default 1):
First sector (34-511966, default = 2048) or {+-}size{KMGTP}:
Last sector (2048-511966, default = 511966) or {+-}size{KMGTP}: +80M
Current type is 8300 (Linux filesystem)
Hex code or GUID (L to show codes, Enter = 8300):
Changed type of partition to 'Linux filesystem'
Command (? for help): n
Partition number (2-128, default 2): 2
First sector (34-511966, default = 165888) or {+-}size{KMGTP}: 165888
Last sector (165888-511966, default = 511966) or {+-}size{KMGTP}: +80M
Current type is 8300 (Linux filesystem)
Hex code or GUID (L to show codes, Enter = 8300):
Changed type of partition to 'Linux filesystem'Verify the partitions.
Command (? for help): p
Disk /dev/sdb: 512000 sectors, 250.0 MiB
Model: VBOX HARDDISK
Sector size (logical/physical): 512/512 bytes
Disk identifier (GUID): 226F7476-7F8C-4445-9025-53B6737AD1E4
Partition table holds up to 128 entries
Main partition table begins at sector 2 and ends at sector 33
First usable sector is 34, last usable sector is 511966
Partitions will be aligned on 2048-sector boundaries
Total free space is 184253 sectors (90.0 MiB)
Number Start (sector) End (sector) Size Code Name
1 2048 165887 80.0 MiB 8300 Linux filesystem
2 165888 329727 80.0 MiB 8300 Linux filesystemSave
Command (? for help): w
Final checks complete. About to write GPT data. THIS WILL OVERWRITE EXISTING
PARTITIONS!!
Do you want to proceed? (Y/N): y
OK; writing new GUID partition table (GPT) to /dev/sdb.
The operation has completed successfully.Delete the partitions
Command (? for help): d
Partition number (1-2): 1
Command (? for help): d
Using 2
Command (? for help): w
Final checks complete. About to write GPT data. THIS WILL OVERWRITE EXISTING
PARTITIONS!!
Do you want to proceed? (Y/N): y
OK; writing new GUID partition table (GPT) to /dev/sdb.
The operation has completed successfully.initialize 1x250MB disk for use in LVM (use lsblk to identify available disks).
root@server2 ~]# sudo parted /dev/sdd mklabel msdos
Warning: The existing disk label on /dev/sdd will be destroyed and all data
on this disk will be lost. Do you want to continue?
Yes/No? yes
Information: You may need to update /etc/fstab.
[root@server2 ~]# sudo parted /dev/sdd mkpart primary 1 250m
Information: You may need to update /etc/fstab.
[root@server2 ~]# sudo parted /dev/sdd print
Model: ATA VBOX HARDDISK (scsi)
Disk /dev/sdd: 262MB
Sector size (logical/physical): 512B/512B
Partition Table: msdos
Disk Flags:
Number Start End Size Type File system Flags
1 1049kB 250MB 249MB primary
[root@server2 ~]# sudo pvcreate /dev/sdd1
Physical volume "/dev/sdd1" successfully created.(Can also just use the full disk without making it into a partition first.)
Create volume group vg100 with PE size 16MB and add the physical volume.
[root@server2 ~]# sudo vgcreate -vs 16 vg100 /dev/sdd1
Wiping signatures on new PV /dev/sdd1.
Adding physical volume '/dev/sdd1' to volume group 'vg100'
Creating volume group backup "/etc/lvm/backup/vg100" (seqno 1).
Volume group "vg100" successfully createdCreate two logical volumes lvol0 and swapvol of sizes 90MB and 120MB.
[root@server2 ~]# sudo lvcreate -vL 90 vg100
Creating logical volume lvol0
Archiving volume group "vg100" metadata (seqno 1).
Activating logical volume vg100/lvol0.
activation/volume_list configuration setting not defined: Checking only host tags for vg100/lvol0.
Creating vg100-lvol0
Loading table for vg100-lvol0 (253:2).
Resuming vg100-lvol0 (253:2).
Wiping known signatures on logical volume vg100/lvol0.
Initializing 4.00 KiB of logical volume vg100/lvol0 with value 0.
Logical volume "lvol0" created.
Creating volume group backup "/etc/lvm/backup/vg100" (seqno 2).
[root@server2 ~]# sudo lvcreate -l 8 -n swapvol vg100
Logical volume "swapvol" created.Use the vgs, pvs, lvs, and vgdisplay commands for verification.
[root@server2 ~]# lvs
Devices file sys_wwid t10.ATA_VBOX_HARDDISK_VB428913dd-446a194f PVID none last seen on /dev/sdd1 not found.
Devices file sys_wwid t10.ATA_VBOX_HARDDISK_VB428913dd-446a194f PVID none last seen on /dev/sdd2 not found.
LV VG Attr LSize Pool Origin Data% Meta% Move Log Cpy%Sync Convert
root rhel -wi-ao---- <17.00g
swap rhel -wi-ao---- 2.00g
lvol0 vg100 -wi-a----- 90.00m
swapvol vg100 -wi-a----- 120.00m
[root@server2 ~]# vgs
Devices file sys_wwid t10.ATA_VBOX_HARDDISK_VB428913dd-446a194f PVID none last seen on /dev/sdd1 not found.
Devices file sys_wwid t10.ATA_VBOX_HARDDISK_VB428913dd-446a194f PVID none last seen on /dev/sdd2 not found.
VG #PV #LV #SN Attr VSize VFree
rhel 1 2 0 wz--n- <19.00g 0
vg100 1 2 0 wz--n- 225.00m 15.00m
[root@server2 ~]# pvs
Devices file sys_wwid t10.ATA_VBOX_HARDDISK_VB428913dd-446a194f PVID none last seen on /dev/sdd1 not found.
Devices file sys_wwid t10.ATA_VBOX_HARDDISK_VB428913dd-446a194f PVID none last seen on /dev/sdd2 not found.
PV VG Fmt Attr PSize PFree
/dev/sda2 rhel lvm2 a-- <19.00g 0
/dev/sdd1 vg100 lvm2 a-- 225.00m 15.00m
[root@server2 ~]# vgdisplay
Devices file sys_wwid t10.ATA_VBOX_HARDDISK_VB428913dd-446a194f PVID none last seen on /dev/sdd1 not found.
Devices file sys_wwid t10.ATA_VBOX_HARDDISK_VB428913dd-446a194f PVID none last seen on /dev/sdd2 not found.
--- Volume group ---
VG Name vg100
System ID
Format lvm2
Metadata Areas 1
Metadata Sequence No 5
VG Access read/write
VG Status resizable
MAX LV 0
Cur LV 2
Open LV 0
Max PV 0
Cur PV 1
Act PV 1
VG Size 225.00 MiB
PE Size 15.00 MiB
Total PE 15
Alloc PE / Size 14 / 210.00 MiB
Free PE / Size 1 / 15.00 MiB
VG UUID fEUf8R-nxKF-Uxud-7rmm-JvSQ-PsN1-Mrs3zc
--- Volume group ---
VG Name rhel
System ID
Format lvm2
Metadata Areas 1
Metadata Sequence No 3
VG Access read/write
VG Status resizable
MAX LV 0
Cur LV 2
Open LV 2
Max PV 0
Cur PV 1
Act PV 1
VG Size <19.00 GiB
PE Size 4.00 MiB
Total PE 4863
Alloc PE / Size 4863 / <19.00 GiB
Free PE / Size 0 / 0
VG UUID UiK3fy-FGOc-2fnP-C1Y6-JS0l-irEe-Sq3c4hCreate a partition on an available 250MB disk and initialize it for use in LVM (use lsblk to identify available disks).
[root@server2 ~]# parted /dev/sdb mklabel msdos
Warning: The existing disk label on /dev/sdb will be destroyed and all data on this disk will be lost. Do you want to continue?
Yes/No? yes
Information: You may need to update /etc/fstab.
[root@server2 ~]# parted /dev/sdb mkpart primary 1 250m
Information: You may need to update /etc/fstab.Add the new physical volume to vg100.
[root@server2 ~]# sudo vgextend vg100 /dev/sdb1
Device /dev/sdb1 has updated name (devices file /dev/sdd1)
Physical volume "/dev/sdb1" successfully created.
Volume group "vg100" successfully extendedExpand the lvol0 logical volume to size 300MB.
[root@server2 ~]# lvextend -L +210 /dev/vg100/lvol0
Size of logical volume vg100/lvol0 changed from 90.00 MiB (6 extents) to 300.00 MiB (20 extents).
Logical volume vg100/lvol0 successfully resized.Use the vgs, pvs, lvs, and vgdisplay commands for verification.
[[root@server2 ~]# lvs
Devices file sys_wwid t10.ATA_VBOX_HARDDISK_VB428913dd-446a194f PVID none last seen on /dev/sdd2 not found.
LV VG Attr LSize Pool Origin Data% Meta% Move Log Cpy%Sync Convert
root rhel -wi-ao---- <17.00g
swap rhel -wi-ao---- 2.00g
lvol0 vg100 -wi-a----- 90.00m
swapvol vg100 -wi-a----- 120.00m](<[root@server20 ~]# lvs
LV VG Attr LSize Pool Origin Data% Meta% Move Log Cpy%Sync Convert
root rhel -wi-ao---- %3C17.00g
swap rhel -wi-ao---- 2.00g
lvol0 vg100 -wi-a----- 300.00m
swapvol vg100 -wi-a----- 120.00m>)
[root@server2 ~]# vgs
Devices file sys_wwid t10.ATA_VBOX_HARDDISK_VB428913dd-446a194f PVID none last seen on /dev/sdd2 not found.
VG #PV #LV #SN Attr VSize VFree
rhel 1 2 0 wz--n- <19.00g 0
vg100 2 2 0 wz--n- 450.00m 30.00m
[root@server2 ~]# pvs
Devices file sys_wwid t10.ATA_VBOX_HARDDISK_VB428913dd-446a194f PVID none last seen on /dev/sdd2 not found.
PV VG Fmt Attr PSize PFree
/dev/sda2 rhel lvm2 a-- <19.00g 0
/dev/sdb1 vg100 lvm2 a-- 225.00m 30.00m
/dev/sdd1 vg100 lvm2 a-- 225.00m 0
[root@server2 ~]# lvs
Devices file sys_wwid t10.ATA_VBOX_HARDDISK_VB428913dd-446a194f PVID none last seen on /dev/sdd2 not found.
LV VG Attr LSize Pool Origin Data% Meta% Move Log Cpy%Sync Convert
root rhel -wi-ao---- <17.00g
swap rhel -wi-ao---- 2.00g
lvol0 vg100 -wi-a----- 300.00m
swapvol vg100 -wi-a----- 120.00m
[root@server2 ~]# vgdisplay
Devices file sys_wwid t10.ATA_VBOX_HARDDISK_VB428913dd-446a194f PVID none last seen on /dev/sdd2 not found.
--- Volume group ---
VG Name vg100
System ID
Format lvm2
Metadata Areas 2
Metadata Sequence No 7
VG Access read/write
VG Status resizable
MAX LV 0
Cur LV 2
Open LV 0
Max PV 0
Cur PV 2
Act PV 2
VG Size 450.00 MiB
PE Size 15.00 MiB
Total PE 30
Alloc PE / Size 28 / 420.00 MiB
Free PE / Size 2 / 30.00 MiB
VG UUID fEUf8R-nxKF-Uxud-7rmm-JvSQ-PsN1-Mrs3zc
--- Volume group ---
VG Name rhel
System ID
Format lvm2
Metadata Areas 1
Metadata Sequence No 3
VG Access read/write
VG Status resizable
MAX LV 0
Cur LV 2
Open LV 2
Max PV 0
Cur PV 1
Act PV 1
VG Size <19.00 GiB
PE Size 4.00 MiB
Total PE 4863
Alloc PE / Size 4863 / <19.00 GiB
Free PE / Size 0 / 0
VG UUID UiK3fy-FGOc-2fnP-C1Y6-JS0l-irEe-Sq3c4h
initialize the sdf disk for use in LVM and add it to vgvdo1.
[root@server2 ~]# pvcreate /dev/sdc
Physical volume "/dev/sdc" successfully created.
[root@server2 ~]# sudo vgextend vgvdo1 /dev/sdc
Volume group "vgvdo1" successfully extendedCreate a VDO logical volume named vdovol using the entire disk capacity.
[root@server2 ~]# lvcreate --type vdo -n vdovol -l 100%FREE vgvdo1
WARNING: LVM2_member signature detected on /dev/vgvdo1/vpool0 at offset 536. Wipe it? [y/n]: y
Wiping LVM2_member signature on /dev/vgvdo1/vpool0.
Logical blocks defaulted to 523108 blocks.
The VDO volume can address 2 GB in 1 data slab.
It can grow to address at most 16 TB of physical storage in 8192 slabs.
If a larger maximum size might be needed, use bigger slabs.
Logical volume "vdovol" created.Use the vgs, pvs, lvs, and vgdisplay commands for verification.
[root@server2 ~]# vgs
Devices file sys_wwid t10.ATA_VBOX_HARDDISK_VB428913dd-446a194f PVID none last seen on /dev/sdd2 not found.
Devices file sys_wwid t10.ATA_VBOX_HARDDISK_VB123ecea1-63467dee PVID RjcGRyHDIWY0OqAgfIHC93WT03Na1WoO last seen on /dev/sdd1 not found.
Devices file sys_wwid t10.ATA_VBOX_HARDDISK_VBa5e3cbf7-10921e08 PVID qeP9dCevNnTy422I8p18NxDKQ2WyDodU last seen on /dev/sdf1 not found.
Devices file sys_wwid t10.ATA_VBOX_HARDDISK_VB428913dd-446a194f PVID brKVLFEG3AoBzhWoso0Sa1gLYHgNZ4vL last seen on /dev/sdb1 not found.
VG #PV #LV #SN Attr VSize VFree
rhel 1 2 0 wz--n- <19.00g 0
vgvdo1 2 2 0 wz--n- <5.24g 248.00mreduce the size of vdovol logical volume to 80MB.
[root@server2 ~]# lvreduce -L 80 /dev/vgvdo1/vdovol
No file system found on /dev/vgvdo1/vdovol.
WARNING: /dev/vgvdo1/vdovol: Discarding 1.91 GiB at offset 83886080, please wait...
Size of logical volume vgvdo1/vdovol changed from 1.99 GiB (510 extents) to 80.00 MiB (20 extents).
Logical volume vgvdo1/vdovol successfully resized.
[root@server2 ~]# lvs
Devices file sys_wwid t10.ATA_VBOX_HARDDISK_VB428913dd-446a194f PVID none last seen on /dev/sdd2 not found.
Devices file sys_wwid t10.ATA_VBOX_HARDDISK_VB123ecea1-63467dee PVID RjcGRyHDIWY0OqAgfIHC93WT03Na1WoO last seen on /dev/sdd1 not found.
Devices file sys_wwid t10.ATA_VBOX_HARDDISK_VBa5e3cbf7-10921e08 PVID qeP9dCevNnTy422I8p18NxDKQ2WyDodU last seen on /dev/sdf1 not found.
Devices file sys_wwid t10.ATA_VBOX_HARDDISK_VB428913dd-446a194f PVID brKVLFEG3AoBzhWoso0Sa1gLYHgNZ4vL last seen on /dev/sdb1 not found.
LV VG Attr LSize Pool Origin Data% Meta% Move Log Cpy%Sync Convert
root rhel -wi-ao---- <17.00g
swap rhel -wi-ao---- 2.00g
vdovol vgvdo1 vwi-a-v--- 80.00m vpool0 0.00
vpool0 vgvdo1 dwi------- <5.00g 60.00
[root@server2 ~]# erase logical volume vdovol.
[root@server2 ~]# lvremove /dev/vgvdo1/vdovol
Do you really want to remove active logical volume vgvdo1/vdovol? [y/n]: y
Logical volume "vdovol" successfully removed.Confirm the deletion with vgs, pvs, lvs, and vgdisplay commands.
\remove the volume group and uninitialized the physical volumes.
[root@server2 ~]# vgremove vgvdo1
Volume group "vgvdo1" successfully removed[root@server2 ~]# pvremove /dev/sdc
Labels on physical volume "/dev/sdc" successfully wiped.
[root@server2 ~]# pvremove /dev/sdf
Labels on physical volume "/dev/sdf" successfully wiped.Confirm the deletion with vgs, pvs, lvs, and vgdisplay commands.
Use the lsblk command and verify that the disks used for the LVM labs no longer show LVM information.
[root@server2 ~]# lsblk
NAME MAJ:MIN RM SIZE RO TYPE MOUNTPOINTS
sda 8:0 0 20G 0 disk
├─sda1 8:1 0 1G 0 part /boot
└─sda2 8:2 0 19G 0 part
├─rhel-root 253:0 0 17G 0 lvm /
└─rhel-swap 253:1 0 2G 0 lvm [SWAP]
sdb 8:16 0 250M 0 disk
sdc 8:32 0 250M 0 disk
sdd 8:48 0 250M 0 disk
sde 8:64 0 250M 0 disk
sdf 8:80 0 5G 0 disk
sr0 11:0 1 9.8G 0 rom Installation Logs and Cockpit
Basic Commands and Directory Structure
Processes, priorities, and scheduling jobs.
/root/anaconda-ks.cfg Configuration entered
/var/log/anaconda/anaconda.log Contains informational, debug, and other general messages
/var/log/anaconda/journal.log Stores messages generated by many services and components during system installation
/var/log/anaconda/packaging.log Records messages generated by the dnf and rpm commands during software installation
/var/log/anaconda/program.log Captures messages generated by external programs
/var/log/anaconda/storage.log Records messages generated by storage modules
/var/log/anaconda/syslog Records messages related to the kernel
/var/log/anaconda/X.log Stores X Window System information
Note: Logs are created in /tmp then transferred over to /var/log/anaconda once the install is finished.Console 1 (Ctrl+Alt+F1)
Console 2 (Ctrl_Alt+F2)
Console 3 (Ctrl_Alt+F3)
Console 4 (Ctrl_Alt+F4)
Console 5 (Ctrl_Alt+F5)
Console 6 (Ctrl_Alt+F6)
Console 1 Brings you to the log in screen. Console 2 does nothing. Console 3-6 all bring you to this log in screen
Lab Setup
VM1
server1.example.om
192.168.0.110
Memory: 2GB
Storage: 1x20GB
2 vCPUsVM2
server2.exmple.om
192.168.0.120
Memory: 2048
Storage: 1x20GB
4x250 MB data disk
1x5GB data disk
2 vCPUsDownload the disc iso on Redhat’s website: https://access.redhat.com/downloads/content/rhel
Name RHEL9-VM1 Accept defaults.
Set drive to 20 gigs
press “spe” to hlt utooot
Selet instll
selet lnguge
onfigure timezone under time & dte
go into instlltion destintion nd li “done”
Networ nd hostnme settings
Set root pssword
Chnge the oot order
Accept license terms and rete user
ssh from host os with putty
Issue these Commnds after set up
whoami
hostname
pwd
logout or ctrl+dsudo dnf install cockpitsudo systemctl enable --now cockpit.socketEnable cockpit.socket:
sudo systemctl enable --now cockpit.socketIn a web browser, go to https://<your-ip>:9090
Looking to get started using Fedora or Red Hat operating systems?
This guide with get you started with the RHEL Graphical environment, file system, and essential commands to get started using Fedora, Red Hat, or other RHEL based systems.
Redhat runs a graphical environment called Wayland. This is the foundation for running GUI apps. Wayland is a client/server display protocol. Which just means that the user (the client) requests a resource and the display manager (the server) serves those resources.
Wayland is slowly replaced and older display protocol called “X”. And has better graphics capabilities, features, and performance than X. And consists of a Display or Login manager and a Desktop environment.
The Display/ Login manager presents the login screen for users to log in. Once you log in, you get to the pre-configured desktop manager or Desktop Environment (DE). The GNOME Display Manager. (GDM)
The standard for the Linux filesystem is the Filesystem Hierarchy Standard (FHS). Which describes locations, names, and permissions for a variety of file types and directories.
The directory structure starts at the root. Which is notated by a “/”. The top levels of the directory can be viewed by running the ls command on the root of the directory tree.
Size of the root file system is automatically determined by the installer program based on the available disk space when you select the default partitioning (it may be altered). Here is a listing of the contents of /:
$ ls /
afs bin boot dev etc home lib lib64 lost+found media mnt opt proc root run sbin snap srv sys tmp usr varSome of these directories hold static data such as commands, configuration files, kernel and device files, etc. And some hold dynamic data such as log and status files.
There are three major categories of file systems. They are:
Disk-based files systems are physical media such as a hard drive or a USB flash drive and store information persistently. The root and boot file systems and both disk-based and created automatically when you select the default partitioning.
Network-Based file systems are disk-based file systems that are shared over the network for remote access. (Also stored persistently)
Memory-Based filesystems are virtual. And are created automatically at system startup and destroyed when the system goes down.
This directory contains system configuration files for systemd, LVM, and user shell startup template files.
david@fedora:$ ls /etc
abrt dhcp gshadow- locale.conf openldap request-key.d sysctl.conf
adjtime DIR_COLORS gss localtime opensc.conf resolv.conf sysctl.d
aliases DIR_COLORS.lightbgcolor gssproxy login.defs opensc-x86_64.conf rpc systemd
alsa dleyna-server-service.conf host.conf logrotate.conf openvpn rpm system-release
alternatives dnf hostname logrotate.d opt rpmdevtools system-release-cpe
anaconda dnsmasq.conf hosts lvm os-release rpmlint tcsd.conf
anthy-unicode.conf dnsmasq.d hp machine-id ostree rsyncd.conf terminfo
apk dracut.conf httpd magic PackageKit rwtab.d thermald
appstream.conf dracut.conf.d idmapd.conf mailcap pam.d rygel.conf timidity++.cfg
asound.conf egl ImageMagick-7 makedumpfile.conf.sample paperspecs samba tmpfiles.d
audit environment init.d man_db.conf passwd sane.d tpm2-tss
authselect ethertypes inittab mcelog passwd- sasl2 Trolltech.conf
avahi exports inputrc mdevctl.d passwdqc.conf security trusted-key.key
bash_completion.d exports.d ipp-usb mercurial pinforc selinux ts.conf
bashrc favicon.png iproute2 mime.types pkcs11 services udev
bindresvport.blacklist fedora-release iscsi mke2fs.conf pkgconfig sestatus.conf udisks2
binfmt.d filesystems issue modprobe.d pki sgml unbound
bluetooth firefox issue.d modules-load.d plymouth shadow updatedb.conf
brlapi.key firewalld issue.net mono pm shadow- UPower
brltty flatpak java motd polkit-1 shells uresourced.conf
brltty.conf fonts jvm motd.d popt.d skel usb_modeswitch.conf
ceph fprintd.conf jvm-common mtab ppp sos vconsole.conf
chkconfig.d fstab kdump mtools.conf printcap speech-dispatcher vdpau_wrapper.cfg
chromium fuse.conf kdump.conf my.cnf profile ssh vimrc
chrony.conf fwupd kernel my.cnf.d profile.d ssl virc
cifs-utils gcrypt keys nanorc protocols sssd vmware-tools
containers gdbinit keyutils ndctl pulse statetab.d vpl
credstore gdbinit.d krb5.conf ndctl.conf.d qemu subgid vpnc
credstore.encrypted gdm krb5.conf.d netconfig qemu-ga subgid- vulkan
crypto-policies geoclue ld.so.cache NetworkManager rc0.d subuid wgetrc
crypttab glvnd ld.so.conf networks rc1.d subuid- whois.conf
csh.cshrc gnupg ld.so.conf.d nfs.conf rc2.d subversion wireplumber
csh.login GREP_COLORS libaudit.conf nfsmount.conf rc3.d sudo.conf wpa_supplicant
cups groff libblockdev nftables rc4.d sudoers X11
cupshelpers group libibverbs.d nilfs_cleanerd.conf rc5.d sudoers.d xattr.conf
dbus-1 group- libnl npmrc rc6.d swid xdg
dconf grub2.cfg libreport nsswitch.conf rc.d swtpm-localca.conf xml
debuginfod grub2-efi.cfg libssh nvme reader.conf.d swtpm-localca.options yum.repos.d
default grub.d libuser.conf odbc.ini redhat-release swtpm_setup.conf zfs-fuse
depmod.d gshadow libvirt odbcinst.ini request-key.conf sysconfigAs you can see, there is a lot of stuff here.
This is the default home directory for the root user.
/mnt is used to temporarily mount a file system.
This directory contains the Linux Kernel, as well as boot support and configuration files.
The size of /boot is determined by the installer program based on the available disk space when you select the default partitioning. It may be set to a different size during or after the installation.
This is used to store user home directories and other user contents.
This directory holds additional software that may need to be installed on the system. A sub directory is created for each installed software.
Holds most of the system files such as:
Binary directory for user executable commands
System binaries required at boot and system administration commands not intended for execution by normal users. This directory is not included in the default search path for normal users.
Contain shared library routines required by many commands/programs located in /usr/bin and /usr/sbin. These are used by kernel and other applications and programs for their successful installation and operation.
/usr/lib directory also stores system initialization and service management programs. /usr/lib64 contains 64-bit shared library routines.
Contains header files for the C programming language.
This is a system administrator repository for storing commands and tools. These commands not generally included with the original Linux distribution.
| Directory | Contains |
|---|---|
| /usr/local/bin | ecutables |
| /usr/local/etc | configuration files |
| /usr/local/lib and /usr/local/lib64 | library routines |
| /usr/share | manual pages, documentation, sample templates, configuration files |
This directory is used to store source code.
For data that frequently changes while the system is operational. Such as log, status, spool, lock, etc.
Common sub directories in /var:
Contains most system log files. Such as boot logs, user logs, failed user logs, installation logs, cron logs, mail logs, etc.
Log, status, etc. for software installed in /opt.
Queued files such as print jobs, cron jobs, mail messages, etc.
For large or longer term temporary files that need to survive system reboots. These are deleted if they are not accessed for a period of 30 days.
Temporary files that survive system reboots. These are deleted after 10 days if they are not accessed. Programs may need to create temporary files in order to run.
Contains Device nodes for physical and virtual devices. Linux kernel talks to devices through these nodes. Device nodes are automatically created and deleted by the udevd service. Which dynamically manages devices.
The two types of device files are character (or raw) and block.
Options. tree -a :: Include hidden files in the output. tree -d :: Exclude files from the output. tree -h :: Displays file sizes in human-friendly format. tree -f :: Prints the full path for each file. tree -p :: Includes file permissions in the output
tree -d /roottree -phf /etc/sysconfigman treeTwo types of commands:
Basic Syntax
An option that starts with a single hyphen character (-la, for instance) ::: Short-option format.
Flags ls -l ::: View long listing format. ls -d ::: View info on the specified directory. ls -h ::: Human readable format. ls -a ::: List all files, including the hidden files. ls -t ::: Sort output by date and time with the newest file first. ls -R ::: List contents recursively. ls -i ::: View inode information.
ls -ld /usrls -lhls -lals -ltls -R /etcls -lR /etcman lsAbsolute path (full path or a fully qualified pathname) :: Points to a file or directory in relation to the top of the directory tree. It always starts with the forward slash (/).
Relative path :: Points to a file or directory in relation to your current location.
cd ..cd /etc/sysconfig
cd /
cd etc/sysconfigcd /usr/binor
cd ../usr/bincdor
cd ~cd ../../rootcd ..cd -uptime commandclearTools for identifying the absolute path of the command that will be executed when you run it without specifying its full path.
which, whereis, and type
show the full location of the ls command:
which command[root@server1 bin]# which ls
alias ls='ls --color=auto'
/usr/bin/lswhereis command[root@server1 bin]# whereis ls
ls: /usr/bin/ls /usr/share/man/man1/ls.1.gz /usr/share/man/man1p/ls.1p.gz>)type commandtype lsuname command[root@server1 bin]# uname
LinuxFlags uname -s ::: Show kernel name. uname -n ::: Show hostname. uname -r ::: Show kernel release. uname -v ::: Show kernel build date. uname -m ::: Show machine hardware name. uname -p ::: Show processor type. uname -i ::: Show hardware platform. uname -o ::: Show OS name. uname -a ::: Show kernel name, nodename, release, version, machine, and os.
unameuname -aLinux = Kernel name
server1.example.com = Hostname of the system
4.18.0-80.el8.x86_64 = Kernel release
#1 SMP Wed Mar 13 12:02:46 UTC 2019 = Date and time of the kernel built
x86_64 = Machine hardware name
x86_64 = Processor type
x86_64 = Hardware platform
GNU/Linux = Operating system name
lscpu commandlscpuarchitecture of the CPU (x86_64)
supported modes of operation (32-bit and 64-bit)
sequence number of the CPU on this system (1)
threads per core (1)
cores per socket (1)
number of sockets (1)
vendor ID (GenuineIntel)
CPU model (58) model name (Intel …)
speed (2294.784 MHz)
amount and levels of cache memory (L1d, L1i, L2, and L3)
See Using Man Pages for more.
man commandFlags: -k
mandb first.-f
apropos whatisinfopinfo/usr/share/doc/
man passwdline at the bottom indicates the line number of the manual page.
h ::: Help on navigation. q ::: Quit the man page. Up arrow key ::: Scroll up one line. Enter or Down arrow key ::: Scroll down one line. f / Spacebar / Page down ::: Move forward one page. b / Page up ::: Move backward one page. d / u ::: Move down/up half a page. g / G ::: Move to the beginning / end of the man pages. :f ::: Display line number and bytes being viewed. /pattern ::: Searches forward for the specified pattern. ?pattern ::: Searches backward for the specified pattern. n / N ::: Find the next / previous occurrence of a pattern.
NAME
passwd command in /usr/bin and the passwd file in /etc.man 5 passwdSection 1
Run man man for more details.
apropos commandmandb command in order to build an indexed database of the manual pages prior to using.mandbmandb commandman -k xfs
or
apropos xfspasswd --help
or
passwd -?whatis commandman -finfo and pinfo Commandsinfo lsu navigate efficiently.
Down / Up arrows
/usr/share/doc/
ls -l /usr/share/doc/gzipCheck your location in the directory tree.
pwdShow file permissions in the current directory including the hidden files.
ls -laChange directory into /etc and confirm the directory change.
cd /etc
pwdSwitch back to the directory where you were before, and run pwd again to verify.
cd -
pwdIdentify the terminal device file.
ttyOpen a couple of terminal sessions. Compare the terminal numbers.
tty
/dev/pts/1Execute the uptime command and analyze the system uptime and processor load information.
uptimeUse three commands to identify the location of the vgs command.
which vgs
whereis vgs
type vgsuname -aExamine the key items relevant to the processor.
lscpuView man page for uname.
man unameView the 5 man page section for the shadow.
man 5 shadowProcess
ps and other commands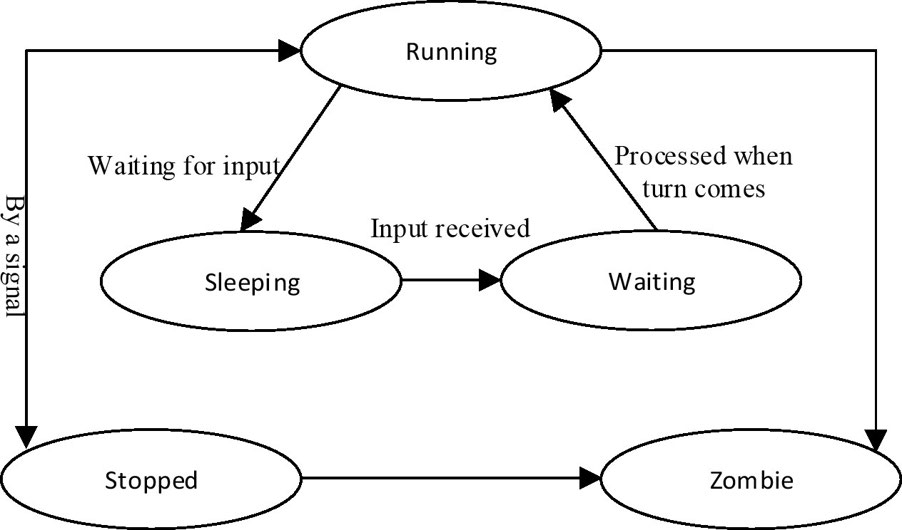
ps commandtop commandpidof and pgrep commandps to list a process by it’s ownership or owning group.nice commandrenice commandkill commandFlags
Common signals - 1 SIGHUP (hangup) - causes a process to disconnect itself from a closed terminal that it was tied to - instruct a running daemon to re-read its configuration without a restart. - 2 SIGINT - ^c (Ctrl+c) signal issued on the controlling terminal to interrupt the execution of a process. - 9 SIGKILL - Terminates a process abruptly - 15 SIGTERM (default) - Soft termination signal to stop a process in an orderly fashion. - Default signal if none is specified with the command. - 18 SIGCONT - Same as using the bg command to resume - 19 SIGSTOP - Same as using Ctrl+z to suspend a job - 20 SIGTSTP - Same as using the fg command
atd and crond manage jobs| at.allow / cron.allow | at.deny / cron.deny | Impact |
|---|---|---|
| Exists, and contains user entries | Existence does not matter | All users listed in allow files are permitted |
| Exists, but is empty | Existence does not matter | No users are permitted |
| Does not exist | Exists, and contains user entries | All users, other than those listed in deny files, are permitted |
| Does not exist | Exists, but is empty | All users are permitted |
| Does not exist | Does not exist | No users are permitted |
/var/log/cron
- Logs for both atd and cron
Shows
- time of activity
- hostname
- process name and PID
- owner
- message for each invocation
- service start time and delays
- must have root privileges to view
at commandcrontab command/etc/crontab contents:

Make sure you understand and memorize the order of the fields defined in crontables.
anacron to run all jobs in /etc/anacrontab that were missed.run-parts command is invoked for execution at the default niceness.psman ps ps -ef ps -o comm,pid,ppid,user ps -C sshdtopman toppidof rsyslogd
or
pgrep rsyslogdps -U user1ps -G rootniceps -efltopps -efl | grep topnice -n 2 topps -efl | grep topsudo nice -n -10 topps -efl | grep toptopps -efl | grep topsudo renice -n -5 $(pidof top)ps -efl | grep topsudo renice -n 8 $(pidof top)ps -efl | grep topsudo pkill crond
# or
sudo kill $(pidof crond)ps -ef | grep crondsudo pkill -9 crond
# or
sudo pkill -s SIGKILL crond
# or
sudo kill -9 $(pgrep crond)sudo killall crondman kill
man pkill
man killallsudo cat /var/log/cronat -f ~/.bash_profile now + 2 hoursman crontab1.Run the at command and specify the correct execution time and date for the job. Type the entire command at the first at> prompt and press Enter. Press Ctrl+d at the second at> prompt to complete the job submission and return to the shell prompt.
at 1:30pm 3/31/20
date &> /tmp/date.outThe system assigned job ID 5 to it, and the output also pinpoints the job’s execution time.
2.List the job file created in the /var/spool/at directory:
sudo ls -l /var/spool/at/3.List the spooled job with the at command. You may alternatively use atq to list it.
at -l
# or
atq4.Display the contents of this file with the at command and specify the job ID:
at -c 55.Remove the spooled job with the at command by specifying its job ID. You may alternatively run atrm 5 to delete it.
at -d 5This should erase the job file from the /var/spool/at directory. You can
atqassume that all users are currently denied access to cron
sudo vim /etc/cron.allow
user1crontab -e
*/5 10-11 5,20 * * echo "Hello, this is a cron test." > /tmp/hello.outsudo ls -l /var/spool/croncrontab -lcrontab -r
crontab -lcat /etc/anacrontab | grep -ve ^# -ve ^$man anacronps -efl | grep topnice -n 8 topps -efl | grep toprenice -n -10 $(pidof top)ps -efl | grep topAs user1 on server1, run the tty and date commands to determine the terminal file (assume /dev/pts/1) and current system time.
tty
dateCreate a cron entry to display “Hello World” on the terminal. Schedule echo “Hello World” > /dev/tty/1 to run 3 minutes from the current system time.
crontab -e
*/3 * * * * echo "Hello World" > /dev/pts/2As root, ensure user1 can schedule cron jobs.
sudo vim /etc/cron.allow
user1Setting up your own Calibre Web server using Docker and NGINX
Guide for setting up a static website with Hugo
Removing extra stuff from Bookfusion exported highlights
Hugo Relearn setup guide
Nextcloud setup guide on a RHEL based server
Self hosting a Nextcloud server
How to use Vagrant from a Linux computer.
Guide to using Vim
Guide to using Man Pages
I couldn’t find a guide on how to set up Calibre web step-by-step as a Docker container. Especially not one that used Nginx as a reverse proxy.
The good news is that it is really fast and simple. You’ll need a few tools to get this done:
First, sync your local Calibre library to a folder on your server:
rsync -avuP your-library-dir root@example.org:/opt/calibre/sudo apt update
sudo apt install docker.ioCreate a Docker network
sudo docker network create calibre_networkCreate a Docker volume to store Calibre Web data
sudo docker volume create calibre_dataPull the Calibre Web Docker image
sudo docker pull linuxserver/calibre-webStart the Calibre Web Docker container
sudo docker run -d \
--name=calibre-web \
--restart=unless-stopped \
-p 8083:8083 \
-e PUID=$(id -u) \
-e PGID=$(id -g) \
-v calibre_data:/config \
-v /opt/calibre/Calibre:/books \
--network calibre_network \
linuxserver/calibre-webCreate the site file
sudo vim /etc/nginx/sites-available/calibre-webAdd the following to the file
server { listen 80;
server_name example.com; # Replace with your domain or server IP location /
{
proxy_pass http://localhost:8083;
proxy_set_header Host $host;
proxy_set_header X-Real-IP $remote_addr;
proxy_set_header X-Forwarded-For $proxy_add_x_forwarded_for;
proxy_set_header X-Forwarded-Proto $scheme;
} }Enable the site
sudo ln -s /etc/nginx/sites-available/calibre-web /etc/nginx/sites-enabled/Restart Nginx
sudo service nginx restartMake sure to set up a cname record for your site with your DNS provider such as: calibre.example.com
Install ssl cert using certbot
certbot --nginxHead to the site at https://calibre.example.com and log in with default credentials:
username: admin password: admin123
Select /books as the library directory. Go into admin settings and change your password.
Whenever you add new books to your server via the rsync command from earlier, you will need to restart the Calibre Web Docker container. Then restart Nginx.
sudo docker restart calibre-web
systemctl restart nginxThat’s all there is to it. Feel free to reach out if you have issues.
Word Press is great, but it is probably a lot more bloated then you need for a personal website. Enter Hugo, it has less server capacity and storage needs than Word Press. Hugo is a static site generator than takes markdown files and converts them to html.
Hosting your own website is also a lot cheaper than having a provider like Bluehost do it for you. Instead of $15 per month, I am currently paying $10 per year.
This guide will walk through building a website step-by-step.
I use Vultr as my VPS. When I signed up they had a $250 credit towards a new account. If you select the cheapest server (you shouldn’t need anything else for a basic site) that comes out to about $6 a month. Of course the $250 credit goes towards that which equates to around 41 months free.
Head to vultr.com. Create and account and Select the Cloud Compute option.
Under CPU & Storage Technology, select “Regular Performance”. Then under “Server Location, select the server closest to you. Or closest to where you think your main audience will be.
Under Server image, select the OS you are most comfortable with. This guide uses Debian.
Under Server Size, slect the 10GB SSD. Do not select the “IPv6 ONLY” option. Leave the other options as default and enter your server hostname.
On the products page, click your new server. You can find your server credentials and IPv4 address here. You will need these to log in to your server.
Log into your sever via ssh to test. From a Linux terminal run:
ssh username@serveripaddressThen, enter your password when prompted.
I got my domain perfectdarkmode.com from Cloudflare.com for about $10 per year. You can check to see available domains there. You can also check https://www.namecheckr.com/ to see iof that name is available on various social media sites.
In CloudFlare, just click “add a site” and pick a domain that works for you. Next, you will need your server address from earlier.
Under domain Registration, click “Manage Domains”, click “manage” on your domain. One the sidebar to the right, there is a qucik actions menu. Click “update DNS configuration”.
Click “Add record”. Type is an “A” record. Enter the name and the ip address that you used earlier for your server. Uncheck “Proxy Status” and save.
You can check to see if your DNS has updated on various DNS severs at https://dnschecker.org/. Once those are up to date (after a couple minutes) you should be able to ping your new domain.
$ ping perfectdarkmode.com
PING perfectdarkmode.com (104.238.140.131) 56(84) bytes of data.
64 bytes from 104.238.140.131.vultrusercontent.com (104.238.140.131): icmp_seq=1 ttl=53 time=33.2 ms
64 bytes from 104.238.140.131.vultrusercontent.com (104.238.140.131): icmp_seq=2 ttl=53 time=28.2 ms
64 bytes from 104.238.140.131.vultrusercontent.com (104.238.140.131): icmp_seq=3 ttl=53 time=31.0 msNow, you can use the same ssh command to ssh into your vultr serverusing your domain name.
ssh username@domain.comHugo is a popular open-source static site generator. It allows you to take markdown files, and builds them into and html website. To start go to https://gohugo.io/installation/ and download Hugo on your local computer. (I will show you how to upload the site to your server later.)
Pick a theme The theme I use is here https://themes.gohugo.io/themes/hugo-theme-hello-friend-ng/
You can browse your own themes as well. Just make sure to follow the installation instructions. Let’s create a new Hugo site. Change into the directory where you want your site to be located in. Mine rests in ~/Documents/.
cd ~/Documents/Create your new Hugo site.
hugo new site site-nameThis will make a new folder with your site name in the ~/Documents directory. This folder will have a few directories and a config file in it.
archetypes config.toml content data layouts public resources static themesFor this tutorial, we will be working with the config.toml file and the content, public, static, and themes. Next, load the theme into your site directory. For the Hello Friend NG theme:
git clone https://github.com/rhazdon/hugo-theme-hello-friend-ng.git themes/hello-friend-ngNow we will load the example site into our working site. Say yes to overwrite.
cp -a themes/hello-friend-ng/exampleSite/* .The top of your new config.toml site now contains:
baseURL = "https://example.com"
title = "Hello Friend NG"
languageCode = "en-us"
theme = "hello-friend-ng"Replace your baseURL with your site name and give your site a title. Set the enableGlobalLanguageMenu option to false if you want to remove the language swithcer option at the top. I also set enableThemeToggle to true so users could set the theme to dark or light.
You can also fill in the links to your social handles. Comment out any lines you don’t want with a “#” like so:
[params.social](params.social)
name = "twitter"
url = "https://twitter.com/"
[params.social](params.social)
name = "email"
url = "mailto:nobody@example.com"
[params.social](params.social)
name = "github"
url = "https://github.com/"
[params.social](params.social)
name = "linkedin"
url = "https://www.linkedin.com/"
# [params.social](params.social)
# name = "stackoverflow"
# url = "https://www.stackoverflow.com/"You may also want to edit the footer text to your liking. I commented out the second line that comes with the example site:
[params.footer]
trademark = true
rss = true
copyright = true
author = true
topText = []
bottomText = [
# "Powered by <a href=\"http://gohugo.io\">Hugo</a>",
# "Made with ❤ by <a href=\"https://github.com/rhazdon\">Djordje Atlialp</a>"
]Now, move the contents of the example contents folder over to your site’s contents folder (giggidy):
cp -r ~/Documents/hugo/themes/hello-friend-ng/exampleSite/content/* ~/Documents/hugo/content/Let’s clean up a little bit. Cd into ~/Documents/hugo/content/posts. Rename the file to the name of your first post. Also, delete all of the other files here:
cd ~/Documents/hugo/contents/posts
mv goisforlovers.md newpostnamehere.md
find . ! -name 'newpostnamehere.md' -type f -exec rm -f {} +Open the new post file and delete everything after this:
+++
title = "Building a Minimalist Website with Hugo"
description = ""
type = ["posts","post"]
tags = [
"hugo",
"nginx",
"ssl",
"http",
"vultr",
]
date = "2023-03-26"
categories = [
"tools",
"linux",
]
series = ["tools"]
[ author ]
name = "David Thomas"
+++You will need to fill out this header information for each new post you make. This will allow you to give your site a title, tags, date, categories, etc. This is what is called a TOML header. TOML stands for Tom’s Obvious Minimal Language. Which is a minimal language used for parsing data. Hugo uses TOML to fill out your site.
Save your doc and exit. Next, there should be an about.md page now in your ~/Documents/hugo/Contents folder. Edit this to edit your about page for your site. You can use this Markdown Guide if you need help learning markdown language. https://www.markdownguide.org/
Let’s test the website by serving it locally and accessing it at localhost:1313 in your web browser. Enter the command:
hugo serveHugo will now be generating your website. You can view it by entering localhost:1313 in your webbrowser.
You can use this to test new changes before uploading them to your server. When you svae a post or page file such as your about page, hugo will automatically update the changes to this local page if the local server is running.
Press “Ctrl + c” to stop this local server. This is only for testing and does not need to be running to make your site work.
Okay, your website is working locally, how do we get it to your server to host it online? We are almost there. First, we will use the hugo command to build your website in the public folder. Then, we will make a copy of our public folder on our server using rsync. I will also show you how to create an alias so you do not have to remember the rsync command every time.
From your hugo site folder run:
hugoNext, we will put your public hugo folder into /var/www/ on your server. Here is how to do that with an alias. Open ~/.bashrc.
vim ~/.bashrcAdd the following line to the end of the file, making sure to replace the username and server name:
# My custom aliases
alias rsyncp='rsync -rtvzP ~/Documents/hugo/public/ username@myserver.com:/var/www/public'Save and exit the file. Then tell bash to update it’s source config file.
source ~/.bashrcNow your can run the command by just using the new alias any time. Your will need to do this every time you update your site locally.
rsyncpInstall nginx
apt update
apt upgrade
apt install nginxcreate an nginx config file in /etc/nginx/sites-available/
vim /etc/nginx/sites-available/publicYou will need to add the following to the file, update the options, then save and exit:
server {
listen 80 ;
listen [::]:80 ;
server_name example.org ;
root /var/www/mysite ;
index index.html index.htm index.nginx-debian.html ;
location / {
try_files $uri $uri/ =404 ;
}
}Enter your domain in “server_name” line in place of “example.org”. Also, point “root” to your new site file from earlier. (/var/www/public). Then save and exit.
Link this site-available config file to sites-enabled to enable it. Then restart nginx:
ln -s /etc/nginx/sites-available/public /etc/nginx/sites-enabled
systemctl reload nginxWe will need to make sure nginx has permissions to your site folder so that it can access them to serve your site. Run:
chmod 777 /var/www/publicYou will need to make sure your firewall allows port 80 and 443. Vultr installs the ufw program by default. But your can install it if you used a different provider. Beware, enabling a firewalll could block you from accessing your vm, so do your research before tinkering outside of these instructions.
ufw allow 80
ufw allow 443We will want to hide your nginx version number on error pages. This will make your site a bit harder for hackers to find exploits. Open your Nginx config file at /etc/nginx/nginx.conf and remove the “#” before “server_tokens off;”
Enter your domain into your browser. Congrats! You now have a running website!
Right now, our site uses the unencrypted http. We want it to use the encrypted version HTTPS (HTTP over SSL). This will increase user privacy, hide usernames and passwords used on your site, and you get the lock symbol by your URL name instead of “!not secure”.
apt install python3-certbot-nginxcertbot --nginxFill out the information, certbot asks for your emaill so it can send you a reminder when the certs need to be renewed every 3 months. You do not need to consent to giving your email to the EFF. Press 1 to select your domain. And 2 too redirect all connections to HTTPS.
Certbot will build out some information in your site’s config file. Refresh your site. You should see your new fancy lock icon.
crontab -eSelect a text editor and add this line to the end of the file. Then save and exit the file:
0 0 1 * * certbot --nginx renewYou now have a running website. Just make new posts locally, the run “hugo” to rebuild the site. And use the rsync alias to update the folder on your server. I will soon be making tutorials on making an email address for your domain, such as david@perfectdarkmode.com on my site. I will also be adding a comments section, RSS feed, email subscription, sidebar, and more.
Feel free to reach out with any questions if you get stuck. This is meant to be an all encompassing guide. So I want it to work.
Create assets folder in main directory.
Create images folder in /assets
Access image using hugo pipes
{{ $image := resources.Get "images/test-image.jpg" }}
<img src="{{ ( $image.Resize "500x" ).RelPermalink }}" />Here are my highlights pulled up in Vim:
As you can see, Bookfusion gives you a lot of extra information when you export highlights. First, let’s get rid of the lines that begin with ##
Enter command mode in Vim by pressing esc. Then type :g/^##/d and press enter.
Much better.

Now let’s get rid of the color references:`
:g/^Color/d
To get rid of the timestamps, we must find a different commonality between the lines. In this case, each line ends with “UTC”. Let’s match that:
:g/UTC$/dWhere $ matches the end of the line.

Now, I want to get rid of the > on each line:
%s/> //g

Almost there, you’ll notice there are 6 empty lines in between each highlight. Let’s shrink those down into one:
:%s/\(\n\)\{3,}/\r\r/g
The command above matches newline character n 3 or more times and replaces them with two newline characters /r/r.
As we scroll down, I see a few weird artifacts from the book conversion to markdown.

Now, I want to get rid of any carrot brackets in the file. Let’s use the substitute command again here:
%s/<//g
Depending on your book and formatting. You may have some other stuff to edit.
Make sure Go is installed
go versionCreate a new site
hugo new site sitename
cd sitenameInitialize your site as a module
hugo mod init sitenameConfirm
cat go.modAdd the module as a dependency using it’s git link
hugo mod get github.com/McShelby/hugo-theme-relearnConfirm
cat go.modadd the theme to config.toml
# add this line to config.toml and save
theme = ["github.com/McShelby/hugo-theme-relearn"]Confirm by viewing site
hugo serve
# visit browser at http://localhost:1313/ to view siteAdding a new “chapter” page
hugo new --kind chapter Chapter/_index.mdAdd a home page
hugo new --kind home _index.mdAdd a default page
hugo new <chapter>/<name>/_index.mdor
hugo new <chapter>/<name>.mdYou will need to change some options in _index.md
+++
# is this a "chaper"?
chapter=true
archetype = "chapter"
# page title name
title = "Linux"
# The "chapter" number
weight = 1
+++Adding a “content page” under a category
hugo new basics/first-content.mdCreate a sub directory:
hugo new basics/second-content/_index.mdAdd these to your config.toml file and edit as you please
[params]
# This controls whether submenus will be expanded (true), or collapsed (false) in the
# menu; if no setting is given, the first menu level is set to false, all others to true;
# this can be overridden in the pages frontmatter
alwaysopen = true
# Prefix URL to edit current page. Will display an "Edit" button on top right hand corner of every page.
# Useful to give opportunity to people to create merge request for your doc.
# See the config.toml file from this documentation site to have an example.
editURL = ""
# Author of the site, will be used in meta information
author = ""
# Description of the site, will be used in meta information
description = ""
# Shows a checkmark for visited pages on the menu
showVisitedLinks = false
# Disable search function. It will hide search bar
disableSearch = false
# Disable search in hidden pages, otherwise they will be shown in search box
disableSearchHiddenPages = false
# Disables hidden pages from showing up in the sitemap and on Google (et all), otherwise they may be indexed by search engines
disableSeoHiddenPages = false
# Disables hidden pages from showing up on the tags page although the tag term will be displayed even if all pages are hidden
disableTagHiddenPages = false
# Javascript and CSS cache are automatically busted when new version of site is generated.
# Set this to true to disable this behavior (some proxies don't handle well this optimization)
disableAssetsBusting = false
# Set this to true if you want to disable generation for generator version meta tags of hugo and the theme;
# don't forget to also set Hugo's disableHugoGeneratorInject=true, otherwise it will generate a meta tag into your home page
disableGeneratorVersion = false
# Set this to true to disable copy-to-clipboard button for inline code.
disableInlineCopyToClipBoard = false
# A title for shortcuts in menu is set by default. Set this to true to disable it.
disableShortcutsTitle = false
# If set to false, a Home button will appear below the search bar on the menu.
# It is redirecting to the landing page of the current language if specified. (Default is "/")
disableLandingPageButton = true
# When using mulitlingual website, disable the switch language button.
disableLanguageSwitchingButton = false
# Hide breadcrumbs in the header and only show the current page title
disableBreadcrumb = true
# If set to true, hide table of contents menu in the header of all pages
disableToc = false
# If set to false, load the MathJax module on every page regardless if a MathJax shortcode is present
disableMathJax = false
# Specifies the remote location of the MathJax js
customMathJaxURL = "https://cdn.jsdelivr.net/npm/mathjax@3/es5/tex-mml-chtml.js"
# Initialization parameter for MathJax, see MathJax documentation
mathJaxInitialize = "{}"
# If set to false, load the Mermaid module on every page regardless if a Mermaid shortcode or Mermaid codefence is present
disableMermaid = false
# Specifies the remote location of the Mermaid js
customMermaidURL = "https://unpkg.com/mermaid/dist/mermaid.min.js"
# Initialization parameter for Mermaid, see Mermaid documentation
mermaidInitialize = "{ \"theme\": \"default\" }"
# If set to false, load the Swagger module on every page regardless if a Swagger shortcode is present
disableSwagger = false
# Specifies the remote location of the RapiDoc js
customSwaggerURL = "https://unpkg.com/rapidoc/dist/rapidoc-min.js"
# Initialization parameter for Swagger, see RapiDoc documentation
swaggerInitialize = "{ \"theme\": \"light\" }"
# Hide Next and Previous page buttons normally displayed full height beside content
disableNextPrev = true
# Order sections in menu by "weight" or "title". Default to "weight";
# this can be overridden in the pages frontmatter
ordersectionsby = "weight"
# Change default color scheme with a variant one. Eg. can be "auto", "red", "blue", "green" or an array like [ "blue", "green" ].
themeVariant = "auto"
# Change the title separator. Default to "::".
titleSeparator = "-"
# If set to true, the menu in the sidebar will be displayed in a collapsible tree view. Although the functionality works with old browsers (IE11), the display of the expander icons is limited to modern browsers
collapsibleMenu = false
# If a single page can contain content in multiple languages, add those here
additionalContentLanguage = [ "en" ]
# If set to true, no index.html will be appended to prettyURLs; this will cause pages not
# to be servable from the file system
disableExplicitIndexURLs = false
# For external links you can define how they are opened in your browser; this setting will only be applied to the content area but not the shortcut menu
externalLinkTarget = "_blank"Supports a variety of [Code Syntaxes] To select the syntax, wrap the code in backticks and place the syntax by the first set of backticks.
```bash
echo hello
\```Tags are displayed in order at the top of the page. They will also display using the menu shortcut made further down.
Add tags to a page:
+++
tags = ["tutorial", "theme"]
title = "Theme tutorial"
weight = 15
+++Add to config.toml with the chosen theme for the “style” option:
[markup]
[markup.highlight]
# if `guessSyntax = true`, there will be no unstyled code even if no language
# was given BUT Mermaid and Math codefences will not work anymore! So this is a
# mandatory setting for your site if you want to use Mermaid or Math codefences
guessSyntax = false
# choose a color theme or create your own
style = "base16-snazzy"add the following to config.toml
[outputs]
home = ["HTML", "RSS", "PRINT", "SEARCH"]
section = ["HTML", "RSS", "PRINT"]
page = ["HTML", "RSS", "PRINT"]This theme has a bunch of editable customizations called partials. You can overwrite the default partials by putting new ones in /layouts/partials/.
to customize “partials”, create a “partials” directory under site/layouts/
cd layouts
mkdir partials
cd partialsYou can find all of the partials available for this theme here
Create logo.html in /layouts/partials
vim logo.htmlAdd the content you want in html. This can be an img html tag referencing an image in the static folder. Or even basic text. Here is the basic syntax of an html page, adding “Perfect Dark Mode” as the text to display:
<!DOCTYPE html>
<html>
<body>
<h3>Perfect Dark Mode</h3>
</body>
</html>static/images/ folder and name it favicon.svg, favicon.png or favicon.ico respectively.If no favicon file is found, the theme will lookup the alternative filename logo in the same location and will repeat the search for the list of supported file types.
If you need to change this default behavior, create a new file in layouts/partials/ named favicon.html. Then write something like this:
<link rel="icon" href="/images/favicon.bmp" type="image/bmp">In your config.toml file edit the themeVariant option under [params]
themeVariant = "relearn-dark"There are some options to choose from or you can custom make your theme colors by using this stylesheet generator
Menu Shortcuts Add a [[menu.shortcuts]] entry for each link
[[menu.shortcuts]]
name = "<i class='fab fa-fw fa-github'></i> GitHub repo"
identifier = "ds"
url = "https://github.com/McShelby/hugo-theme-relearn"
weight = 10
[[menu.shortcuts]]
name = "<i class='fas fa-fw fa-camera'></i> Showcases"
url = "more/showcase/"
weight = 11
[[menu.shortcuts]]
name = "<i class='fas fa-fw fa-bookmark'></i> Hugo Documentation"
identifier = "hugodoc"
url = "https://gohugo.io/"
weight = 20
[[menu.shortcuts]]
name = "<i class='fas fa-fw fa-bullhorn'></i> Credits"
url = "more/credits/"
weight = 30
[[menu.shortcuts]]
name = "<i class='fas fa-fw fa-tags'></i> Tags"
url = "tags/"
weight = 40Extras
Menu button arrows. (Add to page frontmatter)
menuPre = "<i class='fa-fw fas fa-caret-right'></i> "I’m going to show you how to set up your own, self-hosted Nextcloud server using Alma Linux 9 and Apache.
Nextcloud is so many things. It offers so many features and options, it deserves a bulleted list:
It is also free and open source. This mean the source code is available to all. And hosting yourself means you can guarantee that your data isn’t being shared.
As you can see. Nextcloud is feature packed and offers an all in one solution for many needs. The set up is fairly simple.
You will need:
Nextcloud dependencies:
Official docs: https://docs.nextcloud.com/server/latest/admin_manual/installation/source_installation.html
Hard drives: 120g main 500g data 250g backup
OS: Alma 9 CPU: 4 sockets 8 cores RAM: 32768
ip 10.0.10.56/24 root: { password } davidt: { password }
mkdir /var/www/nextcloud/ -p
mkdir /home/databkup
parted /dev/sdb mklabel gpt
parted /dev/sdb mkpart primary 0% 100%
parted /dev/sdc mklabel gpt
parted /dev/sdc mkpart primary 0% 100%
mkfs.xfs /dev/sdb1
mkfs.xfs /dev/sdc1
lsblk
blkid /dev/sdb1 >> /etc/fstab
blkid /dev/sdc1 >> /etc/fstab
vim /etc/fstab
mount -a[root@dt-lab2 ~]# lsblk
NAME MAJ:MIN RM SIZE RO TYPE MOUNTPOINTS
sda 8:0 0 120G 0 disk
├─sda1 8:1 0 1G 0 part /boot
└─sda2 8:2 0 119G 0 part
├─almalinux-root 253:0 0 70G 0 lvm /
├─almalinux-swap 253:1 0 12G 0 lvm [SWAP]
└─almalinux-home 253:2 0 37G 0 lvm /home
sdb 8:16 0 500G 0 disk
└─sdb1 8:17 0 500G 0 part /var/www/nextcloud
sdc 8:32 0 250G 0 disk
└─sdc1 8:33 0 250G 0 part /home/databkupI used this guide to help get a supported php version. As php 2 installed from dnf repos by default: https://orcacore.com/php83-installation-almalinux9-rockylinux9/
Make sure dnf is up to date:
sudo dnf update -y
sudo dnf upgrade -ySet up the epel repository:
sudo dnf install epel-release -ySet up remi to manage php modules:
sudo dnf install -y dnf-utils http://rpms.remirepo.net/enterprise/remi-release-9.rpm
sudo dnf update -yRemove old versions of php:
sudo dnf remove php* -yList available php streams:
sudo dnf module list reset php -y
Last metadata expiration check: 1:03:46 ago on Sun 29 Dec 2024 03:34:52 AM MST.
AlmaLinux 9 - AppStream
Name Stream Profiles Summary
php 8.1 common [d], devel, minimal PHP scripting language
php 8.2 common [d], devel, minimal PHP scripting language
Remi's Modular repository for Enterprise Linux 9 - x86_64
Name Stream Profiles Summary
php remi-7.4 common [d], devel, minimal PHP scripting language
php remi-8.0 common [d], devel, minimal PHP scripting language
php remi-8.1 common [d], devel, minimal PHP scripting language
php remi-8.2 common [d], devel, minimal PHP scripting language
php remi-8.3 [e] common [d], devel, minimal PHP scripting language
php remi-8.4 common [d], devel, minimal PHP scripting language Enable the correct stream:
sudo dnf module enable php:remi-8.3Now the default to install is version 8.3, install it like this:
sudo dnf install php -y
php -vLet’s install git, as it’s also needed in this setup:
sudo dnf -y install git
Install Composer for managing php modules:
cd && curl -sS https://getcomposer.org/installer | php
sudo mv composer.phar /usr/local/bin/composerInstall needed PHP modules:
sudo dnf -y install php-process php-zip php-gd php-mysqlnd php-ldap php-imagick php-bcmath php-gmp php-intl
Upgrade php memory limit:
sudo vim /etc/php.ini
memory_limit = 512MAdd Apache config for vhost:
sudo vim /etc/httpd/conf.d/nextcloud.conf
<VirtualHost *:80>
DocumentRoot /var/www/nextcloud/
ServerName cloud.{ site-name }.com
<Directory /var/www/nextcloud/>
Require all granted
AllowOverride All
Options FollowSymLinks MultiViews
<IfModule mod_dav.c>
Dav off
</IfModule>
</Directory>
</VirtualHost>Install:
sudo dnf install mariadb-server -y
Enable the service:
sudo systemctl enable --now mariadb
Nextcloud needs some tables setup in order to store information in a database. First set up a secure sql database:
sudo mysql_secure_installationSay “Yes” to the prompts and enter root password:
Switch to unix_socket authentication [Y/n]: Y
Change the root password? [Y/n]: Y # enter password.
Remove anonymous users? [Y/n]: Y
Disallow root login remotely? [Y/n]: Y
Remove test database and access to it? [Y/n]: Y
Reload privilege tables now? [Y/n]: YSign in to your SQL database with the password you just chose:
mysql -u root -pWhile signed in with the mysql command, enter the commands below one at a time. Make sure to replace the username and password. But leave localhost as is:
CREATE DATABASE nextcloud;
GRANT ALL ON nextcloud.* TO 'root'@'localhost' IDENTIFIED BY '{ password }';
FLUSH PRIVILEGES;
EXIT;Download nextcloud onto the server.
Extract the contents to /var/www/nextcloud
tar -xjf nextcloud-31.0.4.tar.bz2 -C /var/www/ --strip-components=1
Change the nextcloud folder ownership to apache and add permissions:
sudo chmod -R 755 /var/www/nextcloud
sudo chown -R apache:apache /var/www/nextcloud
Selinux:
sudo semanage fcontext -a -t httpd_sys_content_t "/var/www/nextcloud(/.*)?" && \
sudo semanage fcontext -a -t httpd_sys_rw_content_t "/var/www/nextcloud/(config|data|apps)(/.*)?" && \
sudo semanage fcontext -a -t httpd_sys_rw_content_t "/var/www/nextcloud/data(/.*)?"
sudo restorecon -Rv /var/www/nextcloud/Now we can actually install Nextcloud. cd to the /var/www/nextcloud directory and run occ with these settings to install:
sudo -u apache php occ maintenance:install \
--database='mysql' --database-name='nextcloud' \
--database-user='root' --database-pass='{ password }' \
--admin-user='admin' --admin-pass='{ password }'Before you go any further, you will need to have a domain name set up for your server. I use Cloudflare to manage my DNS records. You will want to make a CNAME record for your nextcloud subdomain.
Just add “nextcloud” as the name and “yourwebsite.com” as the content. This will make it so “nextcloud.yourwebsite.com” is the site for your nextcloud dashboard. Also, make sure to select “DNS Only” under proxy status.
Here’s what my CloudFlare domain setup looks with this blog as the main site, and cloud.perfectdarkmode.com as the nextcloud site:

Then you need to update trusted domains in /var/www/nextcloud/config/config.php:
'trusted_domains' =>
[
'cloud.{ site-name }.com',
'localhost'
],Install:
sudo dnf -y install httpd
Enable:
systemctl enable --now httpd
Restart httpd
systemctl restart httpd
Firewall rules:
sudo firewall-cmd --add-service https --permanent
sudo firewall-cmd --add-service http --permanent
sudo firewall-cmd --reloadInstall certbot:
sudo dnf install certbot python3-certbot-apache -y
Obtain an SSL certificate. (See my Obsidian site setup post for information about Certbot and Apache setup.)
sudo certbot -d {subdomain}.{domain}.comNow log into nextcloud with your admin account using the DNS name you set earlier:

I recommend setting up a normal user account instead of doing everything as “admin”. Just hit the “A” icon at the top right and go to “Accounts”. Then just select “New Account” and create a user account with whatever privileges you want.
I may make a post about which Nextcloud apps I recommend and customize the setup a bit. Let me know if that’s something you’d like to see. That’s all for now.
mkdir /var/log/nextcloud
touch /var/log/nextcloud.log
chown apache:apache -R /var/log/nextcloudsemanage fcontext -a -t httpd_sys_content_t "/var/www/nextcloud/apps(/.*)?"
restorecon -R /var/www/nextcloud/appssudo setsebool -P httpd_can_network_connect 1
sudo setsebool -P httpd_graceful_shutdown 1
sudo setsebool -P httpd_can_network_relay 1
sudo ausearch -c 'php-fpm' --raw | audit2allow -M my-phpfpm
sudo semodule -X 300 -i my-phpfpm.ppmkdir /home/databkup
chown -R apache:apache /home/databkup
vim /root/cleanbackups.sh
#!/bin/bash
find /home/backup -type f -mtime +5 -exec rm {} \;chmod +x /root/cleanbackups.sh
crontab -e
# Clean up old backups every day at midnight
0 0 * * * /root/cleanbackups.sh > /dev/null 2>&1
# Backup MySQL database every 12 hours
0 */12 * * * bash -c '/usr/bin/mysqldump --single-transaction -u root -p{password} nextcloud > /home/backup/nextclouddb-backup_$(date +"\%Y\%m\%d\%H\%M\%S").bak'
# Rsync Nextcloud data directory every day at midnight
15 0 * * * /usr/bin/rsync -Aavx /var/www/nextcloud/ /home/databkup/ --delete-beforemkdir /home/backup
systemctl stop mariadb.service
dnf module switch-to mariadb:10.11
systemctl start mariadb.service
mariadb-upgrade --user=root --password='{ password }'
mariadb --versionMimetype migration error:
sudo -u apache /var/www/nextcloud/occ maintenance:repair --include-expensive
Indices error:
sudo -u apache /var/www/nextcloud/occ db:add-missing-indices
This setup uses Redis for File locking and APCu for memcache
dnf -y install redis php-pecl-redis php-pecl-apcu
systemctl enable --now redis
Add to config.php:
'memcache.locking' => '\OC\Memcache\Redis',
'memcache.local' => '\OC\Memcache\APCu',
'redis' => [
'host' => '/run/redis/redis-server.sock',
'port' => 0,
],Update /etc/redis/redis.conf
vim /etc/redis/redis.conf
change port to port 0/
uncomment the socket options under “Unix Socket” and change to:
unixsocket /run/redis/redis-server.sock
unixsocketperm 770Update permissions for redis
usermod -a -G redis apache
Uncomment the line in /etc/php.d/40-apcu.ini and change from 32M to 256M
vim /etc/php.d/40-apcu.ini
apc.shm_size=256M
Restart apache and redis:
systemctl restart redis
systemctl restart httpdAdded logging and phone region to config.php:
mkdir /var/log/nextcloud/
'log_type' => 'file',
'logfile' => '/var/log/nextcloud/nextcloud.log',
'logfilemode' => 416,
'default_phone_region' => 'US',
'logtimezone' => 'America/Phoenix',
'loglevel' => '1',
'logdateformat' => 'F d, Y H:i:s',Change opcache.interned_strings_buffer to 16 and uncomment:
vim /etc/php.d/10-opcache.ini
opcache.interned_strings_buffer=16systemctl restart php-fpm httpd
Set up cron job for the Apache user:
crontab -u apache -e
Add to file that shows up:
*/5 * * * * php -f /var/www/nextcloud/cron.phpDisabled files_reminder app
Added 'maintenance_window_start' => 1, to config.php
Strict-Transport-Security HTTP header is not set (should be at least 15552000 seconds). For enhanced security, it is recommended to enable HSTS. For more details see the documentation ↗.Added after closing directory line in SSL config:
vim nextcloud-le-ssl.conf Header always set Strict-Transport-Security "max-age=15552000; includeSubDomains; preload"And add to the bottom of /var/www/nextcloud/.htaccess:
"Header always set Strict-Transport-Security "max-age=15552000; includeSubDomains"
Change this line in config.php from localhost to server name:
'overwrite.cli.url' => 'http://cloud.{ site-name }.com',Ignore this
Your webserver does not serve .mjs files using the JavaScript MIME type. This will break some apps by preventing browsers from executing the JavaScript files. You should configure your webserver to serve .mjs files with either the text/javascript or application/javascript MIME type.
sudo vim /etc/httpd/conf.d/nextcloud.confAddType text/javascript .mjs inside the virtual host block. Restart apache.Your web server is not properly set up to resolve “/ocm-provider/”. This is most likely related to a web server configuration that was not updated to deliver this folder directly. Please compare your configuration against the shipped rewrite rules in “.htaccess” for Apache
add to vim /var/www/nextcloud/.htaccess
<IfModule mod_rewrite.c>
RewriteEngine on
RewriteRule ^ocm-provider/(.*)$ /index.php/apps/ocm/$1 [QSA,L]
</IfModule>Your web server is not properly set up to resolve .well-known URLs, failed on: /.well-known/caldav
added to vim /var/www/nextcloud/.htaccess
# .well-known URLs for CalDAV/CardDAV and other services
<IfModule mod_rewrite.c>
RewriteEngine On
RewriteRule ^\.well-known/caldav$ /remote.php/dav/ [R=301,L]
RewriteRule ^\.well-known/carddav$ /remote.php/dav/ [R=301,L]
RewriteRule ^\.well-known/webfinger$ /index.php/.well-known/webfinger [R=301,L]
RewriteRule ^\.well-known/nodeinfo$ /index.php/.well-known/nodeinfo [R=301,L]
RewriteRule ^\.well-known/acme-challenge/.*$ - [L]
</IfModule>PHP configuration option “output_buffering” must be disabled
vim /etc/php.ini
output_buffering = Off
[root@oort31 nextcloud]# echo "output_buffering=off" > .user.ini
[root@oort31 nextcloud]# chown apache:apache .user.ini
chmod 644 .user.ini
[root@oort31 nextcloud]# systemctl restart httpdInstalled tmux
dnf -y install tmux
Disabled File Reminders app
sudo dnf -y install fail2ban
vim /etc/fail2ban/jail.local
[DEFAULT]
bantime = 24h
ignoreip = 10.0.0.0/8
usedns = no
[sshd]
enabled = true
maxretry = 3
findtime = 43200
bantime = 86400systemctl enable –now fail2ban fail2ban-client status sshd
This is a step-by-step guide to setting up Nextcloud on a Debian server. You will need a server hosted by a VPS like Vultr. And a Domain hosted by a DNS provider such as Cloudflare
Nextcloud is so many things. It offers so many features and options, it deserves a bulleted list:
It is also free and open source. This mean the source code is available to all. And hosting yourself means you can guarantee that your data isn’t being shared.
As you can see. Nextcloud is feature packed and offers an all in one solution for many needs. The set up is fairly simple!
sudo apt update sudo apt install software-properties-common ca-certificates lsb-release apt-transport-https sudo sh -c 'echo "deb https://packages.sury.org/php/ $(lsb_release -sc) main" > /etc/apt/sources.list.d/php.list' wget -qO - https://packages.sury.org/php/apt.gpg | sudo apt-key add - https://computingforgeeks.com/how-to-install-php-8-2-on-debian/?expand_article=1 (This is also part of the other dependencies install command below)
sudo apt install php8.2 apt install -y nginx python3-certbot-nginx mariadb-server php8.2 php8.2-{fpm,bcmath,bz2,intl,gd,mbstring,mysql,zip,xml,curl}Adding more child processes for PHP to use:
vim /etc/php/8.2/fpm/pool.d/www.conf
# update the following parameters in the file
pm = dynamic
pm.max_children = 120
pm.start_servers = 12
pm.min_spare_servers = 6
pm.max_spare_servers = 18systemctl enable mariadb --nowNextcloud needs some tables setup in order to store information in a database. First set up a secure sql database:
sudo mysql_secure_installationSay “Yes” to the prompts and enter root password:
Switch to unix_socket authentication [Y/n]: Y
Change the root password? [Y/n]: Y # enter password.
Remove anonymous users? [Y/n]: Y
Disallow root login remotely? [Y/n]: Y
Remove test database and access to it? [Y/n]: Y
Reload privilege tables now? [Y/n]: YSign in to your SQL database with the password you just chose:
mysql -u root -pWhile signed in with the mysql command, enter the commands below one at a time. Make sure to replace the username and password. But leave localhost as is:
CREATE DATABASE nextcloud;
GRANT ALL ON nextcloud.* TO 'david'@'localhost' IDENTIFIED BY '@Rfanext12!';
FLUSH PRIVILEGES;
EXIT;Obtain an SSL certificate. See my website setup post for information about Certbot and nginx setup.
certbot certonly --nginx -d nextcloud.example.comYou will need to have a domain name set up for your server. I use Cloudflare to manage my DNS records. You will want to make a CNAME record for your nextcloud subdomain.
Just add “nextcloud” as the name and “yourwebsite.com” as the content. This will make it so “nextcloud.yourwebsite.com”. Make sure to select “DNS Only” under proxy status.
Edit your sites-available config at /etc/nginx/sites-available/nextcloud. See comments in the following text box:
vim /etc/nginx/sites-available/nextcloud
# Add this to the file:
# replace example.org with your domain name
# use the following vim command to make this easier
# :%s/example.org/perfectdarkmode.com/g
# ^ this will replace all instances of example.org with perfectdarkmode.com. Replace with yur domain
upstream php-handler {
server unix:/var/run/php/php8.2-fpm.sock;
server 127.0.0.1:9000;
}
map $arg_v $asset_immutable {
"" "";
default "immutable";
}
server {
listen 80;
listen [::]:80;
server_name nextcloud.example.org ;
return 301 https://$server_name$request_uri;
}
server {
listen 443 ssl http2;
listen [::]:443 ssl http2;
server_name nextcloud.example.org ;
root /var/www/nextcloud;
ssl_certificate /etc/letsencrypt/live/nextcloud.example.org/fullchain.pem ;
ssl_certificate_key /etc/letsencrypt/live/nextcloud.example.org/privkey.pem ;
client_max_body_size 512M;
client_body_timeout 300s;
fastcgi_buffers 64 4K;
gzip on;
gzip_vary on;
gzip_comp_level 4;
gzip_min_length 256;
gzip_proxied expired no-cache no-store private no_last_modified no_etag auth;
gzip_types application/atom+xml application/javascript application/json application/ld+json application/manifest+json application/rss+xml application/vnd.geo+json application/vnd.ms-fontobject application/wasm application/x-font-ttf application/x-web-app-manifest+json application/xhtml+xml application/xml font/opentype image/bmp image/svg+xml image/x-icon text/cache-manifest text/css text/plain text/vcard text/vnd.rim.location.xloc text/vtt text/x-component text/x-cross-domain-policy;
client_body_buffer_size 512k;
add_header Referrer-Policy "no-referrer" always;
add_header X-Content-Type-Options "nosniff" always;
add_header X-Download-Options "noopen" always;
add_header X-Frame-Options "SAMEORIGIN" always;
add_header X-Permitted-Cross-Domain-Policies "none" always;
add_header X-Robots-Tag "none" always;
add_header X-XSS-Protection "1; mode=block" always;
fastcgi_hide_header X-Powered-By;
index index.php index.html /index.php$request_uri;
location = / {
if ( $http_user_agent ~ ^DavClnt ) {
return 302 /remote.php/webdav/$is_args$args;
}
}
location = /robots.txt {
allow all;
log_not_found off;
access_log off;
}
location ^~ /.well-known {
location = /.well-known/carddav { return 301 /remote.php/dav/; }
location = /.well-known/caldav { return 301 /remote.php/dav/; }
location /.well-known/acme-challenge { try_files $uri $uri/ =404; }
location /.well-known/pki-validation { try_files $uri $uri/ =404; }
return 301 /index.php$request_uri;
}
location ~ ^/(?:build|tests|config|lib|3rdparty|templates|data)(?:$|/) { return 404; }
location ~ ^/(?:\.|autotest|occ|issue|indie|db_|console) { return 404; }
location ~ \.php(?:$|/) {
# Required for legacy support
rewrite ^/(?!index|remote|public|cron|core\/ajax\/update|status|ocs\/v[12]|updater\/.+|oc[ms]-provider\/.+|.+\/richdocumentscode\/proxy) /index.php$request_uri;
fastcgi_split_path_info ^(.+?\.php)(/.*)$;
set $path_info $fastcgi_path_info;
try_files $fastcgi_script_name =404;
include fastcgi_params;
fastcgi_param SCRIPT_FILENAME $document_root$fastcgi_script_name;
fastcgi_param PATH_INFO $path_info;
fastcgi_param HTTPS on;
fastcgi_param modHeadersAvailable true;
fastcgi_param front_controller_active true;
fastcgi_pass php-handler;
fastcgi_intercept_errors on;
fastcgi_request_buffering off;
fastcgi_max_temp_file_size 0;
}
location ~ \.(?:css|js|svg|gif|png|jpg|ico|wasm|tflite|map)$ {
try_files $uri /index.php$request_uri;
add_header Cache-Control "public, max-age=15778463, $asset_immutable";
access_log off; # Optional: Don't log access to assets
location ~ \.wasm$ {
default_type application/wasm;
}
}
location ~ \.woff2?$ {
try_files $uri /index.php$request_uri;
expires 7d;
access_log off;
}
location /remote {
return 301 /remote.php$request_uri;
}
location / {
try_files $uri $uri/ /index.php$request_uri;
}
}Create a link between the file you just made and /etc/nginx/sites-enabled
ln -s /etc/nginx/sites-available/nextcloud /etc/nginx/sites-enabled/Download the latest Nextcloud version. Then extract into /var/www/. Also, update the file’s permissions to give nginx access:
wget https://download.nextcloud.com/server/releases/latest.tar.bz2
tar -xjf latest.tar.bz2 -C /var/www
chown -R www-data:www-data /var/www/nextcloud
chmod -R 755 /var/www/nextcloud<systemctl enable php8.2fpm --now](><--may not need this.
# Do need this->
sudo systemctl enable php8.2-fpm.service --nowsystemctl reload nginxHere is a built in Nextcloud tool just in case things break. Here is a guide on troubleshooting with occ. The basic command is as follows:
sudo -u www-data php /var/www/nextcloud/occAdd this as an alias in ~/.bashrc for ease of use.
Go to your nextcloud domain in a browser. In my case, I head to nextcloud.perfectdarkmode.com. Fill out the form to create your first Nextcloud user:
Now that you are signed in. Here are a few things you can do to start you off:
Install the desktop client (Fedora)
Sudo dnf install nextcloudclientInstall on other distros: https://help.nextcloud.com/t/install-nextcloud-client-for-opensuse-arch-linux-fedora-ubuntu-based-android-ios/13657
This may break things with filepaths so beware. Now you are ready to use and explore nextcloud. Here is a video from TechHut to get you started down the NextCloud rabbit hole.
/var/www/nextcloud/.user.ini php_value upload_max_filesize = 16G php_value post_max_size = 16G
Put Nextcloud in maintenance mode: Edit config/config.php and change this line:
'maintenance' => true,
Empty table oc_file_locks: Use tools such as phpmyadmin or connect directly to your database and run (the default table prefix is oc_, this prefix can be different or even empty):
DELETE FROM oc_file_locks WHERE 1
mysql -u root -p
MariaDB [(none)]> use nextcloud;
MariaDB [nextcloud]> DELETE FROM oc_file_locks WHERE 1;
*figure out redis install if this happens regularly* [https://docs.nextcloud.org/server/13/admin_manual/configuration_server/caching_configuration.html#id4 9.1k](https://docs.nextcloud.org/server/13/admin_manual/configuration_server/caching_configuration.html#id4)Vagrant is software that lets you set up multiple, pre-configured virtual machines in a flash. I am going to show you how to do this using Linux and Virtual Box. But you can do this on MacOS and Windows as well.
Download Vagrant, VirtualBox and Git.
Vagrant link.
Virtualbox link.
You may want to follow another tutorial for setting up VirtualBox.
Git link.
Installing git will install ssh on windows. Which you will use to access your lab. Just make sure you select the option to add git and unit tools to your PATH variable.
Make a Vagrant project folder.
Note: All of these commands are going to be in a Bash command prompt.
mkdir vagranttestMove in to your new directory.
cd vagranttestAdd and Initialize Your Vagrant Project.
You can find preconfigured virtual machines here.
We are going to use ubuntu/trusty64.
Add the Vagrant box
vagrant box add ubuntu/trusty64Initialize your new Vagrant box
vagrant init ubuntu/trusty64Use the dir command to see the contents of this directory.
We are going to edit this Vagrantfile to set up our multiple configurations.
vim VagrantfileHere is the new config without all of the commented lines. Add this (minus the top line) under Vagrant.configure(“2”) do |config|.
Vagrant.configure("2") do |config|
config.vm.box = "ubuntu/trusty64"
config.vm.define "server1" do |server1|
server1.vm.hostname = "server1"
server1.vm.network "private_network", ip: "10.1.1.2"
end
config.vm.define "server2" do |server2|
server2.vm.hostname = "server2"
server2.vm.network "private_network", ip: "10.1.1.3"
end
endNow save your Vagrant file in Vim.
Bring up your selected vagrant boxes:
vagrant upNow if you open virtual box, you should see the new machines running in headless mode. This means that the machines have no user interface..
Ssh into server1
vagrant ssh server1You are now in serve1’s terminal.
From server1, ssh into server2
ssh 10.1.1.3Success! You are now in server2 and can access both machines from your network. Just enter “exit” to return to the previous terminal.
Additional Helpful Vagrant Commands.
Without the machine name specified, vagrant commands will work on all virtual machines in your vagrant folder. I’ve thrown in a couple examples using [machine-name] at the end.
Shut down Vagrant machines
vagrant haltShut down only one machine
vagrant halt [machine-name]Suspend and resume a machine
vagrant suspendvagrant resumeRestart a virtual machine
vagrant reloadDestroy a virtual machine
vagrant detstroy [machine-name]Show running vms
vagrant statusList Vagrant options
vagrantPlayground for future labs
This type of deployment is going to be the bedrock of many Linux and Red Hat labs. You can easily use pre-configured machines to create a multi-machine environment. This is also a quick way to test your network and server changes without damaging anything.
Now go set up a Vagrant lab yourself and let me know what you plan to do with it!
Syntax:
vagrant box add user/boxAdd centos7 box
vagrant box add jasonc/centos7Many public boxes to download
Vagrant project = folder with a vagrant file
Install Vagrant here: https://www.vagrantup.com/downloads
Make a vagrant folder:
mkdir vm1
cd vm1initialize vagrant project:
vagrant init jasonc/centos7bring up all vms defined in the vagrant file)
vagrant upvagrant will import the box into virtualbox and start it
the vm is started in headless mode
(there is no user interfaces)
Vagrant up / multi machine
Bring up only one specific vm
SSH Vagrant
Need to download ssh for windows
downloading git will install this:
Shut down vagrant machines
vagrant halt
Shutdown only one machine
vagrant halt [vm]
Saves present state of the machine
just run vagrant up without having to import tha machines again
Suspend the machine
vagrant suspend [VM]
Resume
vagrant resume [VM]
Destroy VM
vagrant destroy [VM]
List options
vagrant
Vagrant command works on the vagrant folder that you are in
Vagrant File
Vagrant.configure (2) do | config |
config.vm.box = "jasonc/centos7"
config.vm.hostname = "linuxsvr1"
(default files)
config.vm.network "private_network", ip: "10.2.3.4"
config.vm.provider "virtualbox" do | vbi
vb.gui = true
vb.memory = "1024"
(shell provisioner)
config.vm.provision "shell", path: "setup.sh"
end
endConfiguring a multi machine setup:
Specify common configurations at the top of the file
Vagrant.configure (2) do | config |
config.vm.box = "jasonc/centos7"
config.vm.define = "server1" do | server1 |
server1.vm.hostname = "server1"
server1.vm.network "private_network", ip: "10.2.3.4"
end
config.vm.define = "server2" do | server2 |
server2.vm.hostname = "server2"
server2.vm.network "private_network", ip: "10.2.3.5"
end
endYou can search for vagrant boxes at https://app.vagrantup.com/boxes/search
Course software downloads: http://mirror.linuxtrainingacademy.com/
Install Git: https://git-scm.com/download/win
vagrant ssh
vagrant halt
vagrant reload
vagrant status
You can access files in the vagrant directory from both VMs
Vagrant.configure("2") do |config|
config.vm.box = "generic/rhel8"
config.vm.define "server1" do |server1|
server1.vm.hostname = "server1.example.com"
server1.vm.network "private_network", ip: "192.168.1.110"
config.disksize.size = '10GB'
end
config.vm.define "server2" do |server2|
server2.vm.hostname = "server2.example.com"
server2.vm.network "private_network", ip: "192.168.1.120"
config.disksize.size = '16GB'
end
config.vm.provider "virtualbox" do |vb|
vb.memory = "2048"
end
endPlugin to change the disk size:
vagrant plugin install vagrant-disksizeVim (Vi Improved)
Vim stands for vi (Improved) just like its name it stands for an improved version of the vi text editor command.
Lightweight
Start Vim
vimh or left arrow - move left one character k or up arrow - move up one line j or down arrow - move down one line l or right arrow - will move you right one character
I - Enter INSERT mode from command mode esc - Go back to command mode v - visual mode
In enter while in command mode and will bring you to insert mode.
I - insert text before the cursor O - insert text on the previous line o - insert text on the next line a - append text after cursor A - append text at the end of the line
x - used to cut the selected text also used for deleting characters dd - used to delete the current line y - yank or copy whatever is selected yy - yank or copy the current line p - paste the copied text before the cursor
:w - writes or saves the file :q - quit out of vim :wq - write and then quit :q! - quit out of vim without saving the file ZZ - equivalent of :wq, but one character faster
u - undo your last action Ctrl-r - redo your last action :% sort - Sort lines
Add to .vimrc for different key mappings for easy navigation between splits to save a keystroke. So instead of ctrl-w then j, it’s just ctrl-j:
nnoremap <C-J> <C-W><C-J>
nnoremap <C-K> <C-W><C-K>
nnoremap <C-L> <C-W><C-L>
nnoremap <C-H> <C-W><C-H>:vsp filenamehttps://github.com/preservim/nerdtree
https://linuxize.com/post/vim-find-replace/
Open the file in Vim, this command will replace all occurances of the word “foo” with “bar”.
:%s/foo/bar/g% - apply to whole file s - substitution g - operate on all results
In vim, select all files with args. Use regex to select the files you want. Select all files with *
:args *You can also select all recursively:
:args **Run :args to see which files are selected"
:argsThis applies the replacement command to all selected args:
:argdo %s/foo/bar/g | updateAdd to .vimrc
call plug#begin()
Plug 'preservim/nerdtree'
call plug#end()
nnoremap <leader>n :NERDTreeFocus<CR>
nnoremap <C-n> :NERDTree<CR>
nnoremap <C-t> :NERDTreeToggle<CR>
nnoremap <C-f> :NERDTreeFind<CR>dhttps://blog.mague.com/?p=602
Add to vim.rc
:auto FileType vim/wiki map d :Vim/wikiMakeDiaryNote
function! ToggleCalendar()
execute ":Calendar"
if exists("g:calendar_open")
if g:calendar_open == 1
execute "q"
unlet g:calendar_open
else
g:calendar_open = 1
end
else
let g:calendar_open = 1
end
endfunction
:auto FileType vim/wiki map c :call ToggleCalendar()ihttp://thedarnedestthing.com/vimwiki%20cheatsheet
Make sure git is installed? https://github.com/git-guides/install-git
git --version Check git version
sudo dnf install git-all
https://github.com/junegunn/vim-plug
Download plug.vim and put it in ~/.vim/autoload
curl -fLo ~/.vim/autoload/plug.vim --create-dirs \
https://raw.githubusercontent.com/junegunn/vim-plug/master/plug.vimtouch ~/.vimrc
Install Vim Plug
curl -fLo ~/.vim/autoload/plug.vim --create-dirs \https://raw.githubusercontent.com/junegunn/vim-plug/master/plug.vimAdd the following to the plugin-configuration in your vimrc:
set nocompatible
filetype plugin on
syntax on
call plug#begin()
Plug 'vimwiki/vimwiki'
call plug#end()
let mapleader=" "
let wiki_1 = {}
let wiki_1.path = '~/Documents/PerfectDarkMode/'
let wiki_1.syntax = 'markdown'
let wiki_1.ext = ''
let wiki_2 = {}
let wiki_2.path = '~/Documents/vim/wiki_personal/'
let wiki_2.syntax = 'markdown'
let wiki_2.ext = ''
let g:vimwiki_list = [wiki_1, wiki_2] Then run :PlugInstall.
(leader)ws select which wiki to use
= Header1 =
== Header2 ==
=== Header3 ===
*bold* -- bold text
_italic_ -- italic text
[wiki link](wiki%20link) -- wiki link
[description](wiki%20link) -- wiki link with description * bullet list item 1
- bullet list item 2
- bullet list item 3
* bullet list item 4
* bullet list item 5
* bullet list item 6
* bullet list item 7
- bullet list item 8
- bullet list item 9
1. numbered list item 1
2. numbered list item 2
a) numbered list item 3
b) numbered list item 4 For other syntax elements, see :h vimwiki-syntax
:VimwikiTOC Create or update the Table of Contents for the current wiki file. See |vimwiki-toc|.
Table of Contents vimwiki-toc vimwiki-table-of-contents
You can create a “table of contents” at the top of your wiki file. The command |:VimwikiTOC| creates the magic header > = Contents = in the current file and below it a list of all the headers in this file as links, so you can directly jump to specific parts of the file.
For the indentation of the list, the value of |vimwiki-option-list_margin| is used.
If you don’t want the TOC to sit in the very first line, e.g. because you have a modeline there, put the magic header in the second or third line and run :VimwikiTOC to update the TOC.
If English is not your preferred language, set the option |g:vimwiki_toc_header| to your favorite translation.
If you want to keep the TOC up to date automatically, use the option |vimwiki-option-auto_toc|.
vimwiki-option-auto_toc
Key Default value Values~ auto_toc 0 0, 1
Description~ Set this option to 1 to automatically update the table of contents when the current wiki page is saved: > let g:vimwiki_list = [{‘path’: ‘~/my_site/’, ‘auto_toc’: 1}]
vimwiki-option-list_margin
Key Default value~ list_margin -1 (0 for markdown)
Description~
Width of left-hand margin for lists. When negative, the current ‘shiftwidth’
is used. This affects the appearance of the generated links (see
|:VimwikiGenerateLinks|), the Table of contents (|vimwiki-toc|) and the
behavior of the list manipulation commands |:VimwikiListChangeLvl| and the
local mappings |vimwiki_glstar|, |vimwiki_gl#| |vimwiki_gl-|, |vimwiki_gl-|,
|vimwiki_gl1|, |vimwiki_gla|, |vimwiki_glA|, |vimwiki_gli|, |vimwiki_glI| and
|vimwiki_i_
Note: if you use Markdown or MediaWiki syntax, you probably would like to set this option to 0, because every indented line is considered verbatim text.
g:vimwiki_toc_header_level
The header level of the Table of Contents (see |vimwiki-toc|). Valid values are from 1 to 6.
The default is 1.
g:vimwiki_toc_link_format
The format of the links in the Table of Contents (see |vimwiki-toc|).
Value Description~ 0 Extended: The link contains the description and URL. URL references all levels. 1 Brief: The link contains only the URL. URL references only the immediate level.
Default: 0
Note: your terminal may prevent capturing some of the default bindings listed below. See :h vimwiki-local-mappings for suggestions for alternative bindings if you encounter a problem.
<Leader>ww – Open default /wiki index file.<Leader>wt – Open default /wiki index file in a new tab.<Leader>ws – Select and open /wiki index file.<Leader>wd – Delete /wiki file you are in.<Leader>wr – Rename /wiki file you are in.<Enter> – Follow/Create /wiki link.<Shift-Enter> – Split and follow/create /wiki link.<Ctrl-Enter> – Vertical split and follow/create /wiki link.<Backspace> – Go back to parent(previous) /wiki link.<Tab> – Find next /wiki link.<Shift-Tab> – Find previous /wiki link.Refer to the complete documentation at :h vimwiki-mappings to see many more bindings.
:Vimwiki2HTML – Convert current wiki link to HTML.:VimwikiAll2HTML – Convert all your wiki links to HTML.:help vimwiki-commands – List all commands.:help vimwiki – General vimwiki help docs.alias todo=‘vim -c VimwikiDiaryIndex’
:VimwikiDiaryGenerateLinks ^w^i Generate links ^w^w open today ^wi Open diary index ctrl + up previous day ctrl + down next day
https://frostyx.cz/posts/vimwiki-diary-template
[dev](dev/ndex)
Say yes to make new directory
Convert to html live and shows some design stuff https://www.youtube.com/watch?v=A1YgbAp5YRc
https://github.com/Dynalonwiki
https://www.youtube.com/watch?v=UuHJloiDErM requires neovim?
vimwiki integration with task warrior https://github.com/tools-life/taskwiki https://www.youtube.com/watch?v=UuHJloiDErM
Plug ‘ctrlpvim/ctrlp.vim’
https://www.youtube.com/watch?v=RzAkjX_9B7E&t=295s
Man (manual) pages are the built in help system for Linux. They contain documentation for most commands.
Run the man command on a command to get to it’s man page.
man man
Navigating a man page
h
q
Man uses less
^ mean ctrl
^f Forward one page
^b backward one page
can use # followed by command to repeat that many times
g first line in file
G last line in file
CR means press enter
/searchword
press enter to jump first occurance of searched word
n to jump to next match
N to go to previous match
?searchword to do a backward search (n and N are reversed when going through results)
bold text type as shown
italic text replace with arguments
[-abc] optional
-a | -b Options separated by a pipe symbol cannot be used together.
argument … (followed by 3 dots) can be repeated. (Argument is repeatable)
[expression] … entire expression within [ ] is repeatable.
Name
Synopsis
When you see file in a man page, think file and or directory
Description
short and long options do the same thing
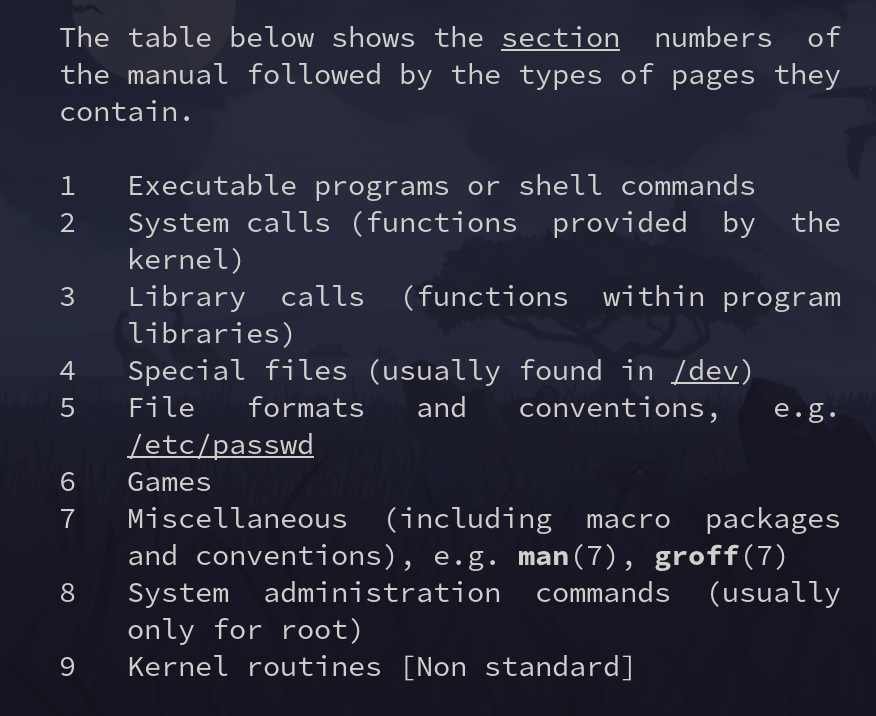
Current section number is printed at the top left of the man page.
-k to search sections using apropos
[root@server30 ~]# man -k unlink
mq_unlink (2) - remove a message queue
mq_unlink (3) - remove a message queue
mq_unlink (3p) - remove a message queue (REALT...
sem_unlink (3) - remove a named semaphore
sem_unlink (3p) - remove a named semaphore
shm_open (3) - create/open or unlink POSIX s...
shm_unlink (3) - create/open or unlink POSIX s...
shm_unlink (3p) - remove a shared memory object...
unlink (1) - call the unlink function to r...
unlink (1p) - call theunlink() function
unlink (2) - delete a name and possibly th...
unlink (3p) - remove a directory entry
unlinkat (2) - delete a name and possibly th...]Shows page number in ()
The sections that end in p are POSIX documentation. Theese are not specific to Linux.
[root@server30 ~]# man -k "man pages"
lexgrog (1) - parse header information in man pages
man (7) - macros to format man pages
man-pages (7) - conventions for writing Linux man pages
man.man-pages (7) - macros to format man pages
[root@server30 ~]# man man-pagesUse man-pages to learn more about man pages
Sections within a manual page
The list below shows conventional or suggested sections. Most manual
pages should include at least the highlighted sections. Arrange a
new manual page so that sections are placed in the order shown in the
list.
NAME
LIBRARY [Normally only in Sections 2, 3]
SYNOPSIS
CONFIGURATION [Normally only in Section 4]
DESCRIPTION
OPTIONS [Normally only in Sections 1, 8]
EXIT STATUS [Normally only in Sections 1, 8]
RETURN VALUE [Normally only in Sections 2, 3]
ERRORS [Typically only in Sections 2, 3]
ENVIRONMENT
FILES
ATTRIBUTES [Normally only in Sections 2, 3]
VERSIONS [Normally only in Sections 2, 3]
STANDARDS
HISTORY
NOTES
CAVEATS
BUGS
EXAMPLES
AUTHORS [Discouraged]
REPORTING BUGS [Not used in man-pages]
COPYRIGHT [Not used in man-pages]
SEE ALSOShell builtins do not have man pages. Look at the shell man page for info on them.
man bash
Search for the Shell Builtins section:
/SHELL BUILTIN COMMANDS
You can find help on builtins with the help command:
david@fedora:~$ help hash
hash: hash [-lr] [-p pathname] [-dt] [name ...]
Remember or display program locations.
Determine and remember the full pathname of each command NAME. If
no arguments are given, information about remembered commands is displayed.
Options:
-d forget the remembered location of each NAME
-l display in a format that may be reused as input
-p pathname use PATHNAME as the full pathname of NAME
-r forget all remembered locations
-t print the remembered location of each NAME, preceding
each location with the corresponding NAME if multiple
NAMEs are given
Arguments:
NAME Each NAME is searched for in $PATH and added to the list
of remembered commands.
Exit Status:
Returns success unless NAME is not found or an invalid option is given.help without any arguments displays commands you can get help on.
david@fedora:~/Documents/davidvargas/davidvargasxyz.github.io$ help help
help: help [-dms] [pattern ...]
Display information about builtin commands.
Displays brief summaries of builtin commands. If PATTERN is
specified, gives detailed help on all commands matching PATTERN,
otherwise the list of help topics is printed.
Options:
-d output short description for each topic
-m display usage in pseudo-manpage format
-s output only a short usage synopsis for each topic matching
PATTERN
Arguments:
PATTERN Pattern specifying a help topic
Exit Status:
Returns success unless PATTERN is not found or an invalid option is given.type command tells you what type of command something is.
Using man on some shell builtins brings you to the bash man page Shell Builtin Section
Many commands support -h or --help options to get quick info on a command.
Password aging, group and user manament
Manage users and groups
chage command with the -m option or the passwd command with the -n option.chage command with the -M option or the passwd command with the -x option.chage command with the -W option or the passwd command with the -w option.chage command with the -I option or the passwd command with the -i option.-E option.newgrp command.newgrp command.gpasswd command:useradd commandMAIL_DIR
PASS_MAX_DAYS, PASS_MIN_DAYS, PASS_MIN_LEN, and PASS_WARN_AGE
UID_MIN, UID_MAX, GID_MIN, and GID_MAX
SYS_UID_MIN, SYS_UID_MAX, SYS_GID_MIN, and SYS_GID_MAX
CREATE_HOME
UMASK
USERGROUPS_ENAB
ENCRYPT_METHOD
chage and passwd—usermod command can be used to implement two aging attributes (user expiry and password expiry) and lock and unlock user accounts.groupadd, groupmod, and groupdelCtrl-d - return to previous user su - - switch user with startup scripts -c - issue a command as a user without switching to them.
visudochage -m 7 -M 28 -W 5 user100chage -l user100chage -E 2020-01-31 user100chage -l user100passwd -n 10 -x 90 -w 14 user200passwd -S user200passwd -i 5 user200passwd -S user200passwd -e user200passwd -S user200grep user200 /etc/shadowusermod -L user200 grep user200 /etc/shadowusermod -U user200
or
passwd -u user200grep user200 /etc/shadowgroupadd -g 5000 linuxadmgroupadd -o -g 5000 dbagrep linuxadm /etc/group
grep dba /etc/groupusermod command. The existing membership for the user must remain intact.usermod -aG dba user1grep dba /etc/group
id user1
groups user1groupmod -n sysadm linuxadmgroupmod -g 6000 sysadmgrep sysadm /etc/group
grep linuxadm /etc/groupgroupdel sysadm
grep sysadm /etc/groupsusu - user100whoami
lognamesu -c 'firewall-cmd --list-services'user1 ALL=/usr/bin/catcat /etc/sudoers
sudo cat /etc/sudoersCmnd_Alias PKGCMD = /usr/bin/yum, /usr/bin/rpm
User_Alias PKGADM = user1, user100, user200
PKGADM ALL=PKGCMDsudo yum cat /etc/sudoerstouch file1
ls -l file1ls -ln file1cd /tmp
touch file10
mkdir dir10ls -l file10
ls -ld dir10sudo chown user100 file10
ls -l file10sudo chgrp dba file10
ls -l file10sudo chown user200:user100 file10sudo chown -R user200:dba dir10
ls -ld dir10groupadd lnxgrp -g 6000useradd -u 5000 -g 6000 user5000chage -m 4 -M 30 -W 10 user5000chage -E 2021-12-20 user5000passwd -l user5000cat /etc/shadowsu - user1
su - user5000A list of the users who have successfully signed on to the system with valid credentials can be printed using who and w
usermod Commanduserdel Commandpasswd Commandnologin command who w last last reboot lastb lastlog id id user1 groups groups user1 ls -l /etc/passwd* /etc/group* /etc/shadow* /etc/gshadow* head -3 /etc/passwd ; tail -3 /etc/passwd ls -l /etc/passwd head -3 /etc/shadow ; tail -3 /etc/shadow ls -l /etc/shadow head -3 /etc/group ; tail -3 /etc/group ls -l /etc/group head -3 /etc/gshadow ; tail -3 /etc/gshadow ls -l /etc/gshadow useradd -D grep -v ^# /etc/login.defs | grep -v ^$ useradd user2 passwd user2 cd /etc ; grep user2: passwd shadow group gshadow su - user2
id
groups useradd -u 1010 -d /usr/user3a -s /bin/sh user3 echo user1234 | passwd --stdin user3 cd /etc ; grep user3: passwd shadow group gshadow su - user3
id
groups usermod -l user2new -m -d /home/user2new -s /sbin/nologin -u 2000 user2 grep user2new /etc/passwd userdel -r user2new grep user2new /etc/passwd grep nologin /etc/passwd useradd -s /sbin/nologin user4 echo user1234 | passwd --stdin user4 grep user4 /etc/passwd su - user4 last
lastb
lastlog last | grep reboot who
wid and groups commands, and compare the outcomes. Examine the extra information that the id command shows, but not the groups command. id
groups useradd -m -d /usr/user4100 -u 4100 user4100 useradd user4200 passwd user4100
passwd user4200 cat /etc/passwd
cat /etc/shadow
cat /etc/group
cat /etc/gshadow useradd -s /sbin/nologin user4300 passwd user4300 su - user4300 cat /etc/passwdLab setup for RHCSA using Vagrant
We are going to use Vagrant to set up two RHEL 8 servers with some custom configuration options. I will include some helpful Vagrant commands at the end if you get stuck.
In this guide, I will be using Fedora 38 as my main operating system. I use Fedora because it is similar in features to Red Hat Linux Distributions. This will give me even more practice for the RHCSA exam as I use it in day-to-day operations.
Note, if you are using Windows, you will need to install ssh. This can be done by installing Git. Which automatically installs ssh for you.
You will also need to have the latest version of Virtualbox installed.
In Fedora, this is very easy. Run the following command to download and install Vagrant:
sudo dnf install vagrant
Make your vagrant directory and make it your current working directory:
cd VagrantAdd the Vagrant box.
vagrant box add generic/rhel8
Install the Vagrant disk size plugin. The disk size program will help us set up custom storage sizes. Since we will be re-partitioning storage, this is a useful feature.
vagrant plugin install vagrant-disksize
vagrant init generic/rhel8
After completion, there will now be a file called “Vagrantfile” in your current directory. Since Vim is on the RHCSA exam, it’s wise to practice with it whenever you can. So let’s open the file in Vim:
vim Vagrantfile
You will see a bunch of lines commented out, and a few lines without comments. Go ahead and comment out everything and paste this at the end of the file:
Vagrant.configure("2") do |config
config.vm.box = "generic/rhel8"
config.vm.define "server1" do |server1|
server1.vm.hostname = "server1.example.com"
server1.vm.network "private_network", ip: "192.168.2.110"
config.disksize.size = '10GB'
end
config.vm.define "server2" do |server2|
server2.vm.hostname = "server2.example.com"
server2.vm.network "private_network", ip: "192.168.2.120"
config.disksize.size = '16GB'
end
config.vm.provider "virtualbox" do |vb|
vb.memory = "2048"
end
end|The configuration file is fairly self-explanatory. Save Vagrantfile and exit Vim. Then, create /etc/vbox/networks.conf and add the following:
* 10.0.0.0/8 192.168.0.0/1
* 2001::/646This will allow you to be more flexible with what network addresses can be used in VirtualBox.
Now, we bring up the Vagrant box. This will open two Virtual machines in Virtualbox named server1 and server2 in headless mode (there is no GUI).
vagrant up
Great! Now we can use Vagrant to ssh into server1:
vagrant ssh server 1
From server1 ssh into server2 using its IP address:
[vagrant@server1 ~]$ ssh 192.168.2.120
Now you are in and ready to stir things up. The last thing you need is some commands to manage your Vagrant machines.
Shut down Vagrant machines:
vagrant halt
Suspend or resume a machine:
vagrant suspend
vagrand resumeRestart a virtual machine:
vagrant reload
Destroy a Vagrant machine:
vagrant destroy [machine-name]
Show running VMs:
vagrant status
List other Vagrant options:
vagrant
If you are going for RHCSA, there is no doubt that you will also use Vagrant sometime in the future. And as you can see, it’s pretty quick and simple to get started.
Feel free to reach out with questions.