Subsections of System

Installation

Chapter 1 RHCSA Notes - Installation

About RHEL9

  • Kernel 5.14
  • Released May 2019
  • Built along side of Fedora 34
  • Installer program = Anaconda
  • Default Bootloader = GRUB2
  • Default automatic partitioning = /boot, /, swap
  • Default desktop environment = GNOME

Installation Logs

/root/anaconda-ks.cfg Configuration entered

/var/log/anaconda/anaconda.log Contains informational, debug, and other general messages

/var/log/anaconda/journal.log Stores messages generated by many services and components during system installation

/var/log/anaconda/packaging.log Records messages generated by the dnf and rpm commands during software installation

/var/log/anaconda/program.log Captures messages generated by external programs

/var/log/anaconda/storage.log Records messages generated by storage modules

/var/log/anaconda/syslog Records messages related to the kernel

/var/log/anaconda/X.log Stores X Window System information

Note: Logs are created in /tmp then transferred over to /var/log/anaconda once the install is finished.

6 Virtual Consoles

  • Monitor the installation process.
  • View diagnostic messages.
  • Discover and fix any issues encountered.
  • Information displayed on the console screens is captured in installation log files.

Console 1 (Ctrl+Alt+F1)

  • Main screen
  • Select language
  • Then switches default console to 6

Console 2 (Ctrl_Alt+F2)

  • Shell interface for root user

Console 3 (Ctrl_Alt+F3)

  • Displays install messages
  • Stores them in /tmp/anaconda.log
  • Info on detected hardware, etc.

Console 4 (Ctrl_Alt+F4)

  • Shows storage messages
  • Stores them in /tmp/storage.log

Console 5 (Ctrl_Alt+F5)

  • Program messages
  • Stores them in /tmp/program.log

Console 6 (Ctrl_Alt+F6)

  • Default Graphical configuration and installation console screen

Console 1 Brings you to the log in screen. Console 2 does nothing. Console 3-6 all bring you to this log in screen

Lab Setup

VM1

server1.example.om 
192.168.0.110 
Memory: 2GB 
Storage: 1x20GB 
2 vCPUs

VM2

server2.exmple.om 
192.168.0.120 
Memory: 2048 
Storage: 1x20GB 
	4x250 MB data disk 
	1x5GB data disk 
2 vCPUs

Setting up VM1

Download the disc iso on Redhat’s website: https://access.redhat.com/downloads/content/rhel

Name RHEL9-VM1 Accept defaults.

Set drive to 20 gigs

press “spe” to hlt utooot

Selet instll

selet lnguge

onfigure timezone under time & dte

go into instlltion destintion nd li “done”

Networ nd hostnme settings

  1. hnge the hostnme to server1.exmple.om
  2. go to IPv4 settings in networ nd host nd set to mnul ddress: 192.168.0.110 netms 24 gtewy 192.168.0.1 then sve
  3. slide the on/off swith in the min menu to on

Set root pssword

Chnge the oot order

  1. power off the vm
  2. Set oot sequene to hrd dis first then optil, remove floppy

Accept license terms and rete user

ssh from host os with putty

Issue these Commnds after set up

whoami 
hostname 
pwd 
logout or ctrl+d

Using cockpit

  • Web gui for managing RHEL system
  • Comes pre-installed
    • if not then install with:
    sudo dnf install cockpit
  • must enable cockpit socket
    sudo systemctl enable --now cockpit.socket
  • https://yourip:9090

Labs

Lab:

Enable cockpit.socket:

sudo systemctl enable --now cockpit.socket

In a web browser, go to https://<your-ip>:9090

Interaction

Looking to get started using Fedora or Red Hat operating systems?

This guide with get you started with the RHEL Graphical environment, file system, and essential commands to get started using Fedora, Red Hat, or other RHEL based systems.

RedHat (RHEL9) Graphical Environment (Wayland)

Redhat runs a graphical environment called Wayland. This is the foundation for running GUI apps. Wayland is a client/server display protocol. Which just means that the user (the client) requests a resource and the display manager (the server) serves those resources.

Wayland is slowly replaced and older display protocol called “X”. And has better graphics capabilities, features, and performance than X. And consists of a Display or Login manager and a Desktop environment.

The Display/ Login manager presents the login screen for users to log in. Once you log in, you get to the pre-configured desktop manager or Desktop Environment (DE). The GNOME Display Manager. (GDM)

File System and Directory Hierarchy

The standard for the Linux filesystem is the Filesystem Hierarchy Standard (FHS). Which describes locations, names, and permissions for a variety of file types and directories.

The directory structure starts at the root. Which is notated by a “/”. The top levels of the directory can be viewed by running the ls command on the root of the directory tree.

Size of the root file system is automatically determined by the installer program based on the available disk space when you select the default partitioning (it may be altered). Here is a listing of the contents of /:

$ ls /
afs  bin  boot  dev  etc  home  lib  lib64  lost+found  media  mnt  opt  proc  root  run  sbin  snap  srv  sys  tmp  usr  var

Some of these directories hold static data such as commands, configuration files, kernel and device files, etc. And some hold dynamic data such as log and status files.

There are three major categories of file systems. They are:

  1. disk-based
  2. network-based
  3. memory-based

Disk-based files systems are physical media such as a hard drive or a USB flash drive and store information persistently. The root and boot file systems and both disk-based and created automatically when you select the default partitioning.

Network-Based file systems are disk-based file systems that are shared over the network for remote access. (Also stored persistently)

Memory-Based filesystems are virtual. And are created automatically at system startup and destroyed when the system goes down.

Key Directories in /

/etc (extended text configuration)

This directory contains system configuration files for systemd, LVM, and user shell startup template files.

david@fedora:$ ls /etc
abrt                    dhcp                        gshadow-       locale.conf               openldap            request-key.d          sysctl.conf
adjtime                 DIR_COLORS                  gss            localtime                 opensc.conf         resolv.conf            sysctl.d
aliases                 DIR_COLORS.lightbgcolor     gssproxy       login.defs                opensc-x86_64.conf  rpc                    systemd
alsa                    dleyna-server-service.conf  host.conf      logrotate.conf            openvpn             rpm                    system-release
alternatives            dnf                         hostname       logrotate.d               opt                 rpmdevtools            system-release-cpe
anaconda                dnsmasq.conf                hosts          lvm                       os-release          rpmlint                tcsd.conf
anthy-unicode.conf      dnsmasq.d                   hp             machine-id                ostree              rsyncd.conf            terminfo
apk                     dracut.conf                 httpd          magic                     PackageKit          rwtab.d                thermald
appstream.conf          dracut.conf.d               idmapd.conf    mailcap                   pam.d               rygel.conf             timidity++.cfg
asound.conf             egl                         ImageMagick-7  makedumpfile.conf.sample  paperspecs          samba                  tmpfiles.d
audit                   environment                 init.d         man_db.conf               passwd              sane.d                 tpm2-tss
authselect              ethertypes                  inittab        mcelog                    passwd-             sasl2                  Trolltech.conf
avahi                   exports                     inputrc        mdevctl.d                 passwdqc.conf       security               trusted-key.key
bash_completion.d       exports.d                   ipp-usb        mercurial                 pinforc             selinux                ts.conf
bashrc                  favicon.png                 iproute2       mime.types                pkcs11              services               udev
bindresvport.blacklist  fedora-release              iscsi          mke2fs.conf               pkgconfig           sestatus.conf          udisks2
binfmt.d                filesystems                 issue          modprobe.d                pki                 sgml                   unbound
bluetooth               firefox                     issue.d        modules-load.d            plymouth            shadow                 updatedb.conf
brlapi.key              firewalld                   issue.net      mono                      pm                  shadow-                UPower
brltty                  flatpak                     java           motd                      polkit-1            shells                 uresourced.conf
brltty.conf             fonts                       jvm            motd.d                    popt.d              skel                   usb_modeswitch.conf
ceph                    fprintd.conf                jvm-common     mtab                      ppp                 sos                    vconsole.conf
chkconfig.d             fstab                       kdump          mtools.conf               printcap            speech-dispatcher      vdpau_wrapper.cfg
chromium                fuse.conf                   kdump.conf     my.cnf                    profile             ssh                    vimrc
chrony.conf             fwupd                       kernel         my.cnf.d                  profile.d           ssl                    virc
cifs-utils              gcrypt                      keys           nanorc                    protocols           sssd                   vmware-tools
containers              gdbinit                     keyutils       ndctl                     pulse               statetab.d             vpl
credstore               gdbinit.d                   krb5.conf      ndctl.conf.d              qemu                subgid                 vpnc
credstore.encrypted     gdm                         krb5.conf.d    netconfig                 qemu-ga             subgid-                vulkan
crypto-policies         geoclue                     ld.so.cache    NetworkManager            rc0.d               subuid                 wgetrc
crypttab                glvnd                       ld.so.conf     networks                  rc1.d               subuid-                whois.conf
csh.cshrc               gnupg                       ld.so.conf.d   nfs.conf                  rc2.d               subversion             wireplumber
csh.login               GREP_COLORS                 libaudit.conf  nfsmount.conf             rc3.d               sudo.conf              wpa_supplicant
cups                    groff                       libblockdev    nftables                  rc4.d               sudoers                X11
cupshelpers             group                       libibverbs.d   nilfs_cleanerd.conf       rc5.d               sudoers.d              xattr.conf
dbus-1                  group-                      libnl          npmrc                     rc6.d               swid                   xdg
dconf                   grub2.cfg                   libreport      nsswitch.conf             rc.d                swtpm-localca.conf     xml
debuginfod              grub2-efi.cfg               libssh         nvme                      reader.conf.d       swtpm-localca.options  yum.repos.d
default                 grub.d                      libuser.conf   odbc.ini                  redhat-release      swtpm_setup.conf       zfs-fuse
depmod.d                gshadow                     libvirt        odbcinst.ini              request-key.conf    sysconfig

As you can see, there is a lot of stuff here.

/root

This is the default home directory for the root user.

/mnt

/mnt is used to temporarily mount a file system.

/boot (Disk-Based)

This directory contains the Linux Kernel, as well as boot support and configuration files.

The size of /boot is determined by the installer program based on the available disk space when you select the default partitioning. It may be set to a different size during or after the installation.

/home

This is used to store user home directories and other user contents.

/opt (Optional)

This directory holds additional software that may need to be installed on the system. A sub directory is created for each installed software.

/usr (UNIX System Resources)

Holds most of the system files such as:

/usr/bin

Binary directory for user executable commands

/usr/sbin

System binaries required at boot and system administration commands not intended for execution by normal users. This directory is not included in the default search path for normal users.

/usr/lib and /usr/lib64

Contain shared library routines required by many commands/programs located in /usr/bin and /usr/sbin. These are used by kernel and other applications and programs for their successful installation and operation.

/usr/lib directory also stores system initialization and service management programs. /usr/lib64 contains 64-bit shared library routines.

/usr/include

Contains header files for the C programming language.

/usr/local:

This is a system administrator repository for storing commands and tools. These commands not generally included with the original Linux distribution.

Directory Contains
/usr/local/bin ecutables
/usr/local/etc configuration files
/usr/local/lib and /usr/local/lib64 library routines
/usr/share manual pages, documentation, sample templates, configuration files
/usr/src:

This directory is used to store source code.

Variable Directory (/var)

For data that frequently changes while the system is operational. Such as log, status, spool, lock, etc.

Common sub directories in /var:

/var/log

Contains most system log files. Such as boot logs, user logs, failed user logs, installation logs, cron logs, mail logs, etc.

/var/opt

Log, status, etc. for software installed in /opt.

/var/spool

Queued files such as print jobs, cron jobs, mail messages, etc.

/var/tmp

For large or longer term temporary files that need to survive system reboots. These are deleted if they are not accessed for a period of 30 days.

/tmp (Temporary)

Temporary files that survive system reboots. These are deleted after 10 days if they are not accessed. Programs may need to create temporary files in order to run.

/dev (Devices)

Contains Device nodes for physical and virtual devices. Linux kernel talks to devices through these nodes. Device nodes are automatically created and deleted by the udevd service. Which dynamically manages devices.

The two types of device files are character (or raw) and block.

Character devices

  • Accessed serially.
  • Console, serial printers, mice, keyboards, terminals, etc.

Block devices

  • Accessed in a parallel fashion with data exchanged in blocks.
  • Data on block devices is accessed randomly.
  • Hard disk drives, optical drives, parallel printers, etc.

Procfs File System (/proc)

  • Config and status info on:
    • Kernel, CPU, memory, disks, partitioning, file systems, networking, running processes, etc.
  • Zero-length pseudo files point to data maintained by the kernel in the memory.
  • Interface to interact with kernel-maintained information.
  • Contents created in memory at system boot time, updated during runtime, and destroyed at system shutdown.

Runtime File System (/run)

  • Data for processes running on the system.
    • /run/media
  • Used to automatically mount external file systems (CD, DVD, flash USB.)
  • Contents deleted at shutdown.

The System File System (/sys)

  • Info about hardware devices, drivers, and some kernel features.
  • Used by the kernel to load necessary support for devices, create device nodes in /dev, and configure devices.
  • Auto-maintained.

Essential System Commands

tree command

  • List hierarchy of directories and files.
  • Column 2
    • Size.
  • Column 3
    • Full path.

Options. tree -a :: Include hidden files in the output. tree -d :: Exclude files from the output. tree -h :: Displays file sizes in human-friendly format. tree -f :: Prints the full path for each file. tree -p :: Includes file permissions in the output

Labs

List only the directories (-d) in the root user’s home directory (/root).

tree -d /root

List files in the /etc/sysconfig directory along with their permissions, sizes in human-readable format, and full path.

tree -phf /etc/sysconfig

View tree man pages.

man tree

Prompt Symbols

  • Hash sign (#) for root user.
  • Dollar sign ($) for normal users.

Linux Commands

Two types of commands:

  1. User
    • General purpose.
    • For any user.
  2. System Management
    • Superuser.
    • Require elevated privileges.

Command Mechanics

Basic Syntax

  • command option(s) argument(s)
  • Many commands have preconfigured default options and arguments.

An option that starts with a single hyphen character (-la, for instance) ::: Short-option format.

  • Two hyphen characters (–all, for instance) ::: Long-option format.

Listing Files and Directories

ls

  • ll :: shortcut for ls -l

Flags ls -l ::: View long listing format. ls -d ::: View info on the specified directory. ls -h ::: Human readable format. ls -a ::: List all files, including the hidden files. ls -t ::: Sort output by date and time with the newest file first. ls -R ::: List contents recursively. ls -i ::: View inode information.

labs:

Show the long listing of only /usr without showing its contents.

ls -ld /usr

Display all files in the current directory with their sizes in human-friendly format.

ls -lh

List all files, including the hidden files, in the current directory with detailed information.

ls -la

Sort output by date and time with the newest file first.

ls -lt

List contents of the /etc directory recursively.

ls -R /etc

List directory info and the contents of a directory recursively.

ls -lR /etc

View ls manpage.

man ls

Printing Working Directory (pwd) command

  • Returns the absolute path to a file or directory.

Absolute path (full path or a fully qualified pathname) :: Points to a file or directory in relation to the top of the directory tree. It always starts with the forward slash (/).

Relative path :: Points to a file or directory in relation to your current location.

Labs:

Go one level up into the parent directory using the relative path

cd ..

cd into /etc/sysconfig using the absolute path (/etc/sysconfig), or the relative path (etc/sysconfig)

cd /etc/sysconfig
cd /
cd etc/sysconfig

Change into the /usr/bin directory from /etc/sysconfig using relative or absolute path

cd /usr/bin

or

cd ../usr/bin

Return to your home directory

cd

or

cd ~

Use the absolute path to change into the home directory of the root user from /etc/sysconfig

cd ../../root

Switch between the current and previous directories

cd ..

use the cd command to print the home directory of the current user

cd -

Terminal Device Files

  • Unique pseudo (or virtual) numbered device files that represent terminal sessions opened by users.
  • Used to communicate with individual sessions.
  • Stored in the /dev/pts/ (pseudo terminal session).
  • Created when a user opens a new terminal session.
  • Removed when a session closes.

tty command

  • Identify current terminal session.
  • Displays filename and location.
  • Example: /dev/pts/0

Inspecting System’s Uptime and Processor Load

uptime command

  • Displays:
    • System’s current time.
    • System up time.
    • Number of users currently logged in.
    • Average % CPU load over the past 1, 5, and 15 minutes.
      • 0.00 and 1.00 represent no load and full load.
      • Greater than 1.00 signifies excess load (over 100%).

clear command

  • Clears the terminal screen and places the cursor at the top left of the screen.
  • Can also use Ctrl+l for this command.
clear

Determining Command Path

Tools for identifying the absolute path of the command that will be executed when you run it without specifying its full path.

which, whereis, and type

show the full location of the ls command:

which command

  • Show command aliases and location.
[root@server1 bin]# which ls
alias ls='ls --color=auto'
        /usr/bin/ls

whereis command

  • Locates binary, source, and manual files for specified command name.
[root@server1 bin]# whereis ls
ls: /usr/bin/ls /usr/share/man/man1/ls.1.gz /usr/share/man/man1p/ls.1p.gz>)

type command

  • Find whether the given command is an alias, shell built-in, file, function, or keyword.
type ls

Viewing System Information

uname command

  • Show system operating system name.
[root@server1 bin]# uname
Linux

Flags uname -s ::: Show kernel name. uname -n ::: Show hostname. uname -r ::: Show kernel release. uname -v ::: Show kernel build date. uname -m ::: Show machine hardware name. uname -p ::: Show processor type. uname -i ::: Show hardware platform. uname -o ::: Show OS name. uname -a ::: Show kernel name, nodename, release, version, machine, and os.

uname
uname -a
Linux = Kernel name
server1.example.com = Hostname of the system
4.18.0-80.el8.x86_64 = Kernel release
#1 SMP Wed Mar 13 12:02:46 UTC 2019 = Date and time of the kernel built
x86_64 = Machine hardware name
x86_64 = Processor type
x86_64 = Hardware platform
GNU/Linux = Operating system name

Viewing CPU Specs

lscpu command

  • Shows CPU:
    • Architecture.
    • Operating modes.
    • Vendor.
    • Family.
    • Model.
    • Speed.
    • Cache memory.
    • Virtualization support type.
lscpu
architecture of the CPU (x86_64)
supported modes of operation (32-bit and 64-bit)
sequence number of the CPU on this system (1)
threads per core (1)
cores per socket (1)
number of sockets (1)
vendor ID (GenuineIntel)
CPU model (58) model name (Intel …)
speed (2294.784 MHz)
amount and levels of cache memory (L1d, L1i, L2, and L3)

Getting Help

Manual pages

  • Informational pages stored in /usr/share/man for each program.

See Using Man Pages for more.

man command

Flags: -k

  • Perform a keyword search on manual pages.
  • Must build the database with mandb first.

-f

  • Equivalent to whatis.

Commands to find information/help about programs.

  • apropos
  • whatis
  • info
  • pinfo

/usr/share/doc/

  • Directory with additional program documentation.
man passwd

line at the bottom indicates the line number of the manual page.

Man page navigation

h ::: Help on navigation. q ::: Quit the man page. Up arrow key ::: Scroll up one line. Enter or Down arrow key ::: Scroll down one line. f / Spacebar / Page down ::: Move forward one page. b / Page up ::: Move backward one page. d / u ::: Move down/up half a page. g / G ::: Move to the beginning / end of the man pages. :f ::: Display line number and bytes being viewed. /pattern ::: Searches forward for the specified pattern. ?pattern ::: Searches backward for the specified pattern. n / N ::: Find the next / previous occurrence of a pattern.

Headings in the Manual

NAME

  • Name of the command or file with a short description. SYNOPSIS
  • Syntax summary. DESCRIPTION
  • Overview of the command or file. OPTIONS
  • Options available for use. EXAMPLES
  • Some examples to explain the usage. FILES
  • A list of related files. SEE ALSO
  • Reference to other manual pages or topics. BUGS
  • Any reported bugs or issues. AUTHOR
  • Contributor information.

Manual Sections

  • Manual information is split into nine sections for organization and clarity.
  • Man searches through each section until it finds a match.
    • Starts at section 1, then section 2, etc.
  • Some commands in Linux also have a configuration file with an identical name.
    • Ex: passwd command in /usr/bin and the passwd file in /etc.
  • Specify the section to find that page only.
    • Ex: man 5 passwd
  • Section number is located at the top (header) of the page.

Section 1

  • Refers to user commands. Section 4
  • Contains special files. Section 5
  • Describes file formats for many system configuration files. Section 8
  • Documents system administration and privileged commands designed for the root user.

Run man man for more details.

Searching by Keyword

apropos command

  • Search all sections of the manual pages and show a list of all entries matching the specified keyword in their names or descriptions.
  • Must mandb command in order to build an indexed database of the manual pages prior to using.
mandb

mandb command

  • Build an indexed database of the manual pages.

Lab: Find a forgotten XFS administration command.

man -k xfs
or
apropos xfs

Lab: Show a brief list of options and a description.

passwd --help
or
passwd -?

whatis command

  • Same output as man -f
  • Display one-line manual page descriptions.

info and pinfo Commands

  • Display command detailed documentation.
  • Divided into sections called nodes.
  • Header:
    • Name of the file being displayed.
    • Names of the current, next, and previous nodes.
  • Almost identical to each other.
info ls

u navigate efficiently.

info page Navigation

Down / Up arrows

  • Move forward / backward one line. Spacebar / Del
  • Move forward / backward one page. q
  • Quit the info page. t
  • Go to the top node of the document. s
  • Search

Documentation in /usr/share/doc/

/usr/share/doc/

  • Stores general documentation for installed packages under subdirectories that match their names.
ls -l /usr/share/doc/gzip

Online RHEL Documentation

  • docs.redhat.com
  • Release notes and guides on planning, installation, administration, security, storage management, virtualization, etc.
  • access.redhat.com

Labs

Lab 2: Navigate Linux Directory Tree

Check your location in the directory tree.

pwd

Show file permissions in the current directory including the hidden files.

ls -la

Change directory into /etc and confirm the directory change.

cd /etc
pwd

Switch back to the directory where you were before, and run pwd again to verify.

cd -
pwd

Lab: Miscellaneous Tasks

Identify the terminal device file.

tty

Open a couple of terminal sessions. Compare the terminal numbers.

tty
/dev/pts/1

Execute the uptime command and analyze the system uptime and processor load information.

uptime

Use three commands to identify the location of the vgs command.

which vgs
whereis vgs
type vgs

Lab: Identify System and Kernel Information

  1. Analyze the basic information about the system and kernel reported.
uname -a

Examine the key items relevant to the processor.

lscpu

Lab: Man

View man page for uname.

man uname

View the 5 man page section for the shadow.

man 5 shadow

Process and Task Scheduling

Processes and Priorities

Process

  • a unit for provisioning system resources.
  • any program, application, or command that runs on the system.
  • created in memory when a program, application, or command is initiated.
  • organized in a hierarchical fashion.
  • Each process has a parent process (a.k.a. a calling process) that spawns it.
  • A single parent process may have one or many child processes
    • passes many of its attributes to them at the time of their creation.
  • Each process is assigned an exclusive identification number (Process IDentifier (PID))
    • is used by the kernel to manage and control the process through its lifecycle.
  • When a process completes its lifespan or is terminated, this event is reported back to its parent process, and all the resources provisioned to it (cpu cycles, memory, etc.) are then freed and the PID is removed from the system.
  • background system processes are called daemons
    • which sit in the memory and wait for an event to trigger a request to use their services.
  • /proc
    • Where information for each running process is recorded and maintained.
    • Referenced by ps and other commands
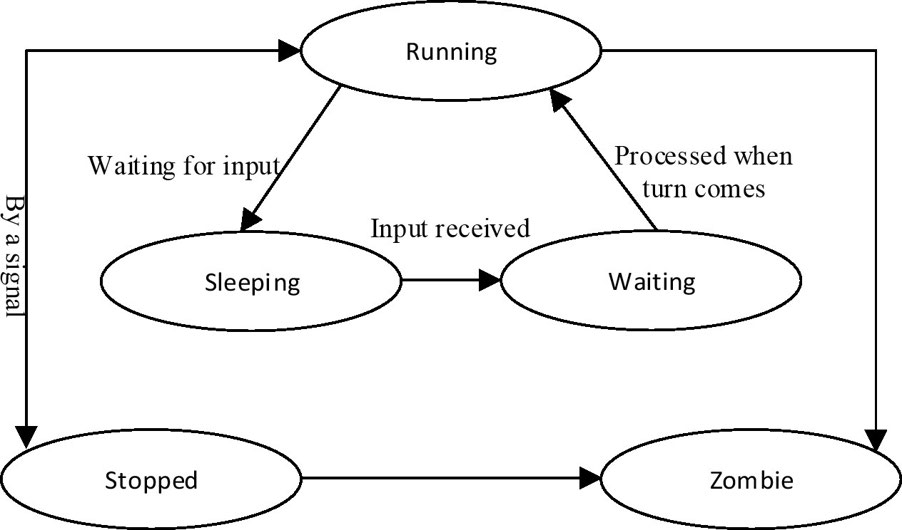
Process States

  • Five basic process states:
    • running
      • being executed by the system CPU.
    • sleeping
      • waiting for input from a user or another process.
    • waiting
      • has received the input it was waiting for and is now ready to run as soon as its turn comes.
    • stopped
      • currently halted and will not run even when its turn comes unless a signal is sent to change its behavior.
    • zombie
      • Dead.
      • Exists in the process table alongside other process entries
      • takes up no resources.
      • entry is retained until its parent process permits it to die
      • also called a defunct process.

ps command

  • Lists processes specific to the terminal where this command is issued.
  • Shows:
    • PID
    • terminal (TTY) the process spawned in
    • cumulative time (TIME) the system CPU has given to the process
    • name of the command or program (CMD) being executed.
    • may be customized to view only desired columns
    • can use ps to list a process by it’s ownership or owning group.
  • Output with -ef
    • UID
      • UID of process owner
    • PID
      • Process ID
    • PPID
      • Parent Process ID
    • C
      • CPU utilization
    • STIME
      • Start time
    • TTY
      • Controlling terminal
      • ?
        • daemon process
      • console
        • system console
    • TIME
      • Aggregated execution time
    • CMD
      • command or program name
  • Flags
    • -e
      • every
    • -f
      • full format
    • -F
      • Extra full format
    • -l
      • long format
    • -efl
      • Detailed process report
    • –forest
      • tree like hierarchy
    • -x
      • include daemon processes
    • -o
      • user-defined format
      • Make sure there are no white spaces between comma separated values.
    • -C
      • command list
      • list processes that match a specific command name.
    • -U or -u
      • List user supplied as argument.
    • -G or -g
      • List processes owned by a specific group

top command

  • Display processes in real time
  • q or ctrl+c to quit
  • Hotkeys while in top
    • o
      • re-sequence the process list.
    • f
      • add or remove fields
    • F
      • select the field to sort on
    • h
      • help
  • summary portion
    • First 5 lines
      • 1
        • system uptime, number of users logged in, and system load averages over the period of 1, 5, and 15 minutes.
      • 2
        • task (or process) information
        • total number of tasks running
        • How many of the total are running, sleeping, stopped, and zombie
      • 3
        • processor usage
        • CPU time in percentage spent in running user and system processes, in idling and waiting, and so on.
      • 4
        • memory utilization
          • total, free, used, and allocated for buffering and caching
      • 5
        • swap useage
          • total, free, and in use
        • avail Mem
          • estimate of memory available for starting processes without using swap.
  • tasks portion
    • details for each process
    • 12 columns
      • 1 and 2
        • Process identifier (PID) and owner (USER)
      • 3 and 4
        • Process priority (PR) and nice value (NI)
      • 5 and 6
        • Depict amounts of virtual memory (VIRT) and non-swapped resident memory (RES) in use
      • 7
        • Shows the amount of shareable memory available to the process (SHR)
      • 8
        • Represents the process status (S)
      • 9 and 10
        • Express the CPU (%CPU) and memory (%MEM) utilization
      • 11
        • Exhibits the CPU time in hundredths of a second (TIME+)
      • 12
        • Identifies the process name (COMMAND)

Listing a Specific Process

pidof and pgrep command

  • List only the PID of a specific process
  • pass a process name as an argument to view its PID
  • identical if used without any options

Listing Processes by User and Group Ownership

  • can use ps to list a process by it’s ownership or owning group.

Process Niceness and Priority

  • A process is spawned at a certain priority,
  • priority is established based on the nice value.
  • Higher niceness lowers execution priority of a process
  • Lower niceness increase priority.
  • Child process inherits nice value of it’s calling process.
  • Can choose a nicenes based on urgency, importance, or system load.
  • Normal users can only increase niceness of their processes.
  • Root can raise or lower niceness of any process.
  • 40 nice values
    • -20
      • highest and most favorable
    • +19
      • lowest and least favorable
    • 0
      • default
  • Showing nice and priority with ps
    • niceness of 0 corresponds to priority of 80
    • -20 corresponds to priority of 60
  • Showing nice and priority with top.
    • niceness of 0 corresponds to priority of 20
    • -20 corresponds to priority of 0

nice command

  • Launch a program at a non-default priority.

renice command

  • Alter the priority of a running program

Controlling Processes with Signals

  • terminating the process gracefully
  • killing it abruptly
  • forcing it to re-read its configuration.
  • Ordinary users can kill processes that they own, while the root user privilege is needed to kill any process on the system.
  • Processes in a waiting state ignore the soft termination signal.

kill command

  • Pass a signal to a process
  • Requires one or more PIDs

Flags

  • -l
    • view a list of signals

Common signals - 1 SIGHUP (hangup) - causes a process to disconnect itself from a closed terminal that it was tied to - instruct a running daemon to re-read its configuration without a restart. - 2 SIGINT - ^c (Ctrl+c) signal issued on the controlling terminal to interrupt the execution of a process. - 9 SIGKILL - Terminates a process abruptly - 15 SIGTERM (default) - Soft termination signal to stop a process in an orderly fashion. - Default signal if none is specified with the command. - 18 SIGCONT - Same as using the bg command to resume - 19 SIGSTOP - Same as using Ctrl+z to suspend a job - 20 SIGTSTP - Same as using the fg command

pkill command

  • pass a signal to a process
  • requires one or more process names to send a signal to.

Job Scheduling

  • Run a command at a specified time.
  • One time or periodic.
  • One time command can be used to run a command at a time with low system usage.
  • Periodic examples:
    • creating a compressed archive
    • trimming log files
    • monitoring the system
    • running a custom script
    • removing unwanted files from the system.
  • atd and crond manage jobs

atd

  • Run one time jobs.
  • atd daemon retries a missed job at the same time next day.
  • Does not need a restart with changes

crond

  • Run periodic scheduled jobs.
  • Daemon reads the schedules in files located in the /var/spool/cron and /etc/cron.d directories.
    • scans these files in short intervals
    • updates the in-memory schedules to reflect any modifications.
    • runs a job at its scheduled time only
    • does not entertain any missed jobs.
    • Does not need a restart with changes

Controlling user access

  • all users can schedule jobs
  • access to job scheduling can be edited
    • must add users to allowed or deny file in /etc
      • /etc/at.allow & /etc/cron.allow
        • Does not exist by default.
      • /etc/at.deny & /etc/cron.deny
        • Exists by default
    • list one username per line
    • root user is always permitted
  • Denial message appears if unauthorized user attempts to use at or cron.
    • Only if there is an entry for the calling user in the deny files.
    at.allow / cron.allow at.deny / cron.deny Impact
    Exists, and contains user entries Existence does not matter All users listed in allow files are permitted
    Exists, but is empty Existence does not matter No users are permitted
    Does not exist Exists, and contains user entries All users, other than those listed in deny files, are permitted
    Does not exist Exists, but is empty All users are permitted
    Does not exist Does not exist No users are permitted

Scheduler Log File

/var/log/cron - Logs for both atd and cron Shows - time of activity - hostname - process name and PID - owner - message for each invocation - service start time and delays - must have root privileges to view

at command

  • schedule a one-time execution of a program in the future.
  • Submitted jobs are spooled in the /var/spool/at/ and executed by the atd daemon at the specified time.
  • file created containing the settings for establishing the user’s shell environment to ensure a successful execution.
    • also includes the name of the command or program to be run.
  • no need to restart the daemon after a job submission.
  • assumes the current year and today’s date if the year and date are not mentioned.
  • ways to express time:
    • at 1:15am
      • (executes the task at the next 1:15 a.m.)
    • at noon
      • (executes the task at 12:00 p.m.)
    • at 23:45
      • (executes the task at 11:45 p.m.)
    • at midnight
      • (executes the task at 12:00 a.m.)
    • at 17:05 tomorrow
      • (executes the task at 5:05 p.m. on the next day)
    • at now + 5 hours
      • (executes the task 5 hours from now. We can specify minutes, days, or weeks in place of hours)
    • at 3:00 10/15/20
      • (executes the task at 3:00 a.m. on October 15, 2020)
  • Flags
    • -f
      • supply a filename

Crontab

crontab command

  • other method for scheduling tasks for running in the future.
  • Unlike atd, crond executes cron jobs on a regular basis as defined in the /etc/crontab file.
  • Crontables (another name for crontab files) are located in the /var/spool/cron directory.
  • Each authorized user with a scheduled job has a file matching their login name in this directory.
    • such as /var/spool/cron/user1
  • /etc/crontab/ & /etc/cron.d/
    • Other locations for system crontables.
    • Only root can create, modify, or delete them.
  • crond daemon
    • scans entries in all 3 directories.
    • adds log entry to /var/log/cronfile
    • no need to start after modifying cron jobs.
  • flags
    • -e
      • edit crontables
    • -l
      • list crontables
    • -r
      • remove crontables.
      • Do not run crontab -r if you do not wish to remove the crontab file. Instead, edit the file with crontab -e and just erase the entry.
    • -u
      • modify a different user’s crontable
      • provided they are allowed to do so and the other user is listed in the cron.allow file.
      • root user can use the -u flag to alter other users’ crontables even if the affected users are not listed in the allow file.

Syntax of User Crontables

  • /etc/crontab
    • Specifies the syntax that each user cron job must comply with in order for crond to interpret and execute it successfully.
  • Each entry for a user crontable has 6 lines
    • 1-5
      • schedule
    • 6
      • login name of executing user
    • rest for command or program to be executed. example crontable line
    • 20 1,12 1-15 feb * ls> /tmp/ls.out
  • Field Content Description
  • 1
    • Minute of the hour
    • Valid values are 0 (the exact hour) to 59. This field can have one specific value as in field 1, multiple comma-separated values as in field 2, a range of values as in field 3, a mix of fields 2 and 3 (1-5,6-19), or an * representing every minute of the hour as in field 5.
  • 2
    • Hour of the day
    • Valid values are 0 (midnight) to 23. Same usage applies as described for field 1.
  • 3
    • Day of the month
    • Valid values are 1 to 31. Same usage applies as described for field 1.
  • 4
    • Month of the year
    • Valid values are 1 to 12 or jan to dec. Same usage applies as described for field 1.
  • 5
    • Day of the week
    • Valid values are 0 to 7 or sun to sat, with 0 and 7 representing Sunday, 1 representing Monday, and so on. Same usage applies as described for field 1.
  • 6
    • Command or program to execute
    • Specifies the full path name of the command or program to be executed, along with any options or arguments that it requires.

/etc/crontab contents:

  • Step values may be used with * and ranges in the crontables using the forward slash character (/).
  • Step values allow the number of skips for a given value.
  • Example:
    • /2 in the minute field
      • every second minute
    • /3 in the minute field
      • every third minute,
    • 0-59/4 in the minute field
      • every 4th minute

Make sure you understand and memorize the order of the fields defined in crontables.

Anacron

  • service that runs after every system reboot
  • checks for any cron and at jobs that were scheduled for execution during the time the system was down and were missed as a result.
  • useful on laptop, desktop, and similar purpose systems with extended periods of frequent downtimes and are not intended for 24/7 operations.
  • Scans the /etc/cron.hourly/0anacron file for three factors to learn whether to run missed jobs.
  • May be run manually at the command line.
    • Run anacron to run all jobs in /etc/anacrontab that were missed.
  • /var/spool/anacron
    • Where anacron stores job execution dates
  • 3 factors must be true for anacron to execute scripts in /etc/cron.daily, /etc/cron.weekly, and /etc/cron.monthly
      1. Presence of the /var/spool/anacron/cron.daily file.
      1. Elapsed time of 24 hours since it was last run.
      1. System is plugged in to an AC source.
  • settings defined in /etc/anacrontab
    • 5 variables defined by default:
      • SHELL and PATH
        • Set the shell and path to be used for executing the programs.
      • MAILTO
        • Defines the login name or an email of the user who is to be sent any output and error messages.
      • RANDOM_DELAY
        • Expresses the maximum arbitrary delay in minutes added to the base delay of the jobs as defined in column 2 of the last three lines.
      • START_HOURS_RANGE
        • States the hour duration within which the missed jobs could be run.
    • Bottom 3 lines define the schedule and the programs to be executed:
      • Column 1:
        • Period in days (or @daily, @weekly, @monthly, or @yearly)
        • How often to run the specified job.
      • Column 2:
        • How many minutes to wait after system boot to execute the job.
      • Column 3:
        • Unique job identifier
      • Columns 4 to 6:
        • Command to be used to execute the scripts located under the /etc/cron.daily, /etc/cron.weekly, and /etc/cron.monthly directories.
        • By default, the run-parts command is invoked for execution at the default niceness.
    • For each job:
      • Examines whether the job was already run during the specified period (column 1).
      • Executes it after waiting for the number of minutes (column 2) plus the RANDOM_DELAY value if it wasn’t.
      • When all missed jobs have been carried out and there is none pending, Anacron exits.

Process and Task Scheduling Labs

Lab: ps

  1. ps
ps
  1. Check manual pages:
man ps
  1. Run with “every” and “full format” flags:
 ps -ef
  1. Produce an output with the command name in column 1, PID in column 2, PPID in column 3, and owner name in column 4, run it as follows:
 ps -o comm,pid,ppid,user
  1. Check how many sshd processes are currently running on the system:
 ps -C sshd

Lab: top

  1. top
top
  1. View manual page:
man top

Lab: List a specific process

  1. list the PID of the rsyslogd daemon
pidof rsyslogd
or
pgrep rsyslogd

Lab: Listing Processes by User and Group Ownership

  1. List processes owned by user1:
ps -U user1
  1. List processes owned by group root:
ps -G root

Lab: nice

  1. View the default nice value:
nice
  1. List priority and niceness for all processes:
ps -efl

Lab: Start Processes at Non-Default Priorities (2 terminals)

  1. Run the top command at the default priority/niceness in Terminal 1:
top
  1. Check the priority and niceness for the top command in Terminal 2 using the ps command:
ps -efl | grep top
  1. Terminate the top session in Terminal 1 by pressing the letter q and relaunch it at a lower priority with a nice value of +2:
nice -n 2 top
  1. \Check the priority and niceness for the top command in Terminal 2 using the ps command:
ps -efl | grep top
  1. Terminate the top session in Terminal 1 by pressing the letter q and relaunch it at a higher priority with a nice value of -10. Use sudo for root privileges.
sudo nice -n -10 top
  1. Check the priority and niceness for the top command in Terminal 2 using the ps command:
ps -efl | grep top
  1. Terminate the top session by pressing the letter q.

Lab: Alter Process Priorities (2 terminals)

  1. Run the top command at the default priority/niceness in Terminal 1:
top
  1. Check the priority and niceness for the top command in Terminal 2 using the ps command:
ps -efl | grep top
  1. While the top session is running in Terminal 1, increase its priority by renicing it to -5. Use the command substitution to get the PID of top. Prepend the renice command by sudo. The output indicates the old (0) and new (-5) priorities for the process.
sudo renice -n -5 $(pidof top)
  1. Validate the above change with ps. Focus on columns 7 and 8.
ps -efl | grep top
  1. Repeat the above but set the process to run at a lower priority by renicing it to 8: The output indicates the old (-5) and new (8) priorities for the process.
sudo renice -n 8 $(pidof top)
  1. Validate the above change with ps. Focus on columns 7 and 8.
ps -efl | grep top

Lab: Controlling Processes with Signals

  1. Pass the soft termination signal to the crond daemon, use either of the following:
sudo pkill crond
# or
sudo kill $(pidof crond)
  1. Confirm:
ps -ef | grep crond
  1. Forcefully kill crond:
sudo pkill -9 crond
# or
sudo pkill -s SIGKILL crond
# or
sudo kill -9 $(pgrep crond)
  1. Kill all crond processes:
sudo killall crond
  1. View manual pages:
man kill
man pkill
man killall

Lab: cron and atd

  1. View log files for cron and atd
sudo cat /var/log/cron

Lab: at and crond

  1. run /home/user1/.bash_profile file for user1 2 hours from now:
at -f ~/.bash_profile now + 2 hours
  1. Consult crontab manual pages:
man crontab

Lab: Submit, View, List, and Erase an at Job

1.Run the at command and specify the correct execution time and date for the job. Type the entire command at the first at> prompt and press Enter. Press Ctrl+d at the second at> prompt to complete the job submission and return to the shell prompt.

at 1:30pm 3/31/20
date &> /tmp/date.out

The system assigned job ID 5 to it, and the output also pinpoints the job’s execution time.

2.List the job file created in the /var/spool/at directory:

sudo ls -l /var/spool/at/

3.List the spooled job with the at command. You may alternatively use atq to list it.

at -l
# or
atq

4.Display the contents of this file with the at command and specify the job ID:

at -c 5

5.Remove the spooled job with the at command by specifying its job ID. You may alternatively run atrm 5 to delete it.

at -d 5

This should erase the job file from the /var/spool/at directory. You can

  1. confirm the deletion by running atq or at -l.
atq

Lab: Add, List, and Erase a Cron Job

assume that all users are currently denied access to cron

  1. Edit the /etc/cron.allow file and add user1 to it:
sudo vim /etc/cron.allow
user1
  1. Switch to user1 Open the crontable and append the following schedule to it. Save the file when done and exit out of the editor.
crontab -e
*/5 10-11 5,20 * * echo "Hello, this is a cron test." > /tmp/hello.out
  1. Check for the presence of a new file by the name user1 under the /var/spool/cron directory:
sudo ls -l /var/spool/cron
  1. List the contents of the crontable:
crontab -l
  1. Remove the crontable and confirm the deletion:
crontab -r
crontab -l

Lab: Anacron

  1. View the default content of /etc/anacrontab without commented or empty lines:
cat /etc/anacrontab | grep -ve ^# -ve ^$
  1. View anacron man pages:
man anacron

Lab 8-1: Nice and Renice a Process

  1. As user1 with sudo on server1, open two terminal sessions. Run the top command in terminal 1. Run the pgrep or ps command in terminal 2 to determine the PID and the nice value of top.
ps -efl | grep top
  1. Stop top on terminal 1 and relaunch at a lower priority (+8).
nice -n 8 top
  1. Confirm the new nice value of the process in terminal 2.
ps -efl | grep top
  1. Issue the renice command in terminal 2 and increase the priority of top to -10:
renice -n -10 $(pidof top)
  1. Confirm:
ps -efl | grep top

Lab 8-2: Configure a User Crontab File

As user1 on server1, run the tty and date commands to determine the terminal file (assume /dev/pts/1) and current system time.

tty
date

Create a cron entry to display “Hello World” on the terminal. Schedule echo “Hello World” > /dev/tty/1 to run 3 minutes from the current system time.

crontab -e
*/3 * * * * echo "Hello World" > /dev/pts/2

As root, ensure user1 can schedule cron jobs.

sudo vim /etc/cron.allow
user1