Thin Provisioning and LVM
Thin Provisioning
- Allows for an economical allocation and utilization of storage space by moving arbitrary data blocks to contiguous locations, which results in empty block elimination.
- Can create a thin pool of storage space and assign volumes much larger storage space than the physical capacity of the pool.
- Workloads begin consuming the actual allocated space for data writing.
- When a preset custom threshold (80%, for instance) on the actual consumption of the physical storage in the pool is reached, expand the pool dynamically by adding more physical storage to it.
- The volumes will automatically start exploiting the new space right away.
- helps prevent spending more money upfront.
Logical Volume Manager (LVM)
- Used for managing block storage in Linux.
- Provides an abstraction layer between the physical storage and the file system
- Enables the file system to be resized, span across multiple disks, use arbitrary disk space, etc.
- Accumulates spaces taken from partitions or entire disks (called Physical Volumes) to form a logical container (called Volume Group) which is then divided into logical partitions (called Logical Volumes).
- online resizing of volume groups and logical volumes,
- online data migration between logical volumes and between physical volumes
- user-defined naming for volume groups and logical volumes
- mirroring and striping across multiple disks
- snapshotting of logical volumes.
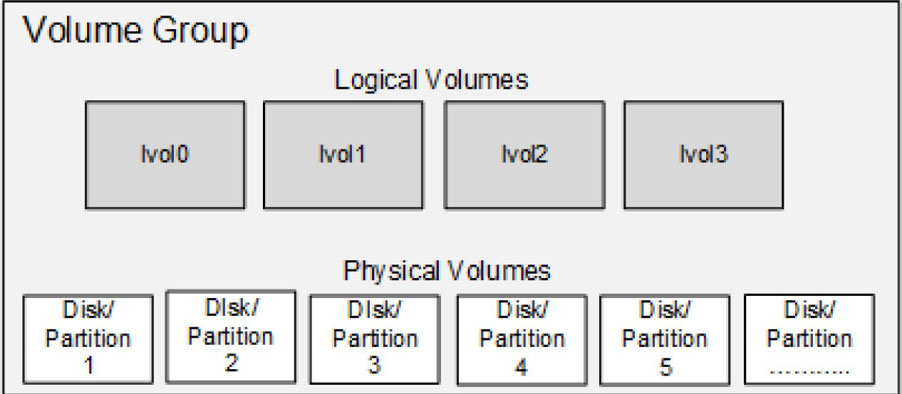
- Made up of three key objects called physical volume, volume group, and logical volume.
- These objects are further virtually broken down into Physical Extents (PEs) and Logical Extents (LEs).
Physical Volume(PV)
- created when a block storage device such as a partition or an entire disk is initialized and brought under LVM control.
- This process constructs LVM data structures on the device, including a label on the second sector and metadata shortly thereafter.
- The label includes the UUID, size, and pointers to the locations of data and metadata areas.
- Given the criticality of metadata, LVM stores a copy of it at the end of the physical volume as well.
- The rest of the device space is available for use.
You can use an LVM command called pvs (physical volume scan or summary) to scan and list available physical volumes on server2:
- (a for allocatable under Attr)
Try running this command again with the -v flag to view more information about the physical volume.
Volume Group
- Created when at least one physical volume is added to it.
- The space from all physical volumes in a volume group is aggregated to form one large pool of storage, which is then used to build logical volumes.
- Physical volumes added to a volume group may be of varying sizes.
- LVM writes volume group metadata on each physical volume that is added to it.
- The volume group metadata contains its name,date, and time of creation, how it was created, the extent size used, a list of physical and logical volumes, a mapping of physical and logical extents, etc.
- Can have a custom name assigned to it at the time of its creation.
- A copy of the volume group metadata is stored and maintained at two distinct locations on each physical volume within the volume group.
Use vgs (volume group scan or summary) to scan and list available volume groups on server2:
- Status of the volume group under the Attr column (w for writeable, z for resizable, and n for normal),
Try running this command again with the -v flag to view more information about the volume group.
Physical Extent
- A physical volume is divided into several smaller logical pieces when it is added to a volume group.
- These logical pieces are known as Physical Extents (PE).
- An extent is the smallest allocatable unit of space in LVM.
- At the time of volume group creation, you can either define the size of the PE or leave it to the default value of 4MB.
- This implies that a 20GB physical volume would have approximately 5,000 PEs.
- Any physical volumes added to this volume group thereafter will use the same PE size.
Use vgdisplay (volume group display) on server2 and grep for ‘PE Size’ to view the PE size used in the rhel volume group:
Logical Volume
- A volume group consists of a pool of storage taken from one or more physical volumes.
- This volume group space is used to create one or more Logical Volumes (LVs).
- A logical volume can be created or weeded out online, expanded or shrunk online, and can use space taken from one or multiple physical volumes inside the volume group.
The default naming convention used for logical volumes is lvol0, lvol1, lvol2, and so on you may assign custom names to them.
Use lvs (logical volume scan or summary) to scan and list available logical volumes on server2:
- Attr column (w for writeable, i for inherited allocation policy, a for active, and o for open) and their sizes.
Try running this command again with the -v flag to view more information about the logical volumes.
Logical Extent
- A logical volume is made up of Logical Extents (LE).
- Logical extents point to physical extents, and they may be random or contiguous.
- The larger a logical volume is, the more logical extents it will have.
- Logical extents are a set of physical extents allocated to a logical volume.
- The LE size is always the same as the PE size in a volume group.
- The default LE size is 4MB, which corresponds to the default PE size of 4MB.
Use lvdisplay (logical volume display) on server2 to view information about the root logical volume in the rhel volume group.
- The output does not disclose the LE size; however, you can convert the LV size in MBs (17,000) and then divide the result by the Current LE count (4,351) to get the LE size (which comes close to 4MB).
LVM Operations and Commands
- Creating and removing a physical volume, volume group, and logical volume
- Extending and reducing a volume group and logical volume
- Renaming a volume group and logical volume
- listing and displaying physical volume, volume group, and logical volume information.
Create and Remove Operations
pvcreate/pvremove
- Initializes/uninitializes a disk or partition for LVM use
vgcreate/vgremove
- Creates/removes a volume group
lvcreate/lvremove
- Creates/removes a logical volume
Extend and Reduce Operations
vgextend/vgreduce
- Adds/removes a physical volume to/from a volume group
lvextend/lvreduce
- Extends/reduces the size of a logical volume
lvresize
- Resizes a logical volume. With the
-roption, this command calls thefsadmcommand to resize the underlying file system as well.
Rename Operations
vgrename
- Rename a volume group
lvrename
- Rename a logical volume
List and Display Operations
pvs/pvdisplay
- Lists/displays physical volume information
vgs/vgdisplay lvs/lvdisplay
-
Lists/displays volume group information Lists/displays logical volume information
-
All the tools accept the -v switch to support verbosity.
Exercise 13-6: Create Physical Volume and Volume Group (server2)
- initialize one partition sdd1 (90MB) and one disk sde (250MB) for use in LVM.
- create a volume group called vgbook and add both physical volumes to it use the PE size of 16MB
- list and display the volume group and the physical volumes.
1. Create a partition of size 90MB on sdd using the parted command and confirm. You need to label the disk first, as it is a new disk.
2. Initialize the sdd1 partition and the sde disk using the pvcreate command. Note that there is no need to apply a disk label on sde with parted as LVM does not require it.
3. Create vgbook volume group using the vgcreate command and add the two physical volumes to it. Use the -s option to specify the PE size in
MBs.
4. List the volume group information:
5. Display detailed information about the volume group and the physical volumes it contains:
6. List the physical volume information:
7. Display detailed information about the physical volumes:
- Once a partition or disk is initialized and added to a volume group, they are treated identically within the volume group. LVM does not prefer one over the other.
Exercise 13-7: Create Logical Volumes(server2)
- Create two logical volumes, lvol0 and lvbook1, in the vgbook volume group.
- Use 120MB for lvol0 and 192MB for lvbook1 from the available pool of space.
- Display the details of the volume group and the logical volumes.
1. Create a logical volume with the default name lvol0 using the lvcreate command. Use the -L option to specify the logical volume size, 120MB. You may use the -v, -vv, or -vvv option with the command for verbosity.
-
Size for the logical volume may be specified in units such as MBs, GBs, TBs, or as a count of LEs
-
MB is the default if no unit is specified
-
The size of a logical volume is always in multiples of the PE size. For instance, logical volumes created in vgbook with the PE size set at 16MB can be 16MB, 32MB, 48MB, 64MB, and so on.
2. Create lvbook1 of size 192MB (16x12) using the lvcreate command. Use the -l switch to specify the size in logical extents and -n for the custom name.
3. List the logical volume information:
4. Display detailed information about the volume group including the logical volumes and the physical volumes:
Alternatively, you can run the following to view only the logical volume details:
Exercise 13-8: Extend a Volume Group and a Logical Volume(server2)
- Add another partition sdd2 of size 158MB to vgbook to increase the pool of allocatable space.
- Initialize the new partition prior to adding it to the volume group.
- Increase the size of lvbook1 to 336MB.
- Display basic information for the physical volumes, volume group, and logical volume.
1. Create a partition of size 158MB on sdd using the parted command. Display the new partition to confirm the partition number and size.
2. Initialize sdd2 using the pvcreate command:
3. Extend vgbook by adding the new physical volume to it:
4. List the volume group:
5. Extend the size of lvbook1 to 340MB by adding 144MB using the lvextend command:
EXAM TIP: Make sure the expansion of a logical volume does not affect the file system and the data it contains.
6. Issue vgdisplay on vgbook with the -v switch for the updated details:
7. View a summary of the physical volumes:
8. View a summary of the logical volumes:
Exercise 13-9: Rename, Reduce, Extend, and Remove Logical Volumes(server2)
- Rename lvol0 to lvbook2.
- Decrease the size of lvbook2 to 50MB using the
lvreducecommand - Add 32MB with the
lvresize command. - remove both logical volumes.
- display the summary for the volume groups, logical volumes, and physical volumes.
1. Rename lvol0 to lvbook2 using the lvrename command and confirm with
lvs:
2. Reduce the size of lvbook2 to 50MB with the lvreduce command. Specify the absolute desired size for the logical volume. Answer “Do you really want to reduce vgbook/lvbook2?” in the affirmative.
3. Add 32MB to lvbook2 with the lvresize command:
4. Use the pvs, lvs, vgs, and vgdisplay commands to view the updated allocation.
5. Remove both lvbook1 and lvbook2 logical volumes using the lvremove
command. Use the -f option to suppress the “Do you really want to remove
active logical volume” message.
- Removing an LV is destructive
- Backup any data in the target LV before deleting it.
- You will need to
unmountthe file system or disable swap in the logical volume.
6. Execute thevgdisplaycommand and grep for “Cur LV” to see the number of logical volumes currently available in vgbook. It should show 0, as you have removed both logical volumes.
Exercise 13-10: Reduce and Remove a Volume Group(server2)
\
- Reduce vgbook by removing the sdd1 and sde physical volumes from it
- Remove the volume group.
- Confirm the deletion of the volume group and the logical volumes at the end.
1. Remove sdd1 and sde physical volumes from vgbook by issuing the vgreduce command:
2. Remove the volume group using the vgremove command. This will also remove the last physical volume, sdd2, from it.
- Use the
-foption with thevgremovecommand to force the volume group removal even if it contains any number of logical and physical volumes in it.
3. Execute the vgs and lvs commands for confirmation:
Exercise 13-11: Uninitialize Physical Volumes (Server2)\
- Uninitialize all three physical volumes—sdd1, sdd2, and sde—by deleting the LVM structural information from them.
- Use the
pvscommand for confirmation. - Remove the partitions from the sdd disk and
- Verify that all disks used in Exercises 13-6 to 13-10 are now in their original raw state.
1. Remove the LVM structures from sdd1, sdd2, and sde using the pvremove command:
2. Confirm the removal using the pvs command:
The partitions and the disk are now back to their raw state and can be repurposed.
3. Remove the partitions from sdd using the parted command:
4. Verify that all disks used in previous exercises have returned to their original raw state using the lsblk command: