Storage
-
Managing AutoFS
-
Local file systems and swap
-
Managing NFS and AutoFS
-
Partitions and their management.
-
Remove a filesystem from a partition.
-
Thin provisioning and LVM
-
Managing AutoFS
Local file systems and swap
Managing NFS and AutoFS
Partitions and their management.
Remove a filesystem from a partition.
Thin provisioning and LVM
/etc/autofs.conf/ preset Directives: master_map_name=auto.master timeout = 300 negative_timeout = 60 mount_nfs_default_protocol = 4 logging = none
master_map_name
Name of the master map. Default is /etc/auto.master timeout
Time in second to unmount a share. negative_timeout
Timeout (in seconds) value for failed mount attempts. (1 minute default) mount_nfs_default_protocol
Sets the NFS version used to mount shares. logging
Logging level (none, verbose, debug)
Default is none (disabled)
Normally left to their default values.
Map Types:
Master Map
Define entries for indirect and direct maps.
Map entry format examples:
  /-                      /etc/auto.master.d/auto.direct   \# Line 1

/misc /etc/auto.misc \# Line 2/- /etc/auto.master.d/auto.direct <-- defines direct map and points to auto.direct for detailsMount shares on unrelated mount points
/misc /etc/auto.misc <-- indirect map and points to auto.misc for detailsAutomount removable filesystems
sudo dnf install -y autofssudo mkdir /autodir/- /etc/auto.master.d/auto.dir/autodir server20:/commonsudo systemctl enable --now autofssudo systemctl status autofs -l --no-pagerls /autodir
mount | grep autodirmount | grep autodirNote that /common is already mounted on the /local mount point via the fstab file and it is also configured via a direct map for automounting on /autodir. There should occur no conflict in configuration or functionality among the three.
1. Install the autofs software package if it is not already there:
2. Confirm the entry for the indirect map /misc in the /etc/auto.master file exists:
[root@server30 common]# grep ^/misc /etc/auto.master
/misc	/etc/auto.misc
3. Edit the /etc/auto.misc file and add the mount point, NFS server, and share information to it:
autoindir server30:/common4. Start the AutoFS service now and set it to autostart at system reboots:
[root@server40 /]# systemctl enable --now autofs5. Verify the operational status of the AutoFS service. Use the -l and --no-pager options to show full details without piping the output to a pager program (the pg command in this case):
[root@server40 /]# systemctl status autofs -l --no-pager
6. Run the ls command on the mount point /misc/autoindir and then grep for both auto.misc and autoindir on the mount command output to verify that the share is automounted and accessible:
[root@server40 /]# ls /misc/autoindir
test.text[root@server40 /]# mount | egrep 'auto.misc|autoindir'
/etc/auto.misc on /misc type autofs (rw,relatime,fd=7,pgrp=3321,timeout=300,minproto=5,maxproto=5,indirect,pipe_ino=31779)
server30:/common on /misc/autoindir type nfs4 (rw,relatime,vers=4.2,rsize=262144,wsize=262144,namlen=255,hard,proto=tcp,timeo=600,retrans=2,sec=sys,clientaddr=192.168.0.40,local_lock=none,addr=192.168.0.30)AutoFS allows us to automount user home directories by exploiting two special characters in indirect maps.
asterisk (*)
ampersand (&)
Substitutes the references to NFS servers and shared subdirectories.
With user home directories located under /home, on one or more NFS servers, the AutoFS service will connect with all of them simultaneously when a user attempts to log on to a client.
The service will mount only that specific user’s home directory rather than the entire /home.
The indirect map entry for this type of substitution is defined in an indirect map, such as /etc/auto.master.d/auto.home.
* -rw &:/home/&
With this entry in place, there is no need to update any AutoFS configuration files if additional NFS servers with /home shared are added or removed.
If user home directories are added or deleted, there will be no impact on the functionality of AutoFS.
If there is only one NFS server sharing the home directories, you can simply specify its name in lieu of the first & symbol in the above entry.
There are two portions for this exercise. The first portion should be done on server20 (NFS server) and the second portion on server10 (NFS client) as user1 with sudo where required.
first portion
second portion
On NFS server server20:
1. Create a user account called user30 with UID 3000 (-u) and assign password “password1”:
[root@server30 common]# useradd -u 3000 user30
[root@server30 common]# echo password1 | sudo passwd --stdin user30
Changing password for user user30.
passwd: all authentication tokens updated successfully.
2. Edit the /etc/exports file and add an entry for /home (do not modify or remove the previous entry):
/home server40(rw)
3. Export all the shares listed in the /etc/exports file:
[root@server30 common]# sudo exportfs -avr
exporting server40.example.com:/home
exporting server40.example.com:/common
On NFS client server10:
1. Install the autofs software package if it is not already there:
dnf install autofs
2. Create a user account called user30 with UID 3000 (-u), base home directory location /nfshome (-b), no home directory (-M), and password “password1”:
[root@server40 misc]# sudo useradd -u 3000 -b /nfshome -M user30
[root@server40 misc]# echo password1 | sudo passwd --stdin user30
This is to ensure that the UID for the user is consistent on the server and the client to avoid access issues.
3. Create the umbrella mount point /nfshome to automount the user’s home directory:
sudo mkdir /nfshome4. Edit the /etc/auto.master file and add the mount point and indirect map location to it:
/nfshome /etc/auto.master.d/auto.home
5. Create the /etc/auto.master.d/auto.home file and add the following information to it:
* -rw server30:/home/&
For multiple user setup, you can replace “user30” with the & character, but ensure that those users exist on both the server and the client with consistent UIDs.
6. Start the AutoFS service now and set it to autostart at system reboots. This step is not required if AutoFS is already running and enabled.
systemctl enable --now autofs
7. Verify the operational status of the AutoFS service. Use the -l and --no-pager options to show full details without piping the output to a pager program (the pg command):
systemctl status autofs -l --no-pager
8. Log in as user30 and run the pwd, ls, and df commands for verification:
[root@server40 nfshome]# su - user30
[user30@server40 ~]$ ls
user30.txt
[user30@server40 ~]$ pwd
/nfshome/user30
[user30@server40 ~]$ df -h
Filesystem             Size  Used Avail Use% Mounted on
devtmpfs               4.0M     0  4.0M   0% /dev
tmpfs                  888M     0  888M   0% /dev/shm
tmpfs                  356M  5.1M  351M   2% /run
/dev/mapper/rhel-root   17G  2.2G   15G  13% /
/dev/sda1              960M  344M  617M  36% /boot
tmpfs                  178M     0  178M   0% /run/user/0
server30:/common        17G  2.2G   15G  13% /local
server30:/home/user30   17G  2.2G   15G  13% /nfshome/user30
EXAM TIP: You may need to configure AutoFS for mounting a remote user home directory.
[root@server30 /]# mkdir /sharenfs
[root@server30 /]# chmod 777 /sharenfs
[root@server30 /]# vim /etc/exports

# Add -> /sharenfs server40(rw)

[root@server30 /]# dnf -y install nfs-utils
[root@server30 /]# firewall-cmd --permanent --add-service nfs
[root@server30 /]# firewall-cmd --reload
success

[root@server30 /]# systemctl --now enable nfs-server


[root@server30 /]# exportfs -av
exporting server40.example.com:/sharenfs[root@server40 nfshome]# dnf -y install autofs[root@server40 ~]# vim /etc/auto.master
/- /etc/auto.master.d/auto.dir
[root@server40 ~]# vim /etc/auto.master.d/auto.dir
/mntauto server30:/sharenfs
[root@server40 /]# mkdir /mntauto
[root@server40 ~]# systemctl enable --now autofs[root@server40 /]# mount | grep mntauto
/etc/auto.master.d/auto.dir on /mntauto type autofs (rw,relatime,fd=10,pgrp=6211,timeout=300,minproto=5,maxproto=5,direct,pipe_ino=40247)
server30:/sharenfs on /mntauto type nfs4 (rw,relatime,vers=4.2,rsize=262144,wsize=262144,namlen=255,hard,proto=tcp,timeo=600,retrans=2,sec=sys,clientaddr=192.168.0.40,local_lock=none,addr=192.168.0.30)df -h to confirm.[root@server40 /]# df -h | grep mntauto
server30:/sharenfs 17G 2.2G 15G 13% /mntauto[root@server40 /]# mkdir /autoindir
[root@server40 etc]# vim /etc/auto.master
/autoindir /etc/auto.misc
[root@server40 etc]# vim /etc/auto.misc
sharenfs server30:/common
[root@server40 etc]# systemctl restart autofs[root@server40 etc]# ls /autoindir/sharenfs
test.textdf -h to confirm.[root@server40 etc]# df -h
Filesystem Size Used Avail Use% Mounted on
devtmpfs 4.0M 0 4.0M 0% /dev
tmpfs 888M 0 888M 0% /dev/shm
tmpfs 356M 5.1M 351M 2% /run
/dev/mapper/rhel-root 17G 2.2G 15G 13% /
/dev/sda1 960M 344M 617M 36% /boot
tmpfs 178M 0 178M 0% /run/user/0
server30:/common 17G 2.2G 15G 13% /autoindir/sharenfsFile systems
Storing disparate data in distinct file systems versus storing all data in a single file system offers the following advantages:
3 types of file systems:
Disk-based
Network-based
Memory-based
Ext3
Ext4
XFS
VFAT
ISO9660
NFS - (Network File System.)
AutoFS (Auto File System)
journaling
Supported by Ext3 and Ext4
Recover swiftly after a system crash.
keep track of recent changes in their metadata in a journal (or log).
Each metadata update is written in its entirety to the journal after completion.
The system peruses the journal of each extended file system following the reboot after a crash to determine if there are any errors
Lets the system recover the file system rapidly using the latest metadata information stored in its journal.
Ext3 that supports file systems up to 16TiB and files up to 2TiB,
Ext4 supports very large file systems up to 1EiB (ExbiByte) and files up to 16TiB (TebiByte).
xfs_repair utility to manually fix any issues.e2label
tune2fs
xfs_admin
xfs_growfs
xfs_info
blkid
df
du
fsadm
lvresize command is run with the -r switch.lsblk
mkfs
-t option and specify ext3, ext4, vfat, or xfs file system type.mount
umount
Use the mount command to view information about xfs mounted file systems:
[root@server2 ~]# mount -t xfs
/dev/mapper/rhel-root on / type xfs (rw,relatime,seclabel,attr2,inode64,logbufs=8,logbsize=32k,noquota)
/dev/sda1 on /boot type xfs (rw,relatime,seclabel,attr2,inode64,logbufs=8,logbsize=32k,noquota)-t option
auto (noauto)
-a option is specifieddefaults
_netdev
remount
ro (rw)
Extended and XFS file systems have a 128-bit (32 hexadecimal characters) UUID (Universally Unique IDentifier) assigned to it at the time of its creation.
UUIDs assigned to vfat file systems are 32-bit (8 hexadecimal characters) in length.
Assigning a UUID makes the file system unique among many other file systems that potentially exist on the system.
Persistent across system reboots.
Used by default in RHEL 9 in the /etc/fstab file for any file system that is created by the system in a standard partition.
RHEL attempts to mount all file systems listed in the /etc/fstab file at reboots.
Each file system has an associated device file and UUID, but may or may not have a corresponding label.
The system checks for the presence of each file system’s device file, UUID, or label, and then attempts to mount it.
Determine the UUID of /boot
[root@server2 ~]# lsblk | grep boot
├─sda1 8:1 0 1G 0 part /boot[root@server2 ~]# sudo xfs_admin -u /dev/sda1
UUID = 630568e1-608f-4603-9b97-e27f82c7d4b4
[root@server2 ~]# sudo blkid /dev/sda1
/dev/sda1: UUID="630568e1-608f-4603-9b97-e27f82c7d4b4" TYPE="xfs" PARTUUID="7dcb43e4-01"
[root@server2 ~]# sudo lsblk -f /dev/sda1
NAME FSTYPE FSVER LABEL UUID FSAVAIL FSUSE% MOUNTPOINTS
sda1 xfs 630568e1-608f-4603-9b97-e27f82c7d4b4 616.1M 36% /bootFor extended file systems, you can use the tune2fs, blkid, or lsblk commands to determine the UUID.
A UUID is also assigned to a file system that is created in a VDO or LVM volume; however, it need not be used in the fstab file, as the device files associated with the logical volumes are always unique and persistent.
The /boot file system is located in the /dev/sda1 partition and its type is XFS. You can use the xfs_admin or the lsblk command as follows to
determine its label:
[root@server2 ~]# sudo xfs_admin -l /dev/sda1
label = ""

[root@server2 ~]# sudo lsblk -f /dev/sda1
NAME FSTYPE FSVER LABEL UUID                                 FSAVAIL FSUSE% MOUNTPOINTS
sda1 xfs 630568e1-608f-4603-9b97-e27f82c7d4b4 616.1M 36% /bootxfs_admin command with the -L option.unmount /boot, set the label “bootfs” on its device file, and remount it:
[root@server2 ~]# sudo umount /boot
[root@server2 ~]# sudo xfs_admin -L bootfs /dev/sda1
writing all SBs
new label = "bootfs"
Confirm the new label by executing sudo xfs_admin -l /dev/sda1 or sudo lsblk -f /dev/sda1.
For extended file systems, you can use the e2label command to apply a label and the tune2fs, blkid, and lsblk commands to view and verify.
Now you can replace the UUID=\"22d05484-6ae1-4ef8-a37d-abab674a5e35" for /boot in the fstab file with LABEL=bootfs, and unmount and remount /boot as demonstrated above for confirmation.
[root@server2 ~]# mount /boot
mount: (hint) your fstab has been modified, but systemd still uses
       the old version; use 'systemctl daemon-reload' to reload.
A label may also be applied to a file system created in a logical volume; however, it is not recommended for use in the fstab file, as the device files for logical volumes are always unique and remain persistent across system reboots.
mount command obtains the rest of the information from this file.umount command to detach it from the directory hierarchy.[root@server2 ~]# cat /etc/fstab
#
# /etc/fstab
# Created by anaconda on Sun Feb 25 12:11:47 2024
#
# Accessible filesystems, by reference, are maintained under '/dev/disk/'.
# See man pages fstab(5), findfs(8), mount(8) and/or blkid(8) for more info.
#
# After editing this file, run 'systemctl daemon-reload' to update systemd
# units generated from this file.
#
/dev/mapper/rhel-root / xfs defaults 0 0
LABEL=bootfs /boot xfs defaults 0 0
/dev/mapper/rhel-swap none swap defaults 0 0EXAM TIP: Any missing or invalid entry in this file may render the system unbootable. You will have to boot the system in emergency mode to fix this file. Ensure that you understand each field in the file for both file system and swap entries.
The format of this file is such that each row is broken out into six columns to identify the required attributes for each file system to be successfully mounted. Here is what the columns contain:
Column 1:
Column 2:
Column 3:
Column 4:
mount command or the fstab file for additional options and details.Column 5:
Column 6:
Sequence number in which to run the e2fsck (file system check and repair utility for Extended file system types) utility on the file system at system boot.
By default, 0 is used for memory-based, remote, and removable file systems, 1 for /, and 2 for /boot and other physical file systems. 0 can also be used for /, /boot, and other physical file systems you don’t want to be checked or repaired.
Applicable only on Extended file systems;
XFS does not use it.
0 in columns 5 and 6 for XFS, virtual, remote, and removable file system types has no meaning. You do not need to add them for these file system types.
1. Apply the label “msdos” to the sdb disk using the parted command:
[root@server20 ~]# sudo parted /dev/sdb mklabel msdos
Warning: The existing disk label on /dev/sdb will be destroyed and all data on this disk will be
lost. Do you want to continue?
Yes/No? y
Information: You may need to update /etc/fstab.
2. Create 2 x 100MB primary partitions on sdb with the parted command:
[root@server20 ~]# sudo parted /dev/sdb mkpart primary 1 101m
Information: You may need to update /etc/fstab.

[root@server20 ~]# sudo parted /dev/sdb mkpart primary 102 201m
Information: You may need to update /etc/fstab.
3. Initialize the first partition (sdb1) with Ext4 file system type using the mkfs command:
[root@server20 ~]# sudo mkfs -t ext4 /dev/sdb1
mke2fs 1.46.5 (30-Dec-2021)
/dev/sdb1 contains a LVM2_member file system
Proceed anyway? (y,N) y
Creating filesystem with 97280 1k blocks and 24288 inodes
Filesystem UUID: 73db0582-7183-42aa-951d-2f48b7712597
Superblock backups stored on blocks:
	8193, 24577, 40961, 57345, 73729

Allocating group tables: done
Writing inode tables: done
Creating journal (4096 blocks): done
Writing superblocks and filesystem accounting information: done
4. Initialize the second partition (sdb2) with VFAT file system type using the mkfs command:
[root@server20 ~]# sudo mkfs -t vfat /dev/sdb2
mkfs.fat 4.2 (2021-01-31)
5. Initialize the whole disk (sdc) with the XFS file system type using the mkfs.xfs command. Add the -f flag to force the removal of any old partitioning or labeling information from the disk.
[root@server20 ~]# sudo mkfs.xfs /dev/sdc -f
Filesystem should be larger than 300MB.
Log size should be at least 64MB.
Support for filesystems like this one is deprecated and they will not be supported in future releases.
meta-data=/dev/sdc               isize=512    agcount=4, agsize=16000 blks
         =                       sectsz=512   attr=2, projid32bit=1
         =                       crc=1        finobt=1, sparse=1, rmapbt=0
         =                       reflink=1    bigtime=1 inobtcount=1 nrext64=0
data     =                       bsize=4096   blocks=64000, imaxpct=25
         =                       sunit=0      swidth=0 blks
naming   =version 2              bsize=4096   ascii-ci=0, ftype=1
log      =internal log           bsize=4096   blocks=1368, version=2
         =                       sectsz=512   sunit=0 blks, lazy-count=1
realtime =none                   extsz=4096   blocks=0, rtextents=0
6. Determine the UUIDs for all three file systems using the lsblk command:
[root@server2 ~]# lsblk -f /dev/sdb /dev/sdc
NAME   FSTYPE FSVER LABEL UUID                                 FSAVAIL FSUSE% MOUNTPOINTS
sdb
├─sdb1 ext4   1.0         0bdd22d0-db53-40bb-8cc7-36efc9184196
└─sdb2 vfat   FAT16       FB3A-6572
sdc    xfs                91884326-9686-4569-96fa-9adb02c1f6f4>)
7. Open the /etc/fstab file, go to the end of the file, and append entries for the file systems for persistence using their UUIDs:
UUID=0bdd22d0-db53-40bb-8cc7-36efc9184196 /ext4fs1 ext4 defaults 0 0
UUID=FB3A-6572 /vfatfs1 vfat defaults 0 0
UUID=91884326-9686-4569-96fa-9adb02c1f6f4 /xfsfs1 xfs defaults 0 0
8. Create mount points /ext4fs1, /vfatfs1, and /xfsfs1 for the three
file systems using the mkdir command:
[root@server2 ~]# sudo mkdir /ext4fs1 /vfatfs1 /xfsfs1
9. Mount the new file systems using the mount command. This command will fail if there are any invalid or missing information in the file.
[root@server2 ~]# sudo mount -a
mount: (hint) your fstab has been modified, but systemd still uses
       the old version; use 'systemctl daemon-reload' to reload.
10. View the mount and availability status as well as the types of all three file systems using the df command:
[root@server2 ~]# df -hT
Filesystem            Type      Size  Used Avail Use% Mounted on
devtmpfs              devtmpfs  4.0M     0  4.0M   0% /dev
tmpfs                 tmpfs     888M     0  888M   0% /dev/shm
tmpfs                 tmpfs     356M  5.1M  351M   2% /run
/dev/mapper/rhel-root xfs        17G  2.0G   15G  12% /
/dev/sda1             xfs       960M  344M  617M  36% /boot
tmpfs                 tmpfs     178M     0  178M   0% /run/user/0
/dev/sdb1             ext4       84M   14K   77M   1% /ext4fs1
/dev/sdb2             vfat       95M     0   95M   0% /vfatfs1
/dev/sdc xfs 245M 15M 231M 6% /xfsfs11. Create a 172MB partition on the sdd disk using the parted command:
[root@server2 ~]# sudo parted /dev/sdd mkpart pri 1 172m
Information: You may need to update /etc/fstab.
2. Initialize the sdd1 partition for use in LVM using the pvcreate command:
[root@server2 ~]# sudo pvcreate /dev/sdd1
  Device /dev/sdb2 has updated name (devices file /dev/sdd2)
  Device /dev/sdb1 has no PVID (devices file brKVLFEG3AoBzhWoso0Sa1gLYHgNZ4vL)
  Physical volume "/dev/sdd1" successfully created.
3. Create the volume group vgfs with a PE size of 16MB using the physical volume sdd1:
[root@server2 ~]# sudo vgcreate -s 16 vgfs /dev/sdd1
  Volume group "vgfs" successfully created
The PE size is not easy to alter after a volume group creation, so ensure it is defined as required at creation.
4. Create two logical volumes ext4vol and xfsvol of size 80MB each in vgfs using the lvcreate command:
[root@server2 ~]# sudo lvcreate -n ext4vol -L 80 vgfs
  Logical volume "ext4vol" created.

[root@server2 ~]# sudo lvcreate  -n xfsvol -L 80 vgfs
  Logical volume "xfsvol" created.
5. Format the ext4vol logical volume with the Ext4 file system type using the mkfs.ext4 command:
[root@server2 ~]# sudo mkfs.ext4 /dev/vgfs/ext4vol
mke2fs 1.46.5 (30-Dec-2021)
Creating filesystem with 81920 1k blocks and 20480 inodes
Filesystem UUID: 4ed1fef7-2164-485b-8035-7f627cd59419
Superblock backups stored on blocks:
	8193, 24577, 40961, 57345, 73729

Allocating group tables: done
Writing inode tables: done
Creating journal (4096 blocks): done
Writing superblocks and filesystem accounting information: done
You can also use sudo mkfs -t ext4 /dev/vgfs/ext4vol.
6. Format the xfsvol logical volume with the XFS file system type using the mkfs.xfs command:
[root@server2 ~]# sudo mkfs.xfs /dev/vgfs/xfsvol
Filesystem should be larger than 300MB.
Log size should be at least 64MB.
Support for filesystems like this one is deprecated and they will not be supported in future releases.
meta-data=/dev/vgfs/xfsvol       isize=512    agcount=4, agsize=5120 blks
         =                       sectsz=512   attr=2, projid32bit=1
         =                       crc=1        finobt=1, sparse=1, rmapbt=0
         =                       reflink=1    bigtime=1 inobtcount=1 nrext64=0
data     =                       bsize=4096   blocks=20480, imaxpct=25
         =                       sunit=0      swidth=0 blks
naming   =version 2              bsize=4096   ascii-ci=0, ftype=1
log      =internal log           bsize=4096   blocks=1368, version=2
         =                       sectsz=512   sunit=0 blks, lazy-count=1
realtime =none                   extsz=4096   blocks=0, rtextents=0
You may also use sudo mkfs -t xfs /dev/vgfs/xfsvol instead.
7. Open the /etc/fstab file, go to the end of the file, and append entries for the file systems for persistence using their device files:
/dev/vgfs/ext4vol /ext4fs2 ext4 defaults 0 0
/dev/vgfs/xfsvol /xfsfs2 xfs defaults 0 0
8. Create mount points /ext4fs2 and /xfsfs2 using the mkdir command:
[root@server2 ~]# sudo mkdir /ext4fs2 /xfsfs2
9. Mount the new file systems using the mount command. This command will fail if there is any invalid or missing information in the file.
[root@server2 ~]# sudo mount -a
mount: (hint) your fstab has been modified, but systemd still uses
       the old version; use 'systemctl daemon-reload' to reload.
10. View the mount and availability status as well as the types of the new LVM file systems using the lsblk and df commands:
[root@server2 ~]# lsblk /dev/sdd
NAME             MAJ:MIN RM  SIZE RO TYPE MOUNTPOINTS
sdd                8:48   0  250M  0 disk
└─sdd1             8:49   0  163M  0 part
  ├─vgfs-ext4vol 253:2    0   80M  0 lvm  /ext4fs2
  └─vgfs-xfsvol  253:3    0   80M  0 lvm  /xfsfs2
[root@server2 ~]# df -hT | grep fs2
/dev/mapper/vgfs-ext4vol ext4       70M   14K   64M   1% /ext4fs2
/dev/mapper/vgfs-xfsvol xfs 75M 4.8M 70M 7% /xfsfs21. Initialize the sde disk and add it to the vgfs volume group:
sde had a gpt partition table with no partitions ran the following to reset it:
[root@server2 ~]# dd if=/dev/zero of=/dev/sde bs=1M count=2 conv=fsync
2+0 records in
2+0 records out
2097152 bytes (2.1 MB, 2.0 MiB) copied, 0.0102036 s, 206 MB/s
[root@server2 ~]# sudo partprobe /dev/sde
[root@server2 ~]# sudo pvcreate /dev/sde
Physical volume "/dev/sde" successfully created.[root@server2 ~]# sudo pvcreate /dev/sde
Physical volume "/dev/sde" successfully created.
[root@server2 ~]# sudo vgextend vgfs /dev/sde
Volume group "vgfs" successfully extended2. Confirm the new size of vgfs using the vgs and vgdisplay commands:
[root@server2 ~]# sudo vgs
  VG   #PV #LV #SN Attr   VSize   VFree
  rhel   1   2   0 wz--n- <19.00g      0
vgfs 2 2 0 wz--n- 400.00m 240.00m[root@server2 ~]# vgdisplay vgfs
Devices file sys_wwid t10.ATA_VBOX_HARDDISK_VBa5e3cbf7-10921e08 PVID qeP9dCevNnTy422I8p18NxDKQ2WyDodU last seen on /dev/sdf1 not found.
--- Volume group ---
VG Name vgfs
System ID
Format lvm2
Metadata Areas 2
Metadata Sequence No 4
VG Access read/write
VG Status resizable
MAX LV 0
Cur LV 2
Open LV 2
Max PV 0
Cur PV 2
Act PV 2
VG Size 400.00 MiB
PE Size 16.00 MiB
Total PE 25
Alloc PE / Size 10 / 160.00 MiB
Free PE / Size 15 / 240.00 MiB
VG UUID amDADJ-I4dH-jQUF-RFcE-58iL-jItl-5ti6LSThere are now two physical volumes in the volume group and the total size increased to 400MiB.
3. Grow the logical volume ext4vol and the file system it holds by 40MB using the lvextend and fsadm command pair. Make sure to use an uppercase L to specify the size. The default unit is MiB. The plus sign (+) signifies an addition to the current size.
[root@server2 ~]# sudo lvextend -L +40 /dev/vgfs/ext4vol
  Rounding size to boundary between physical extents: 48.00 MiB.
  Size of logical volume vgfs/ext4vol changed from 80.00 MiB (5 extents) to 128.00 MiB (8 extents).
  Logical volume vgfs/ext4vol successfully resized.

[root@server2 ~]# sudo fsadm resize /dev/vgfs/ext4vol
resize2fs 1.46.5 (30-Dec-2021)
Filesystem at /dev/mapper/vgfs-ext4vol is mounted on /ext4fs2; on-line resizing required
old_desc_blocks = 1, new_desc_blocks = 1
The filesystem on /dev/mapper/vgfs-ext4vol is now 131072 (1k) blocks long.
The resize subcommand instructs the fsadm command to grow the file system to the full length of the specified logical volume.
4. Grow the logical volume xfsvol and the file system (-r) it holds by (+) 40MB using the lvresize command:
[root@server2 ~]# sudo lvresize -r -L +40 /dev/vgfs/xfsvol
  Rounding size to boundary between physical extents: 48.00 MiB.
  Size of logical volume vgfs/xfsvol changed from 80.00 MiB (5 extents) to 128.00 MiB (8 extents).
  File system xfs found on vgfs/xfsvol mounted at /xfsfs2.
  Extending file system xfs to 128.00 MiB (134217728 bytes) on vgfs/xfsvol...
xfs_growfs /dev/vgfs/xfsvol
meta-data=/dev/mapper/vgfs-xfsvol isize=512    agcount=4, agsize=5120 blks
         =                       sectsz=512   attr=2, projid32bit=1
         =                       crc=1        finobt=1, sparse=1, rmapbt=0
         =                       reflink=1    bigtime=1 inobtcount=1 nrext64=0
data     =                       bsize=4096   blocks=20480, imaxpct=25
         =                       sunit=0      swidth=0 blks
naming   =version 2              bsize=4096   ascii-ci=0, ftype=1
log      =internal log           bsize=4096   blocks=1368, version=2
         =                       sectsz=512   sunit=0 blks, lazy-count=1
realtime =none                   extsz=4096   blocks=0, rtextents=0
data blocks changed from 20480 to 32768
xfs_growfs done
  Extended file system xfs on vgfs/xfsvol.
  Logical volume vgfs/xfsvol successfully resized.
5. Verify the new extensions to both logical volumes using the lvs command. You may also issue the lvdisplay or vgdisplay command instead.
[root@server2 ~]# sudo lvs | grep vol
  Devices file sys_wwid t10.ATA_VBOX_HARDDISK_VBa5e3cbf7-10921e08 PVID qeP9dCevNnTy422I8p18NxDKQ2WyDodU last seen on /dev/sdf1 not found.
  ext4vol vgfs -wi-ao---- 128.00m
  xfsvol  vgfs -wi-ao---- 128.00m
6. Check the new sizes and the current mount status for both file systems using the df and lsblk commands:
[root@server2 ~]# df -hT | grep -E 'ext4vol|xfsvol'
/dev/mapper/vgfs-xfsvol  xfs       123M  5.4M  118M   5% /xfsfs2
/dev/mapper/vgfs-ext4vol ext4 115M 14K 107M 1% /ext4fs2[root@server2 ~]# lsblk /dev/sdd /dev/sde
NAME MAJ:MIN RM SIZE RO TYPE MOUNTPOINTS
sdd 8:48 0 250M 0 disk
└─sdd1 8:49 0 163M 0 part
├─vgfs-ext4vol 253:2 0 128M 0 lvm /ext4fs2
└─vgfs-xfsvol 253:3 0 128M 0 lvm /xfsfs2
sde 8:64 0 250M 0 disk
├─vgfs-ext4vol 253:2 0 128M 0 lvm /ext4fs2
└─vgfs-xfsvol 253:3 0 128M 0 lvm /xfsfs21. Initialize the sdf disk using the pvcreate command:
[root@server2 ~]# sudo pvcreate /dev/sdf
  WARNING: adding device /dev/sdf with idname t10.ATA_VBOX_HARDDISK_VBa5e3cbf7-10921e08 which is already used for missing device.
  Physical volume "/dev/sdf" successfully created.
2. Create vgvdo1 volume group using the vgcreate command:
[root@server2 ~]# sudo vgcreate vgvdo1 /dev/sdf
  WARNING: adding device /dev/sdf with idname t10.ATA_VBOX_HARDDISK_VBa5e3cbf7-10921e08 which is already used for missing device.
  Volume group "vgvdo1" successfully created
3. Display basic information about the volume group:
root@server2 ~]# sudo vgdisplay vgvdo1
  Devices file sys_wwid t10.ATA_VBOX_HARDDISK_VBa5e3cbf7-10921e08 PVID qeP9dCevNnTy422I8p18NxDKQ2WyDodU last seen on /dev/sdf1 not found.
  --- Volume group ---
  VG Name               vgvdo1
  System ID
  Format                lvm2
  Metadata Areas        1
  Metadata Sequence No  1
  VG Access             read/write
  VG Status             resizable
  MAX LV                0
  Cur LV                0
  Open LV               0
  Max PV                0
  Cur PV                1
  Act PV                1
  VG Size               <5.00 GiB
  PE Size               4.00 MiB
  Total PE              1279
  Alloc PE / Size       0 / 0
  Free  PE / Size       1279 / <5.00 GiB
  VG UUID               b9u8Ng-m3BF-Jz2b-sBu8-gEG1-bBGQ-sBgrt0
4. Create a VDO volume called lvvdo1 using the lvcreate command. Use the -l option to specify the number of logical extents (1279) to be allocated and the -V option for the amount of virtual space (20GB).
[root@server2 ~]# sudo lvcreate -n lvvdo -l 1279 -V 20G --type vdo vgvdo1
WARNING: vdo signature detected on /dev/vgvdo1/vpool0 at offset 0. Wipe it? [y/n]: y
  Wiping vdo signature on /dev/vgvdo1/vpool0.
    The VDO volume can address 2 GB in 1 data slab.
    It can grow to address at most 16 TB of physical storage in 8192 slabs.
    If a larger maximum size might be needed, use bigger slabs.
  Logical volume "lvvdo" created.
5. Display detailed information about the volume group including the logical volume and the physical volume:
[root@server2 ~]# sudo vgdisplay -v vgvdo1
  Devices file sys_wwid t10.ATA_VBOX_HARDDISK_VBa5e3cbf7-10921e08 PVID qeP9dCevNnTy422I8p18NxDKQ2WyDodU last seen on /dev/sdf1 not found.
  --- Volume group ---
  VG Name               vgvdo1
  System ID
  Format                lvm2
  Metadata Areas        1
  Metadata Sequence No  3
  VG Access             read/write
  VG Status             resizable
  MAX LV                0
  Cur LV                2
  Open LV               0
  Max PV                0
  Cur PV                1
  Act PV                1
  VG Size               <5.00 GiB
  PE Size               4.00 MiB
  Total PE              1279
  Alloc PE / Size       1279 / <5.00 GiB
  Free  PE / Size       0 / 0
  VG UUID               b9u8Ng-m3BF-Jz2b-sBu8-gEG1-bBGQ-sBgrt0

  --- Logical volume ---
  LV Path                /dev/vgvdo1/vpool0
  LV Name                vpool0
  VG Name                vgvdo1
  LV UUID                nTPKtv-3yTW-J7Cy-HVP1-Aujs-cXZ6-gdS2fI
  LV Write Access        read/write
  LV Creation host, time server2, 2024-07-01 12:57:56 -0700
  LV VDO Pool data       vpool0_vdata
  LV VDO Pool usage      60.00%
  LV VDO Pool saving     100.00%
  LV VDO Operating mode  normal
  LV VDO Index state     online
  LV VDO Compression st  online
  LV VDO Used size       <3.00 GiB
  LV Status              NOT available
  LV Size                <5.00 GiB
  Current LE             1279
  Segments               1
  Allocation             inherit
  Read ahead sectors     auto

  --- Logical volume ---
  LV Path                /dev/vgvdo1/lvvdo
  LV Name                lvvdo
  VG Name                vgvdo1
  LV UUID                Z09BdK-ETJk-Gi53-m8Cg-mnTd-RYug-Z9nV0L
  LV Write Access        read/write
  LV Creation host, time server2, 2024-07-01 12:58:02 -0700
  LV VDO Pool name       vpool0
  LV Status              available
  # open                 0
  LV Size                20.00 GiB
  Current LE             5120
  Segments               1
  Allocation             inherit
  Read ahead sectors     auto
  - currently set to     8192
  Block device           253:6

  --- Physical volumes ---
  PV Name               /dev/sdf
  PV UUID               WKc956-Xp66-L8v9-VA6S-KWM5-5e3X-kx1v0V
  PV Status             allocatable
  Total PE / Free PE    1279 / 0
6. Display the new VDO volume creation using the lsblk command:
[root@server2 ~]# sudo lsblk /dev/sdf
NAME                    MAJ:MIN RM SIZE RO TYPE MOUNTPOINTS
sdf                       8:80   0   5G  0 disk
└─vgvdo1-vpool0_vdata   253:4    0   5G  0 lvm
  └─vgvdo1-vpool0-vpool 253:5    0  20G  0 lvm
    └─vgvdo1-lvvdo      253:6    0  20G  0 lvm
The output shows the virtual volume size (20GB) and the underlying disk size (5GB).
7. Initialize the VDO volume with the XFS file system type using the mkfs.xfs command. The VDO volume device file is
/dev/mapper/vgvdo1-lvvdo as indicated in the above output. Add the -f flag to force the removal of any old partitioning or labeling information from the disk.
[root@server2 mapper]# sudo mkfs.xfs /dev/mapper/vgvdo1-lvvdo
meta-data=/dev/mapper/vgvdo1-lvvdo isize=512    agcount=4, agsize=1310720 blks
         =                       sectsz=4096  attr=2, projid32bit=1
         =                       crc=1        finobt=1, sparse=1, rmapbt=0
         =                       reflink=1    bigtime=1 inobtcount=1 nrext64=0
data     =                       bsize=4096   blocks=5242880, imaxpct=25
         =                       sunit=0      swidth=0 blks
naming   =version 2              bsize=4096   ascii-ci=0, ftype=1
log      =internal log           bsize=4096   blocks=16384, version=2
         =                       sectsz=4096  sunit=1 blks, lazy-count=1
realtime =none                   extsz=4096   blocks=0, rtextents=0
Discarding blocks...Done.
(lab said vgvdo1-lvvdo1 but it didn’t exist for me.)
8. Open the /etc/fstab file, go to the end of the file, and append the following entry for the file system for persistent mounts using its device file:
/dev/mapper/vgvdo1-lvvdo /xfsvdo1 xfs defaults 0 0 9. Create the mount point /xfsvdo1 using the mkdir command:
[root@server2 mapper]# sudo mkdir /xfsvdo110. Mount the new file system using the mount command. This command will fail if there are any invalid or missing information in the file.
[root@server2 mapper]# sudo mount -a
mount: (hint) your fstab has been modified, but systemd still uses
       the old version; use 'systemctl daemon-reload' to reload.
The mount command with the -a flag is a validation test for the fstab file. It should always be executed after updating this file and before rebooting the server to avoid landing the system in an unbootable state.
11. View the mount and availability status as well as the type of the VDO file system using the lsblk and df commands:
[root@server2 mapper]# lsblk /dev/sdf
NAME                    MAJ:MIN RM SIZE RO TYPE MOUNTPOINTS
sdf                       8:80   0   5G  0 disk
└─vgvdo1-vpool0_vdata   253:4    0   5G  0 lvm
  └─vgvdo1-vpool0-vpool 253:5    0  20G  0 lvm
    └─vgvdo1-lvvdo      253:6    0  20G  0 lvm  /xfsvdo1

[root@server2 mapper]# df -hT /xfsvdo1
Filesystem               Type  Size  Used Avail Use% Mounted on
/dev/mapper/vgvdo1-lvvdo xfs 20G 175M 20G 1% /xfsvdo1Let’s run this command with the -h option on server2:
[root@server2 ~]# df -h
Filesystem             Size  Used Avail Use% Mounted on
devtmpfs               4.0M     0  4.0M   0% /dev
tmpfs                  888M     0  888M   0% /dev/shm
tmpfs                  356M  5.1M  351M   2% /run
/dev/mapper/rhel-root   17G  2.0G   15G  12% /
tmpfs                  178M     0  178M   0% /run/user/0
/dev/sda1              960M  344M  617M  36% /boot
Column 1:
Columns 2, 3, 4, 5, 6
Useful flags
-T
-x
-t
-i
Run this command on the /usr/bin directory to view the usage summary:
[root@server2 ~]# du -sh /usr/bin
151M	/usr/bin
Add a “total” row to the output and with numbers displayed in KBs:
[root@server2 ~]# du -sc /usr/bin
154444	/usr/bin
154444 total[root@server2 ~]# du -sch /usr/bin
151M /usr/bin
151M totalTry this command with different options on the /usr/sbin/lvm file and observe the results.
Move pages of idle data between physical memory and swap.
Swap areas act as extensions to the physical memory.
May be activated or deactivated independent of swap spaces located in other partitions and volumes.
The system splits the physical memory into small logical chunks called pages and maps their physical locations to virtual locations on the swap to facilitate access by system processors.
This physical-to-virtual mapping of pages is stored in a data structure called page table, and it is maintained by the kernel.
When a program or process is spawned, it requires space in the physical memory to run and be processed.
Although many programs can run concurrently, the physical memory cannot hold all of them at once.
The kernel monitors the memory usage.
As long as the free memory remains above a high threshold, nothing happens.
When the free memory falls below that threshold, the system starts moving selected idle pages of data from physical memory to the swap space to make room to accommodate other programs.
This piece in the process is referred to as page out.
Since the system CPU performs the process execution in around-robin fashion, when the system needs this paged-out data for execution, the CPU looks for that data in the physical memory and a pagefault occurs, resulting in moving the pages back to the physical memory from the swap.
This return of data to the physical memory is referred to as page in.
The entire process of paging data out and in is known as demand paging.
RHEL systems with less physical memory but high memory requirements can become over busy with paging out and in.
When this happens, they do not have enough cycles to carry out other useful tasks, resulting in degraded system performance.
The excessive amount of paging that affects the system performance is called thrashing.
When thrashing begins, or when the free physical memory falls below a low threshold, the system deactivates idle processes and prevents new processes from being launched.
The idle processes are only reactivated, and new processes are only allowed to be started when the system discovers that the available physical memory has climbed above the threshold level and thrashing has ceased.
free command-h
-k
-m
-g
-t
[root@server2 mapper]# free -ht
               total        used        free      shared  buff/cache   available
Mem:           1.7Gi       783Mi       714Mi       5.0Mi       440Mi       991Mi
Swap:          2.0Gi          0B       2.0Gi
Total:         3.7Gi       783Mi       2.7Gi
Try free -hts 3 and free -htc 2 to refresh the output every three seconds (-s) and to display the output twice (-c).
free. Here are the relevant fields from this file:[root@server2 mapper]# cat /proc/meminfo | grep -E 'Mem|Swap'
MemTotal: 1818080 kB
MemFree: 731724 kB
MemAvailable: 1015336 kB
SwapCached: 0 kB
SwapTotal: 2097148 kB
SwapFree: 2097148 kBmkswap, swapon, and swapoff commands are available.mkswap to initialize a partition for use as a swap space.mkswap command.EXAM TIP: Use the lsblk command to determine available disk space.
1. Use parted print on the sdb disk and the vgs command on the vgfs volume group to determine available space for a new 40MB partition and a 144MB logical volume:
[root@server2 mapper]# sudo parted /dev/sdb print
Model: ATA VBOX HARDDISK (scsi)
Disk /dev/sdb: 262MB
Sector size (logical/physical): 512B/512B
Partition Table: msdos
Disk Flags:

Number  Start   End    Size    Type     File system  Flags
 1      1049kB  101MB  99.6MB  primary  ext4
 2      102MB   201MB  99.6MB  primary  fat16

[root@server2 mapper]# sudo vgs vgfs
  Devices file sys_wwid t10.ATA_VBOX_HARDDISK_VBa5e3cbf7-10921e08 PVID qeP9dCevNnTy422I8p18NxDKQ2WyDodU last seen on /dev/sdf1 not found.
  VG   #PV #LV #SN Attr   VSize   VFree
  vgfs   2   2   0 wz--n- 400.00m 144.00m
The outputs show 49MB (250MB minus 201MB) free space on the sdb disk and 144MB free space in the volume group.
2. Create a partition called sdb3 of size 40MB using the parted command:
[root@server2 mapper]# sudo parted /dev/sdb mkpart primary 202 242
Information: You may need to update /etc/fstab.
3. Create logical volume swapvol of size 144MB in vgs using the lvcreate command:
[root@server2 mapper]# sudo lvcreate -L 144 -n swapvol vgfs
  Logical volume "swapvol" created.
4. Construct swap structures in sdb3 and swapvol using the mkswap command:
[root@server2 mapper]# sudo mkswap /dev/sdb3
Setting up swapspace version 1, size = 38 MiB (39841792 bytes)
no label, UUID=a796e0df-b1c3-4c30-bdde-dd522bba4fff

[root@server2 mapper]# sudo mkswap /dev/vgfs/swapvol
Setting up swapspace version 1, size = 144 MiB (150990848 bytes)
no label, UUID=88196e73-feaf-4137-8743-f9340296aeec
5. Edit the fstab file and add entries for both swap areas for auto-activation on reboots. Obtain the UUID for partition swap with
lsblk -f /dev/sdb3 and use the device file for logical volume. Specify their priorities.
UUID=a796e0df-b1c3-4c30-bdde-dd522bba4fff swap swap pri=1 0 0
/dev/vgfs/swapvol swap swap pri=2 0 0
EXAM TIP: You will not be given any credit for this work if you forget to add entries to the fstab file.
6. Determine the current amount of swap space on the system using the swapon command:
[root@server2]# sudo swapon
NAME      TYPE      SIZE USED PRIO
/dev/dm-1 partition   2G   0B   -2
There is one 2GB swap area on the system and it is configured at the default priority of -2.
7. Activate the new swap regions using the swapon command:
[root@server2]# sudo swapon -a8. Confirm the activation using the swapon command or by viewing the /proc/swaps file:
[root@server2 mapper]# sudo swapon
NAME      TYPE      SIZE USED PRIO
/dev/dm-1 partition   2G   0B   -2
/dev/sdb3 partition  38M   0B    1
/dev/dm-7 partition 144M 0B 2[root@server2 mapper]# cat /proc/swaps
Filename Type Size Used Priority
/dev/dm-1 partition 2097148 0 -2
/dev/sdb3 partition 38908 0 1
/dev/dm-7 partition 147452 0 2
#dm is device mapper9. Issue the free command to view the reflection of swap numbers on the Swap and Total lines:
[root@server2 mapper]# free -ht
               total        used        free      shared  buff/cache   available
Mem:           1.7Gi       793Mi       706Mi       5.0Mi       438Mi       981Mi
Swap:          2.2Gi          0B       2.2Gi
Total: 3.9Gi 793Mi 2.9Gi[root@server2 mapper]# parted /dev/sdc mklabel msdos
Information: You may need to update /etc/fstab.
[root@server2 mapper]# parted /dev/sdc mkpart primary 1 70m
Information: You may need to update /etc/fstab.
root@server2 mapper]# parted /dev/sdb print
Model: ATA VBOX HARDDISK (scsi)
Disk /dev/sdb: 262MB
Sector size (logical/physical): 512B/512B
Partition Table: msdos
Disk Flags:
Number Start End Size Type File system Flags
1 1049kB 70.3MB 69.2MB primaryparted) mkpart primary 71MB 140MB
Warning: The resulting partition is not properly aligned for best performance: 138671s % 2048s != 0s
Ignore/Cancel?
Ignore/Cancel? ignore
(parted) mkpart primary 140MB 210MB
Warning: The resulting partition is not properly aligned for best performance: 273438s % 2048s != 0s
Ignore/Cancel? ignore
(parted) print
Model: ATA VBOX HARDDISK (scsi)
Disk /dev/sdb: 262MB
Sector size (logical/physical): 512B/512B
Partition Table: msdos
Disk Flags:
Number Start End Size Type File system Flags
1 1049kB 70.3MB 69.2MB primary
2 71.0MB 140MB 69.0MB primary
3 140MB 210MB 70.0MB primary[root@server2 mapper]# sudo mkfs -t vfat /dev/sdc1
mkfs.fat 4.2 (2021-01-31)
[root@server2 mapper]# sudo mkfs -t ext4 /dev/sdc2
mke2fs 1.46.5 (30-Dec-2021)
Creating filesystem with 67380 1k blocks and 16848 inodes
Filesystem UUID: 43b590ff-3330-4b88-aef9-c3a97d8cf51e
Superblock backups stored on blocks:
8193, 24577, 40961, 57345
Allocating group tables: done
Writing inode tables: done
Creating journal (4096 blocks): done
Writing superblocks and filesystem accounting information: done
[root@server2 mapper]# sudo mkfs -t xfs /dev/sdc3
Filesystem should be larger than 300MB.
Log size should be at least 64MB.
Support for filesystems like this one is deprecated and they will not be supported in future releases.
meta-data=/dev/sdb3 isize=512 agcount=4, agsize=4273 blks
= sectsz=512 attr=2, projid32bit=1
= crc=1 finobt=1, sparse=1, rmapbt=0
= reflink=1 bigtime=1 inobtcount=1 nrext64=0
data = bsize=4096 blocks=17089, imaxpct=25
= sunit=0 swidth=0 blks
naming =version 2 bsize=4096 ascii-ci=0, ftype=1
log =internal log bsize=4096 blocks=1368, version=2
= sectsz=512 sunit=0 blks, lazy-count=1
realtime =none extsz=4096 blocks=0, rtextents=0[root@server2 mapper]# mkdir /vfatfs5 /ext4fs5 /xfsfs5
[root@server2 mapper]# mount /dev/sdc1 /vfatfs5
mount: (hint) your fstab has been modified, but systemd still uses
the old version; use 'systemctl daemon-reload' to reload.
[root@server2 mapper]# mount /dev/sdc2 /ext4fs5
mount: (hint) your fstab has been modified, but systemd still uses
the old version; use 'systemctl daemon-reload' to reload.
[root@server2 mapper]# mount /dev/sdc3 /xfsfs5
mount: (hint) your fstab has been modified, but systemd still uses
the old version; use 'systemctl daemon-reload' to reload.
[root@server2 mapper]# mount
/dev/sdb1 on /vfatfs5 type vfat (rw,relatime,fmask=0022,dmask=0022,codepage=437,iocharset=ascii,shortname=mixed,errors=remount-ro)
/dev/sdb2 on /ext4fs5 type ext4 (rw,relatime,seclabel)
/dev/sdb3 on /xfsfs5 type xfs (rw,relatime,seclabel,attr2,inode64,logbufs=8,logbsize=32k,noquota)[root@server2 mapper]# blkid /dev/sdc1 /dev/sdc2 /dev/sdc3 >> /etc/fstab
[root@server2 mapper]# vim /etc/fstabmount -a to mount them all.
umount /dev/sdb1 /dev/sdb2 /dev/sdb3df -h for verification.Ensure that VDO software is installed.
sudo dnf install kmod-kvdo
Create a volume vdo5 with a logical size 20GB on a 5GB disk (lsblk) using the lvcreate command.
[root@server2 ~]# sudo lvcreate -n vdo5 -l 1279 -V 20G --type vdo vgvdo1
WARNING: vdo signature detected on /dev/vgvdo1/vpool0 at offset 0. Wipe it? [y/n]: y
  Wiping vdo signature on /dev/vgvdo1/vpool0.
    The VDO volume can address 2 GB in 1 data slab.
    It can grow to address at most 16 TB of physical storage in 8192 slabs.
    If a larger maximum size might be needed, use bigger slabs.
Logical volume "vdo5" created.[root@server2 mapper]# sudo mkfs.xfs /dev/mapper/vgvdo1-vdo5
meta-data=/dev/mapper/vgvdo1-vdo5 isize=512 agcount=4, agsize=1310720 blks
= sectsz=4096 attr=2, projid32bit=1
= crc=1 finobt=1, sparse=1, rmapbt=0
= reflink=1 bigtime=1 inobtcount=1 nrext64=0
data = bsize=4096 blocks=5242880, imaxpct=25
= sunit=0 swidth=0 blks
naming =version 2 bsize=4096 ascii-ci=0, ftype=1
log =internal log bsize=4096 blocks=16384, version=2
= sectsz=4096 sunit=1 blks, lazy-count=1
realtime =none extsz=4096 blocks=0, rtextents=0
Discarding blocks...Done.[root@server2 mapper]# mkdir /vdofs5
[root@server2 mapper]#mount /dev/mapper/vgvdo1-vdo5 /vdofs5)/etc/fstab
[root@server2 mapper]# umount /dev/mapper/vgvdo1-vdo5mount -a to mount it back.[root@server2 mapper]# blkid /dev/mapper/vgvdo1-vdo5 >> /etc/fstab
[root@server2 mapper]# vim /etc/fstabdf -h to confirm.[root@server2 mapper]# parted /dev/sdc mklabel msdos
Warning: The existing disk label on /dev/sdc will be destroyed and all data on
this disk will be lost. Do you want to continue?
Yes/No? y
Information: You may need to update /etc/fstab.
[root@server2 mapper]# parted /dev/sdc mkpart primary 1 100%
Information: You may need to update /etc/fstab.[root@server2 ~]# sudo pvcreate /dev/sdc1
Devices file /dev/sdc is excluded: device is partitioned.
WARNING: adding device /dev/sdc1 with idname t10.ATA_VBOX_HARDDISK_VB6894bac4-590d5546 which is already used for /dev/sdc.
Physical volume "/dev/sdc1" successfully created.
[root@server2 ~]# vgcreate -s 8 vg /dev/sdc1
Devices file /dev/sdc is excluded: device is partitioned.
WARNING: adding device /dev/sdc1 with idname t10.ATA_VBOX_HARDDISK_VB6894bac4-590d5546 which is already used for /dev/sdc.
Volume group "vg" successfully created[root@server2 ~]# lvcreate -n lv200 -L 120 vg
Devices file /dev/sdc is excluded: device is partitioned.
Logical volume "lv200" created.
[root@server2 ~]# lvcreate -n lv300 -L 100 vg
Rounding up size to full physical extent 104.00 MiB
Logical volume "lv300" created.vgs, pvs, lvs, and vgdisplay commands for verification.[root@server2 ~]# mkfs.ext4 /dev/vg/lv200
mke2fs 1.46.5 (30-Dec-2021)
Creating filesystem with 122880 1k blocks and 30720 inodes
Filesystem UUID: 52eac2ee-b5bd-4025-9e40-356b38d21996
Superblock backups stored on blocks:
8193, 24577, 40961, 57345, 73729
Allocating group tables: done
Writing inode tables: done
Creating journal (4096 blocks): done
Writing superblocks and filesystem accounting information: done
[root@server2 ~]# mkfs.xfs /dev/vg/lv300
Filesystem should be larger than 300MB.
Log size should be at least 64MB.
Support for filesystems like this one is deprecated and they will not be supported in future releases.
meta-data=/dev/vg/lv300 isize=512 agcount=4, agsize=6656 blks
= sectsz=512 attr=2, projid32bit=1
= crc=1 finobt=1, sparse=1, rmapbt=0
= reflink=1 bigtime=1 inobtcount=1 nrext64=0
data = bsize=4096 blocks=26624, imaxpct=25
= sunit=0 swidth=0 blks
naming =version 2 bsize=4096 ascii-ci=0, ftype=1
log =internal log bsize=4096 blocks=1368, version=2
= sectsz=512 sunit=0 blks, lazy-count=1
realtime =none extsz=4096 blocks=0, rtextents=0[root@server2 ~]# mkdir /lvmfs5 /lvmfs6
[root@server2 ~]# mount /dev/vg/lv200 /lvmfs5
mount: (hint) your fstab has been modified, but systemd still uses
the old version; use 'systemctl daemon-reload' to reload.
[root@server2 ~]# mount /dev/vg/lv300 /lvmfs6
mount: (hint) your fstab has been modified, but systemd still uses
the old version; use 'systemctl daemon-reload' to reload.[root@server2 ~]# blkid /dev/vg/lv200 >> /etc/fstab
[root@server2 ~]# blkid /dev/vg/lv300 >> /etc/fstab
[root@server2 ~]# vim /etc/fstabdf -h to confirm.[root@server2 ~]# umount /dev/vg/lv200 /dev/vg/lv300
[root@server2 ~]# mount -a[root@server2 ~]# pvcreate /dev/sdb
Devices file /dev/sdc is excluded: device is partitioned.
WARNING: dos signature detected on /dev/sdb at offset 510. Wipe it? [y/n]: y
Wiping dos signature on /dev/sdb.
WARNING: adding device /dev/sdb with idname t10.ATA_VBOX_HARDDISK_VB428913dd-446a194f which is already used for missing device.
Physical volume "/dev/sdb" successfully created.[root@server2 ~]# vgextend vg /dev/sdb
Devices file /dev/sdc is excluded: device is partitioned.
WARNING: adding device /dev/sdb with idname t10.ATA_VBOX_HARDDISK_VB428913dd-446a194f which is already used for missing device.
Volume group "vg" successfully extended[root@server2 ~]# lvextend -L 200m /dev/vg/lv200
Size of logical volume vg/lv200 changed from 120.00 MiB (15 extents) to 200.00 MiB (25 extents).
Logical volume vg/lv200 successfully resized.
[root@server2 ~]# lvextend -L 250m /dev/vg/lv200
Rounding size to boundary between physical extents: 256.00 MiB.
Size of logical volume vg/lv200 changed from 200.00 MiB (25 extents) to 256.00 MiB (32 extents).
Logical volume vg/lv200 successfully resized.vgs, pvs, lvs, vgdisplay, and df commands for verification.[root@localhost ~]# parted /dev/sdd mklabel msdos
Information: You may need to update /etc/fstab.
[root@localhost ~]# parted /dev/sdd mkpart primary 1 100MB
Information: You may need to update /etc/fstab.
[root@localhost ~]# parted /dev/sdd mkpart primary 101 201
Information: You may need to update /etc/fstab.[root@localhost ~]# sudo mkswap /dev/sdd1
Setting up swapspace version 1, size = 94 MiB (98562048 bytes)
no label, UUID=40eea6c2-b80c-4b25-ad76-611071db52d5[root@localhost ~]# swaplabel -L swappart /dev/sdd1
[root@localhost ~]# blkid /dev/sdd1 >> /etc/fstab
[root@localhost ~]# vim /etc/fstab
UUID="40eea6c2-b80c-4b25-ad76-611071db52d5" swap swap pri=1 0 0Execute swapon -a to activate it.
Run swapon -s to confirm activation.
Initialize the other partition for use in LVM.
[root@localhost ~]# pvcreate /dev/sdd2
Physical volume "/dev/sdd2" successfully created.[root@localhost ~]# vgextend vg /dev/sdd2
Volume group "vg200" successfully extended[root@localhost ~]# lvcreate -L 180 -n swapvol vg
Logical volume "swapvol" created.vgs, pvs, lvs, and vgdisplay commands for verification.[root@localhost vg200]# mkswap /dev/vg/swapvol
Setting up swapspace version 1, size = 180 MiB (188739584 bytes)
no label, UUID=a4b939d0-4b53-4e73-bee5-4c402aff6f9b[root@localhost vg200]# vim /etc/fstab
/dev/vg200/swapvol swap swap pri=2 0 0swapon -a to activate it.swapon -s to confirm activation.Same tools for mounting and unmounting a filesystem.
exportfs commandmount and add the filesystem to the fstab file. sudo dnf -y install nfs-utils sudo mkdir /common sudo chmod 777 /commonsudo firewall-cmd --permanent --add-service nfs
sudo firewall-cmd --reloadsudo systemctl --now enable nfs-serversudo systemctl status nfs-server/common server10(rw)sudo exportfs -avsudo exportfs -u server10:/commonsudo exportfs -avsudo dnf -y install nfs-utilssudo mkdir /localsudo mount server20:/common /localmount | grep localdf -h | grep localserver20:/common /local nfs _netdev 0 0Note:
_netdev option makes system wait for networking to come up before trying to mount the share. sudo umount /local
sudo mount -adf -htouch /local/nfsfile
ls -l /localls -l /common/Resides on the first sector of the boot disk.
was the preferred choice for saving partition table information on x86-based computers.
with the arrival of bigger and larger hard drives, a new firmware specification (UEFI) was introduced.
still widely used, but its use is diminishing in favor of UEFI.
allows the creation of three types of partition on a single disk.
primary, extended, and logical
only primary and logical can be used for data storage
extended is a mere enclosure for holding the logical partitions and it is not meant for data storage.
supports the creation of up to four primary partitions numbered 1 through 4 at a time.
In case additional partitions are required, one of the primary partitions must be deleted and replaced with an extended partition to be able to add logical partitions (up to 11) within that extended partition.
Numbering for logical partitions begins at 5.
supports a maximum of 14 usable partitions (3 primary and 11 logical) on a single disk.
Cannot address storage space beyond 2TB due to its 32-bit nature and its 512-byte disk sector size.
non-redundant; the record it contains is not replicated, resulting in an unbootable system in the event of corruption.
If your disk is smaller than 2TB and you don’t intend to build more than 14 usable partitions, you can use MBR without issues.
parted (partition editor)
print
Displays the partition table that includes disk geometry and partition number, start and end, size, type, file system type, and relevant flags.
mklabel
Applies a label to the disk. Common labels are gpt and msdos.
mkpart
Makes a new partition
name
Assigns a name to a partition
rm
Removes the specified partition
print subcommand to ensure you created what you wanted.1. Execute parted on /dev/sdb to view the current partition information:
[root@server2 ~]# sudo parted /dev/sdb print
Error: /dev/sdb: unrecognised disk label
Model: ATA VBOX HARDDISK (scsi)
Disk /dev/sdb: 262MB
Sector size (logical/physical): 512B/512B
Partition Table: unknown
Disk Flags:
There is an error on line 1 of the output, indicating an unrecognized label. disk must be labeled before it can be partitioned.
2. Assign disk label “msdos” to the disk with mklabel. This operation is performed only once on a disk.
[root@server2 ~]# sudo parted /dev/sdb mklabel msdos
Information: You may need to update /etc/fstab.[root@server2 ~]# sudo parted /dev/sdb print
Model: ATA VBOX HARDDISK (scsi)
Disk /dev/sdb: 262MB
Sector size (logical/physical): 512B/512B
Partition Table: msdos
Disk Flags:
Number Start End Size Type File system FlagsTo use the GPT partition table type, run “sudo parted /dev/sdb mklabel gpt” instead.
3. Create a 100MB primary partition starting at 1MB (beginning of the disk) using mkpart:
[root@server2 ~]# sudo parted /dev/sdb mkpart primary 1 101m
Information: You may need to update /etc/fstab.4. Verify the new partition with print:
[root@server2 ~]# sudo parted /dev/sdb print
Model: ATA VBOX HARDDISK (scsi)
Disk /dev/sdb: 262MB
Sector size (logical/physical): 512B/512B
Partition Table: msdos
Disk Flags:

Number  Start  End  Size  Type  File system  Flags
1 1049kB 101MB 99.6MB primaryPartition numbering begins at 1 by default.
5. Confirm the new partition with the lsblk command:
[root@server2 ~]# lsblk /dev/sdb
NAME   MAJ:MIN RM  SIZE RO TYPE MOUNTPOINTS
sdb      8:16   0  250M  0 disk
└─sdb1   8:17   0   95M  0 part
The device file for the first partition on the sdb disk is sdb1 as identified on the bottom line. The partition size is 95MB.
Different tools will have variance in reporting partition sizes. ignore minor differences.
6. Check the /proc/partitions file also:
[root@server2 ~]# cat /proc/partitions | grep sdb
   8       16     256000 sdb
8 17 97280 sdb1delete the sdb1 partition that was created in Exercise 13-2 confirm the deletion.
1. Execute parted on /dev/sdb with the rm subcommand to remove partition number 1:
[root@server2 ~]# sudo parted /dev/sdb rm 1
Information: You may need to update /etc/fstab.
2. Confirm the partition deletion with print:
[root@server2 ~]# sudo parted /dev/sdb print
Model: ATA VBOX HARDDISK (scsi)
Disk /dev/sdb: 262MB
Sector size (logical/physical): 512B/512B
Partition Table: msdos
Disk Flags:

Number  Start  End  Size  Type  File system  Flags
3. Check the /proc/partitions file:
[root@server2 ~]# cat /proc/partitions | grep sdb
   8       16     256000 sdb
can also run the lsblk command for further verification. T
EXAM TIP: Knowing either parted or gdisk for the exam is enough.
gdisk (GPT disk) Commandpartitions disks using the GPT format.
text-based, menu-driven program
show, add, verify, modify, and delete partitions
can create up to 128 partitions on a single disk on systems with UEFI firmware.
Main interface of gdisk can be invoked by specifying a disk device name such as /dev/sdc with the command.
Type help or ? (question mark) at the prompt to view available subcommands.
[root@server2 ~]# sudo gdisk /dev/sdc
GPT fdisk (gdisk) version 1.0.7

Partition table scan:
  MBR: not present
  BSD: not present
  APM: not present
  GPT: not present

Creating new GPT entries in memory.

Command (? for help): ?
b	back up GPT data to a file
c	change a partition's name
d	delete a partition
i	show detailed information on a partition
l	list known partition types
n	add a new partition
o	create a new empty GUID partition table (GPT)
p	print the partition table
q	quit without saving changes
r	recovery and transformation options (experts only)
s	sort partitions
t	change a partition's type code
v	verify disk
w	write table to disk and exit
x	extra functionality (experts only)
?	print this menu

Command (? for help): 1. Execute gdisk on /dev/sdc to view the current partition information:
[root@server2 ~]# sudo gdisk /dev/sdc
GPT fdisk (gdisk) version 1.0.7

Partition table scan:
  MBR: not present
  BSD: not present
  APM: not present
  GPT: not present

Creating new GPT entries in memory.

Command (? for help):
The disk currently does not have any partition table on it.
2. Assign “gpt” as the partition table type to the disk using the o subcommand. Enter “y” for confirmation to proceed. This operation is performed only once on a disk.
Command (? for help): o
This option deletes all partitions and creates a new protective MBR.
Proceed? (Y/N): y
3. Run the p subcommand to view disk information and confirm the GUID partition table creation:
Command (? for help): p
Disk /dev/sdc: 512000 sectors, 250.0 MiB
Model: VBOX HARDDISK
Sector size (logical/physical): 512/512 bytes
Disk identifier (GUID): 9446222A-28AC-4F96-816F-518510F95019
Partition table holds up to 128 entries
Main partition table begins at sector 2 and ends at sector 33
First usable sector is 34, last usable sector is 511966
Partitions will be aligned on 2048-sector boundaries
Total free space is 511933 sectors (250.0 MiB)

Number  Start (sector)    End (sector)  Size       Code  Name
The output returns the assigned GUID and states that the partition table can hold up to 128 partition entries.
4. Create the first partition of size 200MB starting at the default sector with default type “Linux filesystem” using the n subcommand:
Command (? for help): n
Partition number (1-128, default 1):
First sector (34-511966, default = 2048) or {+-}size{KMGTP}:
Last sector (2048-511966, default = 511966) or {+-}size{KMGTP}: +200M
Current type is 8300 (Linux filesystem)
Hex code or GUID (L to show codes, Enter = 8300):
Changed type of partition to 'Linux filesystem'
5. Verify the new partition with p:
Command (? for help): p
Disk /dev/sdc: 512000 sectors, 250.0 MiB
Model: VBOX HARDDISK
Sector size (logical/physical): 512/512 bytes
Disk identifier (GUID): 9446222A-28AC-4F96-816F-518510F95019
Partition table holds up to 128 entries
Main partition table begins at sector 2 and ends at sector 33
First usable sector is 34, last usable sector is 511966
Partitions will be aligned on 2048-sector boundaries
Total free space is 102333 sectors (50.0 MiB)

Number  Start (sector)    End (sector)  Size       Code  Name
   1            2048          411647   200.0 MiB   8300  Linux filesystem
6. Run w to write the partition information to the partition table and exit out of the interface. Enter “y” to confirm when prompted.
Command (? for help): w

Final checks complete. About to write GPT data. THIS WILL OVERWRITE EXISTING
PARTITIONS!!

Do you want to proceed? (Y/N): y
OK; writing new GUID partition table (GPT) to /dev/sdc.
The operation has completed successfully.
You may need to run the partprobe command after exiting the gdisk utility to inform the kernel of partition table changes.
7. Verify the new partition by issuing either of the following at the command prompt:
[root@server2 ~]# grep sdc /proc/partitions
   8       32     256000 sdc
   8       33     204800 sdc1

[root@server2 ~]# lsblk /dev/sdc
NAME   MAJ:MIN RM  SIZE RO TYPE MOUNTPOINTS
sdc      8:32   0  250M  0 disk
└─sdc1 8:33 0 200M 0 part 1. Execute gdisk on /dev/sdc and run d1 at the utility’s prompt to delete partition number 1:
[root@server2 ~]# gdisk /dev/sdc
GPT fdisk (gdisk) version 1.0.7

Partition table scan:
  MBR: protective
  BSD: not present
  APM: not present
  GPT: present

Found valid GPT with protective MBR; using GPT.

Command (? for help): d1
Using 1
2. Confirm the partition deletion with p:
Command (? for help): p
Disk /dev/sdc: 512000 sectors, 250.0 MiB
Model: VBOX HARDDISK
Sector size (logical/physical): 512/512 bytes
Disk identifier (GUID): 9446222A-28AC-4F96-816F-518510F95019
Partition table holds up to 128 entries
Main partition table begins at sector 2 and ends at sector 33
First usable sector is 34, last usable sector is 511966
Partitions will be aligned on 2048-sector boundaries
Total free space is 511933 sectors (250.0 MiB)

Number  Start (sector)    End (sector)  Size       Code  Name
3. Write the updated partition information to the disk with w and quit gdisk:
Command (? for help): w

Final checks complete. About to write GPT data. THIS WILL OVERWRITE EXISTING
PARTITIONS!!

Do you want to proceed? (Y/N): y
OK; writing new GUID partition table (GPT) to /dev/sdc.
The operation has completed successfully.
4. Verify the partition deletion by issuing either of the following at the command prompt:
[root@server2 ~]# grep sdc /proc/partitions
   8       32     256000 sdc
[root@server2 ~]# lsblk /dev/sdc
NAME MAJ:MIN RM  SIZE RO TYPE MOUNTPOINTS
sdc 8:32 0 250M 0 disk Use lsblk to list disk and partition information.
[root@server1 ~]# lsblk
NAME          MAJ:MIN RM  SIZE RO TYPE MOUNTPOINTS
sda             8:0    0   10G  0 disk
├─sda1          8:1    0    1G  0 part /boot
└─sda2          8:2    0    9G  0 part
  ├─rhel-root 253:0    0    8G  0 lvm  /
  └─rhel-swap 253:1    0    1G  0 lvm  [SWAP]
sr0            11:0    1  9.8G  0 rom  /mnt
sr0 represents the ISO image mounted as an optical medium:
[root@server1 ~]# sudo fdisk -l
Disk /dev/sda: 10 GiB, 10737418240 bytes, 20971520 sectors
Disk model: VBOX HARDDISK
Units: sectors of 1 * 512 = 512 bytes
Sector size (logical/physical): 512 bytes / 512 bytes
I/O size (minimum/optimal): 512 bytes / 512 bytes
Disklabel type: dos
Disk identifier: 0xfc8b3804

Device     Boot   Start      End  Sectors Size Id Type
/dev/sda1  *       2048  2099199  2097152   1G 83 Linux
/dev/sda2       2099200 20971519 18872320   9G 8e Linux LVM


Disk /dev/mapper/rhel-root: 8 GiB, 8585740288 bytes, 16769024 sectors
Units: sectors of 1 * 512 = 512 bytes
Sector size (logical/physical): 512 bytes / 512 bytes
I/O size (minimum/optimal): 512 bytes / 512 bytes


Disk /dev/mapper/rhel-swap: 1 GiB, 1073741824 bytes, 2097152 sectors
Units: sectors of 1 * 512 = 512 bytes
Sector size (logical/physical): 512 bytes / 512 bytes
I/O size (minimum/optimal): 512 bytes / 512 bytes
identifiers 83 and 8e are hexadecimal values for the partition types
parted, gdisk, and LVM
Partitions created with a combination of most of these tools and toolsets can coexist on the same disk.
parted
understands both MBR and GPT formats.
gdisk
LVM
To delete a filesystem, partition, raid and disk labels from the disk. Use wipefs -a /dev/sdb1 May also use wipefs -a /dev/sdb? to delete sub partitions? (I need to verify this)
Make sure the filesystem is unmounted first.
[root@server2 mapper]# lsblk
NAME                    MAJ:MIN RM  SIZE RO TYPE MOUNTPOINTS
sda                       8:0    0   20G  0 disk
├─sda1                    8:1    0    1G  0 part
└─sda2                    8:2    0   19G  0 part
  ├─rhel-root           253:0    0   17G  0 lvm  /
  └─rhel-swap           253:1    0    2G  0 lvm  [SWAP]
sdb                       8:16   0  250M  0 disk
├─sdb1                    8:17   0   95M  0 part
├─sdb2                    8:18   0   95M  0 part
└─sdb3                    8:19   0   38M  0 part [SWAP]
sdc                       8:32   0  250M  0 disk
sdd                       8:48   0  250M  0 disk
└─sdd1                    8:49   0  163M  0 part
  ├─vgfs-ext4vol        253:2    0  128M  0 lvm
  └─vgfs-xfsvol         253:3    0  128M  0 lvm
sde                       8:64   0  250M  0 disk
├─vgfs-ext4vol          253:2    0  128M  0 lvm
├─vgfs-xfsvol           253:3    0  128M  0 lvm
└─vgfs-swapvol          253:7    0  144M  0 lvm  [SWAP]
sdf                       8:80   0    5G  0 disk
└─vgvdo1-vpool0_vdata   253:4    0    5G  0 lvm
  └─vgvdo1-vpool0-vpool 253:5    0   20G  0 lvm
    └─vgvdo1-lvvdo      253:6    0   20G  0 lvm
sr0 11:0 1 9.8G 0 rom [root@server2 mapper]# wipefs -a /dev/sdb1
/dev/sdb1: 2 bytes were erased at offset 0x00000438 (ext4): 53 ef
[root@server2 mapper]# wipefs -a /dev/sdb2
/dev/sdb2: 8 bytes were erased at offset 0x00000036 (vfat): 46 41 54 31 36 20 20 20
/dev/sdb2: 1 byte was erased at offset 0x00000000 (vfat): eb
/dev/sdb2: 2 bytes were erased at offset 0x000001fe (vfat): 55 aa
[root@server2 mapper]# wipefs -a /dev/sdb3
wipefs: error: /dev/sdb3: probing initialization failed: Device or resource busy
[root@server2 mapper]# wipefs -a /dev/sdb
wipefs: error: /dev/sdb: probing initialization failed: Device or resource busy
[root@server2 mapper]# swapoff /dev/sdb3
[root@server2 mapper]# wipefs -a /dev/sdb3
/dev/sdb3: 10 bytes were erased at offset 0x00000ff6 (swap): 53 57 41 50 53 50 41 43 45 32
[root@server2 mapper]# wipefs -a /dev/sdb
/dev/sdb: 2 bytes were erased at offset 0x000001fe (dos): 55 aa
/dev/sdb: calling ioctl to re-read partition table: Success
[root@server2 mapper]# lsblk
NAME MAJ:MIN RM SIZE RO TYPE MOUNTPOINTS
sda 8:0 0 20G 0 disk
├─sda1 8:1 0 1G 0 part
└─sda2 8:2 0 19G 0 part
├─rhel-root 253:0 0 17G 0 lvm /
└─rhel-swap 253:1 0 2G 0 lvm [SWAP]
sdb 8:16 0 250M 0 disk
sdc 8:32 0 250M 0 disk
sdd 8:48 0 250M 0 disk
└─sdd1 8:49 0 163M 0 part
├─vgfs-ext4vol 253:2 0 128M 0 lvm
└─vgfs-xfsvol 253:3 0 128M 0 lvm
sde 8:64 0 250M 0 disk
├─vgfs-ext4vol 253:2 0 128M 0 lvm
├─vgfs-xfsvol 253:3 0 128M 0 lvm
└─vgfs-swapvol 253:7 0 144M 0 lvm [SWAP]
sdf 8:80 0 5G 0 disk
└─vgvdo1-vpool0_vdata 253:4 0 5G 0 lvm
└─vgvdo1-vpool0-vpool 253:5 0 20G 0 lvm
└─vgvdo1-lvvdo 253:6 0 20G 0 lvm
sr0 11:0 1 9.8G 0 rom I could not use this on a disk used in an LV. Remove the LVs: lvremove lvvdo vgfs
[root@server2 mapper]# lsblk
NAME           MAJ:MIN RM  SIZE RO TYPE MOUNTPOINTS
sda              8:0    0   20G  0 disk
├─sda1           8:1    0    1G  0 part
└─sda2           8:2    0   19G  0 part
  ├─rhel-root  253:0    0   17G  0 lvm  /
  └─rhel-swap  253:1    0    2G  0 lvm  [SWAP]
sdb              8:16   0  250M  0 disk
sdc              8:32   0  250M  0 disk
sdd              8:48   0  250M  0 disk
└─sdd1           8:49   0  163M  0 part
sde              8:64   0  250M  0 disk
└─vgfs-swapvol 253:7    0  144M  0 lvm  [SWAP]
sdf              8:80   0    5G  0 disk
sr0             11:0    1  9.8G  0 rom
Need to remove swapvol from swap:
[root@server2 mapper]# swapoff /dev/mapper/vgfs-swapvolRemove the LV:
[root@server2 mapper]# lvremove /dev/mapper/vgfs-swapvol
Do you really want to remove active logical volume vgfs/swapvol? [y/n]: y
  Logical volume "swapvol" successfully removed.
Wipe sdd:
[root@server2 mapper]# wipefs -a /dev/sdd
/dev/sdd: 2 bytes were erased at offset 0x000001fe (dos): 55 aa
/dev/sdd: calling ioctl to re-read partition table: Success
[root@server2 mapper]# lsblk
NAME          MAJ:MIN RM  SIZE RO TYPE MOUNTPOINTS
sda             8:0    0   20G  0 disk
├─sda1          8:1    0    1G  0 part
└─sda2          8:2    0   19G  0 part
  ├─rhel-root 253:0    0   17G  0 lvm  /
  └─rhel-swap 253:1    0    2G  0 lvm  [SWAP]
sdb             8:16   0  250M  0 disk
sdc             8:32   0  250M  0 disk
sdd             8:48   0  250M  0 disk
sde             8:64   0  250M  0 disk
sdf             8:80   0    5G  0 disk
sr0 11:0 1 9.8G 0 rom 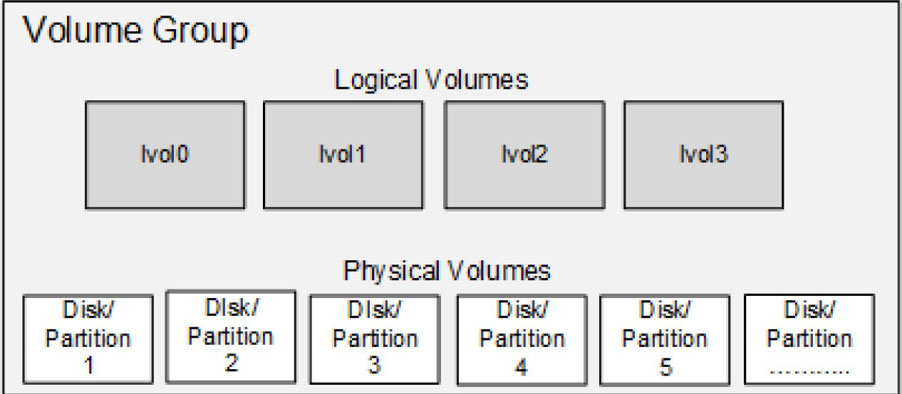
Physical Volume(PV)
You can use an LVM command called pvs (physical volume scan or summary) to scan and list available physical volumes on server2:
[root@server2 ~]# sudo pvs
  PV         VG   Fmt  Attr PSize   PFree
/dev/sda2 rhel lvm2 a-- <19.00g 0Try running this command again with the -v flag to view more information about the physical volume.
Volume Group
Use vgs (volume group scan or summary) to scan and list available volume groups on server2:
[root@server2 ~]# sudo vgs
  VG   #PV #LV #SN Attr   VSize   VFree
rhel 1 2 0 wz--n- <19.00g 0Try running this command again with the -v flag to view more information about the volume group.
Use vgdisplay (volume group display) on server2 and grep for ‘PE Size’ to view the PE size used in the rhel volume group:
[root@server2 ~]# sudo vgdisplay rhel | grep 'PE Size'
PE Size 4.00 MiBThe default naming convention used for logical volumes is lvol0, lvol1, lvol2, and so on you may assign custom names to them.
Use lvs (logical volume scan or summary) to scan and list available logical volumes on server2:
[root@server2 ~]# sudo lvs
  LV   VG   Attr       LSize   Pool Origin Data%  Meta%  Move Log Cpy%Sync Convert
  root rhel -wi-ao---- <17.00g
swap rhel -wi-ao---- 2.00gTry running this command again with the -v flag to view more information about the logical volumes.
Use lvdisplay (logical volume display) on server2 to view information about the root logical volume in the rhel volume group.
[root@server30 ~]# lvdisplay /dev/rhel/root
  --- Logical volume ---
  LV Path                /dev/rhel/root
  LV Name                root
  VG Name                rhel
  LV UUID                DhHyeI-VgwM-w75t-vRcC-5irj-AuHC-neryQf
  LV Write Access        read/write
  LV Creation host, time localhost.localdomain, 2024-07-08 17:32:18 -0700
  LV Status              available
  # open                 1
  LV Size                <17.00 GiB
  Current LE             4351
  Segments               1
  Allocation             inherit
  Read ahead sectors     auto
  - currently set to     8192
Block device 253:0pvcreate/pvremove
vgcreate/vgremove
lvcreate/lvremove
vgextend/vgreduce
lvextend/lvreduce
lvresize
-r option, this command calls the fsadm command to resize the underlying file system as well.vgrename
lvrename
pvs/pvdisplay
vgs/vgdisplay lvs/lvdisplay
Lists/displays volume group information Lists/displays logical volume information
All the tools accept the -v switch to support verbosity.
1. Create a partition of size 90MB on sdd using the parted command and confirm. You need to label the disk first, as it is a new disk.
[root@server2 ~]# sudo parted /dev/sdd mklabel msdos
Information: You may need to update /etc/fstab.

[root@server2 ~]# sudo parted /dev/sdd mkpart primary 1 91m
Information: You may need to update /etc/fstab.

[root@server2 ~]# sudo parted /dev/sdd print
Model: ATA VBOX HARDDISK (scsi)
Disk /dev/sdd: 262MB
Sector size (logical/physical): 512B/512B
Partition Table: msdos
Disk Flags:

Number  Start   End     Size    Type     File system  Flags
 1      1049kB  91.2MB  90.2MB  primary
2. Initialize the sdd1 partition and the sde disk using the pvcreate command. Note that there is no need to apply a disk label on sde with parted as LVM does not require it.
[root@server2 ~]# sudo pvcreate /dev/sdd1 /dev/sde -v
  Wiping signatures on new PV /dev/sdd1.
  Wiping signatures on new PV /dev/sde.
  Set up physical volume for "/dev/sdd1" with 176128 available sectors.
  Zeroing start of device /dev/sdd1.
  Writing physical volume data to disk "/dev/sdd1".
  Physical volume "/dev/sdd1" successfully created.
  Set up physical volume for "/dev/sde" with 512000 available sectors.
  Zeroing start of device /dev/sde.
  Writing physical volume data to disk "/dev/sde".
  Physical volume "/dev/sde" successfully created.
3. Create vgbook volume group using the vgcreate command and add the two physical volumes to it. Use the -s option to specify the PE size in
MBs.
[root@server2 ~]# sudo vgcreate -vs 16 vgbook /dev/sdd1 /dev/sde
  Wiping signatures on new PV /dev/sdd1.
  Wiping signatures on new PV /dev/sde.
  Adding physical volume '/dev/sdd1' to volume group 'vgbook'
  Adding physical volume '/dev/sde' to volume group 'vgbook'
  Creating volume group backup "/etc/lvm/backup/vgbook" (seqno 1).
  Volume group "vgbook" successfully created
4. List the volume group information:
[root@server2 ~]# sudo vgs vgbook
  VG     #PV #LV #SN Attr   VSize   VFree
  vgbook   2   0   0 wz--n- 320.00m 320.00m
5. Display detailed information about the volume group and the physical volumes it contains:
[root@server2 ~]# sudo vgdisplay -v vgbook
  --- Volume group ---
  VG Name               vgbook
  System ID
  Format                lvm2
  Metadata Areas        2
  Metadata Sequence No  1
  VG Access             read/write
  VG Status             resizable
  MAX LV                0
  Cur LV                0
  Open LV               0
  Max PV                0
  Cur PV                2
  Act PV                2
  VG Size               320.00 MiB
  PE Size               16.00 MiB
  Total PE              20
  Alloc PE / Size       0 / 0
  Free  PE / Size       20 / 320.00 MiB
  VG UUID               zRu1d2-ZgDL-bnzV-I9U1-0IFo-uM4x-w4bX0Q

  --- Physical volumes ---
  PV Name               /dev/sdd1
  PV UUID               8x8IgZ-3z5T-ODA8-dofQ-xk5s-QN7I-KwpQ1e
  PV Status             allocatable
  Total PE / Free PE    5 / 5

  PV Name               /dev/sde
  PV UUID               xJU0Hh-W5k9-FyKO-d6Ha-1ofW-ajvh-hJSo8R
  PV Status             allocatable
  Total PE / Free PE    15 / 15
6. List the physical volume information:
[root@server2 ~]# sudo pvs
  PV         VG     Fmt  Attr PSize   PFree
  /dev/sda2  rhel   lvm2 a--  <19.00g      0
  /dev/sdd1  vgbook lvm2 a--   80.00m  80.00m
  /dev/sde   vgbook lvm2 a--  240.00m 240.00m
7. Display detailed information about the physical volumes:
[root@server2 ~]# sudo pvdisplay /dev/sdd1
  --- Physical volume ---
  PV Name               /dev/sdd1
  VG Name               vgbook
  PV Size               86.00 MiB / not usable 6.00 MiB
  Allocatable           yes
  PE Size               16.00 MiB
  Total PE              5
  Free PE               5
  Allocated PE          0
PV UUID 8x8IgZ-3z5T-ODA8-dofQ-xk5s-QN7I-KwpQ1e1. Create a logical volume with the default name lvol0 using the lvcreate command. Use the -L option to specify the logical volume size, 120MB. You may use the -v, -vv, or -vvv option with the command for verbosity.
root@server2 ~]# sudo lvcreate -vL 120 vgbook
  Rounding up size to full physical extent 128.00 MiB
  Creating logical volume lvol0
  Archiving volume group "vgbook" metadata (seqno 1).
  Activating logical volume vgbook/lvol0.
  activation/volume_list configuration setting not defined: Checking only host tags for vgbook/lvol0.
  Creating vgbook-lvol0
  Loading table for vgbook-lvol0 (253:2).
  Resuming vgbook-lvol0 (253:2).
  Wiping known signatures on logical volume vgbook/lvol0.
  Initializing 4.00 KiB of logical volume vgbook/lvol0 with value 0.
  Logical volume "lvol0" created.
  Creating volume group backup "/etc/lvm/backup/vgbook" (seqno 2).
Size for the logical volume may be specified in units such as MBs, GBs, TBs, or as a count of LEs
MB is the default if no unit is specified
The size of a logical volume is always in multiples of the PE size. For instance, logical volumes created in vgbook with the PE size set at 16MB can be 16MB, 32MB, 48MB, 64MB, and so on.
2. Create lvbook1 of size 192MB (16x12) using the lvcreate command. Use the -l switch to specify the size in logical extents and -n for the custom name.
[root@server2 ~]# sudo lvcreate -l 12 -n lvbook1 vgbook
  Logical volume "lvbook1" created.
3. List the logical volume information:
[root@server2 ~]# sudo lvs
  LV      VG     Attr       LSize   Pool Origin Data%  Meta%  Move Log Cpy%Sync Convert
  root    rhel   -wi-ao---- <17.00g
  swap    rhel   -wi-ao----   2.00g
  lvbook1 vgbook -wi-a----- 192.00m
  lvol0   vgbook -wi-a----- 128.00m
4. Display detailed information about the volume group including the logical volumes and the physical volumes:
[root@server2 ~]# sudo vgdisplay -v vgbook
  --- Volume group ---
  VG Name               vgbook
  System ID
  Format                lvm2
  Metadata Areas        2
  Metadata Sequence No  3
  VG Access             read/write
  VG Status             resizable
  MAX LV                0
  Cur LV                2
  Open LV               0
  Max PV                0
  Cur PV                2
  Act PV                2
  VG Size               320.00 MiB
  PE Size               16.00 MiB
  Total PE              20
  Alloc PE / Size       20 / 320.00 MiB
  Free  PE / Size       0 / 0
  VG UUID               zRu1d2-ZgDL-bnzV-I9U1-0IFo-uM4x-w4bX0Q

  --- Logical volume ---
  LV Path                /dev/vgbook/lvol0
  LV Name                lvol0
  VG Name                vgbook
  LV UUID                9M9ahf-1L3y-c0yk-3Z2O-UzjH-0Amt-QLi4p5
  LV Write Access        read/write
  LV Creation host, time server2, 2024-06-12 02:42:51 -0700
  LV Status              available
  open                 0
  LV Size                128.00 MiB
  Current LE             8
  Segments               1
  Allocation             inherit
  Read ahead sectors     auto
  - currently set to     8192
  Block device           253:2

  --- Logical volume ---
  LV Path                /dev/vgbook/lvbook1
  LV Name                lvbook1
  VG Name                vgbook
  LV UUID                pgd8qR-YXXK-3Idv-qmpW-w8Az-WGLR-g2d8Yn
  LV Write Access        read/write
  LV Creation host, time server2, 2024-06-12 02:45:31 -0700
  LV Status              available
  # open                 0
  LV Size                192.00 MiB
  Current LE             12
  Segments               2
  Allocation             inherit
  Read ahead sectors     auto
  - currently set to     8192
  Block device           253:3

  --- Physical volumes ---
  PV Name               /dev/sdd1
  PV UUID               8x8IgZ-3z5T-ODA8-dofQ-xk5s-QN7I-KwpQ1e
  PV Status             allocatable
  Total PE / Free PE    5 / 0

  PV Name               /dev/sde
  PV UUID               xJU0Hh-W5k9-FyKO-d6Ha-1ofW-ajvh-hJSo8R
  PV Status             allocatable
  Total PE / Free PE    15 / 0
Alternatively, you can run the following to view only the logical volume details:
[root@server2 ~]# sudo lvdisplay /dev/vgbook/lvol0
  --- Logical volume ---
  LV Path                /dev/vgbook/lvol0
  LV Name                lvol0
  VG Name                vgbook
  LV UUID                9M9ahf-1L3y-c0yk-3Z2O-UzjH-0Amt-QLi4p5
  LV Write Access        read/write
  LV Creation host, time server2, 2024-06-12 02:42:51 -0700
  LV Status              available
  # open                 0
  LV Size                128.00 MiB
  Current LE             8
  Segments               1
  Allocation             inherit
  Read ahead sectors     auto
  - currently set to     8192
Block device 253:2[root@server2 ~]# sudo lvdisplay /dev/vgbook/lvbook1
--- Logical volume ---
LV Path /dev/vgbook/lvbook1
LV Name lvbook1
VG Name vgbook
LV UUID pgd8qR-YXXK-3Idv-qmpW-w8Az-WGLR-g2d8Yn
LV Write Access read/write
LV Creation host, time server2, 2024-06-12 02:45:31 -0700
LV Status available
# open 0
LV Size 192.00 MiB
Current LE 12
Segments 2
Allocation inherit
Read ahead sectors auto
- currently set to 8192
Block device 253:31. Create a partition of size 158MB on sdd using the parted command. Display the new partition to confirm the partition number and size.
[root@server20 ~]# parted /dev/sdd mkpart primary 91 250

[root@server2 ~]# sudo parted /dev/sdd print
Model: ATA VBOX HARDDISK (scsi)
Disk /dev/sdd: 262MB
Sector size (logical/physical): 512B/512B
Partition Table: msdos
Disk Flags:

Number  Start   End     Size    Type     File system  Flags
 1      1049kB  91.2MB  90.2MB  primary
 2      92.3MB  250MB   157MB   primary               lvm
2. Initialize sdd2 using the pvcreate command:
[root@server2 ~]# sudo pvcreate /dev/sdd2
  Physical volume "/dev/sdd2" successfully created.
3. Extend vgbook by adding the new physical volume to it:
[root@server2 ~]# sudo vgextend vgbook /dev/sdd2
  Volume group "vgbook" successfully extended
4. List the volume group:
[root@server2 ~]# sudo vgs
  VG     #PV #LV #SN Attr   VSize   VFree
  rhel     1   2   0 wz--n- <19.00g      0
  vgbook   3   2   0 wz--n- 464.00m 144.00m
5. Extend the size of lvbook1 to 340MB by adding 144MB using the lvextend command:
[root@server2 ~]# sudo lvextend -L +144 /dev/vgbook/lvbook1
  Size of logical volume vgbook/lvbook1 changed from 192.00 MiB (12 extents) to 336.00 MiB (21 extents).
  Logical volume vgbook/lvbook1 successfully resized.
EXAM TIP: Make sure the expansion of a logical volume does not affect the file system and the data it contains.
6. Issue vgdisplay on vgbook with the -v switch for the updated details:
[root@server2 ~]# sudo vgdisplay -v vgbook
  --- Volume group ---
  VG Name               vgbook
  System ID
  Format                lvm2
  Metadata Areas        3
  Metadata Sequence No  5
  VG Access             read/write
  VG Status             resizable
  MAX LV                0
  Cur LV                2
  Open LV               0
  Max PV                0
  Cur PV                3
  Act PV                3
  VG Size               464.00 MiB
  PE Size               16.00 MiB
  Total PE              29
  Alloc PE / Size       29 / 464.00 MiB
  Free  PE / Size       0 / 0
  VG UUID               zRu1d2-ZgDL-bnzV-I9U1-0IFo-uM4x-w4bX0Q

  --- Logical volume ---
  LV Path                /dev/vgbook/lvol0
  LV Name                lvol0
  VG Name                vgbook
  LV UUID                9M9ahf-1L3y-c0yk-3Z2O-UzjH-0Amt-QLi4p5
  LV Write Access        read/write
  LV Creation host, time server2, 2024-06-12 02:42:51 -0700
  LV Status              available
  open                 0
  LV Size                128.00 MiB
  Current LE             8
  Segments               1
  Allocation             inherit
  Read ahead sectors     auto
  - currently set to     8192
  Block device           253:2

  --- Logical volume ---
  LV Path                /dev/vgbook/lvbook1
  LV Name                lvbook1
  VG Name                vgbook
  LV UUID                pgd8qR-YXXK-3Idv-qmpW-w8Az-WGLR-g2d8Yn
  LV Write Access        read/write
  LV Creation host, time server2, 2024-06-12 02:45:31 -0700
  LV Status              available
  # open                 0
  LV Size                336.00 MiB
  Current LE             21
  Segments               3
  Allocation             inherit
  Read ahead sectors     auto
  - currently set to     8192
  Block device           253:3

  --- Physical volumes ---
  PV Name               /dev/sdd1
  PV UUID               8x8IgZ-3z5T-ODA8-dofQ-xk5s-QN7I-KwpQ1e
  PV Status             allocatable
  Total PE / Free PE    5 / 0

  PV Name               /dev/sde
  PV UUID               xJU0Hh-W5k9-FyKO-d6Ha-1ofW-ajvh-hJSo8R
  PV Status             allocatable
  Total PE / Free PE    15 / 0

  PV Name               /dev/sdd2
  PV UUID               1olOnk-o8FH-uJRD-2pJf-8GCy-3K0M-gcf3pF
  PV Status             allocatable
  Total PE / Free PE    9 / 0
7. View a summary of the physical volumes:
root@server2 ~]# sudo pvs
  PV         VG     Fmt  Attr PSize   PFree
  /dev/sda2  rhel   lvm2 a--  <19.00g    0
  /dev/sdd1  vgbook lvm2 a--   80.00m    0
  /dev/sdd2  vgbook lvm2 a--  144.00m    0
  /dev/sde   vgbook lvm2 a--  240.00m    0
8. View a summary of the logical volumes:
[root@server2 ~]# sudo lvs
  LV      VG     Attr       LSize   Pool Origin Data%  Meta%  Move Log Cpy%Sync Convert
  root    rhel   -wi-ao---- <17.00g
  swap    rhel   -wi-ao----   2.00g
  lvbook1 vgbook -wi-a----- 336.00m
lvol0 vgbook -wi-a----- 128.00m lvreduce commandlvresize command.1. Rename lvol0 to lvbook2 using the lvrename command and confirm with
lvs:
[root@server2 ~]# sudo lvrename vgbook lvol0 lvbook2
  Renamed "lvol0" to "lvbook2" in volume group "vgbook"
2. Reduce the size of lvbook2 to 50MB with the lvreduce command. Specify the absolute desired size for the logical volume. Answer “Do you really want to reduce vgbook/lvbook2?” in the affirmative.
[root@server2 ~]# sudo lvreduce -L 50 /dev/vgbook/lvbook2
  Rounding size to boundary between physical extents: 64.00 MiB.
  No file system found on /dev/vgbook/lvbook2.
  Size of logical volume vgbook/lvbook2 changed from 128.00 MiB (8 extents) to 64.00 MiB (4 extents).
  Logical volume vgbook/lvbook2 successfully resized.
3. Add 32MB to lvbook2 with the lvresize command:
[root@server2 ~]# sudo lvresize -L +32 /dev/vgbook/lvbook2
  Size of logical volume vgbook/lvbook2 changed from 64.00 MiB (4 extents) to 96.00 MiB (6 extents).
  Logical volume vgbook/lvbook2 successfully resized.
4. Use the pvs, lvs, vgs, and vgdisplay commands to view the updated allocation.
[root@server2 ~]# pvs
  PV         VG     Fmt  Attr PSize   PFree
  /dev/sda2  rhel   lvm2 a--  <19.00g     0
  /dev/sdd1  vgbook lvm2 a--   80.00m     0
  /dev/sdd2  vgbook lvm2 a--  144.00m     0
  /dev/sde   vgbook lvm2 a--  240.00m 32.00m

[root@server2 ~]# lvs
  LV      VG     Attr       LSize   Pool Origin Data%  Meta%  Move Log Cpy%Sync Convert
  root    rhel   -wi-ao---- <17.00g
  swap    rhel   -wi-ao----   2.00g
  lvbook1 vgbook -wi-a----- 336.00m
  lvbook2 vgbook -wi-a-----  96.00m

[root@server2 ~]# vgs
  VG     #PV #LV #SN Attr   VSize   VFree
  rhel     1   2   0 wz--n- <19.00g     0
  vgbook   3   2   0 wz--n- 464.00m 32.00m

[root@server2 ~]# vgdisplay
  --- Volume group ---
  VG Name               vgbook
  System ID
  Format                lvm2
  Metadata Areas        3
  Metadata Sequence No  8
  VG Access             read/write
  VG Status             resizable
  MAX LV                0
  Cur LV                2
  Open LV               0
  Max PV                0
  Cur PV                3
  Act PV                3
  VG Size               464.00 MiB
  PE Size               16.00 MiB
  Total PE              29
  Alloc PE / Size       27 / 432.00 MiB
  Free  PE / Size       2 / 32.00 MiB
  VG UUID               zRu1d2-ZgDL-bnzV-I9U1-0IFo-uM4x-w4bX0Q

  --- Volume group ---
  VG Name               rhel
  System ID
  Format                lvm2
  Metadata Areas        1
  Metadata Sequence No  3
  VG Access             read/write
  VG Status             resizable
  MAX LV                0
  Cur LV                2
  Open LV               2
  Max PV                0
  Cur PV                1
  Act PV                1
  VG Size               <19.00 GiB
  PE Size               4.00 MiB
  Total PE              4863
  Alloc PE / Size       4863 / <19.00 GiB
  Free  PE / Size       0 / 0
  VG UUID               UiK3fy-FGOc-2fnP-C1Y6-JS0l-irEe-Sq3c4h
5. Remove both lvbook1 and lvbook2 logical volumes using the lvremove
command. Use the -f option to suppress the “Do you really want to remove
active logical volume” message.
[root@server2 ~]# sudo lvremove /dev/vgbook/lvbook1 -f
  Logical volume "lvbook1" successfully removed.
[root@server2 ~]# sudo lvremove /dev/vgbook/lvbook2 -f
Logical volume "lvbook2" successfully removed.unmount the file system or disable swap in the logical volume.
vgdisplay command and grep for “Cur LV” to see the number of logical volumes currently available in vgbook. It should show 0, as you have removed both logical volumes.[root@server2 ~]# sudo vgdisplay vgbook | grep 'Cur LV'
Cur LV 0\
1. Remove sdd1 and sde physical volumes from vgbook by issuing the vgreduce command:
[root@server2 ~]# sudo vgreduce vgbook /dev/sdd1 /dev/sde
  Removed "/dev/sdd1" from volume group "vgbook"
  Removed "/dev/sde" from volume group "vgbook"
2. Remove the volume group using the vgremove command. This will also remove the last physical volume, sdd2, from it.
[root@server2 ~]# sudo vgremove vgbook
Volume group "vgbook" successfully removed-f option with the vgremove command to force the volume group removal even if it contains any number of logical and physical volumes in it.3. Execute the vgs and lvs commands for confirmation:
[root@server2 ~]# sudo vgs
  VG   #PV #LV #SN Attr   VSize   VFree
  rhel   1   2   0 wz--n- <19.00g    0
[root@server2 ~]# sudo lvs
  LV   VG   Attr       LSize   Pool Origin Data%  Meta%  Move Log Cpy%Sync Convert
  root rhel -wi-ao---- <17.00g
swap rhel -wi-ao---- 2.00g pvs command for confirmation.1. Remove the LVM structures from sdd1, sdd2, and sde using the pvremove command:
[root@server2 ~]# sudo pvremove /dev/sdd1 /dev/sdd2 /dev/sde
  Labels on physical volume "/dev/sdd1" successfully wiped.
  Labels on physical volume "/dev/sdd2" successfully wiped.
  Labels on physical volume "/dev/sde" successfully wiped.
2. Confirm the removal using the pvs command:
[root@server2 ~]# sudo pvs
  PV         VG   Fmt  Attr PSize   PFree
  /dev/sda2  rhel lvm2 a--  <19.00g    0
The partitions and the disk are now back to their raw state and can be repurposed.
3. Remove the partitions from sdd using the parted command:
[root@server2 ~]# sudo parted /dev/sdd rm 1 ; sudo parted /dev/sdd rm 2
Information: You may need to update /etc/fstab.

Information: You may need to update /etc/fstab.
4. Verify that all disks used in previous exercises have returned to their original raw state using the lsblk command:
[root@server2 ~]# lsblk
NAME          MAJ:MIN RM  SIZE RO TYPE MOUNTPOINTS
sda             8:0    0   20G  0 disk
├─sda1          8:1    0    1G  0 part /boot
└─sda2          8:2    0   19G  0 part
  ├─rhel-root 253:0    0   17G  0 lvm  /
  └─rhel-swap 253:1    0    2G  0 lvm  [SWAP]
sdb             8:16   0  250M  0 disk
sdc             8:32   0  250M  0 disk
sdd             8:48   0  250M  0 disk
sde             8:64   0  250M  0 disk
sdf             8:80   0    5G  0 disk
sr0 11:0 1 9.8G 0 rom Stage 1
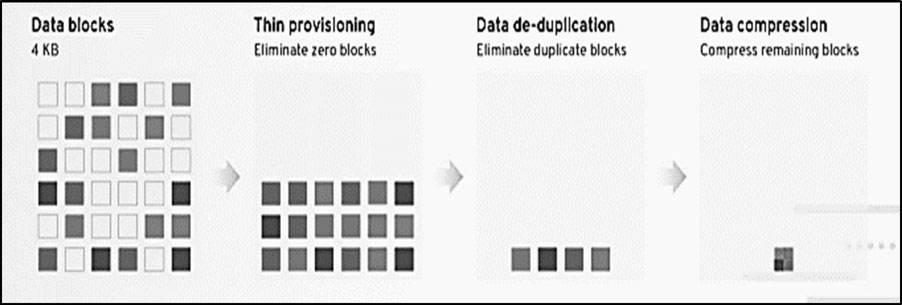
Stage 2
Stage 3
vdo and kmod-kvdo Commandsvdo
kmod-kvdo
1. Initialize the sdf disk using the pvcreate command:
[root@server2 ~]# sudo pvcreate /dev/sdf
  Physical volume "/dev/sdf" successfully created.
2. Create vgvdo volume group using the vgcreate command:
[root@server2 ~]# sudo vgcreate vgvdo /dev/sdf
  Volume group "vgvdo" successfully created
3. Display basic information about the volume group:
[root@server2 ~]# sudo vgdisplay vgvdo
  Devices file sys_wwid t10.ATA_VBOX_HARDDISK_VB428913dd-446a194f PVID none last seen on /dev/sdd1 not found.
  Devices file sys_wwid t10.ATA_VBOX_HARDDISK_VB428913dd-446a194f PVID none last seen on /dev/sdd2 not found.
  --- Volume group ---
  VG Name               vgvdo
  System ID
  Format                lvm2
  Metadata Areas        1
  Metadata Sequence No  1
  VG Access             read/write
  VG Status             resizable
  MAX LV                0
  Cur LV                0
  Open LV               0
  Max PV                0
  Cur PV                1
  Act PV                1
  VG Size               <5.00 GiB
  PE Size               4.00 MiB
  Total PE              1279
  Alloc PE / Size       0 / 0
  Free  PE / Size       1279 / <5.00 GiB
  VG UUID               tED1vC-Ylec-fpeR-KM8F-8FzP-eaQ4-AsFrgc
4. Create a VDO volume called lvvdo using the lvcreate command. Use the -l option to specify the number of logical extents (1279) to be allocated and the -V option for the amount of virtual space.
[root@server2 ~]# sudo dnf install kmod-kvdo
[root@server2 ~]# sudo lvcreate --type vdo -l 1279 -n lvvdo -V 20G vgvdo
    The VDO volume can address 2 GB in 1 data slab.
    It can grow to address at most 16 TB of physical storage in 8192 slabs.
    If a larger maximum size might be needed, use bigger slabs.
  Logical volume "lvvdo" created.
5. Display detailed information about the volume group including the logical volume and the physical volume:
[root@server2 ~]# sudo vgdisplay -v vgvdo
  Devices file sys_wwid t10.ATA_VBOX_HARDDISK_VB428913dd-446a194f PVID none last seen on /dev/sdd1 not found.
  Devices file sys_wwid t10.ATA_VBOX_HARDDISK_VB428913dd-446a194f PVID none last seen on /dev/sdd2 not found.
  --- Volume group ---
  VG Name               vgvdo
  System ID
  Format                lvm2
  Metadata Areas        1
  Metadata Sequence No  3
  VG Access             read/write
  VG Status             resizable
  MAX LV                0
  Cur LV                2
  Open LV               0
  Max PV                0
  Cur PV                1
  Act PV                1
  VG Size               <5.00 GiB
  PE Size               4.00 MiB
  Total PE              1279
  Alloc PE / Size       1279 / <5.00 GiB
  Free  PE / Size       0 / 0
  VG UUID               tED1vC-Ylec-fpeR-KM8F-8FzP-eaQ4-AsFrgc

  --- Logical volume ---
  LV Path                /dev/vgvdo/vpool0
  LV Name                vpool0
  VG Name                vgvdo
  LV UUID                yGAsK2-MruI-QGy2-Q1IF-CDDC-XPNT-qkjJ9t
  LV Write Access        read/write
  LV Creation host, time server2, 2024-06-16 09:35:46 -0700
  LV VDO Pool data       vpool0_vdata
  LV VDO Pool usage      60.00%
  LV VDO Pool saving     100.00%
  LV VDO Operating mode  normal
  LV VDO Index state     online
  LV VDO Compression st  online
  LV VDO Used size       <3.00 GiB
  LV Status              NOT available
  LV Size                <5.00 GiB
  Current LE             1279
  Segments               1
  Allocation             inherit
  Read ahead sectors     auto

  --- Logical volume ---
  LV Path                /dev/vgvdo/lvvdo
  LV Name                lvvdo
  VG Name                vgvdo
  LV UUID                nnGTW5-tVFa-T3Cy-9nHj-sozF-2KpP-rVfnSq
  LV Write Access        read/write
  LV Creation host, time server2, 2024-06-16 09:35:47 -0700
  LV VDO Pool name       vpool0
  LV Status              available
  # open                 0
  LV Size                20.00 GiB
  Current LE             5120
  Segments               1
  Allocation             inherit
  Read ahead sectors     auto
  - currently set to     8192
  Block device           253:4

  --- Physical volumes ---
  PV Name               /dev/sdf
  PV UUID               0oAXHG-C4ub-Myou-5vZf-QxIX-KVT3-ipMZCp
  PV Status             allocatable
  Total PE / Free PE    1279 / 0
The output reflects the creation of two logical volumes: a pool called /dev/vgvdo/vpool0 and a volume called /dev/vgvdo/lvvdo.
1. Remove the volume group along with the VDO volumes using the vgremove command:
[root@server2 ~]# sudo vgremove vgvdo -f
  Logical volume "lvvdo" successfully removed.
  Volume group "vgvdo" successfully removed
Remember to proceed with caution whenever you perform erase operations.
2. Execute sudo vgs and sudo lvs commands for confirmation.
[root@server2 ~]# sudo vgs
  Devices file sys_wwid t10.ATA_VBOX_HARDDISK_VB428913dd-446a194f PVID none last seen on /dev/sdd1 not found.
  Devices file sys_wwid t10.ATA_VBOX_HARDDISK_VB428913dd-446a194f PVID none last seen on /dev/sdd2 not found.
  VG   #PV #LV #SN Attr   VSize   VFree
  rhel   1   2   0 wz--n- <19.00g    0

[root@server2 ~]# sudo lvs
  Devices file sys_wwid t10.ATA_VBOX_HARDDISK_VB428913dd-446a194f PVID none last seen on /dev/sdd1 not found.
  Devices file sys_wwid t10.ATA_VBOX_HARDDISK_VB428913dd-446a194f PVID none last seen on /dev/sdd2 not found.
  LV   VG   Attr       LSize   Pool Origin Data%  Meta%  Move Log Cpy%Sync Convert
  root rhel -wi-ao---- <17.00g
  swap rhel -wi-ao----   2.00g
3. Remove the LVM structures from sdf using the pvremove command:
[root@server2 ~]# sudo pvremove /dev/sdf
  Labels on physical volume "/dev/sdf" successfully wiped.
4. Confirm the removal by running sudo pvs.
[root@server2 ~]# sudo pvs
  Devices file sys_wwid t10.ATA_VBOX_HARDDISK_VB428913dd-446a194f PVID none last seen on /dev/sdd1 not found.
  Devices file sys_wwid t10.ATA_VBOX_HARDDISK_VB428913dd-446a194f PVID none last seen on /dev/sdd2 not found.
  PV         VG   Fmt  Attr PSize   PFree
  /dev/sda2  rhel lvm2 a--  <19.00g    0
The disk is now back to its raw state and can be repurposed.
5. Verify that the sdf disk used in the previous exercises has returned to its original raw state using the lsblk command:
[root@server2 ~]# lsblk
NAME          MAJ:MIN RM  SIZE RO TYPE MOUNTPOINTS
sda             8:0    0   20G  0 disk
├─sda1          8:1    0    1G  0 part /boot
└─sda2          8:2    0   19G  0 part
  ├─rhel-root 253:0    0   17G  0 lvm  /
  └─rhel-swap 253:1    0    2G  0 lvm  [SWAP]
sdb             8:16   0  250M  0 disk
sdc             8:32   0  250M  0 disk
sdd             8:48   0  250M  0 disk
sde             8:64   0  250M  0 disk
sdf             8:80   0    5G  0 disk
sr0            11:0    1  9.8G  0 rom
This brings the exercise to an end.
Create a 100MB primary partition on one of the available 250MB disks (lsblk) by invoking the parted utility directly at the command prompt. Apply label “msdos” if the disk is new.
[root@server20 ~]# sudo parted /dev/sdb mklabel msdos
Warning: The existing disk label on /dev/sdb will be destroyed and all data on this disk will be lost. Do you want to
continue?
Yes/No? yes
Information: You may need to update /etc/fstab.

[root@server20 ~]# sudo parted /dev/sdb mkpart primary 1 101m
Information: You may need to update /etc/fstab.
Create another 100MB partition by running parted interactively while ensuring that the second partition won’t overlap the first.
[root@server20 ~]# parted /dev/sdb
GNU Parted 3.5
Using /dev/sdb
Welcome to GNU Parted! Type 'help' to view a list of commands.
(parted) mkpart primary 101 201m
Verify the label and the partitions.
(parted) print
Model: ATA VBOX HARDDISK (scsi)
Disk /dev/sdb: 262MB
Sector size (logical/physical): 512B/512B
Partition Table: msdos
Disk Flags:

Number  Start   End    Size    Type     File system  Flags
 1      1049kB  101MB  99.6MB  primary
 2      101MB   201MB  101MB   primary
Remove both partitions at the command prompt.
[root@server20 ~]# sudo parted /dev/sdb rm 1 rm 2Create two 80MB partitions on one of the 250MB disks (lsblk) using the gdisk utility. Make sure the partitions won’t overlap.
Command (? for help): o
This option deletes all partitions and creates a new protective MBR.
Proceed? (Y/N): y

Command (? for help): p
Disk /dev/sdb: 512000 sectors, 250.0 MiB
Model: VBOX HARDDISK
Sector size (logical/physical): 512/512 bytes
Disk identifier (GUID): 226F7476-7F8C-4445-9025-53B6737AD1E4
Partition table holds up to 128 entries
Main partition table begins at sector 2 and ends at sector 33
First usable sector is 34, last usable sector is 511966
Partitions will be aligned on 2048-sector boundaries
Total free space is 511933 sectors (250.0 MiB)

Number  Start (sector)    End (sector)  Size       Code  Name

Command (? for help): n
Partition number (1-128, default 1):
First sector (34-511966, default = 2048) or {+-}size{KMGTP}:
Last sector (2048-511966, default = 511966) or {+-}size{KMGTP}: +80M
Current type is 8300 (Linux filesystem)
Hex code or GUID (L to show codes, Enter = 8300):
Changed type of partition to 'Linux filesystem'

Command (? for help): n
Partition number (2-128, default 2): 2
First sector (34-511966, default = 165888) or {+-}size{KMGTP}: 165888
Last sector (165888-511966, default = 511966) or {+-}size{KMGTP}: +80M
Current type is 8300 (Linux filesystem)
Hex code or GUID (L to show codes, Enter = 8300):
Changed type of partition to 'Linux filesystem'
Verify the partitions.
Command (? for help): p
Disk /dev/sdb: 512000 sectors, 250.0 MiB
Model: VBOX HARDDISK
Sector size (logical/physical): 512/512 bytes
Disk identifier (GUID): 226F7476-7F8C-4445-9025-53B6737AD1E4
Partition table holds up to 128 entries
Main partition table begins at sector 2 and ends at sector 33
First usable sector is 34, last usable sector is 511966
Partitions will be aligned on 2048-sector boundaries
Total free space is 184253 sectors (90.0 MiB)

Number  Start (sector)    End (sector)  Size       Code  Name
   1            2048          165887   80.0 MiB    8300  Linux filesystem
   2          165888          329727   80.0 MiB    8300  Linux filesystem
Save
Command (? for help): w

Final checks complete. About to write GPT data. THIS WILL OVERWRITE EXISTING
PARTITIONS!!

Do you want to proceed? (Y/N): y
OK; writing new GUID partition table (GPT) to /dev/sdb.
The operation has completed successfully.
Delete the partitions
Command (? for help): d
Partition number (1-2): 1

Command (? for help): d
Using 2

Command (? for help): w

Final checks complete. About to write GPT data. THIS WILL OVERWRITE EXISTING
PARTITIONS!!

Do you want to proceed? (Y/N): y
OK; writing new GUID partition table (GPT) to /dev/sdb.
The operation has completed successfully.initialize 1x250MB disk for use in LVM (use lsblk to identify available disks).
root@server2 ~]# sudo parted /dev/sdd mklabel msdos
Warning: The existing disk label on /dev/sdd will be destroyed and all data
on this disk will be lost. Do you want to continue?
Yes/No? yes
Information: You may need to update /etc/fstab.

[root@server2 ~]# sudo parted /dev/sdd mkpart primary 1 250m
Information: You may need to update /etc/fstab.

[root@server2 ~]# sudo parted /dev/sdd print
Model: ATA VBOX HARDDISK (scsi)
Disk /dev/sdd: 262MB
Sector size (logical/physical): 512B/512B
Partition Table: msdos
Disk Flags:

Number  Start   End    Size   Type     File system  Flags
 1      1049kB  250MB  249MB  primary

[root@server2 ~]# sudo pvcreate /dev/sdd1
  Physical volume "/dev/sdd1" successfully created.
(Can also just use the full disk without making it into a partition first.)
Create volume group vg100 with PE size 16MB and add the physical volume.
[root@server2 ~]# sudo vgcreate -vs 16 vg100 /dev/sdd1
  Wiping signatures on new PV /dev/sdd1.
  Adding physical volume '/dev/sdd1' to volume group 'vg100'
  Creating volume group backup "/etc/lvm/backup/vg100" (seqno 1).
  Volume group "vg100" successfully created
Create two logical volumes lvol0 and swapvol of sizes 90MB and 120MB.
[root@server2 ~]# sudo lvcreate -vL 90 vg100
  Creating logical volume lvol0
  Archiving volume group "vg100" metadata (seqno 1).
  Activating logical volume vg100/lvol0.
  activation/volume_list configuration setting not defined: Checking only host tags for vg100/lvol0.
  Creating vg100-lvol0
  Loading table for vg100-lvol0 (253:2).
  Resuming vg100-lvol0 (253:2).
  Wiping known signatures on logical volume vg100/lvol0.
  Initializing 4.00 KiB of logical volume vg100/lvol0 with value 0.
  Logical volume "lvol0" created.
  Creating volume group backup "/etc/lvm/backup/vg100" (seqno 2).

[root@server2 ~]# sudo lvcreate -l 8 -n swapvol vg100
  Logical volume "swapvol" created.
Use the vgs, pvs, lvs, and vgdisplay commands for verification.
[root@server2 ~]# lvs
  Devices file sys_wwid t10.ATA_VBOX_HARDDISK_VB428913dd-446a194f PVID none last seen on /dev/sdd1 not found.
  Devices file sys_wwid t10.ATA_VBOX_HARDDISK_VB428913dd-446a194f PVID none last seen on /dev/sdd2 not found.
  LV      VG    Attr       LSize   Pool Origin Data%  Meta%  Move Log Cpy%Sync Convert
  root    rhel  -wi-ao---- <17.00g
  swap    rhel  -wi-ao----   2.00g
  lvol0   vg100 -wi-a-----  90.00m
  swapvol vg100 -wi-a----- 120.00m
[root@server2 ~]# vgs
  Devices file sys_wwid t10.ATA_VBOX_HARDDISK_VB428913dd-446a194f PVID none last seen on /dev/sdd1 not found.
  Devices file sys_wwid t10.ATA_VBOX_HARDDISK_VB428913dd-446a194f PVID none last seen on /dev/sdd2 not found.
  VG    #PV #LV #SN Attr   VSize   VFree
  rhel    1   2   0 wz--n- <19.00g     0
  vg100   1   2   0 wz--n- 225.00m 15.00m

[root@server2 ~]# pvs
  Devices file sys_wwid t10.ATA_VBOX_HARDDISK_VB428913dd-446a194f PVID none last seen on /dev/sdd1 not found.
  Devices file sys_wwid t10.ATA_VBOX_HARDDISK_VB428913dd-446a194f PVID none last seen on /dev/sdd2 not found.
  PV         VG    Fmt  Attr PSize   PFree
  /dev/sda2  rhel  lvm2 a--  <19.00g     0
  /dev/sdd1  vg100 lvm2 a--  225.00m 15.00m

[root@server2 ~]# vgdisplay
  Devices file sys_wwid t10.ATA_VBOX_HARDDISK_VB428913dd-446a194f PVID none last seen on /dev/sdd1 not found.
  Devices file sys_wwid t10.ATA_VBOX_HARDDISK_VB428913dd-446a194f PVID none last seen on /dev/sdd2 not found.
  --- Volume group ---
  VG Name               vg100
  System ID
  Format                lvm2
  Metadata Areas        1
  Metadata Sequence No  5
  VG Access             read/write
  VG Status             resizable
  MAX LV                0
  Cur LV                2
  Open LV               0
  Max PV                0
  Cur PV                1
  Act PV                1
  VG Size               225.00 MiB
  PE Size               15.00 MiB
  Total PE              15
  Alloc PE / Size       14 / 210.00 MiB
  Free  PE / Size       1 / 15.00 MiB
  VG UUID               fEUf8R-nxKF-Uxud-7rmm-JvSQ-PsN1-Mrs3zc

  --- Volume group ---
  VG Name               rhel
  System ID
  Format                lvm2
  Metadata Areas        1
  Metadata Sequence No  3
  VG Access             read/write
  VG Status             resizable
  MAX LV                0
  Cur LV                2
  Open LV               2
  Max PV                0
  Cur PV                1
  Act PV                1
  VG Size               <19.00 GiB
  PE Size               4.00 MiB
  Total PE              4863
  Alloc PE / Size       4863 / <19.00 GiB
  Free  PE / Size       0 / 0
VG UUID UiK3fy-FGOc-2fnP-C1Y6-JS0l-irEe-Sq3c4hCreate a partition on an available 250MB disk and initialize it for use in LVM (use lsblk to identify available disks).
[root@server2 ~]# parted /dev/sdb mklabel msdos
Warning: The existing disk label on /dev/sdb will be destroyed and all data on this disk will be lost. Do you want to continue?
Yes/No? yes
Information: You may need to update /etc/fstab.

[root@server2 ~]# parted /dev/sdb mkpart primary 1 250m
Information: You may need to update /etc/fstab.
Add the new physical volume to vg100.
[root@server2 ~]# sudo vgextend vg100 /dev/sdb1
  Device /dev/sdb1 has updated name (devices file /dev/sdd1)
  Physical volume "/dev/sdb1" successfully created.
  Volume group "vg100" successfully extended
Expand the lvol0 logical volume to size 300MB.
[root@server2 ~]# lvextend -L +210 /dev/vg100/lvol0
  Size of logical volume vg100/lvol0 changed from 90.00 MiB (6 extents) to 300.00 MiB (20 extents).
  Logical volume vg100/lvol0 successfully resized.
Use the vgs, pvs, lvs, and vgdisplay commands for verification.
[[root@server2 ~]# lvs
  Devices file sys_wwid t10.ATA_VBOX_HARDDISK_VB428913dd-446a194f PVID none last seen on /dev/sdd2 not found.
  LV      VG    Attr       LSize   Pool Origin Data%  Meta%  Move Log Cpy%Sync Convert
  root    rhel  -wi-ao---- <17.00g
  swap    rhel  -wi-ao----   2.00g
  lvol0   vg100 -wi-a-----  90.00m
  swapvol vg100 -wi-a----- 120.00m](<[root@server20 ~]# lvs
  LV      VG    Attr       LSize   Pool Origin Data%  Meta%  Move Log Cpy%Sync Convert
  root    rhel  -wi-ao---- %3C17.00g
  swap    rhel  -wi-ao----   2.00g
  lvol0   vg100 -wi-a----- 300.00m
  swapvol vg100 -wi-a----- 120.00m>)
[root@server2 ~]# vgs
  Devices file sys_wwid t10.ATA_VBOX_HARDDISK_VB428913dd-446a194f PVID none last seen on /dev/sdd2 not found.
  VG    #PV #LV #SN Attr   VSize   VFree
  rhel    1   2   0 wz--n- <19.00g     0
  vg100   2   2   0 wz--n- 450.00m 30.00m

[root@server2 ~]# pvs
  Devices file sys_wwid t10.ATA_VBOX_HARDDISK_VB428913dd-446a194f PVID none last seen on /dev/sdd2 not found.
  PV         VG    Fmt  Attr PSize   PFree
  /dev/sda2  rhel  lvm2 a--  <19.00g     0
  /dev/sdb1  vg100 lvm2 a--  225.00m 30.00m
  /dev/sdd1  vg100 lvm2 a--  225.00m     0

[root@server2 ~]# lvs
  Devices file sys_wwid t10.ATA_VBOX_HARDDISK_VB428913dd-446a194f PVID none last seen on /dev/sdd2 not found.
  LV      VG    Attr       LSize   Pool Origin Data%  Meta%  Move Log Cpy%Sync Convert
  root    rhel  -wi-ao---- <17.00g
  swap    rhel  -wi-ao----   2.00g
  lvol0   vg100 -wi-a----- 300.00m
  swapvol vg100 -wi-a----- 120.00m
[root@server2 ~]# vgdisplay
  Devices file sys_wwid t10.ATA_VBOX_HARDDISK_VB428913dd-446a194f PVID none last seen on /dev/sdd2 not found.
  --- Volume group ---
  VG Name               vg100
  System ID
  Format                lvm2
  Metadata Areas        2
  Metadata Sequence No  7
  VG Access             read/write
  VG Status             resizable
  MAX LV                0
  Cur LV                2
  Open LV               0
  Max PV                0
  Cur PV                2
  Act PV                2
  VG Size               450.00 MiB
  PE Size               15.00 MiB
  Total PE              30
  Alloc PE / Size       28 / 420.00 MiB
  Free  PE / Size       2 / 30.00 MiB
  VG UUID               fEUf8R-nxKF-Uxud-7rmm-JvSQ-PsN1-Mrs3zc

  --- Volume group ---
  VG Name               rhel
  System ID
  Format                lvm2
  Metadata Areas        1
  Metadata Sequence No  3
  VG Access             read/write
  VG Status             resizable
  MAX LV                0
  Cur LV                2
  Open LV               2
  Max PV                0
  Cur PV                1
  Act PV                1
  VG Size               <19.00 GiB
  PE Size               4.00 MiB
  Total PE              4863
  Alloc PE / Size       4863 / <19.00 GiB
  Free  PE / Size       0 / 0
  VG UUID               UiK3fy-FGOc-2fnP-C1Y6-JS0l-irEe-Sq3c4h
initialize the sdf disk for use in LVM and add it to vgvdo1.
[root@server2 ~]# pvcreate /dev/sdc
  Physical volume "/dev/sdc" successfully created.

[root@server2 ~]# sudo vgextend vgvdo1 /dev/sdc
  Volume group "vgvdo1" successfully extended
Create a VDO logical volume named vdovol using the entire disk capacity.
[root@server2 ~]# lvcreate --type vdo -n vdovol -l 100%FREE vgvdo1
WARNING: LVM2_member signature detected on /dev/vgvdo1/vpool0 at offset 536. Wipe it? [y/n]: y
  Wiping LVM2_member signature on /dev/vgvdo1/vpool0.
    Logical blocks defaulted to 523108 blocks.
    The VDO volume can address 2 GB in 1 data slab.
    It can grow to address at most 16 TB of physical storage in 8192 slabs.
    If a larger maximum size might be needed, use bigger slabs.
  Logical volume "vdovol" created.
Use the vgs, pvs, lvs, and vgdisplay commands for verification.
[root@server2 ~]# vgs
  Devices file sys_wwid t10.ATA_VBOX_HARDDISK_VB428913dd-446a194f PVID none last seen on /dev/sdd2 not found.
  Devices file sys_wwid t10.ATA_VBOX_HARDDISK_VB123ecea1-63467dee PVID RjcGRyHDIWY0OqAgfIHC93WT03Na1WoO last seen on /dev/sdd1 not found.
  Devices file sys_wwid t10.ATA_VBOX_HARDDISK_VBa5e3cbf7-10921e08 PVID qeP9dCevNnTy422I8p18NxDKQ2WyDodU last seen on /dev/sdf1 not found.
  Devices file sys_wwid t10.ATA_VBOX_HARDDISK_VB428913dd-446a194f PVID brKVLFEG3AoBzhWoso0Sa1gLYHgNZ4vL last seen on /dev/sdb1 not found.
  VG     #PV #LV #SN Attr   VSize   VFree
  rhel     1   2   0 wz--n- <19.00g      0
vgvdo1 2 2 0 wz--n- <5.24g 248.00mreduce the size of vdovol logical volume to 80MB.
[root@server2 ~]# lvreduce -L 80 /dev/vgvdo1/vdovol
No file system found on /dev/vgvdo1/vdovol.
WARNING: /dev/vgvdo1/vdovol: Discarding 1.91 GiB at offset 83886080, please wait...
Size of logical volume vgvdo1/vdovol changed from 1.99 GiB (510 extents) to 80.00 MiB (20 extents).
Logical volume vgvdo1/vdovol successfully resized.
[root@server2 ~]# lvs
Devices file sys_wwid t10.ATA_VBOX_HARDDISK_VB428913dd-446a194f PVID none last seen on /dev/sdd2 not found.
Devices file sys_wwid t10.ATA_VBOX_HARDDISK_VB123ecea1-63467dee PVID RjcGRyHDIWY0OqAgfIHC93WT03Na1WoO last seen on /dev/sdd1 not found.
Devices file sys_wwid t10.ATA_VBOX_HARDDISK_VBa5e3cbf7-10921e08 PVID qeP9dCevNnTy422I8p18NxDKQ2WyDodU last seen on /dev/sdf1 not found.
Devices file sys_wwid t10.ATA_VBOX_HARDDISK_VB428913dd-446a194f PVID brKVLFEG3AoBzhWoso0Sa1gLYHgNZ4vL last seen on /dev/sdb1 not found.
LV VG Attr LSize Pool Origin Data% Meta% Move Log Cpy%Sync Convert
root rhel -wi-ao---- <17.00g
swap rhel -wi-ao---- 2.00g
vdovol vgvdo1 vwi-a-v--- 80.00m vpool0 0.00
vpool0 vgvdo1 dwi------- <5.00g 60.00
[root@server2 ~]# erase logical volume vdovol.
[root@server2 ~]# lvremove /dev/vgvdo1/vdovol
Do you really want to remove active logical volume vgvdo1/vdovol? [y/n]: y
Logical volume "vdovol" successfully removed.Confirm the deletion with vgs, pvs, lvs, and vgdisplay commands.
\remove the volume group and uninitialized the physical volumes.
[root@server2 ~]# vgremove vgvdo1
Volume group "vgvdo1" successfully removed[root@server2 ~]# pvremove /dev/sdc
Labels on physical volume "/dev/sdc" successfully wiped.
[root@server2 ~]# pvremove /dev/sdf
Labels on physical volume "/dev/sdf" successfully wiped.Confirm the deletion with vgs, pvs, lvs, and vgdisplay commands.
Use the lsblk command and verify that the disks used for the LVM labs no longer show LVM information.
[root@server2 ~]# lsblk
NAME MAJ:MIN RM SIZE RO TYPE MOUNTPOINTS
sda 8:0 0 20G 0 disk
├─sda1 8:1 0 1G 0 part /boot
└─sda2 8:2 0 19G 0 part
├─rhel-root 253:0 0 17G 0 lvm /
└─rhel-swap 253:1 0 2G 0 lvm [SWAP]
sdb 8:16 0 250M 0 disk
sdc 8:32 0 250M 0 disk
sdd 8:48 0 250M 0 disk
sde 8:64 0 250M 0 disk
sdf 8:80 0 5G 0 disk
sr0 11:0 1 9.8G 0 rom