Cyber Security
-
The confusing world of SELinux
-
Firewalld stuff mostly
-
OpenSSH, system access, file transfer
The confusing world of SELinux
Firewalld stuff mostly
OpenSSH, system access, file transfer
Implementation of the Mandatory Access Control (MAC) architecture
MAC controls
SELinux decisions are stored in a special cache area called Access Vector Cache (AVC).
This cache area is checked for each access attempt by a process to determine whether the access attempt was previously allowed.
With this mechanism in place, SELinux does not have to check the policy ruleset repeatedly, thus improving performance.
SELinux is enabled by default
Subject
Object
Access
Policy
Context (label)
Labeling
SELinux User
su and sudo commands or the programs located in their home directories if they are mapped to the SELinux user user_u.Role
Type Enforcement (TE)
Type
Domain
Rules
Level
Use the id command with the -Z option to view the context set on Linux users:
[root@server30 ~]# id -Z
unconfined_u:unconfined_r:unconfined_t:s0-s0:c0.c1023
Output:
Mapped to the SELinux unconfined_u user
No SELinux restrictions placed on this user.
All Linux users, including root, run unconfined by default, (full system access)
Seven confined user identities with restricted access to objects.
Use the seinfo query command to list the SELinux users; however, the setools-console software package must be installed before doing so.
[root@server30 ~]# seinfo -u

Users: 8
   guest_u
   root
   staff_u
   sysadm_u
   system_u
   unconfined_u
   user_u
   xguest_u
Use the semanage command to view the mapping between Linux and SELinux users:
[root@server30 ~]# semanage login -l

Login Name           SELinux User         MLS/MCS Range        Service

__default__          unconfined_u         s0-s0:c0.c1023       *
root                 unconfined_u         s0-s0:c0.c1023       *
MLS/MCS Range
__default__, which is mapped to the unconfined_u user in the policy.Determine the context for processes using the ps command with the -Z flag:
[root@server30 ~]# ps -eZ | head -2
LABEL                               PID TTY          TIME CMD
system_u:system_r:init_t:s0           1 ?        00:00:02 systemd
Output:
The subject system_u is a SELinux username (mapped to Linux user root)
Object is system_r
Domain init_t reveals the type of protection applied to the process.
Level of security s0
A process that is unprotected will run in the unconfined_t domain.
ls -Z
Show the four attributes set on the /etc/passwd file:
[root@server30 ~]# ls -lZ /etc/passwd
-rw-r--r--. 1 root root system_u:object_r:passwd_file_t:s0 2806 Jul 19 21:54 /etc/passwdpasswd_file_ts0 for the passwd file./etc/selinux/targeted/contexts/files/file_contexts /etc/selinux/targeted/contexts/files/file_contexts.local
semanage command.Rules for copy move and archive:
If a file is copied to a different directory, the destination file will receive the destination directory’s context, unless the --preserve=context switch is specified with the cp command to retain the source file’s original context.
If a copy operation overwrites the destination file in the same or different directory, the file being copied will receive the context of the overwritten file, unless the --preserve=context switch is specified with the cp command to preserve the source file’s original context.
If a file is moved to the same or different directory, the SELinux context will remain intact, which may differ from the destination directory’s context.
If a file is archived with the tar command, use the --selinux option to preserve the context.
View attributes for network ports with the semanage command:
[root@server30 ~]# semanage port -l | head -7
SELinux Port Type              Proto    Port Number

afs3_callback_port_t           tcp      7001
afs3_callback_port_t           udp      7001
afs_bos_port_t                 udp      7007
afs_fs_port_t                  tcp      2040
afs_fs_port_t udp 7000, 7005Example:
What happens when a Linux user attempts to change their password using the /usr/bin/passwd command.
The passwd command is labeled with the passwd_exec_t type:
[root@server30 ~]# ls -lZ /usr/bin/passwd
-rwsr-xr-x. 1 root root system_u:object_r:passwd_exec_t:s0 32648 Aug 10  2021 /usr/bin/passwd
The passwd command requires access to the /etc/shadow file in order to modify a user password. The shadow file has a different type set on it
(shadow_t):
**[root@server30 ~]# ls -lZ /etc/shadow
----------. 1 root root system_u:object_r:shadow_t:s0 2756 Jul 19 21:54 /etc/shadowpasswd command to switch into the passwd_t domain and update the shadow file.Open two terminal windows. In window 1, issue the passwd command as user1 and wait at the prompt:
[user1@server30 root]$ passwd
Changing password for user user1.
Current password:
In window 2, run the ps command:
[root@server30 ~]# ps -eZ | grep passwd
unconfined_u:unconfined_r:passwd_t:s0-s0:c0.c1023 13001 pts/1 00:00:00 passwdpasswd command (process) transitioned into the passwd_t domain to change the user password.A sample listing of this directory is provided below:
[root@server30 ~]# ls -l /sys/fs/selinux/booleans/ | head -7
total 0
-rw-r--r--. 1 root root 0 Jul 23 04:44 abrt_anon_write
-rw-r--r--. 1 root root 0 Jul 23 04:44 abrt_handle_event
-rw-r--r--. 1 root root 0 Jul 23 04:44 abrt_upload_watch_anon_write
-rw-r--r--. 1 root root 0 Jul 23 04:44 antivirus_can_scan_system
-rw-r--r--. 1 root root 0 Jul 23 04:44 antivirus_use_jit
-rw-r--r--. 1 root root 0 Jul 23 04:44 auditadm_exec_content
The manual pages of the Booleans are available through the selinux-policy-doc package.
Once installed, use the -K option with the man command to bring the pages up for a specific Boolean.
For instance, issue man -K abrt_anon_write to view the manual pages for the abrt_anon_write Boolean.
Can be viewed, and flipped temporarily or for permanence.
New value takes effect right away.
Temporary changes are stored as a “1” or “0” in the corresponding Boolean file in the /sys/fs/selinux/booleans/
Permanent changes are saved in the policy database.
Utilities and the commands they provide
libselinux-utils
getenforcegetseboolpolicycoreutils
sestatussetseboolrestoreconpolicycoreutils-python-utils
semanagesetools-console
seinfosesearchSELinux Alert Browser
Graphical tool for viewing alerts and debugging SELinux issues.
Part of the setroubleshoot-server package.
In order to fully manage SELinux, you need to ensure that all these packages are installed on the system.
SELinux delivers a variety of commands for effective administration. Table 20-1 lists and describes the commands mentioned above plus a few more under various management categories.
Mode Management
getenforce
grubby
sestatus
setenforce
Context Management
chcon
restorecon
semanage
fcontext subcommand (changes survive file system relabeling)Policy Management
seinfo
semanage
sesearch
Boolean Management
getsebool
setsebool
semanage
booleansubcommand.Troubleshooting
sealert
/etc/selinux/config
The default content of the file is displayed below:
[root@server30 ~]# cat /etc/selinux/config

# This file controls the state of SELinux on the system.
# SELINUX= can take one of these three values:
#     enforcing - SELinux security policy is enforced.
#     permissive - SELinux prints warnings instead of enforcing.
#     disabled - No SELinux policy is loaded.
# See also:
# https://access.redhat.com/documentation/en-us/red_hat_enterprise_linux/9/html/using_selinux/changing-selinux-states-and-modes_using-selinux#changing-selinux-modes-at-boot-time_changing-selinux-states-and-modes
#
# NOTE: Up to RHEL 8 release included, SELINUX=disabled would also
# fully disable SELinux during boot. If you need a system with SELinux
# fully disabled instead of SELinux running with no policy loaded, you
# need to pass selinux=0 to the kernel command line. You can use grubby
# to persistently set the bootloader to boot with selinux=0:
#
#    grubby --update-kernel ALL --args selinux=0
#
# To revert back to SELinux enabled:
#
#    grubby --update-kernel ALL --remove-args selinux
#
SELINUX=enforcing
# SELINUXTYPE= can take one of these three values:
#     targeted - Targeted processes are protected,
#     minimum - Modification of targeted policy. Only selected processes are protected.
#     mls - Multi Level Security protection.
SELINUXTYPE=targeted
Directives:
SELINUX
SELINUXTYPE
Determine the current operating mode:
getenforce
Change the state to permissive and verify:
[root@server30 ~]# setenforce permissive
[root@server30 ~]# getenforce
PermissiveEXAM TIP: You may switch SELinux to permissive for troubleshooting a non-functioning service. Don’t forget to change it back to enforcing when the issue is resolved.
Disable SELinux persistently:
grubby --update-kernel ALL --args selinux=0
cat /boot/loader/entries/dcb323fab47049e8b89dae2ae00d41e8-5.14.0-427.26.1.el9_4.x86_64.conf Revert the above:
grubby --update-kernel ALL --remove-args selinux=0
sestatus Command
[root@server30 ~]# sestatus
SELinux status:                 enabled
SELinuxfs mount:                /sys/fs/selinux
SELinux root directory:         /etc/selinux
Loaded policy name:             targeted
Current mode:                   permissive
Mode from config file:          enforcing
Policy MLS status:              enabled
Policy deny_unknown status:     allowed
Memory protection checking:     actual (secure)
Max kernel policy version:      33
-v
[root@server30 ~]# cat /etc/sestatus.conf
[files]
/etc/passwd
/etc/shadow
/bin/bash
/bin/login
/bin/sh
/sbin/agetty
/sbin/init
/sbin/mingetty
/usr/sbin/sshd
/lib/libc.so.6
/lib/ld-linux.so.2
/lib/ld.so.1

[process]
/sbin/mingetty
/sbin/agetty
/usr/sbin/sshd[root@server30 ~]# sestatus -v
SELinux status: enabled
SELinuxfs mount: /sys/fs/selinux
SELinux root directory: /etc/selinux
Loaded policy name: targeted
Current mode: permissive
Mode from config file: enforcing
Policy MLS status: enabled
Policy deny_unknown status: allowed
Memory protection checking: actual (secure)
Max kernel policy version: 33
Process contexts:
Current context: unconfined_u:unconfined_r:unconfined_t:s0-s0:c0.c1023
Init context: system_u:system_r:init_t:s0
/sbin/agetty system_u:system_r:getty_t:s0-s0:c0.c1023
/usr/sbin/sshd system_u:system_r:sshd_t:s0-s0:c0.c1023
File contexts:
Controlling terminal: unconfined_u:object_r:user_devpts_t:s0
/etc/passwd system_u:object_r:passwd_file_t:s0
/etc/shadow system_u:object_r:shadow_t:s0
/bin/bash system_u:object_r:shell_exec_t:s0
/bin/login system_u:object_r:login_exec_t:s0
/bin/sh system_u:object_r:bin_t:s0 -> system_u:object_r:shell_exec_t:s0
/sbin/agetty system_u:object_r:getty_exec_t:s0
/sbin/init system_u:object_r:bin_t:s0 -> system_u:object_r:init_exec_t:s0
/usr/sbin/sshd system_u:object_r:sshd_exec_t:s01. Create the hierarchy sedir1/sefile1 under /tmp:
 [root@server30 ~]# cd /tmp
 [root@server30 tmp]# mkdir sedir1
 [root@server30 tmp]# touch sedir1/sefile1
2. Determine the context on the new directory and file:
 [root@server30 tmp]# ls -ldZ sedir1
drwxr-xr-x. 2 root root unconfined_u:object_r:user_tmp_t:s0 21 Jul 28 15:12 sedir1 [root@server30 tmp]# ls -ldZ sedir1/sefile1
-rw-r--r--. 1 root root unconfined_u:object_r:user_tmp_t:s0 0 Jul 28 15:12 sedir1/sefile13. Modify the SELinux user (-u) on the directory to user_u and type
(-t) to public_content_t recursively (-R) with the chcon command:
 [root@server30 tmp]# chcon -vu user_u -t  public_content_t sedir1 -R
 changing security context of 'sedir1/sefile1'
 changing security context of 'sedir1'
4. Validate the new context:
 [root@server30 tmp]# ls -ldZ sedir1
drwxr-xr-x. 2 root root user_u:object_r:public_content_t:s0 21 Jul 28 15:12 sedir1 [root@server30 tmp]# ls -ldZ sedir1/sefile1
-rw-r--r--. 1 root root user_u:object_r:public_content_t:s0 0 Jul 28 15:12 sedir1/sefile1 [root@server30 tmp]# ls -ldZ sedir1
drwxr-xr-x. 2 root root user_u:object_r:public_content_t:s0 21 Jul 28 15:12 sedir1 [root@server30 tmp]# ls -ldZ sedir1/sefile1
-rw-r--r--. 1 root root user_u:object_r:public_content_t:s0 0 Jul 28 15:12 sedir1/sefile1semanage command with the fcontext subcommand: [root@server30 tmp]# semanage fcontext -a -s user_u -t public_content_t "/tmp/sedir1(/.*)?"The above command added the context to the /etc/selinux/targeted/contexts/files/file_contexts.local file.
 [root@server30 tmp]# semanage fcontext -Cl | grep  sedir
/tmp/sedir1(/.*)? all files user_u:object_r:public_content_t:s0 chcon command: root@server30 tmp]# chcon -vu staff_u -t etc_t sedir1 -R
changing security context of 'sedir1/sefile1'
changing security context of 'sedir1'ls command: [root@server30 tmp]# ls -ldZ sedir1 ; ls -lZ sedir1/sefile1
drwxr-xr-x. 2 root root staff_u:object_r:etc_t:s0 21 Jul 28 15:12 sedir1
-rw-r--r--. 1 root root staff_u:object_r:etc_t:s0 0 Jul 28 15:12 sedir1/sefile1-R) as stored in the policy database using the restorecon command: (-F option will update all attributes, only does type by default. )$ restorecon -R -v -F sedir1
Relabeled /tmp/sedir1 from unconfined_u:object_r:public_content_t:s0 to user_u:object_r:public_content_t:s0
Relabeled /tmp/sedir1/sefile1 from unconfined_u:object_r:public_content_t:s0 to user_u:object_r:public_content_t:s0-l) the ports for the httpd service as defined in the SELinux policy database: [root@server10 ~]# semanage port -l | grep ^http_port
http_port_t tcp 80, 81, 443, 488, 8008, 8009, 8443, 9000The output reveals eight network ports the httpd process is currently allowed to listen on.
http_port_t and protocol tcp to the policy: [root@server10 ~]# semanage port -at http_port_t -p tcp 8010 [root@server10 ~]# semanage port -l | grep ^http_port
http_port_t tcp 8010, 80, 81, 443, 488, 8008, 8009, 8443, 90008010 from the policy and confirm: [root@server10 ~]# semanage port -dp tcp 8010
 [root@server10 ~]# semanage port -l | grep ^http_port
http_port_t tcp 80, 81, 443, 488, 8008, 8009, 8443, 9000EXAM TIP: Any non-standard port you want to use for any service, make certain to add it to the SELinux policy database with the correct type.
1. Create file sefile2 under /tmp and show context:
 [root@server10 ~]# touch /tmp/sefile2
 [root@server10 ~]# ls -lZ /tmp/sefile2
 -rw-r--r--. 1 root root  unconfined_u:object_r:user_tmp_t:s0 0 Jul 29 08:44  /tmp/sefile2
2. Copy this file to the /etc/default directory, and check the context again:
 [root@server10 ~]# cp /tmp/sefile2 /etc/default/

 [root@server10 ~]# ls -lZ /etc/default/sefile2
 -rw-r--r--. 1 root root  unconfined_u:object_r:etc_t:s0 0 Jul 29 08:45  /etc/default/sefile2
3. Erase the /etc/default/sefile2 file, and copy it again with the --preserve=context option:
 [root@server10 ~]# rm /etc/default/sefile2

 [root@server10 ~]# cp --preserve=context  /tmp/sefile2 /etc/default
4. List the file to view the context:
 [root@server10 ~]# ls -lZ /etc/default/sefile2
-rw-r--r--. 1 root root unconfined_u:object_r:user_tmp_t:s0 0 Jul 29 08:49 /etc/default/sefile2nfs_export_all_rw.1. Display the current setting of the Boolean nfs_export_all_rw using three different commands—getsebool, sestatus, and semanage:
 [root@server10 ~]# getsebool -a | grep  nfs_export_all_rw
 nfs_export_all_rw --> on

 [root@server10 ~]# sestatus -b | grep  nfs_export_all_rw
 nfs_export_all_rw                           on

 [root@server10 ~]# semanage boolean -l | grep  nfs_export_all_rw
 nfs_export_all_rw              (on   ,   on)  Allow  nfs to export all rw
 [root@server10 ~]#
2. Turn off the value of nfs_export_all_rw using the setsebool command by simply furnishing “off” or “0” with it and confirm:
 [root@server10 ~]# setsebool nfs_export_all_rw 0

 [root@server10 ~]# getsebool -a | grep  nfs_export_all_rw
 nfs_export_all_rw --> off
3. Reboot the system and rerun the getsebool command to check the Boolean state:
 [root@server10 ~]# getsebool -a | grep  nfs_export_all_rw
 nfs_export_all_rw --> on
4. Set the value of the Boolean persistently (-P or -m as needed) using either of the following:
 [root@server10 ~]# setsebool -P nfs_export_all_rw off
 [root@server10 ~]# semanage boolean -m -0  nfs_export_all_rw
5. Validate the new value using the getsebool, sestatus, or semanage command:
 [root@server10 ~]# sestatus -b | grep  nfs_export_all_rw
 nfs_export_all_rw                           off
 [root@server10 ~]# semanage boolean -l | grep  nfs_export_all_rw
 nfs_export_all_rw              (off  ,  off)  Allow  nfs to export all rw
 [root@server10 ~]# semanage boolean -l | grep  nfs_export_all_rw
nfs_export_all_rw (off , off) Allow nfs to export all rwSELinux generates alerts for system activities when it runs in enforcing or permissive mode.
It writes the alerts to /var/log/audit/audit.logif the auditd daemon is running, or to /var/log/messages via the rsyslog daemon in the absence of auditd.
SELinux also logs the alerts that are generated due to denial of an action, and identifies them with a type tag AVC (Access Vector Cache) in the audit.log file.
It also writes the rejection in the messages file with a message ID, and how to view the message details.
SELinux denial messages are analyzed, and the audit data is examined to identify the potential cause of the rejection.
The results of the analysis are recorded with recommendations on how to fix it.
These results can be reviewed to aid in troubleshooting, and recommended actions taken to address the issue.
SELinux runs a service daemon called setroubleshootd that performs this analysis and examination in the background.
This service also has a client interface called SELinux Troubleshooter (the sealert command) that reads the data and displays it for assessment.
The client tool has both text and graphical interfaces.
The server and client components are part of the setroubleshoot-server software package that must be installed on the system prior to using this service.
How SELinux handles an incoming access request (from a subject) to a target object:
Subject (eg: a process) makes an Action request (eg: read) > SELinux Security Server checks the SELinux Policy Database > if permission is not granted the AVC Denied Message is diaplayed. If Permission is granted, then access to object (eg: a file) is granted.
su to root from user1 and view the log:
 [root@server10 ~]# cat /var/log/audit/audit.log |  tail -10
 ...
 type=USER_START msg=audit(1722274070.748:90):  pid=1394 uid=1000 auid=0 ses=1  subj=unconfined_u:unconfined_r:unconfined_t:s0- s0:c0.c1023 msg='op=PAM:session_open  grantors=pam_keyinit,pam_limits,pam_systemd,pam_unix, pam_umask,pam_xauth acct="root" exe="/usr/bin/su"  hostname=? addr=? terminal=/dev/pts/0  res=success'UID="user1" AUID="root"
WIll show avc denied if denied.
passwd command as user1 to modify the password.restorecon /etc/shadow. ' [root@server10 ~]# chcon -vt etc_t /etc/shadow
changing security context of '/etc/shadow'passwd command as user1 to modify the password: [root@server10 ~]# su user1
[user1@server10 root]$ passwd
Changing password for user user1.
Current password:
roopasswd: Authentication token manipulation errorThe following is a sample denial record from the same file in raw format:

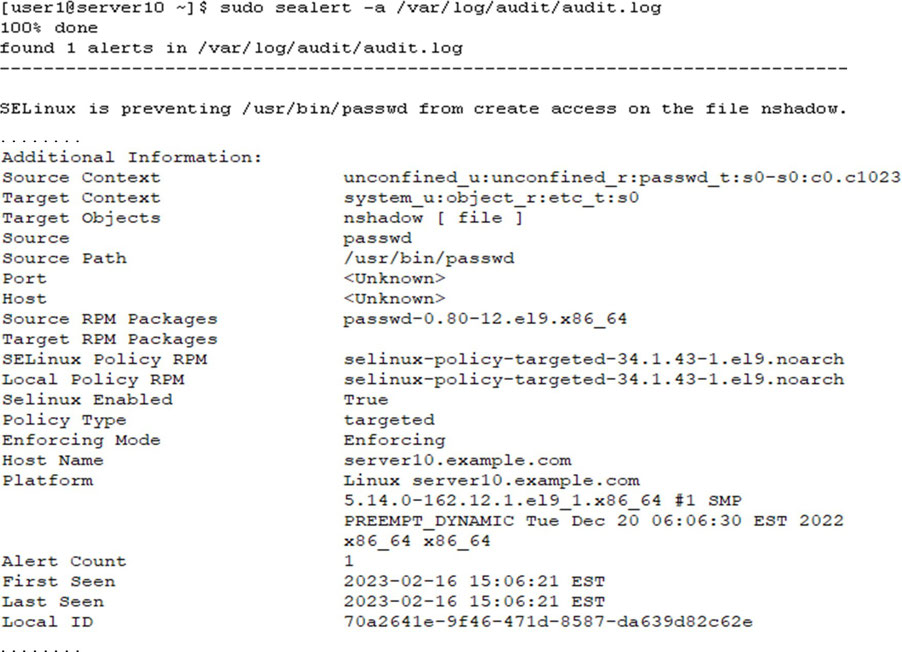
passwd command (comm)scontext) unconfined_u:unconfined_r:passwd_t:s0-s0:c0.c1023system_u:object_r:etc_t:s0permissive=0.passwd command from updating the user’s password.Use sealert to analyze (-a) all AVC records in the audit.log file. This command produces a formatted report with all relevant details:
 [root@server30 ~]# getenforce
Enforcing [root@server30 ~]# vim /etc/selinux/config
SELINUX=disabled [root@server30 ~]# rebootsudo getenforce to confirm the change when the system is up. [root@server30 ~]# getenforce
Disabled [root@server30 ~]# vim /etc/selinux/config
SELINUX=enforcing
[root@server30 ~]# rebootsudo getenforce to confirm the mode when the system is up. [root@server30 ~]# getenforce
Enforcing mkdir -p /tmp/d1/d2 [root@server30 d1]# ls -ldZ /tmp/d1
drwxr-xr-x. 3 root root unconfined_u:object_r:user_tmp_t:s0 16 Jul 29 13:17 /tmp/d1
[root@server30 d1]# ls -ldZ /tmp/d1/d2
drwxr-xr-x. 2 root root unconfined_u:object_r:user_tmp_t:s0 6 Jul 29 13:17 /tmp/d1/d2etc_t recursively with the chcon command and confirm. [root@server30 tmp]# chcon -Rv -t etc_t /tmp/d1
changing security context of '/tmp/d1/d2'
changing security context of '/tmp/d1'
[root@server30 tmp]# ls -ldZ /tmp/d1
drwxr-xr-x. 3 root root unconfined_u:object_r:etc_t:s0 16 Jul 29 13:17 /tmp/d1
[root@server30 tmp]# ls -ldZ /tmp/d1/d2
drwxr-xr-x. 2 root root unconfined_u:object_r:etc_t:s0 6 Jul 29 13:17 /tmp/d1/d2semanage command to ensure the new context is persistent on the directory hierarchy. [root@server30 tmp]# semanage fcontext -a -t etc_t /tmp/d1
[root@server30 tmp]# reboot
[root@server30 ~]# ls -ldZ /tmp/d1
drwxr-xr-x. 3 root root unconfined_u:object_r:etc_t:s0 16 Jul 29 13:17 /tmp/d1
[root@server30 ~]# ls -ldZ /tmp/d1/d2
drwxr-xr-x. 2 root root unconfined_u:object_r:etc_t:s0 6 Jul 29 13:17 /tmp/d1/d2 [root@server30 ~]# semanage port -l | grep ^http_port
http_port_t tcp 80, 81, 443, 488, 8008, 8009, 8443, 9000
[root@server30 ~]# semanage port -at http_port_t -p tcp 9005 [root@server30 ~]# semanage port -l | grep ^http_port
http_port_t tcp 9005, 80, 81, 443, 488, 8008, 8009, 8443, 9000 [root@server30 ~]# touch /tmp/sef1 [root@server30 ~]# cp /tmp/sef1 /usr/local [root@server30 ~]# ls -lZ /tmp/sef1
-rw-r--r--. 1 root root unconfined_u:object_r:user_tmp_t:s0 0 Jul 29 13:33 /tmp/sef1
[root@server30 ~]# ls -lZ /usr/local/sef1
-rw-r--r--. 1 root root unconfined_u:object_r:usr_t:s0 0 Jul 29 13:33 /usr/local/sef1--preserve=context option with the cp command. [root@server30 ~]# touch /tmp/sef2
[root@server30 ~]# cp --preserve=context /tmp/sef2 /var/local/ [root@server30 ~]# ls -lZ /tmp/sef2 /var/local/sef2
-rw-r--r--. 1 root root unconfined_u:object_r:user_tmp_t:s0 0 Jul 29 13:35 /tmp/sef2
-rw-r--r--. 1 root root unconfined_u:object_r:user_tmp_t:s0 0 Jul 29 13:36 /var/local/sef2ssh_use_tcpd using the getsebool and sestatus commands. [root@server30 ~]# getsebool -a | grep ssh_use_tcpd
ssh_use_tcpd --> offsetsebool command and toggle the value of the directive. [root@server30 ~]# setsebool ssh_use_tcpd 1 getsebool, semanage, or sestatus command. [root@server30 ~]# getsebool -a | grep ssh_use_tcpd
ssh_use_tcpd --> on
[root@server30 ~]# sestatus -b | grep ssh_use_tcpd
ssh_use_tcpd on
[root@server30 ~]# semanage boolean -l | grep ssh_use_tcpd
ssh_use_tcpd (on , off) Allow ssh to use tcpdfirewalld Zonesfirewalldfirewall-cmd command, graphically using the web console, or manually by editing rules files.Match source ip to zone that matches address > match based on zone the interface is in > matches default zone
firewalld inspects each incoming packet to determine the source IP address and applies the rules of the zone that has a match for the address.
In the event no zone configuration matches the address, it associates the packet with the zone that has the network connection defined, and applies the rules of that zone.
If neither works, firewalld associates the packet with the default zone, and enforces the rules of the default zone on the packet.
Several predefined zone files that may be selected or customized.
These files include templates for traffic that must be blocked or dropped, and for traffic that is:
public zone is the default zone, and it is activated by default when the firewalld service is started.
Predefined zones sorted based on the trust level from trusted to untrusted:
trusted
internal
home
work
dmz
external
public
block
drop
Drop all incoming traffic without responding with ICMP errors.
Intended for use in highly secure places.
For all the predefined zones, outgoing traffic is allowed by default.
firewalld stores zone rules in XML format at two locations
can copy the required zone file to the /etc/firewalld/zones directory manually, and make the necessary changes.
The firewalld service reads the files saved in this location, and applies the rules defined in them.
View the system Zones:
[root@server30 ~]# ll /usr/lib/firewalld/zones
total 40
-rw-r--r--. 1 root root 312 Nov  6  2023 block.xml
-rw-r--r--. 1 root root 306 Nov  6  2023 dmz.xml
-rw-r--r--. 1 root root 304 Nov  6  2023 drop.xml
-rw-r--r--. 1 root root 317 Nov  6  2023 external.xml
-rw-r--r--. 1 root root 410 Nov  6  2023 home.xml
-rw-r--r--. 1 root root 425 Nov  6  2023 internal.xml
-rw-r--r--. 1 root root 729 Feb 21 23:44 nm-shared.xml
-rw-r--r--. 1 root root 356 Nov  6  2023 public.xml
-rw-r--r--. 1 root root 175 Nov  6  2023 trusted.xml
-rw-r--r--. 1 root root 352 Nov  6  2023 work.xml
View the public zone:
[root@server30 ~]# cat /usr/lib/firewalld/zones/public.xml
<?xml version="1.0" encoding="utf-8"?>
<zone>
  <short>Public</short>
  <description>For use in public areas. You do not trust the other computers on networks to not harm your computer. Only selected incoming connections are accepted.</description>
  <service name="ssh"/>
  <service name="dhcpv6-client"/>
  <service name="cockpit"/>
  <forward/>
</zone>A listing of the system service files is presented below:
root@server30 ~]# ll /usr/lib/firewalld/services
total 884
-rw-r--r--. 1 root root 352 Nov  6  2023 afp.xml
-rw-r--r--. 1 root root 399 Nov  6  2023 amanda-client.xml
-rw-r--r--. 1 root root 427 Nov  6  2023 amanda-k5-client.xml
-rw-r--r--. 1 root root 283 Nov  6  2023 amqps.xml
-rw-r--r--. 1 root root 273 Nov  6  2023 amqp.xml
-rw-r--r--. 1 root root 285 Nov  6  2023 apcupsd.xml
-rw-r--r--. 1 root root 301 Nov  6  2023 audit.xml
-rw-r--r--. 1 root root 436 Nov  6  2023 ausweisapp2.xml
-rw-r--r--. 1 root root 320 Nov  6  2023 bacula-client.xml
-rw-r--r--. 1 root root 346 Nov  6  2023 bacula.xml
-rw-r--r--. 1 root root 390 Nov  6  2023 bareos-director.xml
...
...
Shows the content of the ssh service file:
[root@server30 ~]# cat /usr/lib/firewalld/services/ssh.xml
<?xml version="1.0" encoding="utf-8"?>
<service>
  <short>SSH</short>
  <description>Secure Shell (SSH) is a protocol for logging into and executing commands on remote machines. It provides secure encrypted communications. If you plan on accessing your machine remotely via SSH over a firewalled interface, enable this option. You need the openssh-server package installed for this option to be useful.</description>
  <port protocol="tcp" port="22"/>
</service>firewall-cmdfirewall-cmd Command--state
--reload
--permanent
--get-default-zone
--set-default-zone
--get-zones
–get-active-zones
--list-all
--list-all-zones
–zone
--get-services
--list-services
--add-service
--remove-service
--query-service
--list-ports
--add-port
--remove-port
--query-port
--list-interfaces
--add-interface
--change-interface
--remove-interface
--list-sources
--add-source
--change-source
--remove-source
--add and --remove options
Check the running status of the firewalld service using either the systemctl or the firewall-cmd command.
[root@server20 ~]# firewall-cmd --state
running

[root@server20 ~]# systemctl status firewalld -l --no-pager
● firewalld.service - firewalld - dynamic firewall daemon
     Loaded: loaded (/usr/lib/systemd/system/firewalld.service; enabled; preset: enabled)
     Active: active (running) since Thu 2024-07-25 13:25:21 MST; 44min ago
       Docs: man:firewalld(1)
   Main PID: 829 (firewalld)
      Tasks: 2 (limit: 11108)
     Memory: 43.9M
        CPU: 599ms
     CGroup: /system.slice/firewalld.service
             └─829 /usr/bin/python3 -s /usr/sbin/firewalld --nofork --nopid

Jul 25 13:25:21 server20 systemd[1]: Starting firewalld - dynamic firewall daemon...
Jul 25 13:25:21 server20 systemd[1]: Started firewalld - dynamic firewall daemon.1. Determine the name of the current default zone:
 [root@server20 ~]# firewall-cmd --get-default-zone
 public
2. Add a permanent rule to allow HTTP traffic on its default port:
 [root@server20 ~]# firewall-cmd --permanent --add-service  http
 success
The command made a copy of the public.xml file from /usr/lib/firewalld/zones directory into the /etc/firewalld/zones directory, and added the rule for the HTTP service.
3. Activate the new rule:
 [root@server20 zones]# firewall-cmd --reload
 success
4. Confirm the activation of the new rule:
 [root@server20 zones]# firewall-cmd --list-services
 cockpit dhcpv6-client http nfs ssh
5. Display the content of the default zone file to confirm the addition of the permanent rule:
 [root@server20 zones]# cat /etc/firewalld/zones/public.xml
 <?xml version="1.0" encoding="utf-8"?>
 <zone>
  <short>Public</short>
  <description>For use in public areas. You do not trust    the other computers on networks to not harm your computer.  Only selected incoming connections are accepted. </description>
  <service name="ssh"/>
  <service name="dhcpv6-client"/>
  <service name="cockpit"/>
  <service name="nfs"/>
  <service name="http"/>
  <forward/>
 </zone>
6. Add a runtime rule to allow traffic on TCP port 443 and verify:
 [root@server20 zones]# firewall-cmd --add-port 443/tcp
 success

 [root@server20 zones]# firewall-cmd --list-ports
 443/tcp
7. Add a permanent rule to the internal zone for TCP port range 5901 to 5910:
 [root@server20 zones]# firewall-cmd --add-port 5901-5910/tcp --permanent --zone internal
 success
8. Display the content of the internal zone file to confirm the addition of the permanent rule:
 [root@server20 zones]# cat /etc/firewalld/zones/internal.xml
 <?xml version="1.0" encoding="utf-8"?>
 <zone>
  <short>Internal</short>
  <description>For use on internal networks. You mostly  trust the other computers on the networks to not harm your  computer. Only selected incoming connections are accepted. </description>
  <service name="ssh"/>
  <service name="mdns"/>
  <service name="samba-client"/>
  <service name="dhcpv6-client"/>
  <service name="cockpit"/>
  <port port="5901-5910" protocol="tcp"/>
  <forward/>
</zone>9. Switch the default zone to internal and confirm:
 [root@server20 zones]# firewall-cmd --set-default-zone  internal
success [root@server20 zones]# firewall-cmd --get-default-zone
internal10. Activate the rules defined in the internal zone and list the port range added earlier:
  [root@server20 zones]# firewall-cmd --list-ports
5901-5910/tcp1. Remove the permanent rule for HTTP from the public zone:
 [root@server20 zones]# firewall-cmd --remove-service=http --zone public --permanent
success2. Remove the permanent rule for ports 5901 to 5910 from the internal zone:
 [root@server20 zones]# firewall-cmd --remove-port 5901- 5910/tcp --permanent
 success
3. Switch the default zone to public and validate:
 [root@server20 zones]# firewall-cmd --set-default- zone=public
 success
 [root@server20 zones]# firewall-cmd --get-default-zone
 public
4. Activate the public zone rules, and list the current services:
 [root@server20 zones]# firewall-cmd --reload
 success
 [root@server20 zones]# firewall-cmd --list-services
cockpit dhcpv6-client nfs ssh1. Remove the rule for the sshd service on server20:
 [root@server20 zones]# firewall-cmd --remove-service ssh
 success
2. Issue the ssh command on server10 to access server20:
 [root@server10 ~]# ssh 192.168.0.37
 ssh: connect to host 192.168.0.37 port 22: No route to host
3. Add the rule back for sshd on server20:
 [root@server20 zones]# firewall-cmd --add-service ssh
 success
4. Issue the ssh command on server10 to access server20. Enter “yes” if prompted and the password for user1.
 [root@server10 ~]# ssh 192.168.0.37
 The authenticity of host '192.168.0.37 (192.168.0.37)'  can't be established.
 ED25519 key fingerprint is  SHA256:Z8nFu0Jj1ASZeXByiy3aAWHpUhGhUmDCr+Omu/iWTjs.
 This key is not known by any other names
 Are you sure you want to continue connecting  (yes/no/[fingerprint])? yes
 Warning: Permanently added '192.168.0.37' (ED25519) to  the list of known hosts.
 root@192.168.0.37's password:
 Web console: https://server20:9090/ or  https://192.168.0.37:9090/

 Register this system with Red Hat Insights: insights- client --register
 Create an account or view all your systems at  https://red.ht/insights-dashboard
Last login: Thu Jul 25 13:37:47 2024 from 192.168.0.21/ [root@server20 ~]# firewall-cmd --add-service https --permanent
success
[root@server20 ~]# firewall-cmd --reload
successfirewall-cmd command. [root@server20 ~]# cat /etc/firewalld/zones/public.xml
<?xml version="1.0" encoding="utf-8"?>
<zone>
<short>Public</short>
<description>For use in public areas. You do not trust the other computers on networks to not harm your computer. Only selected incoming connections are accepted.</description>
<service name="ssh"/>
<service name="dhcpv6-client"/>
<service name="cockpit"/>
<service name="nfs"/>
<service name="https"/>
<forward/>
</zone>
[root@server20 ~]# firewall-cmd --list-services
cockpit dhcpv6-client https nfs ssh [root@server20 ~]# firewall-cmd --add-port 8000- 8005/udp --zone trusted --permanent
success
[root@server20 ~]# firewall-cmd --reload
successfirewall-cmd command. [root@server20 ~]# firewall-cmd --list-ports -- zone trusted
8000-8005/udp
[root@server20 ~]# cat /etc/firewalld/zones/trusted.xml
<?xml version="1.0" encoding="utf-8"?>
<zone target="ACCEPT">
<short>Trusted</short>
<description>All network connections are accepted.</description>
<port port="8000-8005" protocol="udp"/>
<forward/>
</zone>Secure Shell (SSH)
ssh and sftp for remote users to log in, transfer files, and execute commands securely.Symmetric Technique
Asymmetric Technique
GSSAPI-Based Authentication
Host-Based Authentication
Private/Public Key-Based Authentication
Challenge-Response Authentication
Password-Based Authentication
RSA (Rivest-Shamir-Adleman)
DSA and ECDSA (Digital Signature Algorithm and Elliptic Curve Digital Signature Algorithm)
openssh
ssh-keygen command and some library routinesopenssh-clients
sftp, ssh, and ssh-copy-id, and a client configuration file /etc/ssh/ssh_configopenssh-server
sshd
Preconfigured and operational on new RHEL installations
Allows remote users to log in to the system using an ssh client program such as PuTTY or the ssh command.
Daemon listens on TCP port 22
Use sftp instead of scp do to scp security flaws.
sftp
ssh
ssh-copy-id
ssh-keygen
/etc/ssh/sshd_config
/var/log/secure
View directives listed in /etc/ssh/sshd_config:
[root@server30 tmp]# cat /etc/ssh/sshd_configPort
Protocol
ListenAddress
SyslogFacility
LogLevel
Identifies the level of criticality for the messages to be logged. Default is INFO.
PermitRootLogin
Allows or disallows the root user to log in directly to the system. Default is yes.
PubKeyAuthentication
Enables or disables public key-based authentication. Default is yes.
AuthorizedKeysFile
Sets the name and location of the file containing a user’s authorized keys. Default is ~/.ssh/authorized_keys.
PasswordAuthentication
Enables or disables local password authentication. Default is yes.
PermitEmptyPasswords
Allows or disallows the use of null passwords. Default is no.
ChallengeResponseAuthentication
Enables or disables challenge-response authentication mechanism. Default is yes.
UsePAM
Enables or disables user authentication via PAM. If enabled, only root will be able to run the sshd daemon. Default is yes.
X11Forwarding
Allows or disallows remote access to graphical applications. Default is yes.
/etc/ssh/ssh_config
View the default directive settings:
[root@server30 tmp]# cat /etc/ssh/sshd_config
Host
ForwardX11
PasswordAuthentication
StrictHostKeyChecking
Whether to add host keys (host fingerprints) to ~/.ssh/known_hosts when accessing a host for the first time
What to do when the keys of a previously accessed host mismatch with what is stored in ~/.ssh/known_hosts.
no:
yes:
accept-new:
ask (default):
IdentityFile
Port
Sets the port number to listen on. Default is 22.
Protocol
Specifies the default protocol version to use
~/.ssh/
ssh-keygen command for the first time to generate a key pair1. Issue the ssh command as user1 on server10:
[user1@server30 tmp]$ ssh server202. Issue the basic Linux commands whoami, hostname, and pwd to confirm that you are logged in as user1 on server20 and placed in the correct home directory:
[user1@server40 ~]$ whoami
user1
[user1@server40 ~]$ hostname
server40
[user1@server40 ~]$ pwd
/home/user1
3. Run the logout or the exit command or simply press the key combination Ctrl+d to log off server20 and return to server10:
[user1@server40 ~]$ exit
logout
Connection to server40 closed.
If you wish to log on as a different user such as user2 (assuming user2 exists on the target server server20), you may run the ssh command in either of the following ways:
[user1@server30 tmp]$ ssh -l user2 server40
[user1@server30 tmp]$ ssh user2@server40
1. Log on to server10 as user1.
2. Generate RSA keys without a password (-N) and without detailed output (-q). Press Enter when prompted to provide the filename to store the private key.
[user1@server30 tmp]$ ssh-keygen -N "" -q
Enter file in which to save the key (/home/user1/.ssh/id_rsa):
View the private key:
[user1@server30 tmp]$ cat ~/.ssh/id_rsa
View the public key:
[user1@server30 tmp]$ cat ~/.ssh/id_rsa.pub
3. Copy the public key file to server20 under /home/user1/.ssh directory.
user1@server30 tmp]$ ssh-copy-id server40
/usr/bin/ssh-copy-id: INFO: Source of key(s) to be installed: "/home/user1/.ssh/id_rsa.pub"
/usr/bin/ssh-copy-id: INFO: attempting to log in with the new key(s), to filter out any that are already installed
/usr/bin/ssh-copy-id: INFO: 1 key(s) remain to be installed -- if you are prompted now it is to install the new keys
user1@server40's password:

Number of key(s) added: 1

Now try logging into the machine, with:   "ssh 'server40'"
and check to make sure that only the key(s) you wanted were added.[user1@server30 tmp]$ cat ~/.ssh/known_hosts
4. On server10, run the ssh command as user1 to connect to server20. You will not be prompted for a password because there was none assigned to the ssh keys.
[user1@server30 tmp]$ ssh server40
Register this system with Red Hat Insights: insights-client --register
Create an account or view all your systems at https://red.ht/insights-dashboard
Last login: Sun Jul 21 01:20:17 2024 from 192.168.0.30
View this login attempt in the /var/log/secure file on server20:
[user1@server40 ~]$ sudo tail /var/log/secure
ssh command to run programs without remoting in:Execute the hostname command on server20:
[user1@server30 tmp]$ ssh server40 hostname
server40
Run the nmcli command on server20 to show (s) active network connections(c):
[user1@server30 tmp]$ ssh server40 nmcli c s
NAME    UUID                                  TYPE      DEVICE
enp0s3  1c391bb6-20a3-4eb4-b717-1e458877dbe4  ethernet  enp0s3
lo 175f8a4c-1907-4006-b838-eb43438d847b loopback lo On server10, to connect to server20:
[user1@server30 tmp]$ sftp server40
Connected to server40.
sftp>
Type ? at the prompt to list available commands along with a short description:
[user1@server30 tmp]$ sftp server40
Connected to server40.
sftp> ?
Available commands:
bye                                Quit sftp
cd path                            Change remote directory to 'path'
chgrp [-h] grp path                Change group of file 'path' to 'grp'
chmod [-h] mode path               Change permissions of file 'path' to 'mode'
chown [-h] own path                Change owner of file 'path' to 'own'
df [-hi] [path]                    Display statistics for current directory or
                                   filesystem containing 'path'
exit                               Quit sftp
get [-afpR] remote [local]         Download file
help                               Display this help text
lcd path                           Change local directory to 'path'
lls [ls-options [path]]            Display local directory listing
lmkdir path                        Create local directory
ln [-s] oldpath newpath            Link remote file (-s for symlink)
lpwd                               Print local working directory
ls [-1afhlnrSt] [path]             Display remote directory listing
lumask umask                       Set local umask to 'umask'
mkdir path                         Create remote directory
progress                           Toggle display of progress meter
put [-afpR] local [remote]         Upload file
pwd                                Display remote working directory
quit                               Quit sftp
reget [-fpR] remote [local]        Resume download file
rename oldpath newpath             Rename remote file
reput [-fpR] local [remote]        Resume upload file
rm path                            Delete remote file
rmdir path                         Remove remote directory
symlink oldpath newpath            Symlink remote file
version                            Show SFTP version
!command                           Execute 'command' in local shell
!                                  Escape to local shell
?                                  Synonym for help
Example:
sftp> ls
sftp> mkdir /tmp/dir10-20
sftp> cd /tmp/dir10-20
sftp> pwd
Remote working directory: /tmp/dir10-20
sftp> put /etc/group
Uploading /etc/group to /tmp/dir10-20/group
group                                       100% 1118     1.0MB/s   00:00
sftp> ls -l
-rw-r--r--    1 user1    user1        1118 Jul 21 01:41 group
sftp> cd ..
sftp> pwd
Remote working directory: /tmp
sftp> cd /home/user1
sftp> get /usr/bin/gzip
Fetching /usr/bin/gzip to gzip
gzip                                        100%   90KB  23.0MB/s   00:00
sftp> lcd, lls, lpwd, and lmkdir are run on the source server.Type quit at the sftp> prompt to exit the program when you’re done:
sftp> quit
[user1@server30 tmp]$ [root@server40 ~]# adduser user20
[root@server40 ~]# passwd user20
Changing password for user user20.
New password:
BAD PASSWORD: The password is shorter than 8 characters
Retype new password:
passwd: all authentication tokens updated successfully.[user20@server40 ~]# ssh-keygen -N "" -q
Enter file in which to save the key (/root/.ssh/id_rsa): [user20@server40 ~]# ssh-copy-id server30[user20@server40 ~]# ssh server30
Activate the web console with: systemctl enable --now cockpit.socket
Register this system with Red Hat Insights: insights-client --register
Create an account or view all your systems at https://red.ht/insights-dashboard
Last login: Fri Jul 19 14:09:22 2024
[user20@server30 ~]# As user1 with sudo on server30, edit the /etc/ssh/sshd_config file and change the value of the directive PermitRootLogin to “no”.
[user1@server30 ~]$ sudo vim /etc/ssh/sshd_config
Use the systemctl command to activate the change.
[user1@server30 ~]$ systemctl restart sshd
==== AUTHENTICATING FOR org.freedesktop.systemd1.manage-units ====
Authentication is required to restart 'sshd.service'.
Authenticating as: root
Password:
==== AUTHENTICATION COMPLETE ====(this didn’t work, I think it’s because I configured passwordless authentication on here)