Containers
Introduction to Containers
- Take advantage of the native virtualization features available in the Linux kernel.
- Each container typically encapsulates one self-contained application that includes all dependencies such as library files, configuration files, software binaries, and services.
Traditional server/ application deployment:
- Applications may have conflicting requirements in terms of shared library files, package dependencies, and software versioning.
- Patching or updating the operating system may result in breaking an application functionality.
- Developers perform an analysis on their current deployments before they decide whether to collocate a new application with an existing one or to go with a new server without taking the risk of breaking the current operation.
Container Model:
-
Developers can now package their application alongside dependencies, shared library files, environment variables, and other specifics in a single image file and use that file to run the application in a unique, isolated “environment” called container.
-
A container is essentially a set of processes that runs in complete seclusion on a Linux system.
-
A single Linux system running on bare metal hardware or in a virtual machine may have tens or hundreds of containers running at a time.
-
The underlying hardware may be located either on the ground or in the cloud.
-
Each container is treated as a complete whole, which can be tagged, started, stopped, restarted, or even transported to another server without impacting other running containers.
-
Any conflicts that may exist among applications, within application components, or with the operating system can be evaded.
-
Applications encapsulated to run inside containers are called containerized applications.
-
Containerization is a growing trend for architecting and deploying applications, application components, and databases in real world environments.
Containers and the Linux Features
- Container technology employs some of the core features available in the Linux kernel.
- These features include:
- control groups
- namespaces
- seccomp (secure computing mode)
- SELinux
Control Groups (cgroups)
- Split processes into groups to set limits on their consumption of compute resources—CPU, memory, disk, and network I/O.
- These restrictions result in controlling individual processes from over utilizing available resources.
Namespaces
- Restrict the ability of process groups from seeing or accessing system resources—PIDs, network interfaces, mount points, hostname, etc.
- Creates a layer of isolation between process groups and the rest of the system.
- Guarantees a secure, performant, and stable environment for containerized applications as well as the host operating system.
Secure Computing Mode (seccomp) and SELinux
- Impose security constraints thereby protecting processes from one another and the host operating system from running processes.
- Container technology employs these characteristics to run processes isolated in a highly secure environment with full control over what they can or cannot do.
Benefits of Using Containers
Isolation
- Containers are not affected due to changes in the host operating system or in other hosted or containerized applications, as they run fully isolated from the rest of the environment.
Loose Coupling
- Containerized applications are loosely coupled with the underlying operating system due to their self-containment and minimal level of dependency.
Maintenance Independence
- Maintenance is performed independently on individual containers.
Less Overhead
- Containers require fewer system resources than do bare metal and virtual servers.
Transition Time
- Containers require a few seconds to start and stop.
Transition Independence
- Transitioning from one state to another (start or stop) is independent of other containers, and it does not affect or require a restart of any underlying host operating system service.
Portability
- Containers can be migrated to other servers without modifications to the contained applications.
- Target servers may be bare metal or virtual and located on-premises or in the cloud.
Reusability
- The same container image can be used to run identical containers in development, test, preproduction, and production environments.
- There is no need to rebuild the image.
Rapidity
- The container technology allows for accelerated application development, testing, deployment, patching, and scaling.
- There is no need for an exhaustive testing.
Version Control
- Container images can be version-controlled, which gives users the flexibility in choosing the right version to run a container.
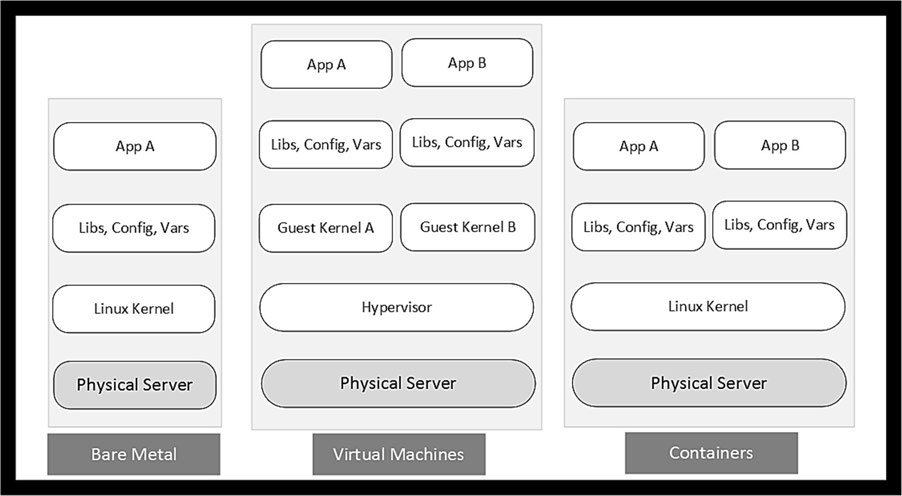
Container Home: Bare Metal or Virtual Machine
Containers
- run directly on the underlying operating system whether it be running on a bare metal server or in a virtual machine.
- Share hardware and operating system resources securely among themselves.
- Containerized applications stay lightweight and isolated, and run in parallel.
- Share the same Linux kernel and require far fewer hardware resources than do virtual machines, which contributes to their speedy start and stop.
- Given the presence of an extra layer of hypervisor services, it may be more beneficial and economical to run containers directly on non-virtualized physical servers.
Container Images and Container Registries
- Launching a container requires a pre-packaged image to be available.
container image
-
Essentially a static file that is built with all necessary components (application binaries, library files, configuration settings, environment variables, static data files, etc.)
-
Required by an application to run smoothly, securely, and independently.
-
RHEL follows the open container initiative (OCI) to allow users to build images based on industry standard specifications that define the image format, host operating system metadata, and supported hardware architectures.
-
An OCI-compliant image can be executed and managed with OCI-compliant tools such as podman (pod manager) and Docker.
-
Images can be version-controlled giving users the suppleness to use the latest or any of the previous versions to launch their containers.
-
A single image can be used to run several containers at once.
-
Container images adhere to a standard naming convention for identification.
-
This is referred to as fully qualified image name (FQIN).
- Comprised of four components:
- (1) the storage location (registry_name)
- (2) the owner or organization name (user_name)
- (3) a unique repository name (repo_name)
- (4) an optional version (tag).
- The syntax of an FQIN is: registry_hostname/user_name/repo_name:tag.
- Comprised of four components:
-
Images are stored and maintained in public or private registries;
-
They need to be downloaded and made locally available for consumption.
-
There are several registries available on the Internet.
- registry.redhat.io (/images/images based on official Red Hat products; requires authentication),
- registry.access.redhat.com (requires no authentication)
- registry.connect.redhat.com (/images/images based on third-party products)
- hub.docker.com (Docker Hub).
-
The three Red Hat registries may be searched using the Red Hat Container Catalog at catalog.redhat.com/software/containers/search.
-
Additional registries may be added as required.
-
Private registries may also require authentication for access.
Rootful vs. Rootless Containers
-
Containers can be launched with the root user privileges (sudo or directly as the root user).
-
This gives containers full access to perform administrative functions including the ability to map privileged network ports (1024 and below).
-
Launching containers with superuser rights opens a gate to potential unauthorized access to the container host if a container is compromised due to a vulnerability or misconfiguration.
-
To secure containers and the underlying operating system, containers should be launched and interacted with as normal Linux users.
-
Such containers are referred to as rootless containers.
-
Rootless containers allow regular, unprivileged users to run containers without the ability to perform tasks that require privileged access.
Working with Images and Containers
Lab: Install Necessary Container Support
- Install the necessary software to set the foundation for completing the exercises in the remainder of the chapter.
- The standard RHEL 9.1 image includes a package called
container-toolsthat consists of all the required components and commands. - Use the standard
dnfcommand to install the package.
1. Install the container-tools package:
2. Verify the package installation:
podman Command
- Finding, inspect, retrieve, and delete images
- Run, stop, list, and delete containers.
- Used for most of these operations.
Subcommands
Image Management
build
- Builds an image using instructions delineated in a Container file
images
- Lists downloaded images from local storage
inspect
- Examines an image and displays its details
login/logout
- Logs in/out to/from a container registry. A login may be required to access private and protected registries.
pull
- Downloads an image to local storage from a registry
rmi
- Removes an image from local storage
search
- Searches for an image. The following options can be included with this subcommand:
- A partial image name in the search will produce a list of all images containing the partial name.
- The
--no-truncoption makes the command exhibit output without truncating it. - The
--limit <number>option limits the displayed results to the specified number.
tag
- Adds a name to an image. The default is ’latest’ to classify the image as the latest version. Older images may have specific version identifiers.
Container Management
attach
- Attaches to a running container
exec
- Runs a process in a running container
generate
- Generates a systemd unit configuration file that can be used to control the operational state of a container. The
--newoption is important and is employed in later exercises.
info
- Reveals system information, including the defined registries
inspect
- Exhibits the configuration of a container
ps
- Lists running containers (includes stopped containers with the -a option)
rm
- Removes a container
run
- Launches a new container from an image. Some options such as -d (detached), -i (interactive), and -t (terminal) are important and are employed in exercises where needed.
start/stop/restart
- Starts, stops, or restarts a container
skopeo Command
- Utilized for interacting with local and remote images and registries.
- Has numerous subcommands available; however, you will be using only the
inspectsubcommand to examine the details of an image stored in a remote registry.
/etc/containers/registries.conf
- System-wide configuration file for image registries.
- Normal Linux users may store a customized copy of this file, if required, under the ~/.config/containers directory.
- Settings stored in the per-user file will take precedence over those stored in the system-wide file.
- Useful for running rootless containers.
- Defines searchable and blocked registries.
- The output shows three registries.
- The
podmancommand searches these registries for container images in the given order. - Can add additional registries to the list.
Add a private registry called registry.private.myorg.io to be added with the highest priority:
If this private registry is the only one to be used, you can take the rest of the registry entries out of the list:
EXAM TIP: As there is no Internet access provided during Red Hat exams, you may have to access a network-based registry to download images.
Viewing Podman Configuration and Version
- The podman command references various system runtime and configuration files and runs certain Linux commands in the background to gather and display information.
- For instance, it looks for registries and storage data in the system-wide and per-user configuration files, pulls memory information from the /proc/meminfo file, executes
uname -rto obtain the kernel version, and so on. - podman’s
infosubcommand shows all this information.
Here is a sample when this command is executed as a normal user (user1):
-
Re-run the command as root (preceded by sudo if running as user1) and compare the values for the settings “rootless” under host and “ConfigFile” and “ImageStore” under store.
-
The differences lie between where the root and rootless (normal) users store and obtain configuration data, the number of container images they have locally available, and so on.
Similarly, you can run the podman command as follows to check its version:
Image Management
Container images
- Are available from numerous private and public registries.
- They are pre-built for a variety of use cases.
- You can search through registries to find the one that suits your needs.
- You can examine their metadata before downloading them for consumption.
- Downloaded images can be removed when no longer needed to conserve local storage.
- The same pair of commands—
podmanandskopeo—is employed for these operations.
Lab: Search, Examine, Download, and Remove an Image
- Log in to the registry.access.redhat.com registry
- Look for an image called mysql-80 in the registry, examine its details, pull it to your system, confirm the retrieval, and finally erase it from the local storage.
1. Log in to the specified Red Hat registry:
2. Confirm a successful login:
3. Find the mysql-80 image in the specified registry. Add the
--no-trunc option to view full output.
4. Select the second image rhel9/mysql-80 for this exercise. Inspect the image without downloading it using skopeo inspect. A long output will be generated. The command uses the docker:// mechanism to access the image.
Output:
-
Shows older versions under RepoTags
-
Creation time for the latest version
-
Build date of the image
-
description
-
other information.
-
It is a good practice to analyze the metadata of an image prior to downloading and consuming it.
5. Download the image by specifying the fully qualified image name using podman pull:
6. List the image to confirm the retrieval using podman images:
7. Display the image’s details using podman inspect:
8. Remove the mysql-80 image from local storage:
- Shows the ID of the image after deletion.
9. Confirm the removal:
Containerfile
- Can build a custom image by outlining the steps you need to be run in a file called Containerfile.
- The podman command can then be used to read those instructions and executes them to produce a new image.
- File name containerfile is widespread; but you can use any name of your liking.
Instructions that may be utilized inside a Containerfile to perform specific functions during the build process:
CMD
- Runs a command
COPY
- Copies files to the specified location
ENV
- Defines environment variables to be used during the build process
EXPOSE
- A port number that will be opened when a container is launched using this image
FROM
- Identifies the base container image to use
RUN
- Executes the specified commands
USER
- Defines a non-root user to run the commands as
WORKDIR
- Sets the working directory. This directory is automatically created if it does not already exist.
A sample container file is presented below:
- The index.html file may contain a basic statement such as “This is a custom-built Apache web server container image based on RHEL 9”.
Lab: Use Containerfile to Build Image
- Use a containerfile to build a custom image based on the latest version of the RHEL 9 universal base image (ubi) available from a Red Hat container registry.
- Confirm the image creation.
- Use the podman command for these activities.
1. Log in to the specified Red Hat registry:
2. Confirm a successful login:
3. Create a file called containerfile with the following code:
4. Create a file called testfile with some random text in it and place it in the same directory as the containerfile.
5. Build an image by specifying the containerfile name and an image tag such as ubi9-simple-image. The period character at the end represents the current directory and this is where both containerfile and testfile are located.
6. Confirm image creation:
Output:
-
downloaded image
-
new custom image along with their image IDs, creation time, and size.
-
Do not remove the custom image yet as you will be using it to launch a container in the next section.
Basic Container Management
- Starting, stopping, listing, viewing information about, and deleting them.
- Depending on the use case, containers can be launched in different ways.
- They can:
- Have a name assigned or be nameless
- Have a terminal session opened for interaction
- Execute an entry point command (the command specified at the launch time) and be auto-terminated right after.
- etc.
- Running containers can be stopped and restarted, or discarded if no longer needed.
- The podman command is utilized to start containers and manage their lifecycle.
- This command is also employed to list stopped and running containers, and view their details.
Lab: Run, Interact with, and Remove a Named Container
- Run a container based on the latest version of the RHEL 8 ubi available in the Red Hat container registry.
- Assign this container a name and run a few native Linux commands in a terminal window interactively.
- Exit out of the container to mark the completion of the exercise.
1. Launch a container using ubi8 (RHEL 8). Name this container rhel8-base-os and open a terminal session for interaction:
-
Downloaded the latest version of the specified image automatically even though no FQIN was provided.
- This is because it searched through the registries listed in the /etc/containers/registries.conf file and retrieved the image from wherever it found it first (registry.access.redhat.com).
-
Opened a terminal session inside the container as the root user to interact with the containerized RHEL 8 OS.
-
The container ID is reflected as the hostname in the container’s command prompt (last line in the output). This is an auto-generated ID.
-
If you encounter any permission issues, delete the /etc/docker directory (if it exists) and try again.
2. Run a few basic commands such as pwd, ls, cat, and date inside the container for verification:
3. Close the terminal session when done:
4. Delete the container using podman rm:
Confirm the removal with podman ps.
Lab: Run a Nameless Container and Auto-Remove it After Entry Point Command Execution
- Launch a container based on the latest version of RHEL 7 ubi available in a Red Hat container registry.
- This image provides the base operating system layer to deploy containerized applications.
- Enter a Linux command at the command line for execution inside the container as an entry point command and the container should be automatically deleted right after that.
1. Start a container using ubi7 (RHEL 7) and run ls as an entry point command. Remove the container as soon as the entry point command has finished running.
2. Confirm the container removal with podman ps:
Advanced Container Management
- Preset environment variables may be passed when launching containers or new variables may be set for containerized applications to consume for proper operation.
- Information stored during an application execution is lost when a container is restarted or erased.
- This behavior can be overridden by making a directory on the host available inside the container for saving data persistently.
- Containers may be configured to start and stop with the transitioning of the host system via the systemd service. These advanced tasks are also performed with the
podmancommand.
Containers and Port Mapping
- Applications running in different containers often need to exchange data for proper operation.
- For instance, a containerized Apache web server may need to talk to a MySQL database instance running in a different container.
- It may also need to talk to the outside world over a port such as 80 or 8080.
- To support this traffic flow, appropriate port mappings are established between the host system and each container.
EXAM TIP: As a normal user, you cannot map a host port below 1024 to a container port.
Lab: Configure Port Mapping
- Launch a container called rhel7-port-map in detached mode (as a daemon) with host port 10000 mapped to port 8000 inside the container.
- Use a version of the RHEL 7 image with Apache web server software pre-installed.
- This image is available from a Red Hat container registry.
- List the running container and confirm the port mapping.
1. Search for an Apache web server image for RHEL 7 using podman search:
2. Log in to registry.redhat.io using the Red Hat credentials to access the image:
3. Download the latest version of the Apache image using podman pull:
4. Verify the download using podman images:
5. Launch a container named rhel7-port-map in detached mode to run the containerized Apache web server with host port 10000 mapped to container port 8000.
6. Verify that the container was launched successfully using podman ps:
7. You can also use podman port to view the mapping:
- Now any inbound web traffic on host port 10000 will be redirected to the container.
Exercise 22-7: Stop, Restart, and Remove a Container
- Stop the container, restart it, stop it again, and then erase it.
- Use appropriate
podmansubcommands and verify each transition.
1. Verify the current operational state of the container rhel7-port-map:
2. Stop the container and confirm.
(the -a option with ps also includes the stopped containers in the output):
3. Start the container and confirm:
4. Stop the container and remove it:
5. Confirm the removal:
Containers and Environment Variables
- Many times it is necessary to pass a host’s pre-defined environment variable, such as PATH, to a containerized application for consumption.
- Moreover, it may also be necessary at times to set new variables to inject debugging flags or sensitive information such as passwords, access keys, or other secrets for use inside containers.
- Passing host environment variables or setting new environment variables is done at the time of launching a container.
- The
podmancommand allows multiple variables to be passed or set with the-eoption.
EXAM TIP: Use the -e option with each variable that you want to pass or set.
Lab: Pass and Set Environment Variables
- Launch a container using the latest version of a ubi for RHEL 9 available in a Red Hat container registry.
- Inject the HISTSIZE environment variable, and a variable called SECRET with a value “secret123”.
- Name this container rhel9-env-vars and have a shell terminal opened to check the variable settings.
- Remove this container.
1. Launch a container with an interactive terminal session and inject variables HISTSIZE and SECRET as directed. Use the specified container image.
2. Verify both variables using the echo command:
3. Disconnect from the container, and stop and remove it:
Confirm the deletion:
Containers and Persistent Storage
- Containers are normally launched for a period of time to run an application and then stopped or deleted when their job is finished.
- Any data that is produced during runtime is lost on their restart, failure, or termination.
- This data may be saved for persistence on a host directory by attaching the host directory to a container.
- The containerized application will see the attached directory just like any other local directory and will use it to store data if it is configured to do so.
- Any data that is saved on the directory will be available even after the container is rebooted or removed.
- Later, this directory can be re-attached to other containers to give them access to the stored data or to save their own data.
- The source directory on the host may itself exist on any local or remote file system.
EXAM TIP: Proper ownership, permissions, and SELinux file type must be set to ensure persistent storage is accessed and allows data writes without issues.
- There are a few simple steps that should be performed to configure a host directory before it can be attached to a container.
- These steps include the correct ownership, permissions, and SELinux type (container_file_t).
- The special SELinux file type is applied to prevent containerized applications (especially those running in root containers) from gaining undesired privileged access to host files and processes, or other running containers on the host if compromised.
Lab: Attach Persistent Storage and Access Data Across Containers
- Set up a directory on server20 and attach it to a new container.
- Write some data to the directory while in the container.
- Delete the container and launch another container with the same directory attached.
- Observe the persistence of saved data in the new container and that it is accessible.
- Remove the container to mark the completion of this exercise.
1. Create a directory called /host_data, set full permissions on it, and confirm:
2. Launch a root container called rhel9-persistent-data in interactive mode using the latest ubi9 image. Specify the attachment point (/container_data) to be used inside the container for the host directory (/host_data) Ensure the SELinux type container_file_t is automatically set on the directory and files within.
3. Confirm the presence of the directory inside the container with ls on /container_data:
4. Create a file called testfile with the echo command under /container_data:
5. Verify the file creation and the SELinux type on it:
6. Exit out of the container and check the presence of the file in the host directory:
7. Stop and remove the container:
8. Launch a new root container called rhel8-persistent-data in interactive mode using the latest ubi8 image from any of the defined registries. Specify the attachment point (/container_data2) to be used inside the container for the host directory (/host_data). Ensure the SELinux type container_file_t is automatically set on the directory and files within.
9. Confirm the presence of the directory inside the container with ls on /container_data2:
10. Create a file called testfile2 with the echo command under /container_data2:
11. Exit out of the container and confirm the existence of both files in the host directory:
12. Stop and remove the container using the stop and rm subcommands:
13. Re-check the presence of the files in the host directory:
Container State Management with systemd
-
Multiple containers run on a single host and it becomes a challenging task to change their operational state or delete them manually.
-
In RHEL 9, these administrative functions can be automated via the systemd service
-
There are several steps that need to be completed to configure container state management via systemd.
-
These steps vary for rootful and rootless container setups and include the creation of service unit files and their storage in appropriate directory locations (~/.config/systemd/user for rootless containers and /etc/systemd/system for rootful containers).
-
Once setup and enabled, the containers will start and stop automatically as a systemd service with the host state transition or manually with the
systemctlcommand. -
The
podmancommand to start and stop containers is no longer needed if the systemd setup is in place. -
You may experience issues if you continue to use
podmanfor container state transitioning alongside. -
The start and stop behavior for rootless containers differs slightly from that of rootful containers.
-
For the rootless setup, the containers are started when the relevant user logs in to the host and stopped when that user logs off from all their open terminal sessions;
-
However, this default behavior can be altered by enabling lingering for that user with the
loginctlcommand. -
User lingering is a feature that, if enabled for a particular user, spawns a user manager for that user at system startup and keeps it running in the background to support long-running services configured for that user.
-
The user need not log in.
EXAM TIP: Make sure that you use a normal user to launch rootless containers and the root user (or sudo) for rootful containers.
- Rootless setup does not require elevated privileges of the root user.
Lab: Configure a Rootful Container as a systemd Service
- Create a systemd unit configuration file for managing the state of your rootful containers.
- Launch a new container and use it as a template to generate a service unit file.
- Stop and remove the launched container to avoid conflicts with new containers that will start.
- Use the
systemctlcommand to verify the automatic container start, stop, and deletion.
1. Launch a new container called rootful-container in detached mode using the latest ubi9:
2. Confirm the new container using podman ps. Note the container ID.
3. Create (generate) a service unit file called rootful-container.service under /etc/systemd/system while ensuring that the next new container that will be launched based on this configuration file will not require the source container to work. The tee command will show the generated file content on the screen as well as store it in the specified file.
- The unit file has the same syntax as any other systemd service configuration file.
- There are three sections—Unit, Service, and Install.
- (1) The unit section provides a short description of the service, the manual page location, and the dependencies (wants and after).
- (2) The service section highlights the full commands for starting (ExecStart) and stopping (ExecStop) containers.
- It also highlights the commands that will be executed before the container start (ExecStartPre) and after the container stop (ExecStopPost).
- There are a number of options and arguments with the commands to ensure a proper transition.
- The restart on-failure stipulates that systemd will try to restart the container in the event of a failure.
- (3) The install section identifies the operational target the host needs to be running in before this container service can start.
4. Stop and delete the source container (rootful-container):
Verify the removal by running sudo podman ps -a:
5. Update systemd to bring the new service under its control (reboot the system if required):
6. Enable and start the container service:
7. Check the running status of the new service:
8. Verify the launch of a new container (compare the container ID with that of the source root container):
9. Restart the container service using the systemctl command:
10. Check the status of the container again. Observe the removal of the previous container and the launch of a new container (compare container IDs).
- Each time the rootful-container service is restarted or server20 is rebooted, a new container will be launched.
Lab: Configure Rootless Container as a systemd Service
- Create a systemd unit configuration file for managing the state of your rootless containers.
- Launch a new container as conuser1 (create this user) and use it as a template to generate a service unit file.
- Stop and remove the launched container to avoid conflicts with new containers that will start.
- Use the
systemctlcommand as conuser1 to verify the automatic container start, stop, and deletion.
1. Create a user account called conuser1 and assign a simple password:
2. Open a new terminal window on server20 and log in as conuser1. Create directory ~/.config/systemd/user to store a service unit file:
3. Launch a new container called rootless-container in detached mode using the latest ubi8:
4. Confirm the new container using podman ps. Note the container ID.
5. Create (generate) a service unit file called rootless-container.service under ~/.config/systemd/user while ensuring that the next new container that will be launched based on this configuration will not require the source container to work:
6. Display the content of the unit file:
7. Stop and delete the source container rootless-container using the stop and rm subcommands:
Verify the removal by running podman ps -a:
8. Update systemd to bring the new service to its control
9. Enable and start the container service:
10. Check the running status of the new service:
11. Verify the launch of a new container (compare the container ID with that of the source rootless container):
12. Enable the container service to start and stop with host transition using the loginctl command (systemd login manager) and confirm:
13. Restart the container service using the systemctl command:
14. Check the status of the container again. Observe the removal of the previous container and the launch of a new container (compare container IDs).
- Each time the rootless-container service is restarted or server20 is rebooted, a new container will be launched. You can verify this by comparing their container IDs.
Containers DIY Labs
Lab: Launch Named Root Container with Port Mapping
- Create a new user account called conadm on server30 and give them full sudo rights.
- As conadm with sudo (where required) on server30, inspect the latest version of ubi9 and then download it to your computer.
- Launch a container called rootful-cont-port in attached terminal mode with host port 80 mapped to container port 8080.
- Run a few basic Linux commands such as
ls,pwd,df,cat/etc/redhat-release, and os-release while in the container.
- Check to confirm the port mapping from server30.
- Do not remove the container yet.
Lab: Launch Nameless Rootless Container with Two Variables
- As conadm on server30, launch a container using the latest version of ubi8 in interactive mode (-it) with two environment variables VAR1=lab1 and VAR2=lab2 defined.
- Check the variables from within the container.
- Delete the container and the image when done.
Lab: Launch Named Rootless Container with Persistent Storage
- As conadm with sudo (where required) on server30, create a directory called /host_perm1 with full permissions, and a file called str1 in it.
- Launch a container called rootless-cont-str in attached terminal mode with the created directory mapped to /cont_perm1 inside the container.
- While in the container, check access to the directory and the presence of the file.
- Create a sub-directory and a file under /cont_perm1 and exit out of the container shell.
- List /host_perm1 on server30 to verify the sub-directory and the file.
- Stop and delete the container.
- Remove /host_perm1.
Lab: Launch Named Rootless Container with Port Mapping, Environment Variables, and Persistent Storage
- As conadm with sudo (where required) on server30, launch a named rootless container called rootless-cont-adv in attached mode with two variables (HISTSIZE=100 and MYNAME=RedHat), host port 9000 mapped to container port 8080, and /host_perm2 mounted at /cont_perm2
- Check and confirm the settings while inside the container.
- Exit out of the container.
- Do not remove the container yet.
Lab 22-5: Control Rootless Container States via systemd
- As conadm on server30, use the rootless-cont-adv container launched in the last lab as a template and generate a systemd service configuration file and store the file in the appropriate directory.
- Stop and remove the source container rootless-cont-adv.
- Add the support for the new service to systemd and enable the new service to auto-start at system reboots.
- Perform the required setup to ensure the container is launched without the need for the conadm user to log in.
- Reboot server30 and confirm a successful start of the container service and the container.
Lab 22-6: Control Rootful Container States via systemd
- As conadm with sudo where required on server10, use the rootful-cont-port container launched in Lab 22-1 as a template and generate a systemd service configuration file and store the file in the appropriate directory.
- Stop and remove the source container rootful-cont-port.
- Add the support for the new service to systemd and enable the service to auto-start at system reboots.
- Reboot server10 and confirm a successful start of the container service and the container.
Lab 22-7: Build Custom Image Using Containerfile
- As conadm on server10, write a containerfile to use the latest version of ubi8 and create a user account called user-in-container in the resultant custom image.
- Test the image by launching a container in interactive mode and verifying the user.