Subsections of Boot
Boot Process, Grub2, and Kernel
Linux Kernel
- controls everything on the system.
- hardware
- enforces security and access controls
- runs, schedules, and manages processes and service daemons.
- comprised of several modules.
- new kernel must be installed or an existing kernel must be upgraded when the need arises from an application or functionality standpoint.
- core of the Linux system.
- manages
- hardware
- enforces security
- regulates access to the system
handles
-
processes
-
services
-
application workloads.
-
collection of software components called modules
- Modules
- device drivers that control hardware devices
- processor
- memory
- storage
- controller cards
- peripheral equipment
- interact with software subsystems
- storage partitioning
- file systems
- networking
- virtualization
- device drivers that control hardware devices
- Modules
-
Some modules are static to the kernel and are integral to system functionality,
-
Some modules are loaded dynamically as needed
-
RHEL 8.0 and RHEL 8.2 are shipped with kernel version 4.18.0 (4.18.0-80 and 4.18.0-193 to be specific) for the 64-bit Intel/AMD processor architecture computers with single, multi-core, and multi-processor configurations.
-
uname -mshows the architecture of the system. -
Kernel requires a rebuild when a new functionality is added or removed.
-
functionality may be introduced by:
- installing a new kernel
- upgrading an existing one
- installing a new hardware device, or
- changing a critical system component.
-
existing functionality that is no longer needed may be removed to make the overall footprint of the kernel smaller for improved performance and reduced memory utilization.
-
tunable parameters are set that define a baseline for kernel functionality.
-
Some parameters must be tuned for some applications and database software to be installed smoothly and operate properly.
-
You can generate and store several custom kernels with varied configuration and required modules
-
only one of them can be active at a time.
-
different kernel may be loaded by interacting with GRUB2.
Kernel Packages
- set of core kernel packages that must be installed on the system at a minimum to make it work.
- Additional packages providing supplementary kernel support are also available.
Core and some add-on kernel packages.
| Kernel Package | Description |
|---|---|
| kernel | Contains no files, but ensures other kernel packages are accurately installed |
| kernel-core | Includes a minimal number of modules to provide core functionality |
| kernel-devel | Includes support for building kernel modules |
| kernel-modules | Contains modules for common hardware devices |
| kernel-modules-extra | Contains modules for not-so-common hardware devices |
| kernel-headers | Includes files to support the interface between the kernel and userspace |
| kernel-tools-libs | Includes the libraries to support the kernel tools |
| libraries and programs kernel-tools | Includes tools to manipulate the kernel |
Kernel Packages
- Packages containing the source code for RHEL 8 are also available for those who wish to customize and recompile the code
List kernel packages installed on the system:
dnf list installed kernel*- Shows six kernel packages that were loaded during the OS installation.
Analyzing Kernel Version
Check the version of the kernel running on the system to check for compatibility with an application or database:
 uname -r
 5.14.0-362.24.1.el9_3.x86_64
5 - Major version 14 - Major revision 0 - Kernel patch version 362 - Red Hat version el9 - Enterprise Linux 9 x86_64 - Processor architecture
Kernel Directory Structure
Kernel and its support files (noteworthy locations)
- /boot
- /proc
- /usr/lib/modules
/boot
- Created at system installation.
- Linux kernel
- GRUB2 configuration
- other kernel and boot support files.
View the /boot filesystem:
ls -l /boot
- four files are for the kernel and
- vmlinuz - main kernel file
- initramfs - main kernel’s boot image
- config - configuration
- System.map - mapping
- two files for kernel rescue version
- Have the current kernel version appended to their names.
- have the string “rescue” embedded within their names
/boot/efi/ and /boot/grub2/
- hold bootloader information specific to firmware type used on the system: UEFI or BIOS.
List /boot/Grub2:
 [root@localhost ~]# ls -l /boot/grub2
 total 32
 -rw-r--r--. 1 root root   64 Feb 25 05:13 device.map
 drwxr-xr-x. 2 root root   25 Feb 25 05:13 fonts
 -rw-------. 1 root root 7049 Mar 21 04:47 grub.cfg
 -rw-------. 1 root root 1024 Mar 21 05:12 grubenv
 drwxr-xr-x. 2 root root 8192 Feb 25 05:13 i386-pc
drwxr-xr-x. 2 root root 4096 Feb 25 05:13 locale- grub.cfg
- bootable kernel information
- grub.env
- environment information that the kernel uses.
/boot/loader
- storage location for configuration of the running and rescue kernels.
- Configuration is stored in files under the /boot/loader/entries/
 [root@localhost ~]# ls -l /boot/loader/entries/
 total 12
 -rw-r--r--. 1 root root 484 Feb 25 05:13  8215ac7e45d34823b4dce2e258c3cc47-0-rescue.conf
 -rw-r--r--. 1 root root 460 Mar 16 06:17  8215ac7e45d34823b4dce2e258c3cc47-5.14.0-362.18.1.el9_3.x86_64.conf
-rw-r--r--. 1 root root 459 Mar 16 06:17 8215ac7e45d34823b4dce2e258c3cc47-5.14.0-362.24.1.el9_3.x86_64.conf- The files are named using the machine id of the system as stored in /etc/machine-id/ and the kernel version they are for.
content of the kernel file:
 [root@localhost entries]# cat  /boot/loader/entries/8215ac7e45d34823b4dce2e258c3cc47-5.14.0- 362.18.1.el9_3.x86_64.conf
 title Red Hat Enterprise Linux (5.14.0-362.18.1.el9_3.x86_64) 9.3  (Plow)
 version 5.14.0-362.18.1.el9_3.x86_64
 linux /vmlinuz-5.14.0-362.18.1.el9_3.x86_64
 initrd /initramfs-5.14.0-362.18.1.el9_3.x86_64.img $tuned_initrd
 options root=/dev/mapper/rhel-root ro crashkernel=1G-4G:192M,4G- 64G:256M,64G-:512M resume=/dev/mapper/rhel-swap rd.lvm.lv=rhel/root  rd.lvm.lv=rhel/swap rhgb quiet  $tuned_params
 grub_users $grub_users
 grub_arg --unrestricted
grub_class rhel- “title” is displayed on the bootloader screen
- “kernelopts” and “tuned_params” supply values to the booting kernel to control its behavior.
/proc
- Virtual, memory-based file system
- contents are created and updated in memory at system boot and during runtime
- destroyed at system shutdown
- current state of the kernel, which includes
- hardware configuration
- status information
- processor
- memory
- storage
- file systems
- swap
- processes
- network interfaces
- connections
- routing
- etc.
- Data kept in tens of thousands of zero-byte files organized in a hierarchy.
List /proc:
ls -l /proc
- numerical subdirectories contain information about a specific process
- process ID matches the subdirectory name.
- other files and subdirectories contain information, such as
- memory segments for processes and
- configuration data for system components.
- can view the configuration in vim
Show selections from the cpuinfo and meminfo files that hold
processor and memory information:
cat/proc/cpuinfo && cat /proc/meminfo
- data used by top, ps, uname, free, uptime and w, to display information.
/usr/lib/modules/
- holds information about kernel modules.
- subdirectories are specific to the kernels installed on the system.
Long listing of /usr/lib/modules/ shows two installed kernels:
 [root@localhost entries]# ls -l /usr/lib/modules
 total 8
 drwxr-xr-x. 7 root root 4096 Mar 16 06:18 5.14.0-362.18.1.el9_3.x86_64
 drwxr-xr-x. 8 root root 4096 Mar 16 06:18 5.14.0-362.24.1.el9_3.x86_64
View /usr/lib/modules/5.14.0-362.18.1.el9_3.x86_64/:
ls -l /usr/lib/modules/5.14.0-362.18.1.el9_3.x86_64- Subdirectories hold module-specific information for the kernel version.
/lib/modules/4.18.0-80.el8.x86_64/kernel/drivers/
- stores modules for a variety of hardware and software components in various subdirectories:
ls -l /usr/lib/modules/5.14.0-362.18.1.el9_3.x86_64/kernel/drivers- Additional modules may be installed on the system to support more components.
Installing the Kernel
-
requires extra care
-
could leave your system in an unbootable or undesirable state.
-
have the bootable medium handy prior to starting the kernel install process.
-
By default, the dnf command adds a new kernel to the system, leaving the existing kernel(s) intact. It does not replace or overwrite existing kernel files.
-
Always install a new version of the kernel instead of upgrading it.
-
The upgrade process removes any existing kernel and replaces it with a new one.
-
In case of a post-installation issue, you will not be able to revert to the old working kernel.
-
Newer version of the kernel is typically required:
- if an application needs to be deployed on the system that requires a different kernel to operate.
- When deficiencies or bugs are identified in the existing kernel, it can hamper the kernel’s smooth operation.
-
new kernel
- addresses existing issues
- adds bug fixes
- security updates
- new features
- improved support for hardware devices.
-
dnf is the preferred tool to install a kernel
-
it resolves and installs any required dependencies automatically.
-
rpm may be used but you must install any dependencies manually.
-
Kernel packages for RHEL are available to subscribers on Red Hat’s Customer Portal.
Linux Boot Process
Multiple phases during the boot process.
- Starts selective services during its transition from one phase into another.
- Presents the administrator an opportunity to interact with a preboot program to boot the system into a non-default target.
- Pass an option to the kernel.
- Reset the lost or forgotten root user password.
- Launches a number of services during its transition to the default or specified target.
- boot process after the system has been powered up or restarted.
- lasts until all enabled services are started.
- login prompt will appear on the screen
- boot process is automatic, but you
- may need to interact with it to take a non-default action, such as
- booting an alternative kernel
- booting into a non-default operational state
- repairing the system
- recovering from an unbootable state boot process on an x86 computer may be split into four major phases: (1) the firmware phase (2) the bootloader phase (3) the kernel phase (4) the initialization phase.
- may need to interact with it to take a non-default action, such as
The system accomplishes these phases one after the other while performing and attempting to complete the tasks identified in each phase.
The Firmware Phase (BIOS and UEFI)
firmware:
- BIOS (Basic Input/Output System) or the UEFI (Unified Extensible Firmware Interface) code that is stored in flash memory on the x86-based system board.
- runs the Power-On-Self-Test (POST) to detect, test, and initialize the system hardware components.
- Installs appropriate drivers for the video hardware
- exhibits system messages on the screen.
- scans available storage devices to locate a boot device,
- starting with a 512-byte image that contains
- 446 bytes of the bootloader program,
- 64 bytes for the partition table
- last two bytes with the boot signature.
- referred to as the Master Boot Record (MBR)
- located on the first sector of the boot disk.
- As soon as it discovers a usable boot device, it loads the bootloader into memory and passes control over to it.
- starting with a 512-byte image that contains
BIOS
- small memory chip in the computer that stores
- system date and time,
- list and sequence of boot devices,
- I/O configuration,
- etc.
- configuration is customizable.
- hardware initialization phase
- detecting and diagnosing peripheral devices.
- runs the POST on the devices as it finds them
- installs drivers for the graphics card and the attached monitor
- begins exhibiting system messages on the video hardware.
- discovers a usable boot device
- loads the bootloader program into memory, and passes control over to it.
UEFI
- new 32/64-bit architecture-independent specification replacing BIOS.
- delivers enhanced boot and runtime services
- superior features such as speed over the legacy 16-bit BIOS.
- has its own device drivers
- able to mount and read extended file systems
- includes UEFI-compliant application tools
- supports one or more bootloader programs.
- comes with a boot manager that allows you to choose an alternative boot source.
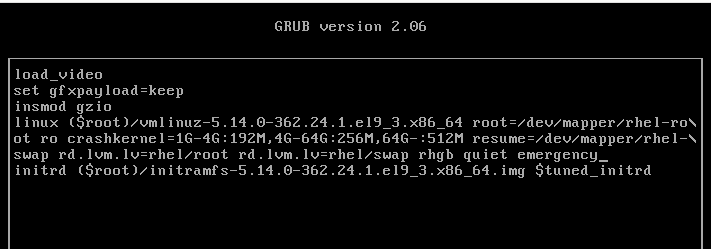
Bootloader Phase
- Once the firmware phase is over and a boot device is detected,
- system loads a piece of software called bootloader that is located in the boot sector of the boot device.
- RHEL uses GRUB2 (GRand Unified Bootloader) version 2 as the bootloader program. GRUB2 supports both BIOS and UEFI firmware.
The primary job of the bootloader program is to
- spot the Linux kernel code in the /boot file system
- decompress it
- load it into memory based on the configuration defined in the /boot/grub2/grub.cfg file
- transfer control over to it to further the boot process.
UEFI-based systems,
- GRUB2 looks for the EFI system partition /boot/efi instead
- Runs the kernel based on the configuration defined in the /boot/efi/EFI/redhat/grub.efi file.
Kernel Phase
- kernel is the central program of the operating system, providing access to hardware and system services.
- After getting control from the bootloader, the kernel:
-
extracts the initial RAM disk (initrd) file system image found in the /boot file system into memory,
-
decompresses it
-
mounts it as read-only on /sysroot to serve as the temporary root file system
-
loads necessary modules from the initrd image to allow access to the physical disks and the partitions and file systems therein.
-
loads any required drivers to support the boot process.
-
Later, it unmounts the initrd image and mounts the actual physical root file system on / in read/write mode.
-
At this point, the necessary foundation has been built for the boot process to carry on and to start loading the enabled services.
-
kernel executes the systemd process with PID 1 and passes the control over to it.
-
Initialization Phase
-
fourth and the last phase in the boot process.
-
Systemd:
-
takes control from the kernel and continues the boot process.
-
is the default system initialization scheme used in RHEL 9.
-
starts all enabled userspace system and network services
-
Brings the system up to the preset boot target.
-
A boot target is an operational level that is achieved after a series of services have been started to get to that state.
-
system boot process is considered complete when all enabled services are operational for the boot target and users are able to log in to the system
GRUB2 Bootloader
- After the firmware phase has concluded:
- Bootloader presents a menu with a list of bootable kernels available on the system
- Waits for a predefined amount of time before it times out and boots the default kernel.
- You may want to interact with GRUB2 before the autoboot times out to boot with a non-default kernel boot to a different target, or customize the kernel boot string.
- Press a key before the timeout expires to interrupt the autoboot process and interact with GRUB2.
- autoboot countdown default value is 5 seconds.
Interacting with GRUB2
- GRUB2 main menu shows a list of bootable kernels at the top.
- Edit a selected kernel menu entry by pressing an e or go to the grub> command prompt by pressing a c.
edit mode,
- GRUB2 loads the configuration for the selected kernel entry from the /boot/grub2/grub.cfg file in an editor
- enables you to make a desired modification before booting the system.
- you can boot the system into a less capable operating target by adding “rescue”, “emergency”, or “3” to the end of the line that begins with the keyword “linux”,
- Press
Ctrl+xwhen done to boot. - one-time temporary change and it won’t touch the grub.cfg file.
- press
ESCto discard the changes and return to the main menu. grub>command prompt appears when you pressCtrl+cwhile in the edit window- or a
cfrom the main menu. - command mode: execute debugging, recovery, etc.
- view available commands by pressing the TAB key.
GRUB2 Commands
Understanding GRUB2 Configuration Files
/boot/grub2/grub.cfg
- Referenced at boot time.
- Generated automatically when a new kernel is installed or upgraded
- not advisable to modify it directly, as your changes will be overwritten. :
/etc/default/grub
- primary source file that is used to regenerate grub.cfg.
- Defines the directives that govern how GRUB2 should behave at boot time.
- Any changes made to the grub file will only take effect after the grub2-mkconfig utility has been executed
- Defines the directives that control the behavior of GRUB2 at boot time.
- Any changes in this file must be followed by the execution of the
grub2-mkconfigcommand in order to be reflected in grub.cfg.
Default settings:
 [root@localhost default]# nl /etc/default/grub
     1	GRUB_TIMEOUT=5
     2	GRUB_DISTRIBUTOR="$(sed 's, release .*$,,g' /etc/system-release)"
     3	GRUB_DEFAULT=saved
     4	GRUB_DISABLE_SUBMENU=true
     5	GRUB_TERMINAL_OUTPUT="console"
     6	GRUB_CMDLINE_LINUX="crashkernel=1G-4G:192M,4G-64G:256M,64G-:512M resume=/dev/mapper/rhel-swap rd.lvm.lv=rhel/root rd.lvm.lv=rhel/swap rhgb quiet"
     7	GRUB_DISABLE_RECOVERY="true"
8 GRUB_ENABLE_BLSCFG=true| Directive | Description |
|---|---|
| GRUB_TIMEOUT | Wait time, in seconds, before booting off the default kernel. Default is 5. |
| GRUB_DISTRIBUTOR | Name of the Linux distribution |
| GRUB_DEFAULT | Boots the selected option from the previous system boot |
| GRUB_DISABLE_SUBMENU | Enables/disables the appearance of GRUB2 submenu |
| GRUB_TERMINAL_OUTPUT | Sets the default terminal |
| GRUB_CMDLINE_LINUX | Specifies the command line options to pass to the kernel at boot time |
| GRUB_DISABLE_RECOVERY | Lists/hides system recovery entries in the GRUB2 menu |
| GRUB_ENABLE_BLSCFG | Defines whether to use the new bootloader specification to manage bootloader configuration |
- Default settings are good enough for normal system operation.
/boot/grub2/grub.cfg - /boot/efi/EFI/redhat/grub.cfg
- Main GRUB2 configuration file that supplies boot-time configuration information.
- located in the /boot/grub2/ on BIOS-based systems
- /boot/efi/EFI/redhat/ on UEFI-based systems.
- can be recreated manually with the
grub2-mkconfigutility - automatically regenerated when a new kernel is installed or upgraded.
- file will lose any previous manual changes made to it.
grub2-mkconfig command
- Uses the settings defined in helper scripts located in the /etc/grub.d directory.
 [root@localhost default]# ls -l /etc/grub.d
 total 104
 -rwxr-xr-x. 1 root root  9346 Jan  9 09:51 00_header
 -rwxr-xr-x. 1 root root  1046 Aug 29  2023 00_tuned
 -rwxr-xr-x. 1 root root   236 Jan  9 09:51 01_users
 -rwxr-xr-x. 1 root root   835 Jan  9 09:51  08_fallback_counting
 -rwxr-xr-x. 1 root root 19665 Jan  9 09:51 10_linux
 -rwxr-xr-x. 1 root root   833 Jan  9 09:51  10_reset_boot_success
 -rwxr-xr-x. 1 root root   892 Jan  9 09:51  12_menu_auto_hide
 -rwxr-xr-x. 1 root root   410 Jan  9 09:51  14_menu_show_once
 -rwxr-xr-x. 1 root root 13613 Jan  9 09:51  20_linux_xen
 -rwxr-xr-x. 1 root root  2562 Jan  9 09:51  20_ppc_terminfo
 -rwxr-xr-x. 1 root root 10869 Jan  9 09:51 30_os- prober
 -rwxr-xr-x. 1 root root  1122 Jan  9 09:51 30_uefi- firmware
 -rwxr-xr-x. 1 root root   218 Jan  9 09:51 40_custom
 -rwxr-xr-x. 1 root root   219 Jan  9 09:51 41_custom
 -rw-r--r--. 1 root root   483 Jan  9 09:51 README
00_header
- sets the GRUB2 environment 10_linux
- searches for all installed kernels on the same disk partition 30_os-prober
- searches for the presence of other operating systems 40_custom and 41_custom are to
- introduce any customization.
- like add custom entries to the boot menu.
grub.cfg file
- Sources /boot/grub2/grubenv for kernel options and other settings.
 [root@localhost grub2]# cat grubenv
 # GRUB Environment Block
 # WARNING: Do not edit this file by tools other than grub-editenv!!!
 saved_entry=8215ac7e45d34823b4dce2e258c3cc47-5.14.0- 362.24.1.el9_3.x86_64
 menu_auto_hide=1
 boot_success=0
 boot_indeterminate=0
 ############################################################################
 ##################################################### #######################
If a new kernel is installed:
- the existing kernel entries remain intact.
- All bootable kernels are listed in the GRUB2 menu
- any of the kernel entries can be selected to boot.
Lab: Change Default System Boot Timeout
- change the default system boot timeout value to 8 seconds persistently, and validate.
-
Edit the /etc/default/grub file and change the setting as follows: `GRUB_TIMEOUT=8
-
Execute the grub2-mkconfig command to reproduce grub.cfg:
grub2-mkconfig -o /boot/grub2/grub.cfg3.Restart the system with sudo reboot and confirm the new timeout value when GRUB2 menu appears.
Booting into Specific Targets
RHEL
-
boots into graphical target state by default if the Server with GUI software selection is made during installation.
-
can also be directed to boot into non-default but less capable operating targets from the GRUB2 menu.
-
offers emergency and rescue boot targets.
- special target levels can be launched from the GRUB2 interface by
- selecting a kernel
- pressing e to enter the edit mode
- appending the desired target name to the line that begins with the keyword “linux”.
- Press ctrl+x to boot into the supplied target
- Enter root password
rebootwhen you are done
- special target levels can be launched from the GRUB2 interface by
-
You must know how to boot a RHEL 9 system into a specific target from the GRUB2 menu to modify the fstab file or reset an unknown root user password.
Append “emergency” to the kernel line entry:
Other options:
- “rescue”
- “1”
- “s”
- “single”
Reset the root User Password
- Terminate the boot process at an early stage to be placed in a special debug shell in order to reset the root password.
-
Reboot or reset server1, and interact with GRUB2 by pressing a key before the autoboot times out. Highlight the default kernel entry in the GRUB2 menu and press e to enter the edit mode. Scroll down to the line entry that begins with the keyword “linux” and press the End key to go to the end of that line:
-
Modify this kernel string and append “rd.break” to the end of the line.
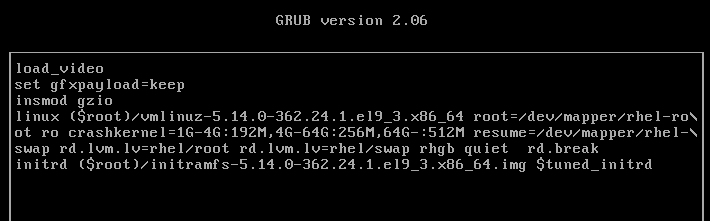
-
Press Ctrl+x when done to boot to the special shell. The system mounts the root file system read-only on the /sysroot directory. Make /sysroot appear as mounted on / using the chroot command:
chroot sysroot3. Remount the root file system in read/write mode for the passwd command to be able to modify the shadow file with a new password:
mount -o remount,rw /- Enter a new password for root by invoking the passwd command:
passwd- Create a hidden file called .autorelabel to instruct the operating system to run SELinux relabeling on all files, including the shadow file that was updated with the new root password, on the next reboot:
touch .autorelabel- Issue the exit command to quit the chroot shell and then the reboot command to restart the system and boot it to the default target.
 exit
 reboot
Second method
Look into using init=/bin/bash for password recovery as a second method.
Boot Grub2 Kernel Labs
Lab: Enable Verbose System Boot
- Remove “quiet” from the end of the value of the variable GRUB_CMDLINE_LINUX in the /etc/default/grub file
- Run grub2-mkconfig to apply the update.
- Reboot the system and observe that the system now displays verbose information during the boot process.
Lab: Reset root User Password
- Reset the root user password by booting the system into emergency mode with SELinux disabled.
- Try to log in with root and enter the new password after the reboot.
Lab: Install New Kernel
- Check the current version of the kernel using the uname or rpm command.
- Download a higher version from the Red Hat Customer Portal or rpmfind.net and install it.
- Reboot the system and ensure the new kernel is listed on the bootloader menu. 5.14.0-427.35.1.el9_4.x86_64
Lab: Download and Install a New Kernel
- download the latest available kernel packages from the Red Hat Customer Portal
- install them using the dnf command.
- ensure that the existing kernel and its configuration remain intact.
- As an alternative (preferred) to downloading kernel packages individually and then installing them, you can follow the instructions provided in “Containers” chapter to register server1 with RHSM and run sudo dnf install kernel to install the latest kernel and all the dependencies collectively.
-
Check the version of the running kernel:
uname -r -
List the kernel packages currently installed:
rpm -qa | grep kernel -
Sign in to the Red Hat Customer Portaland click downloads.
-
Click “Red Hat Enterprise Linux 8” under “By Category”:
-
Click Packages and enter “kernel” in the Search bar to narrow the list of available packages:
-
Click “Download Latest” against the packages kernel, kernel-core, kernel-headers, kernel-modules, kernel-tools, and kernel-tools-libs to download them.
-
Once downloaded, move the packages to the /tmp directory using the mv command.
-
List the packages after moving them:
-
Install all the six packages at once using the dnf command:
dnf install /tmp/kernel* -y -
Confirm the installation alongside the previous version:
sudo dnf list installed kernel* -
The /boot/grub2/grubenv/ file now has the directive “saved_entry” set to the new kernel, which implies that this new kernel will boot up on the next system restart:
sudo cat /boot/grub2/grubenv -
Reboot the system. You will see the new kernel entry in the GRUB2 boot list at the top. The system will autoboot this new default kernel.
-
Run the uname command once the system has been booted up to confirm the loading of the new kernel:
uname -r -
View the contents of the version and cmdline files under /proc to verify the active kernel: `cat /proc/version
Or just dnf install kernel
System Initialization, Message Logging, and System Tuning
System Initialization and Service Management
systemd (system daemon)
-
System initialization and service management mechanism.
-
Units and targets for initialization, service administration, and state changes
-
Has fast-tracked system initialization and state transitioning by introducing:
- Parallel processing of startup scripts
- Improved handling of service dependencies
- On-demand activation of services
-
Supports snapshotting of system states.
-
Used to handle operational states of services
-
Boots the system into one of several predefined targets
-
Tracks processes using control groups
-
Automatically maintains mount points.
-
First process with PID 1 that spawns at boot
-
Last process that terminates at shutdown.
-
Spawns several processes during a service startup.
-
Places the processes in a private hierarchy composed of control groups (or cgroups for short) to organize processes for the purposes of monitoring and controlling system resources such as:
- processor
- memory
- network bandwidth
- disk I/O
-
Limit, isolate, and prioritize process usage of resources.
-
Resources distributed among users, databases, and applications based on need and priority
-
Initiates distinct services concurrently, taking advantage of multiple CPU cores and other compute resources.
-
Creates sockets for all enabled services that support socket-based activation at the very beginning of the initialization process.
-
It passes them on to service daemon processes as they attempt to start in parallel.
-
This lets systemd handle inter-service order dependencies
-
Allows services to start without any delays.
-
Systemd creates sockets first, starts daemons next, and caches any client requests to daemons that have not yet started in the socket buffer.
-
Files the pending client requests when the daemons they were awaiting come online.
Socket
- Communication method that allows a single process to talk to another process on the same or remote system.
During the operational state, systemd:
- maintains the sockets and uses them to reconnect other daemons and services that were interacting with an old instance of a daemon before that daemon was terminated or restarted.
- services that use activation based on D-Bus (Desktop Bus) are started when a client application attempts to communicate with them for the first time.
- Additional methods used by systemd for activation are
- device-based
- starting the service when a specific hardware type such as USB is plugged in
- path-based
- starting the service when a particular file or directory alters its state.
- device-based
D-Bus
- Allows multiple services running in parallel on a system or remote systems to talk to one another
on-demand activation
- systemd defers the startup of services—Bluetooth and printing—until they are actually needed.
parallelization and on-demand activation
- save time and compute resources.
- contribute to expediting the boot process considerably.
benefit of parallelism witnessed at system boot is
- the file systems are checked that may result in unnecessary delays.
- With autofs, the file systems are temporarily mounted on their normal mount points
- as soon as the checks on the file systems are finished, systemd remounts them using their standard devices.
- Parallelism in file system mounts does not affect the root and virtual file systems.
Units
Units
-
systemd objects used for organizing boot and maintenance tasks, such as:
- hardware initialization
- socket creation
- file system mounts
- service startups.
-
Unit configuration is stored in their respective configuration files
-
Config files are:
- Auto-generated from other configurations
- Created dynamically from the system state
- Produced at runtime
- User-developed.
-
Units operational states:
- active
- inactive
- in the process of being activated
- deactivated
- failed.
-
Units can be enabled or disabled
- enabled unit
- can be started to an active state
- disabled unit
- cannot be started.
- enabled unit
Units have a name and a type, and they are
- encoded in files with names in the form unitname.type. Some
- examples:
- tmp.mount
- sshd.service
- syslog.socket
- umount.target.
There are two types of unit configuration files:
- System unit files
- distributed with installed packages and located in the /usr/lib/systemd/system/
- User unit files
- user-defined and stored in the /etc/systemd/user/
View unit config file directories:
ls -l /usr/lib/systemd/system
ls -l /etc/systemd/user
pkg-config command:
-
View systemd unit config directory information:
pkg-config systemd --variable=systemdsystemunitdirpkg-config systemd --variable=systemduserconfdir -
additional system units that are created at runtime and destroyed when they are no longer needed.
- located in /run/systemd/system/
-
runtime unit files take precedence over the system unit files
-
user unit files take priority over the runtime files.
Unit configuration files
- direct replacement of the initialization scripts found in /etc/rc.d/init.d/ in older RHEL releases.
11 unit types
| Unit Type | Description |
|---|---|
| Automount | automount capabilities for on-demand mounting of file systems |
| Device | Exposes kernel devices in systemd and may be used to implement device-based activation |
| Mount | Controls when and how to mount or unmount file systems |
| Path | Activates a service when monitored files or directories are accessed |
| Scope | Manages foreign processes instead of starting them |
| Service | Starts, stops, restarts, or reloads service daemons and the processes they are made up of |
| Slice | May be used to group units, which manage system processes in a tree-like structure for resource management |
| Socket | Encapsulates local inter-process communication or network sockets for use by matching service units |
| Swap | Encapsulates swap partitions |
| Target | Defines logical grouping of units |
| Timer | Useful for triggering activation of other units based on timers |
Unit files contain common and specific configuration elements. Common elements
- fall under the [Unit] and [Install] sections
- description
- documentation location
- dependency information
- conflict information
- other options
- independent of the type of unit unit-specific configuration data
- located under the unit type section:
- [Service] for the service unit type
- [Socket] for the socket unit type
- so forth
Sample unit file for sshd.service from the /usr/lib/systemd/system/:
david@fedora:~$ cat /usr/lib/systemd/system/sshd.service
[Unit]
Description=OpenSSH server daemon
Documentation=man:sshd(8) man:sshd_config(5)
After=network.target sshd-keygen.target
Wants=sshd-keygen.target

# Migration for Fedora 38 change to remove group ownership for standard host keys
# See https://fedoraproject.org/wiki/Changes/SSHKeySignSuidBit
Wants=ssh-host-keys-migration.service

[Service]
Type=notify
EnvironmentFile=-/etc/sysconfig/sshd
ExecStart=/usr/sbin/sshd -D $OPTIONS
ExecReload=/bin/kill -HUP $MAINPID
KillMode=process
Restart=on-failure
RestartSec=42s

[Install]
WantedBy=multi-user.target- Units can have dependencies based on a sequence (ordering) or a requirement.
- sequence
- outlines one or more actions that need to be taken before or after the activation of a unit (the Before and After directives).
- requirement
- specifies what must already be running (the Requires directive) or not running (the Conflicts directive) in order for the successful launch of a unit.
- sequence
Example:
- The graphical.target unit file tells us that the system must already be operating in the multi-user mode and not in rescue mode in order for it to boot successfully into the graphical mode.
Wants
- May be used instead of Requires in the [Unit] or [Install] section so that the unit is not forced to fail activation if a required unit fails to start.
Run man systemd.unit for details on systemd unit files.
- There are also other types of dependencies
- systemd generally sets and maintains inter-service dependencies automatically
- This can be done manually if needed.
Targets
- logical collections of units
- special systemd unit type with the .target file extension.
- share the directory locations with other unit configuration files.
- used to execute a series of units.
- true for booting the system to a desired operational run level with all the required services up and running.
- Some targets inherit services from other targets and add their own to them.
- systemd includes several predefined targets
| Target | Description |
|---|---|
| halt | Shuts down and halts the system |
| poweroff | Shuts down and powers off the system |
| shutdown | Shuts down the system |
| rescue | Single-user target for running administrative and recovery functions. All local file systems are mounted. Some essential services are started, but networking remains disabled. |
| emergency | Runs an emergency shell. The root file system is mounted in read-only mode; other file systems are not mounted. Networking and other services remain disabled. |
| multi-user | Multi-user target with full network support, but without GUI |
| graphical | Multi-user target with full network support and GUI |
| reboot | Shuts down and reboots the system |
| default | A special soft link that points to the default system boot target (multi-user.target or graphical.target) |
| hibernate | Puts the system into hibernation by saving the running state of the system on the hard disk and powering it off. When powered up, the system restores from its saved state rather than booting up. |
Systemd Targets
Target unit files
- contain all information under the [Unit] section
- description
- documentation location
- dependency and conflict information.
Show the graphical target file (/usr/lib/systemd/system/graphical.target):
root@localhost ~]# cat /usr/lib/systemd/system/graphical.target
[Unit]
Description=Graphical Interface
Documentation=man:systemd.special(7)
Requires=multi-user.target
Wants=display-manager.service
Conflicts=rescue.service rescue.target
After=multi-user.target rescue.service rescue.target display-manager.service
AllowIsolate=yes
Requires, Wants, Conflicts, and After suggests that the system must have already accomplished the rescue.service, rescue.target, multi-user.target, and display-manager.service levels in order to be declared running in the graphical target.
Run man systemd.targetfor details
systemctl Command
- Performs administrative functions and supports plentiful subcommands and flags.
| Subcommand | Description |
|---|---|
| daemon-reload | Re-reads and reloads all unit configuration files and recreates the entire user dependency tree. |
| enable (disable) | Activates (deactivates) a unit for autostart at system boot |
| get-default (set-default) | Shows (sets) the default boot target |
| get-property (set-property) | Returns (sets) the value of a property |
| is-active | Checks whether a unit is running |
| is-enabled | Displays whether a unit is set to autostart at system boot |
| is-failed | Checks whether a unit is in the failed state |
| isolate | Changes the running state of a system |
| kill | Terminates all processes for a unit |
| list-dependencies | Lists dependency tree for a unit |
| list-sockets | Lists units of type socket |
| list-unit-files | Lists installed unit files |
| list-units | Lists known units. This is the default behavior when systemctl is executed without any arguments. |
| mask (unmask) | Prohibits (permits) auto and manual activation of a unit to avoid potential conflict |
| reload | Forces a running unit to re-read its configuration file. This action does not change the PID of the running unit. |
| restart | Stops a running unit and restarts it |
| show | Shows unit properties |
| start (stop) | Starts (stops) a unit |
| status | Presents the unit status information |
Listing and Viewing Units
List all units that are currently loaded in memory along with their status and description:
systemctl
Output: UNIT column
-
shows the name of the unit and its location in the tree LOAD column
-
reflects whether the unit configuration file was properly loaded (loaded, not found, bad setting, error, and masked) ACTIVE column
-
returns the high-level activation state ( active, reloading, inactive, failed, activating, and deactivating) SUB column
-
depicts the low-level unit activation state (reports unit-specific information) DESCRIPTION column
-
illustrates the unit’s content and functionality.
-
systemctl only lists active units by default
--all
- include the inactive units:
List all active and inactive units of type socket:
systemctl -t socket --allList all units of type socket currently loaded in memory and the service they activate, sorted by the listening address:
systemctl list-socketsList all unit files (column 1) installed on the system and their current state (column 2):
systemctl list-unit-filesList all units that failed to start at the last system boot:
systemctl --failedList the hierarchy of all dependencies (required and wanted units) for the current default target:
systemctl list-dependenciesList the hierarchy of all dependencies (required and wanted units) for a specific unit such as atd.service:
systemctl list-dependencies atd.serviceManaging Service Units
systemctl subcommands to manage service units, including
- starting
- stopping
- restarting
- checking status
Check the current operational status and other details for the atd service:
systemctl status atdOutput: service description
- read from /usr/lib/systemd/system/atd.service load status, which
- reveals the current load status of the unit configuration file in memory.
- Other possibilities for “Loaded” include
- “error” (if there was a problem loading the file)
- "not-found" (if no file associated with this unit was found)
- "bad-setting" (if a key setting was missing)
- "masked" (if the unit configuration file is masked)
- (enable or disable) for autostart at system boot. Active
- current activation status
- time the service was started
- Possible states:
- Active (running): The service is running with one or more processes
- Active (exited): Completed a one-time configuration
- Active (waiting): Running but waiting for an event
- Inactive: Not running
- Activating: In the process of being activated
- Deactivating: In the process of being deactivated
- Failed: If the service crashed or could not be started Also includes Main PID of the service process and more.
Disable the atd service from autostarting at the next system reboot:
sudo systemctl disable atdRe-enable atd to autostart at the next system reboot:
systemctl enable atdCheck whether atd is set to autostart at the next system reboot:
systemctl is-enabled atdCheck whether the atd service is running:
systemctl is-active atdStop and restart atd, run either of the following:
systemctl stop atd ; systemctl start atd systemctl restart atdShow the details of the atd service:
systemctl show atdProhibit atd from being enabled or disabled:
systemctl mask atdTry disabling or enabling atd and observe the effect of the previous command:
systemctl disable atdReverse the effect of the mask subcommand and try disable and enable operations:
systemctl unmask atd && systemctl disable atd && systemctl enable atdManaging Target Units
systemctl can also manage target units.
- view or change the default boot target
- switch from one running target into another
View what units of type target are currently loaded and active:
systemctl -t targetoutput:
- target unit’s name
- load state
- high-level and low-level activation states
- short description.
–all option to the above
- see all loaded targets in either active or inactive state.
Viewing and Setting Default Boot Target
- view the current default boot target and to set it.
- get-default and set-default subcommands
Check the current default boot target:
- You may have to modify the default boot target persistently for the exam.
Change the current default boot target from graphical.target to multi-user.target:
systemctl set-default multi-user- removes the existing symlink (default.target) pointing to the old boot target and replaces it with the new target file path.
revert the default boot target to graphical:
systemctl set-default graphicalSwitching into Specific Targets
- Use
systemctlto transition the running system from one target state into another. - graphical, multi-user, reboot, shutdown—are the most common
- rescue and emergency targets are for troubleshooting and system recovery purposes,
- poweroff and halt are similar to shutdown
- hibernate is suitable for mobile devices.
Switch into multi-user using the isolate subcommand:
systemctl isolate multi-user- This will stop the graphical service on the system and display the text-based console login screen.
Type in a username such as user1 and enter the password to log in:
Log in and return to the graphical target:
systemctl isolate graphicalShut down the system and power it off, use the following or simply run the poweroff command:
systemctl poweroff poweroffShut down and reboot the system:
systemctl reboot reboothalt, poweroff, and reboot are symbolic links to the systemctl command:
 [root@localhost ~]# ls -l /usr/sbin/halt /usr/sbin/poweroff  /usr/sbin/reboot
 lrwxrwxrwx. 1 root root 16 Aug 22  2023 /usr/sbin/halt ->  ../bin/systemctl
 lrwxrwxrwx. 1 root root 16 Aug 22  2023 /usr/sbin/poweroff ->  ../bin/systemctl
 lrwxrwxrwx. 1 root root 16 Aug 22  2023 /usr/sbin/reboot ->  ../bin/systemctl
shutdown command options:
-H now
- Halt -P now
- poweroff -r now
- reboot
- broadcasts a warning message to all logged-in users
- blocks new user login attempts
- waits for the specified amount of time for users to log off
- stops the services
- shut the system down to the specified target state.
System Logging
- Log files need to be rotated periodically to prevent the file system space from filling up.
- Configuration files that define the default and custom locations to direct the log messages to and to configure rotation settings. system log file
- records custom messages sent to it.
- systemd includes a service for viewing and managing system logs in addition to the traditional logging service.
- This service maintains a log of runtime activities for faster retrieval and can be configured to store the information permanently.
System logging (syslog for short)
- capture messages generated by:
- kernel
- daemons
- commands
- user activities
- applications
- other events
- Forwards messages to various log files
- For security auditing, service malfunctioning, system troubleshooting, or informational purposes.
rsyslogd daemon (rocket-fast system for log processing)
- Responsible for system logging
- Multi-threaded
- support for:
- enhanced filtering
- encryption-protected message relaying
- variety of configuration options.
- Reads its configuration file /etc/rsyslog.conf and the configuration files located in /etc/rsyslog.d/ at startup.
- /var/log
- Default depository for most system log files
- Other services such as audit, Apache, etc. have subdirectories here as well.
rsyslog service
- modular
- allows the modules listed in its configuration file to be dynamically loaded in the kernel when/as needed.
- Each module brings a new functionality to the system upon loading.
rsyslogd daemon
-
can be stopped manually using
systemctl stop rsyslog -
start, restart, reload, and status options are also available
-
A PID is assigned to the daemon at startup
-
rsyslogd.pid file is created in the /run directory to save the PID.
-
PID is stored to prevent multiple instances of this daemon.
TheSyslog Configuration File
/etc/rsyslog.conf
- primary syslog configuration file
View /etc/rsyslog.conf:
cat /etc/rsyslog.conf
Output: Three sections:
-
Modules, Global Directives, and Rules.
- Modules section
- default defines two modules imuxsock and imjournal
- loaded on demand. imuxsock module
- Modules section
-
furnishes support for local system logging via the logger command imjournal module
-
allows access to the systemd journal.
-
Global Directives section
- contains three active directives.
- Definitions in this section influence the overall functionality of the rsyslog service.
- first directive
- Sets the location for the storage of auxiliary files (/var/lib/rsyslog).
- second directive
- instructs the rsyslog service to save captured messages using traditional file formatting
- third directive
- directs the service to load additional configuration from files located in the /etc/rsyslogd.d/ directory.
- first directive
-
Rules section
- Right field is referred to as action. selector field
- left field of the rules section
- divided into two period-separated sub-fields called
- facility (left)
- representing one or more system process categories that generate messages
- priority (right)
- identifying the severity associated with the messages.
- facility (left)
- semicolon (;) is used as a distinction mark if multiple facility.priority groups are present. action field
- determines the destination to send the messages to.
- numerous supported facilities:
- auth
- authpriv
- cron
- daemon
- kern
- lpr
- news
- syslog
- user
- uucp
- local0 throughv local7
- asterisk (*) character represents all of them.
- supported priorities in the descending criticality order:
- emerg
- alert
- crit
- error
- warning
- notice
- info
- debug
- none
-
If a lower priority is selected, the daemon logs all messages of the service at that and higher levels.
After modifying the syslog configuration file, Inspect it and set the verbosity:
rsyslogd -N 1 (-N inspect, 1 level 1)
- Restart or reload the rsyslog service in order for the changes to take effect.
Rotating Log Files
Log location is defined in the rsyslog configuration file.
View the /var/log/ directory:
ls -l /var/log
systemd unit file called logrotate.timer under the /usr/lib/systemd/system directory invokes the logrotate service (/usr/lib/systemd/system/logrotate.service) on a daily basis. Here is what this file contains:
 [root@localhost cron.daily]# systemctl cat logrotate.timer

 # /usr/lib/systemd/system/logrotate.timer
 [Unit]
 Description=Daily rotation of log files
 Documentation=man:logrotate(8) man:logrotate.conf(5)

 [Timer]
 OnCalendar=daily
 AccuracySec=1h
 Persistent=true

 [Install]
 WantedBy=timers.target
The logrotate service runs rotations as per the schedule and other parameters defined in the /etc/logrotate.conf and additional log configuration files located in the /etc/logrotate.d directory.
/etc/cron.daily/logrotate script
- invokes the logrotate command on a daily basis.
- runs a rotation as per the schedule defined in /etc/logrotate.conf and the
- configuration files for various services are located in /etc/logrotate.d/ The
- configuration files may be modified to alter the schedule or include additional tasks on log files such as:
- removing
- compressing
- emailing
 grep -v ^$ /etc/logrotate.conf
 # see "man logrotate" for details
 # global options do not affect preceding include directives
 # rotate log files weekly
 weekly
 # keep 4 weeks worth of backlogs
 rotate 4
 # create new (empty) log files after rotating old ones
 create
 # use date as a suffix of the rotated file
 dateext
 # uncomment this if you want your log files compressed
 #compress
 # packages drop log rotation information into this directory
 include /etc/logrotate.d
 # system-specific logs may be also be configured here.
content:
-
default log rotation frequency (weekly).
-
period of time (4 weeks) to retain the rotated logs before deleting them.
-
Each time a log file is rotated:
- Empty replacement file is created with the date as a suffix to its name
- rsyslog service is restarted
-
script presents the option of compressing the rotated files using the gzip utility.
- logrotate command checks for the presence of additional log configuration files in /etc/logrotate.d/ and includes them as necessary.
- directives defined in /etc/logrotate.conf file have a global effect on all log files
- can define custom settings for a specific log file in /etc/logrotate.conf/ or create a separate file in /etc/logrotate.d/
- settings defined in user-defined files overrides the global settings.
The /etc/logrotate.d/ directory includes additional configuration files for other service logs:
ls -l /etc/logrotate.d/Show the file content for btmp (records of failed user login attempts) that is used to control the rotation behavior for /var/log/btmp:
 cat /etc/logrotate.d/btmp
	```

- rotation is once a month.
- replacement file created will get read/write permission bits for the owner (*root*)
- owning group will be set to *utmp*
- rsyslog service will maintain one rotated copy of the *btmp* log file.

### The Boot Log File
Logs generated during the system startup:
- Display the service startup sequence.
- Status showing whether the service was started successfully.
- May help in any post-boot troubleshooting if required.
- /var/log/boot.log

View /var/log/boot.log:
sudo head /var/log/boot.log
output:
- OK or FAILED
   - indicates if the service was started successfully or not.

### The System Log File
/var/log/messages
- default location for storing most system activities, as defined in the *rsyslog.conf* file
- saves log information in plain text format
- may be viewed with any file display utility (*cat*, *more*, *pg*, *less*, *head*, or *tail*.)
- may be observed in real time using the *tail* command with the -f switch. The *messages* file
- captures:
   - the date and time of the activity,
   - hostname of the system,
   - name and PID of the service
   - short description of the event being logged.

View /var/log messages:
```bash
tail /var/log/messages
Logging Custom Messages
The Modules section in the rsyslog.conf file
- Provides the support via the imuxsock module to record custom messages to the messages file using the logger command.
logger command
Add a note indicating the calling user has rebooted the system:
logger -i "System rebooted by $USER"observe the message recorded along with the timestamp, hostname, and PID:
tail -l /var/log/messages-p option
- specify a priority level either as a numerical value or in the facility.priority format.
- default priority
- user.notice.
View logger man pages:
man logger
The systemd Journal
-
Systemd-based logging service for the collection and storage of logging data.
-
Implemented via the systemd-journald daemon.
-
Gather, store, and display logging events from a variety of sources such as:
- the kernel
- rsyslog and other services
- initial RAM disk
- alerts generated during the early boot stage. journals
-
stored in the binary format files
-
located in /run/log/journal/ (remember run is not a persistent directory)
-
structured and indexed for faster and easier searches
-
May be viewed and managed using the journalctl command.
-
Can enable persistent storage for the logs if desired.
-
RHEL runs both rsyslogd and systemd-journald concurrently.
-
data gathered by systemd-journald may be forwarded to rsyslogd for further processing and persistent storage in text format.
/etc/systemd/journald.conf
- main config file for journald
- contains numerous default settings that affect the overall functionality of the service.
Retrieving and Viewing Messages
journalctl command
- retrieve messages from the journal for viewing in a variety of ways using different options.
run journalctl without any options to see all the messages generated since the last system reboot:
journalctl
- format of the messages is similar to that of the events logged to /var/log/messages
- Each line begins with a timestamp followed by the system hostname, process name with or without a PID, and the actual message.
Display verbose output for each entry:
journalctl -o verboseView all events since the last system reboot:
journalctl -b-0 (default, since the last system reboot), -1 (the previous system reboot), -2 (two reboots before) 1 & 2 only work if there are logs persistently stored.
View only kernel-generated alerts since the last system reboot:
journalctl -kb0Limit the output to view 3 entries only:
journalctl -n3To show all alerts generated by a particular service, such as crond:
journalctl /usr/sbin/crondRetrieve all messages logged for a certain process, such as the PID associated with the chronyd service:
journalctl _PID=$(pgrep chronyd)Reveal all messages for a particular system unit, such as sshd.service:
journalctl _SYSTEMD_UNIT=sshd.serviceView all error messages logged between a date range, such as October 10, 2019 and October 16, 2019:
journalctl --since 2019-10-16 --until 2019-10-16 -p errGet all warning messages that have appeared today and display them in reverse chronological order:
journalctl --since today -p warning -r - Can specify the time range in hh:mm:ss format, or yesterday, today, or tomorrow as well.
follow option
journalctl -f man journalctl man systemd-journaldPreserving Journal Information
- enable a separate storage location for the journal to save all its messages there persistently.
- default is under /var/log/journal/
The systemd-journald service supports four options with the Storage directive to control how the logging data is handled.
| Option | Description |
|---|---|
| volatile | Stores data in memory only |
| persistent | Stores data permanently under /var/log/journal and falls back to memory-only option if this directory does not exist or has a permission or other issue. The service creates /var/log/journal in case of its non-existence. |
| auto | Similar to “persistent” but does not create /var/log/journal if it does not exist. This is the default option. |
| none | Disables both volatile and persistent storage options. Not recommended. |
Journal Data Storage Options
create the /var/log/journal/ manually and use preferred “auto” option.
- faster query responses from in-memory storage
- access to historical log data from on-disk storage.
Lab: Configure Persistent Storage for Journal Information
Run the necessary steps to enable and confirm persistent storage for the journals.
- Create a subdirectory called journal under the /var/log/ directory and confirm:
sudo mkdir /var/log/journal- Restart the systemd-journald service and confirm:
systemctl restart systemd-journald && systemctl status systemd- journald- List the new directory and observe a subdirectory matching the machine ID of the system as defined in the /etc/machine-id file is created:
ll /var/log/journal && cat /etc/machine-id- This log file is rotated automatically once a month based on the settings in the journald.conf file.
Check the manual pages of journal.conf
man journald.confSystem Tuning
System tuning service
- Monitor connected devices
- Tweak their parameters to improve performance or conserve power.
- Recommended tuning profile may be identified and activated for optimal performance and power saving.
tuned - system tuning service
- monitor storage, networking, processor, audio, video, and a variety of other connected devices
- Adjusts their parameters for better performance or power saving based on a chosen profile.
- Several predefined tuning profiles may be activated either statically or dynamically.
tuned service
-
static behavior (default)
- activates a selected profile at service startup and continues to use it until it is switched to a different profile.
-
dynamic
- adjusts the system settings based on the live activity data received from monitored system components
tuned tuning Profiles
- Nine profiles to support a variety of use cases.
- Can create custom profiles from nothing or by using one of the existing profiles as a template.
- Must to store the custom profile in /etc/tuned/
Three groups: (1) Performance (2) Power consumption (3) Balanced
| Profile | Description |
|---|---|
| Performance | |
| Desktop | Based on the balanced profile for desktop systems. Offers improved throughput for interactive applications. |
| Latency-performance | For low-latency requirements |
| Network-latency | Based on the latency-performance for faster network throughput |
| Network-throughput | Based on the throughput-performance profile for maximum network throughput |
| Virtual-guest | Optimized for virtual machines |
| Virtual-host | Optimized for virtualized hosts |
| Power Saving | |
| Powersave | Saves maximum power at the cost of performance |
| Balanced/Max Profiles | |
| Balanced | Preferred choice for systems that require a balance between performance and power saving |
| Throughput-performance | Provides maximum performance and consumes maximum power |
Tuning Profiles
Predefined profiles are located in /usr/lib/tuned/ in subdirectories matching their names.
View predefined profiles:
ls -l /usr/lib/tunedThe default active profile set on server1 and server2 is the virtual-guest profile, as the two systems are hosted in a VirtualBox virtualized environment.
The tuned-adm Command
- single profile management command that comes with tuned
- can list active and available profiles, query current settings, switch between profiles, and turn the tuning off.
- Can recommend the best profile for the system based on many system attributes.
View the man pages:
man tuned-admLab 12-2: Manage Tuning Profiles
- install the tuned service
- start it now
- enable it for auto-restart upon future system reboots.
- display all available profiles and the current active profile.
- switch to one of the available profiles and confirm.
- determine the recommended profile for the system and switch to it.
- deactivate tuning and reactivate it.
- confirm the activation
- Install the tuned package if it is not already installed:
dnf install tuned- Start the tuned service and set it to autostart at reboots:
systemctl --now enable tuned- Confirm the startup:
systemctl status tuned- Display the list of available and active tuning profiles:
tuned-adm list- List only the current active profile:
tuned-adm active- Switch to the powersave profile and confirm:
 tuned-adm profile powersave
tuned-adm active- Determine the recommended profile for server1 and switch to it:
 [root@localhost ~]# tuned-adm recommend
 virtual-guest
 [root@localhost ~]# tuned-adm profile virtual-guest
 [root@localhost ~]# tuned-adm active
Current active profile: virtual-guest- Turn off tuning:
 [root@localhost ~]# tuned-adm off
 [root@localhost ~]# tuned-adm active
No current active profile.- Reactivate tuning and confirm:
 [root@localhost ~]# tuned-adm profile virtual-guest
 [root@localhost ~]# tuned-adm active
 Current active profile: virtual-guest
Sysinit, Logging, and Tuning Labs
Lab: Modify Default Boot Target
- Modify the default boot target from graphical to multi-user, and reboot the system to test it.
systemctl set-default multi-user- Run the
systemctlandwhocommands after the reboot for validation. - Restore the default boot target back to graphical and reboot to verify.
Lab: Record Custom Alerts
- Write the message “This is $LOGNAME adding this marker on $(date)” to /var/log/messages.
logger -i "This is $LOGNAME adding this marker on $(date)"- Ensure that variable and command expansions work. Verify the entry in the file.
tail -l /var/log/messagesLab: Apply Tuning Profile
- identify the current system tuning profile with the tuned-adm command.
tuned-adm active- List all available profiles.
tuned-adm list- List the recommended profile for server1.
tuned-adm recommend- Apply the “balanced” profile and verify with tuned-adm.
tuned-adm profile balanced tuned-adm active