Subsections of Ansible
Ad Hoc Ansible Commands
Ad hoc commands are ansible tasks you can run against managed hosts without the need of a playbook or script. These are used for bringing nodes to their desired states, verifying playbook results, and verifying nodes meet any needed criteria/pre-requisites. These must be ran as the ansible user (whatever your remote_user directive is set to under [defaults] in ansible.cfg)
Run the user module with the argument name=lisa on all hosts to make sure the user “lisa” exists. If the user doesn’t exist, it will be created on the remote system:
ansible all -m user -a "name=lisa"
{command} {host} -m {module} -a {"argument1 argument2 argument3"}
In our lab:
ansible all -m user -a "name=lisa"This Ad Hoc command created user “Lisa” on ansible1 and ansible2. If we run the command again, we get “SUCCESS” on the first line instead of “CHANGED”. Which means the hosts already meet the requirements:
[ansible@control base]$ ansible all -m user -a "name=lisa"indempotent Regardless of current condition, the host is brought to the desired state. Even if you run the command multiple times.
Run the command id lisa on all managed hosts:
[ansible@control base]$ ansible all -m command -a "id lisa"Here, the command module is used to run a command on the specified hosts. And the output is displayed on screen. To note, this does not show up in our ansible user’s command history on the host:
[ansible@ansible1 ~]$ historyRemove the user lisa from all managed hosts:
[ansible@control base]$ ansible all -m user -a "name=lisa state=absent"You can also use the -u option to specify the Ansible user that Ansible will use to run the command. Remember, with no modules specified, ansible uses the command module:
ansible all -a "free -m" -u david
`
Ad hoc commands in Scripts
Follow normal bash scripting guidelines to run ansible commands in a script:
[ansible@control base]$ vim httpd-ansible.shLet’s set up a script that installs and starts/enables httpd, creates a user called “anna”, and copies the ansible control node’s /etc/hosts file to /tmp/ on the managed nodes:
#!/bin/bash

ansible all -m yum -a "name=httpd state=latest"
ansible all -m service -a "name=httpd state=started enabled=yes"
ansible all -m user -a "name=anna"
ansible all -m copy -a "src=/etc/hosts dest=/tmp/hosts"[ansible@control base]$ chmod +x httpd-ansible.sh
[ansible@control base]$ ./httpd-ansible.sh
web2 | UNREACHABLE! => {
"changed": false,
"msg": "Failed to connect to the host via ssh: ssh: Could not resolve hostname web2: Name or service not known",
"unreachable": true
}
web1 | UNREACHABLE! => {
"changed": false,
"msg": "Failed to connect to the host via ssh: ssh: Could not resolve hostname web1: Name or service not known",
"unreachable": true
}
ansible1 | SUCCESS => {
"ansible_facts": {
"discovered_interpreter_python": "/usr/bin/python3"
},
"changed": false,
"msg": "Nothing to do",
"rc": 0,
"results": []
}
ansible2 | SUCCESS => {
"ansible_facts": {
"discovered_interpreter_python": "/usr/bin/python3"
},
"changed": false,
"msg": "Nothing to do",
"rc": 0,
"results": []
}
... <-- Results truncatedAnd from the ansible1 node we can verify:
[ansible@ansible1 ~]$ cat /etc/passwd | grep anna
anna:x:1001:1001::/home/anna:/bin/bash[ansible@ansible1 ~]$ cat /tmp/hosts
127.0.0.1 localhost localhost.localdomain localhost4 localhost4.localdomain4
::1 localhost localhost.localdomain localhost6 localhost6.localdomain6
192.168.124.201 ansible1
192.168.124.202 ansible2View a file from a managed node:
ansible ansible1 -a "cat /somfile.txt"
Ansible Documentation
ansible-navigator
Was advised to start using this tools for Ansible because it is available during the RHCE exam. https://ansible.readthedocs.io/projects/navigator/
Ansible Docs
ansible-doc
https://docs.ansible.com/ansible/latest/cli/ansible-doc.html
Ansible Facts
An Ansible fact is a variable that contains information about a target system.This information can be used in conditional statements to tailor playbooks to that system. Systems facts are system property values. Custom facts are user-defined variables stored on managed hosts. system.
Facts are collected when Ansible executes on the remote system. You’ll see a “Gathering Facts” task everytime you run a playbook. These facts are then stored in the variable ansible_facts.
Use the debug module to check the value of variables. This module requires variables to be enclosed in curly brackets. This example shows a large list of facts from managed nodes:
---
- name: show facts
  hosts: all
  tasks:
  - name: show facts
    debug:
      var: ansible_facts
There are two supported formats for using Ansible fact variables:
It’s recommended to use square brackets: ansible_facts['default_ipv4']['address'] but dotted notation is also supported for now: ansible_facts.default_ipv4.address
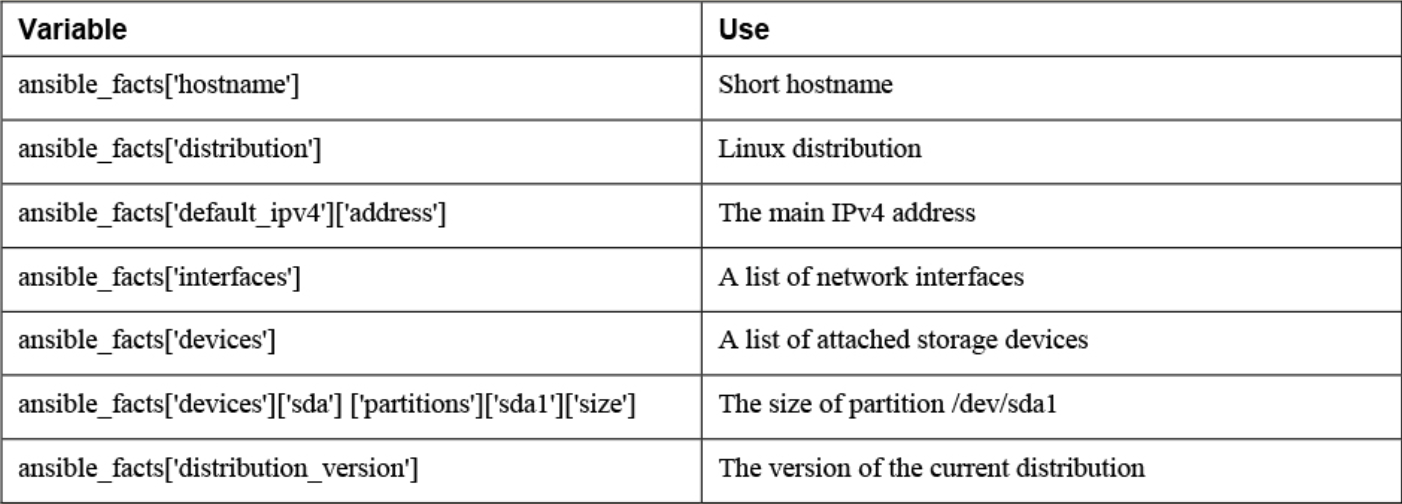
Commonly used ansible_facts:
There are additional Ansible modules for gathering more information. See `ansible-doc -l | grep fact
package_facts module collects information about software packages installed on managed hosts.
Two ways facts are displayed
Ansible_facts variable (current way)
- All facts are stored in a dictionary with the name ansible_facts, and items in this dictionary are addressed using the notation with square brackets
- ie:
ansible_facts['distribution_version'] - Recommended to use this.
injected variables (old way)
-
Variable are prefixed with the string ansible_
-
Will lose support eventually
-
Old approach and the new approach both still occur.
ansible ansible1 -m setupcommand Ansible facts are injected as variables.
    ansible1 | SUCCESS => {
        "ansible_facts": {
            "ansible_all_ipv4_addresses": [
                "192.168.122.1",
                "192.168.4.201"
            ],
            "ansible_all_ipv6_addresses": [
                "fe80::e564:5033:5dec:aead"
            ],
            "ansible_apparmor": {
Comparing ansible_facts Versus Injected Facts as Variables
ansible_facts                               Injected Variable
--------------------------------------------------------------
ansible_facts['hostname']                  ansible_hostname
ansible_facts['distribution']              ansible_distribution
ansible_facts['default_ipv4']['address']   ansible_default_ipv4['address']
ansible_facts['interfaces']                ansible_interfaces
ansible_facts['devices']                   ansible_devices
ansible_facts['devices']['sda']\
['partitions']['sda1']['size']             ansible_devices['sda']['partitions']['sda1']['size']
ansible_facts['distribution_version']      ansible_distribution_version
Different notations can be used in either method, the listings address the facts in dotted notation, not in the notation with square brackets.
Addressing Facts with Injected Variables:
    - hosts: all
      tasks:
      - name: show IP address
        debug:
          msg: >
            This host uses IP address {{ ansible_default_ipv4.address }}
Addressing Facts Using the ansible_facts Variable
    ---
    - hosts: all
      tasks:
      - name: show IP address
        debug:
          msg: >
            This host uses IP address {{ ansible_facts.default_ipv4.address }}
If, for some reason, you want the method where facts are injected into variables to be the default method, you can use inject_facts_as_vars=true in the [default] section of the ansible.cfg file.
• In Ansible versions since 2.5, all facts are stored in one variable: ansible_facts. This method is used while gathering facts from a playbook.
• Before Ansible version 2.5, facts were injected into variables such as ansible_hostname. This method is used by the setup module. (Note that this may change in future versions of Ansible.)
• Facts can be addressed in dotted notation:
{{ansible_facts.default_ipv4.address }}
• Alternatively, facts can be addressed in square brackets notation:
{{ ansible_facts['default_ipv4']['address'] }}. (preferred)
Managing Fact Gathering
By default, upon execution of each playbook, facts are gathered. This does slow down playbooks, and for that reason, it is possible to disable fact gathering completely. To do so, you can use the gather_facts: no parameter in the play header. If later in the same playbook it is necessary to gather facts, you can do this by running the setup module in a task.
Even if it is possible to disable fact gathering for all of your Ansible configuration, this practice is not recommended. Too many playbooks use conditionals that are based on the current value of facts, and all of these conditionals would stop working if fact gathering were disabled altogether.
As an alternative to make working with facts more efficient, you can disable a fact cache. To do so, you need to install an external plug-in. Currently, two plug-ins are available for this purpose: jsonfile and redis. To configure fact caching using the redis plug-in, you need to install it first. Next, you can enable fact caching through ansible.cfg.
The following procedure describes how to do this:
1. Use yum install redis.
2. Use service redis start.
3. Use pip install redis.
4. Edit /etc/ansible/ansible.cfg and ensure it contains the following parameters:
[defaults]
gathering = smart
fact_caching = redis
fact_caching_timeout = 86400
Note
Fact caching can be convenient but should be used with caution. If, for instance, a playbook installs a certain package only if a sufficient amount of disk space is available, it should not do this based on information that may be up to 24 hours old. For that reason, using a fact cache is not recommended in many situations.
Custom Facts
-
Used to provide a host with arbitrary values that Ansible can use to change the behavior of plays.
-
can be provided as static files.
-
files must
- be in either INI or JSON format,
- have the extension .fact, and
- on the managed hosts must be stored in the /etc/ansible/facts.d directory.
-
can be generated by a script, and
- in that case the only requirement is that the script must generate its output in JSON format.
Dynamic custom facts are useful because they allow the facts to be determined at the moment that a script is running. provides an example of a static custom fact file.
Custom Facts Sample File:
    [packages]
    web_package = httpd
    ftp_package = vsftpd

    [services]
    web_service = httpd
    ftp_service = vsftpd
To get the custom facts files on the managed hosts, you can use a playbook that copies a local custom fact file (existing in the current Ansible project directory) to the appropriate location on the managed hosts. Notice that this playbook uses variables, which are explained in more detail in the section titled “Working with Variables.”
    ---
    - name: Install custom facts
      hosts: all
      vars:
        remote_dir: /etc/ansible/facts.d
        facts_file: listing68.fact
      tasks:
      - name: create remote directory
        file:
          state: directory
          recurse: yes
          path: "{{ remote_dir }}"
      - name: install new facts
        copy:
          src: "{{ facts_file }}"
          dest: "{{ remote_dir }}"
Custom facts are stored in the variable ansible_facts.ansible_local. In this variable, you use the filename of the custom fact file and the label in the custom fact file. For instance, after you run the playbook in Listing 6-9, the web_package fact that was defined in listing68.fact is accessible as
{{ ansible_facts[’ansible_local’][’listing67’][’packages’][’web_package’] }}
To verify, you can use the setup module with the filter argument. Notice that because the setup module produces injected variables as a result, the ad hoc command to use is ansible all -m setup -a "filter=ansible_local" . The command ansible all -m setup -a "filter=ansible_facts\['ansible_local'\]" does not work.
Lab Working with Ansible Facts
1. Create a custom fact file with the name custom.fact and the following contents:
[software]
package = httpd
service = httpd
state = started
enabled = true
2. Write a playbook with the name copy_facts.yaml and the following contents:
---
- name: copy custom facts
  become: yes
  hosts: ansible1
  tasks:
  - name: create the custom facts directory
    file:
      state: directory
      recurse: yes
      path: /etc/ansible/facts.d
  - name: copy the custom facts
    copy:
      src: custom.fact
      dest: /etc/ansible/facts.d
3. Apply the playbook using ansible-playbook copy_facts.yaml -i inventory
4. Check the availability of the custom facts by using ansible all -m setup -a "filter=ansible_local" -i inventory
5. Use an ad hoc command to ensure that the httpd service is not installed on any of the managed servers: ansible all -m yum -a "name=httpd state=absent" -i inventory -b
6. Create a playbook with the name setup_with_facts.yaml that installs and enables the httpd service, using the custom facts:
---
- name: install and start the web service
  hosts: ansible1
  tasks:
  - name: install the package
    yum:
      name: "{{ ansible_facts['ansible_local']['custom']['software']['package'] }}"
      state: latest
  - name: start the service
    service:
      name: "{{ ansible_facts['ansible_local']['custom']['software']['service'] }}"
      state: "{{ ansible_facts['ansible_local']['custom']['software']['state'] }}"
      enabled: "{{ ansible_facts['ansible_local']['custom']['software']['enabled'] }}"
7. Run the playbook to install and set up the service by using ansible-playbook setup_with_facts.yaml -i inventory -b
8. Use an ad hoc command to verify the service is running: ansible ansible1 -a "systemctl status httpd" -i inventory -b
Ansible Galaxy Roles
Using Ansible Galaxy Roles
- Ansible Galaxy is a public library of Ansible content and contains thousands of roles that have been provided by community members.
Working with Galaxy
The easiest way to work with Ansible Galaxy is to use the website at https://galaxy.ansible.com:


-
Use the Search Feature to Search for Specific Packages
-
In the result of any Search action, you see a list of collections as well as a list of roles.
-
An Ansible Galaxy collection is a distribution format for Ansible content.
-
It can contain roles, but also playbooks, modules, and plug-ins.
-
In most cases you just need the roles, not the collection: roles contain all that you include in the playbooks you’re working with.
-
Some important indicators are the number of times the role has been downloaded and the score of the role.
-
This information enables you to easily distinguish between commonly used roles and roles that are not used that often.
-
Also, you can use tags to make identifying Galaxy roles easier.
-
These tags provide more information about a role and make it possible to search for roles in a more efficient way.

- You can download roles directly from the Ansible Galaxy website
- You can also use the
ansible-galaxycommand
Using the ansible-galaxy Command
ansible-galaxy search
- Find roles based on many different keywords and manage them.
- Must provide a string as an argument.
- Ansible searches for this string in the name and description of the roles.
Useful Command-Line Options: –platforms
- Operating system platform to search for –author
- GitHub username of the author –galaxy-tags
- Additional tags to filter by
`ansible-galaxy info
- Get more information about a role.
[ansible@control ansible-lab]$ ansible-galaxy info geerlingguy.docker

Role: geerlingguy.docker
        description: Docker for Linux.
        commit: 9115e969c1e57a1639160d9af3477f09734c94ac
        commit_message: Merge pull request #501 from adamus1red/adamus1red/alpine-compose

add compose package to Alpine specific variables
        created: 2023-05-08T20:49:45.679874Z
        download_count: 23592264
        github_branch: master
        github_repo: ansible-role-docker
        github_user: geerlingguy
        id: 10923
        imported: 2025-03-24T00:01:45.901567
        modified: 2025-03-24T00:01:47.840887Z
        path: ('/home/ansible/.ansible/roles', '/usr/share/ansible/roles', '/etc/ansible/roles')
        upstream_id: None
        username: geerlingguy
Managing Ansible Galaxy Roles
ansible-galaxy install
- Install a role
- normally installs the role into the ~/.ansible/roles directory because this role is specified in the role_path setting in ansible.cfg.
- If you want roles to be installed in another directory, consider changing this parameter.
-p - option to install the role to a different role path directory.
requirements file.
- YAML file that you can include when using the
ansible-rolescommand.
    - src: geerlingguy.nginx
version: "2.7.0"- possible to add roles from sources other than Ansible Galaxy, such as a Git repository or a tarball.
- In that case, you must specify the exact URL to the role using the
srcoption. - When you are installing roles from a Git repository, the
scmkeyword is also required and must be set togit.
To install a role using the requirements file, you can use the -r option with the ansible-galaxy install command:
ansible-galaxy install -r roles/requirements.yml
ansible-galaxy list
- Get a list of currently installed roles
ansible-galaxy remove
- Remove roles from your system.
LAB: Using ansible-galaxy to Manage Roles
- Type
ansible-galaxy search --author geerlingguy --platforms ELto see a list of roles that geerlingguy has created. - Make the command more specific and type
ansible-galaxy search nginx --author geerlingguy --platforms ELto find the geerlingguy.nginx role. - Request more information about this role by using
ansible-galaxy info geerlingguy.nginx. - Create a requirements file with the name listing96.yaml and give this file the following contents:
- src: geerlingguy.nginx
version: "2.7.0"-
Add the line
roles_path = /home/ansible/rolesto the ansible.cfg file. -
Use the command
ansible-galaxy install -r listing96.yamlto install the role from the requirements file. It is possible that by the time you run this exercise, the specified version 2.7.0 is no longer available. If that is the case, useansible-galaxy infoagain to find a version that still is available, and change the requirements file accordingly. -
Type
ansible-galaxy listto verify that the new role was successfully installed on your system. -
Write a playbook with the name exercise92.yaml that uses the role and has the following contents:
---
- name: install nginx using Galaxy role
  hosts: ansible2
  roles:
- geerlingguy.nginx- Run the playbook using
ansible-playbook exercise92.yamland observe that the new role is installed from the custom roles path.
Ansible Inventory and Ansible.cfg
Ansible projects
For small companies, you can use a single Ansible configuration. But for larger ones, it’s a good idea to use different project directories. A project directory contains everything you need to work on a single project. Including:
- playbooks
- variable files
- task files
- inventory files
- ansible.cfg
playbook An Ansible script written in YAML that enforce the desired configuration on manage hosts.
Inventory
A file that Identifies hosts that Ansible has to manage. You can also use this to list and group hosts and specify host variables. Each project should have it’s own inventory file.
/etc/ansible/hosts
- can be used for system wide inventory.
- default if no inventory file is specified.
- has some basic inventory formatting info if you forget)
- Ansible will also target localhosts if no hosts are found in the inventory file.
- It’s a good idea to store inventory files in large environments in their own project folders.
localhost is not defined in inventory. It is an implicit host that is usable and refers to the Ansible control machine. Using localhost can be a good way to verify the accessibility of services on managed hosts.
Listing hosts
List hosts by IP address or hostname. You can list a range of hosts in an inventory file as well such as web-server[1:10].example.com
ansible1:2222 < specify ssh port if the host is not using the default port 22
ansible2
10.0.10.55
web-server[1:10].example.com
Listing groups
You can list groups and groups of groups. See the groups web and db are included in the group “servers:children”
ansible1
ansible2
10.0.10.55
web-server[1:10].example.com

[web]
web-server[1:10].example.com

[db]
db1
db2

[servers:children] <-- servers is the group of groups and children is the parameter that specifies child groups
web
db
There are 3 general approaches to using groups:
Functional groups Address a specific group of hosts according to use. Such as web servers or database servers.
Regional host groups Used when working with region oriented infrastructure. Such as USA, Canada.
Staging host groups Used to address different hosts according to the staging phase that the current environment is in. Such as testing, development, production.
Undefined host groups are called implicit host groups. These are all, ungrouped, and localhost. Names making the meaning obvious.
Host variables
In older versions of Ansible you could define variables for hosts. This is no longer used. Example:
[groupname:vars]
ansible=ansible_user
Variables are now set using host_vars and group_vars directories instead.
Multiple inventory files
Put all inventory files in a directory and specify the directory as the inventory to be used. For dynamic directories you also need to set the execution bit on the inventory file.
Ansible Playbooks
- Exploring playbooks
- YAML
- Managing Multiplay Playbooks
Lets create our first playbook:
[ansible@control base]$ vim playbook.yaml
---
- name: install start and enable httpd <-- play is at the highest level
  hosts: all
  tasks: <-- play has a list of tasks
  - name: install package <-- name of task 1
    yum: <-- module
      name: httpd <-- argument 1
      state: installed <-- argument 2
  - name: start and enable service <-- task 2
    service:
      name: httpd
      state: started
      enabled: yes
There are thee dashes at the top of the playbook. And sometimes you’ll find three dots at the end of a playbook. These make it easy to isolate the playbook and embed the playbook code into other projects.
Playbooks are written in YAML format and saved as either .yml or .yaml. YAML specifies objects as key-value pairs (dictionaries). Key value pairs can be listed in either key: value (preferred) or key=value. And dashes specify lists of embedded objects.
There is a collection of one or more plays in a playbook. Each play targets specific hosts and lists tasks to perform on those hosts. There is one play here with the name “install start and enable httpd”. You target the host names to target at the top of the play, not in the individual tasks performed.
Each task is identified by “- name” (not required but recommended for troubleshooting and identifying tasks). Then the module is listed with arguments and their values under that.
Indentation is important here. It identifies the relationships between different elements. Data elements at the same level must have the same indentation. And items that are children or properties of another element must be indented more than their parent elements.
Indentation is created using spaces. Usually two spaces is used, but not required. You cannot use tabs for indentation.
You can also edit your .vimrc file to help with indentation when it detects that you are working with a YAML file:
vim ~/.vimrc
autocmd FileType yaml setlocal ai ts=2 sw=2 etRequired elements:
- hosts - name of host(s) to perform play on
- name - name of the play
- tasks - one or more tasks to execute for this play
To run a playbook:
[ansible@control base]$ ansible-playbook playbook.yaml

# Name of the play
PLAY [install start and enable http+userd] ***********************************************

# Overview of tasks and the hosts it was successful on
TASK [Gathering Facts] **************************************************************
fatal: [web1]: UNREACHABLE! => {"changed": false, "msg": "Failed to connect to the host via ssh: ssh: Could not resolve hostname web1: Name or service not known", "unreachable": true}
fatal: [web2]: UNREACHABLE! => {"changed": false, "msg": "Failed to connect to the host via ssh: ssh: Could not resolve hostname web2: Name or service not known", "unreachable": true}
ok: [ansible1]
ok: [ansible2]

TASK [install package] **************************************************************
ok: [ansible1]
ok: [ansible2]

TASK [start and enable service] *****************************************************
ok: [ansible2]
ok: [ansible1]

# overview of the status of each task
PLAY RECAP **************************************************************************
ansible1                   : ok=3 (no changes required)    changed=0 (indicates the task was successful and target node was modified.)   unreachable=0    failed=0    skipped=0    rescued=0    ignored=0
ansible2                   : ok=3    changed=0    unreachable=0    failed=0    skipped=0    rescued=0    ignored=0
web1                       : ok=0    changed=0    unreachable=1    failed=0    skipped=0    rescued=0    ignored=0
web2                       : ok=0    changed=0    unreachable=1    failed=0    skipped=0    rescued=0    ignored=0
Before running tasks, the ansible-playbook command gathers facts (current configuration and settings) about managed nodes.
How to undo playbook modifications
Ansible does not have a built in feature to undo a playbook that you ran. So to undo changes, you need to make another playbook that defines the new desired state of the host.
Working with YAML
Key value pairs can also be listed as:
tasks:
 - name: install vsftpd
   yum: name=vsftpd
 - name: enable vsftpd
   service: name=vsftpd enabled=true
 - name: create readme file
But better to list them as such for better readability:
    copy:
      content: "welcome to the FTP server\n"
      dest: /var/ftp/pub/README
      force: no
      mode: 0444
Some modules support multiple values for a single key:
---
- name: install multiple packages
  hosts: all
  tasks:
  - name: install packages
    yum:
      name: <-- key with multiple values
      - nmap
      - httpd
      - vsftpd
      state: latest <-- will install and/or update to latest version
YAML Strings
Valid fomats for a string in YAML:
super string"super string"'super string'
When inserting text into a file, you may have to deal with spacing. You can either preserve newline characters with a pipe | such as:
    - name: Using | to preserve newlines
      copy:
        dest: /tmp/rendezvous-with-death.txt
        content: |
          I have a rendezvous with Death
          At some disputed barricade,
          When Spring comes back with rustling shade
          And apple-blossoms fill the air—
Output:
I have a rendezvous with Death
At some disputed barricade,
When Spring comes back with rustling shade
And apple-blossoms fill the air—
Or chose not to with a carrot >
 - name: Using > to fold lines into one
      copy:
        dest: /tmp/rendezvous-with-death.txt
        content: >
          I have a rendezvous with Death
          At some disputed barricade,
          When Spring comes back with rustling shade
          And apple-blossoms fill the air—
Output:
I have a rendezvous with Death At some disputed barricade, When Spring comes back with rustling shade And apple-blossoms fill the air—Checking syntax with --syntax-check
You can use the --syntax-check flag to check a playbook for errors. The ansible-playbook command does check syntax by default though, and will throw the same error messages. The syntax check stops after detecting a single error. So you will need to fix the first errors in order to see errors further in the file. I’ve added a tab in front of the host key to demonstrate:
[ansible@control base]$ cat playbook.yaml
---
- name: install start and enable httpd
    hosts: all
  tasks:
  - name: install package
    yum:
      name: httpd
      state: installed
  - name: start and enable service
    service:
      name: httpd
      state: started
      enabled: yes

[ansible@control base]$ ansible-playbook --syntax-check playbook.yaml
ERROR! We were unable to read either as JSON nor YAML, these are the errors we got from each:
JSON: Expecting value: line 1 column 1 (char 0)

Syntax Error while loading YAML.
  mapping values are not allowed in this context

The error appears to be in '/home/ansible/base/playbook.yaml': line 3, column 10, but may
be elsewhere in the file depending on the exact syntax problem.

The offending line appears to be:

- name: install start and enable httpd
    hosts: all
         ^ here
And here it is again, after fixing the syntax error:
[ansible@control base]$ vim playbook.yaml
[ansible@control base]$ cat playbook.yaml
---
- name: install start and enable httpd
  hosts: all
  tasks:
  - name: install package
    yum:
      name: httpd
      state: installed
  - name: start and enable service
    service:
      name: httpd
      state: started
      enabled: yes
[ansible@control base]$ ansible-playbook --syntax-check playbook.yaml

playbook: playbook.yaml
Doing a dry run
Use the -C flag to perform a dry run. This will check the success status of all of the tasks without actually making any changes.
ansible-playbook -C playbook.yaml
Multiple play playbooks
Using multiple plays in a playbook lets you set up one group of servers with one configuration and another group with a different configuration. Each play has it’s own list of hosts to address.
You can also specify different parameters in each play such as become: or the remote_user: parameters.
Try to keep playbooks small. As bigger playbooks will be harder to troubleshoot. You can use include: to include other playbooks. Other than troubleshooting, using smaller playbooks lets you use your playbooks in a flexible way to perform a wider range of tasks.
Here is an example of a playbook with two plays:
---
- name: install start and enable httpd   <--- play 1
  hosts: all
  tasks:
  - name: install package
    yum:
      name: httpd
      state: installed
  - name: start and enable service
    service:
      name: httpd
      state: started
      enabled: yes

- name: test httpd accessibility <-- play 2
  hosts: localhost
  tasks:
  - name: test httpd access
    uri:
      url: http://ansible1
Verbose output options
You can increase the output of verbosity to an amount hitherto undreamt of. This can be useful for troubleshooting.
Verbose output of the playbook above showing task results:
[ansible@control base]$ ansible-playbook -v playbook.yaml
Verbose output of the playbook above showing task results and task configuration:
[ansible@control base]$ ansible-playbook -vv playbook.yaml
Verbose output of the playbook above showing task results, task configuration, and info about connections to managed hosts:
[ansible@control base]$ ansible-playbook -vvv playbook.yaml
Verbose output of the playbook above showing task results, task configuration, and info about connections to managed hosts, plug-ins, user accounts, and executed scripts:
[ansible@control base]$ ansible-playbook -vvvv playbook.yaml
Lab playbook
Now we know enough to create and enable a simple webserver. Here is a playbook example. Just make sure to download the posix collection or you won’t be able to use the firewalld module:
[ansible@control base]$ ansible-galaxy collection install ansible.posix
[ansible@control base]$ cat playbook.yaml
---
- name: Enable web server
  hosts: ansible1
  tasks:
  - name: install package
    yum:
      name:
        - httpd
        - firewalld
      state: installed
  - name: Create welcome page
    copy:
      content: "Welcome to the webserver!\n"
      dest: /var/www/html/index.html
  - name: start and enable service
    service:
      name: httpd
      state: started
      enabled: yes
  - name: enable firewall
    service:
      name: firewalld
      state: started
      enabled: true
  - name: Open service in firewall
    firewalld:
      service: http
      permanent: true
      state: enabled
      immediate: yes

- name: test webserver accessibility
  hosts: localhost
  become: no
  tasks:
  - name: test webserver access
    uri:
      url: http://ansible1
      return_content: yes <-- Return the body of the response as a content key in the dictionary result
      status_code: 200 <--
After running this playbook, you should be able to reach the webserver at http://ansible1
With return content and status code
ok: [localhost] => {"accept_ranges": "bytes", "changed": false, "connection": "close", "content": "Welcome to the webserver!\n", "content_length": "26", "content_type": "text/html; charset=UTF-8", "cookies": {}, "cookies_string": "", "date": "Thu, 10 Apr 2025 12:12:37 GMT", "elapsed": 0, "etag": "\"1a-6326b4cfb4042\"", "last_modified": "Thu, 10 Apr 2025 11:58:14 GMT", "msg": "OK (26 bytes)", "redirected": false, "server": "Apache/2.4.62 (Red Hat Enterprise Linux)", "status": 200, "url": "http://ansible1"}Adds this: "content": "Welcome to the webserver!\n" and this: "status": 200, "url": "http://ansible1"} to verbose output for that task.
Ansible Roles
Work with roles and Create roles
Using Ansible Roles
- Ready-to-use playbook-based Ansible solutions that you can easily include in your own playbooks.
- Community roles are provided through Ansible Galaxy
- Also possible to create your own roles.
- Red Hat provides RHEL System Roles.
- Roles make it possible to provide Ansible code in a reusable way.
- You can easily define a specific task in a role, and after defining it in a role, you can easily redistribute that and ensure that tasks are handled the same way, no matter where they are executed.
- Roles can be custom-made for specific environments, or default roles provided from Ansible Galaxy can be used.
Understanding Ansible Roles
- work with include files.
- All the different components that you may use in a playbook are used in roles and stored in separate directories.
- While defining the role, you don’t need to tell the role that it should look in some of these specific directories; it does that automatically.
- The only thing you need to do is tell your Ansible playbook that it should include a role.
- Different components of the role are stored in different subdirectories.
Roles Sample Directory Structure:
    [ansible@control roles]$ tree testrole/
    testrole/
    |-- defaults
    |   `-- main.yml
    |-- files
    |-- handlers
    |   `-- main.yml
    |-- meta
    |   `-- main.yml
    |-- README.md
    |-- tasks
    |   `-- main.yml
    |-- templates
    |-- tests
    |   |-- inventory
    |   `-- test.yml
    `-- vars
        `-- main.yml
Role Directory Structure defaults
-
Default variables that may be overwritten by other variables files
-
Static files that are needed by role tasks handlers
-
Handlers for use in this role meta
-
metadata, such as dependencies, plus license and maintainer information tasks
-
Role task definitions templates
-
Jinja2 templates tests
-
Optional inventory and a test.yml file to test the role vars
-
Variables that are not meant to be overwritten
-
Most of the role directories have a main.yml file.
-
This is the entry-point YAML file that is used to define components in the role.
Understanding Role Location
Roles can be stored in different locations:
./roles
- store roles in the current project directory.
- highest precedence.
~/.ansible/roles
- exists in the current user home directory and makes the role available to the current user only.
- second-highest precedence.
/etc/ansible/roles
- Where roles are stored to make them accessible to any user.
/usr/share/ansible/roles
- Where roles are stored after they are installed from RPM files.
- lowest precedence
- should not be used for storing custom-made roles.
ansible-galaxy init { newrolename }
- create a custom role
- creates the default role directory structure with a main.yml file
- includes sample files
Using Roles from Playbooks
- Call roles in a playbook the same way you call a task
- Roles are included as a list.
    ---
    - name: include some roles
      roles:
      - role1
- role2- Roles are executed before the tasks.
- In specific cases you might have to execute tasks before the roles. To do so, you can specify these tasks in a pre_tasks section.
- Also, it’s possible to use the post_tasks section to include tasks that will be executed after the roles, but also after tasks specified in the playbook as well as the handlers they call.
Creating Custom Roles
- Use
mkdir rolesto create a roles subdirectory in the current directory, and usecd rolesto get into that subdirectory. - Use
ansible-galaxy init motdto create the motd role structure. - Add contents to motd/tasks/main.yml
- Add contents to motd/templates/motd.j2
- Add contents to motd/defaults/main.yml
- Add contents to motd/meta/main.yml
- Create the playbook exercise91.yaml to run the role
- Run the playbook by using
ansible-playbook exercise91.yaml - Verify that modifications have been applied correctly by using the ad hoc command
ansible ansible2 -a "cat /etc/motd"
Sample role all under roles/motd/:
defaults/main.yml
---
# defaults file for motd
system_manager: anna@example.com
meta/main.yml
galaxy_info:
author: Sander van V
description: your description
company: your company (optional)
license: license (GPLv2, CC-BY, etc)
min_ansible_version: 2.5
tasks/main.yml
---
tasks file for motd
- name: copy motd file
  template:
    src: templates/motd.j2
    dest: /etc/motd
    owner: root
    group: root
    mode: 0444
templates/motd.j2
Welcome to {{ ansible_hostname }}

This file was created on {{ ansible_date_time.date }}
Disconnect if you have no business being here

Contact {{ system_manager }} if anything is wrong
Playbook motd.yml:
---
- name: use the motd role playbook
  hosts: ansible2
  roles:
  - role: motd
    system_manager: bob@example.com
handlers/main.yml example:
---
# handlers file for base-config
  - name: source profile
    command: source /etc/profile

  - name: source bash
    command: source /etc/bash.bashrc
Managing Role Dependencies
- Roles may use other roles as a dependency.
- You can put role dependencies in meta/main.yml
- Dependent roles are always executed before the roles that depend on them.
- Dependent roles are executed once.
- When two roles that are used in a playbook call the same dependency, the dependent role is executed once only.
- When calling dependent roles, it is possible to pass variables to the dependent role.
- You can define a when statement to ensure that the dependent role is executed only in specific situations.
Defining dependencies in meta/main.yml
    dependencies:
    - role: apache
      port: 8080
    - role: mariabd
      when: environment == ’production’
Understanding File Organization Best Practices
-
Working with roles splits the contents of the role off the tasks that are run through the playbook.
-
Splitting files to store them in a location that makes sense is common in Ansible
-
When you’re working with Ansible, it’s a good idea to work with project directories in bigger environments.
-
Working with project directories makes it easier to delegate tasks and have the right people responsible for the right things.
-
Each project directory may have its own ansible.cfg file, inventory file, and playbooks.
-
If the project grows bigger, variable files and other include files may be used, and they are normally stored in subdirectories.
-
At the top-level directory, create the main playbook from which other playbooks are included. The suggested name for the main playbook is site.yml.
-
Use group_vars/ and host_vars/ to set host-related variables and do not define them in inventory.
-
Consider using different inventory files to differentiate between production and staging phases.
-
Use roles to standardize common tasks.
When you are working with roles, some additional recommendations apply:
-
Use a version control repository to maintain roles in a consistent way. Git is commonly used for this purpose.
-
Sensitive information should never be included in roles. Use Ansible Vault to store sensitive information in an encrypted way.
-
Use
ansible-galaxy initto create the role base structure. Remove files and directories you don’t use. -
Don’t forget to provide additional information in the role’s README.md and meta/main.yml files.
-
Keep roles focused on a specific function. It is better to use multiple roles to perform multiple tasks.
-
Try to develop roles in a generic way, such that they can be used for multiple purposes.
Lab 9-1
Create a playbook that starts the Nginx web server on ansible1, according to the following requirements: • A requirements file must be used to install the Nginx web server. Do NOT use the latest version of the Galaxy role, but instead use the version before that. • The same requirements file must also be used to install the latest version of postgresql. • The playbook needs to ensure that neither httpd nor mysql is currently installed.
Lab 9-2
Use the RHEL SELinux System Role to manage SELinux properties according to the following requirements:
• A Boolean is set to allow SELinux relabeling to be automated using
cron.
• The directory /var/ftp/uploads is created, permissions are set to 777,
and the context label is set to public_content_rw_t.
• SELinux should allow web servers to use port 82 instead of port 80.
• SELinux is in enforcing state.
Subjects:
ansible-playbook timesync.yaml to run the playbook. Observe its output. Notice that some messages in red are shown, but these can safely be ignored.
5. Use ansible ansible2 -a "timedatectl show" and notice that the timezone variable is set to UTC.
Lab 9-1
Create a playbook that starts the Nginx web server on ansible1, according to the following requirements:
• A requirements file must be used to install the Nginx web server. Do NOT use the latest version of the Galaxy role, but instead use the version before that.
• The same requirements file must also be used to install the latest version of postgresql.
ansible-galaxy install -r roles/requirements.yml
cat roles/requirements.yml
- src: geerlingguy.nginx
  version: "3.1.4"

- src: geerlingguy.postgresql
• The playbook needs to ensure that neither httpd nor mysql is currently installed.
---
- name: ensure conflicting packages are not installed
  hosts: web1
  tasks:
  - name: remove packages
    yum:
      name:
      - mysql
      - httpd
      state: absent

- name: nginx web server
  hosts: web1
  roles:
  - geerlingguy.nginx
  - geerlingguy.postgresql
(Had to add a variable file for redhat 10 into the role. )
Lab 9-2
Use the RHEL SELinux System Role to manage SELinux properties according to the following requirements:
• A Boolean is set to allow SELinux relabeling to be automated using cron. • The directory /var/ftp/uploads is created, permissions are set to 777, and the context label is set to public_content_rw_t. • SELinux should allow web servers to use port 82 instead of port 80. • SELinux is in enforcing state.
vim lab92.yml
---
- name: manage ftp selinux properties
  hosts: ftp1
  vars:
    selinux_booleans:
      - name: cron_can_relabel
        state: true
        persistent: true
    selinux_state: enforcing
    selinux_ports:
    - ports: 82
      proto: tcp
      setype: http_port_t
      state: present
      local: true

  tasks:

  - name: create /var/ftp/uploads/
    file:
      path: /var/ftp/uploads
      state: directory
      mode: 777

  - name: set selinux context
    sefcontext:
      target: '/var/ftp/uploads(/.*)?'
      setype: public_content_rw_t
      ftype: d
      state: present
    notify: run restorecon

  - name: Execute the role and reboot in a rescue block
    block:
      - name: Include selinux role
        include_role:
          name: rhel-system-roles.selinux
    rescue:
      - name: >-
          Fail if failed for a different reason than selinux_reboot_required
        fail:
          msg: "role failed"
        when: not selinux_reboot_required

      - name: Restart managed host
        reboot:

      - name: Wait for managed host to come back
        wait_for_connection:
          delay: 10
          timeout: 300

      - name: Reapply the role
        include_role:
          name: rhel-system-roles.selinux

  handlers:
    - name:  run restorecon
      command: restorecon -v /var/ftp/uploads
Ansible Vault
Ansible Vault
- For webkeys, passwords, and other types of sensitive data that you really shouldn’t store as plain text in a playbook.
- Can use Ansible Vault to encrypt and decrypt sensitive data to make it unreadable, and only while accessing data does it ask for a password so that it is decrypted.
1. Sensitive data is stored as values in variables in a separate variable file. 2. The variable file is encrypted, using the ansible-vault command. 3. While accessing the variable file from a playbook, you enter a password to decrypt.
Managing Encrypted Files
ansible-vault create secret.yaml
- Ansible Vault prompts for a password and then opens the file using the default editor.
- The password can be provided in a password file.(must be really well protected (for example, by putting it in the user root home directory))
- If a password file is used, the encrypted variable file can be created using
ansible-vault create \--vault-password-file=passfile secret.yaml
ansible-vault encrypt
- encrypt one or more existing files.
- The encrypted file can next be used from a playbook, where a password needs to be entered to decrypt.
ansible-vault decrypt
- used to decrypt the file.
Commonly used ansible-vault commands:
create
- Creates new encrypted file
encrypt - Encrypts an existing file
encrypt_string - Encrypts a string
decrypt - Decrypts an existing file
rekey - Changes password on an existing file
view - Shows contents of an existing file
edit - Edits an existing encrypted file
Using Vault in Playbooks
--vault-id @prompt
- When a Vault-encrypted file is accessed from a playbook, a password must be entered.
- Has the
ansible-playbookcommand prompt for a password for each of the Vault-encrypted files that may be used - Enables a playbook to work with multiple Vault-encrypted files where these files are allowed to have different passwords set.
ansible-playbook --ask-vault-pass
- Used if all Vault-encrypted files a playbook refers to have the same password set.
ansible-playbook --vault-password-file=secret
- Obtain the Vault password from a password file.
- Password file should contain a string that is stored as a single line in the file.
- Make sure the vault password file is protected through file permissions, such that it is not accessible by unauthorized users!
Managing Files with Sensitive Variables
-
You should separate files containing unencrypted variables from files that contain encrypted variables.
-
Use group_vars and host_vars variable inclusion for this.
-
You may create a directory (instead of a file) with the name of the host or host group.
-
Within that directory you can create a file with the name vars, which contains unencrypted variables, and a file with the name vault, which contains Vault-encrypted variables.
-
Vault-encrypted variables can be included from a file using the
vars_filesparameter.
Lab: Working with Ansible Vault
1. Create a secret file containing encrypted values for a variable user and a variable password by using ansible-vault create secrets.yaml
Set the password to password and enter the following lines:
username: bob
pwhash: password
When creating users, you cannot provide the password in plain text; it needs to be provided as a hashed value. Because this exercise focuses on the use of Vault, the password is not provided as a hashed value, and as a result, a warning is displayed. You may ignore this warning.
2. Create the file create-users.yaml and provide the following contents:
---
- name: create a user with vaulted variables
  hosts: ansible1
  vars_files:
    - secrets.yaml
  tasks:
  - name: creating user
    user:
      name: "{{ username }}"
      password: "{{ pwhash }}"
3. Run the playbook by using ansible-playbook --ask-vault-pass create-users.yaml
4. Change the current password on secrets.yaml by using ansible-vault rekey secrets.yaml and set the new password to
secretpassword.
5. To automate the process of entering the password, use echo secretpassword > vault-pass
6. Use chmod 400 vault-pass to ensure the file is readable for the ansible user only; this is about as much as you can do to secure the file.
7. Verify that it’s working by using ansible-playbook --vault-password-file=vault-pass create-users.yaml
JunctionScallopPoise
Ansible-inventory command
Inventory commands:
To view the inventory, specify the inventory file such as ~/base/inventory in the command line. You can name the inventory file anything you want. You can also set the default in the ansible.cfg file.
View the current inventory:
ansible -i inventory <pattern> --list-hosts
List inventory hosts in JSON format:
ansible-inventory -i inventory --list
Display overview of hosts as a graph:
ansible-inventory -i inventory --graph
In our lab example:
[ansible@control base]$ pwd
/home/ansible/base

[ansible@control base]$ ls
inventory

[ansible@control base]$ cat inventory
ansible1
ansible2

[web]
web1
web2

[ansible@control base]$ ansible-inventory -i inventory --graph
@all:
  |--@ungrouped:
  |  |--ansible1
  |  |--ansible2
  |--@web:
  |  |--web1
  |  |--web2

[ansible@control base]$ ansible-inventory -i inventory --list
{
    "_meta": {
        "hostvars": {}
    },
    "all": {
        "children": [
            "ungrouped",
            "web"
        ]
    },
    "ungrouped": {
        "hosts": [
            "ansible1",
            "ansible2"
        ]
    },
    "web": {
        "hosts": [
            "web1",
            "web2"
        ]
    }
}

[ansible@control base]$ ansible -i inventory all --list-hosts
  hosts (4):
    ansible1
    ansible2
    web1
    web2

[ansible@control base]$ ansible -i inventory ungrouped --list-hosts
  hosts (2):
    ansible1
    ansible2
Using the ansible-inventory Command
- default output of a dynamic inventory script is unformatted.
- To show formatted JSON output of the scripts, you can use the
ansible-inventorycommand. - Apart from the
--listand--hostoptions, this command also uses the--graphoption to show a list of hosts, including the host groups they are a member of.
    [ansible@control rhce8-book]$ ansible-inventory -i listing101.py --graph
    [WARNING]: A duplicate localhost-like entry was found (localhost). First found
    localhost was 127.0.0.1
    @all:
      |--@ungrouped:
      |  |--127.0.0.1
      |  |--192.168.4.200
      |  |--192.168.4.201
      |  |--192.168.4.202
      |  |--ansible1
      |  |--ansible1.example.com
      |  |--ansible2
      |  |--ansible2.example.com
      |  |--control
      |  |--control.example.com
      |  |--localhost
      |  |--localhost.localdomain
      |  |--localhost4
      |  |--localhost4.localdomain4
      |  |--localhost6
      |  |--localhost6.localdomain6
Ansible.cfg
ansible.cfg
You can store this in a project’s directory or a user’s home directory, in the case that multiple user’s want to have their own Ansible configuration. Or in /etc/ansible if the configuration will be the same for every user and every project. You can also specify these settings in Ansible playbooks. The settings in a playbook take precedence over the .cfg file.
ansible.cfg precedence (Ansible uses the first one it finds and ignores the rest.)
- ANSIBLE_CONFIG environment variable
- ansible.cfg in current directory
- ~/.ansible.cfg
- /etc/ansible/ansible.cfg
Generate an example config file in the current directory. All directive are commented out by default:
[ansible@control base]$ ansible-config init --disabled > ansible.cfg
Include existing plugin to the file:
ansible-config init --disabled -t all > ansible.cfg
This generates an extremely large file. So I’ll just show Van Vugt’s example in .ini format:
[defaults] <-- General information
remote_user = ansible <--Required
host_key_checking = false <-- Disable SSH host key validity check
inventory = inventory

[privilege_escalation] <-- Define how ansible user requires admin rights to connect to hosts
become = True <-- Escalation required
become_method = sudo
become_user = root <-- Escalated user
become_ask_pass = False <-- Do not ask for escalation password
Privilege escalation parameters can be specified in ansible.cfg, playbooks, and on the command line.
Boot Process
Managing the Boot Process
No modules for managing boot process.
file module
- manage the systemd boot targets
lineinfile module
- manage the GRUB configuration.
reboot module
- enables you to reboot a host and pick up after the reboot at the exact same location.
Managing Systemd Targets
To manage the default systemd target:
- /etc/systemd/system/default.target file must exist as a symbolic link to the desired default target.
ls -l /etc/systemd/system/default.target
    lrwxrwxrwx. 1 root root 37 Mar 23 05:33 /etc/systemd/system/default.target -> /lib/systemd/system/multi-user.target
---
- name: set default boot target
hosts: ansible2
tasks:
- name: set boot target to graphical
file:
src: /usr/lib/systemd/system/graphical.target
dest: /etc/systemd/system/default.target
state: linkRebooting Managed Hosts
reboot module.
- Restart managed nodes.
test_command argument
- Verify the renewed availability of the managed hosts
- Specifies an arbitrary command that Ansible should run successfully on the managed hosts after the reboot. The success of this command indicates that the rebooted host is available again.
Equally useful while using the reboot module are the arguments that relate to timeouts. The reboot module uses no fewer than four of them:
• connect_timeout: The maximum seconds to wait for a successful connection before trying again
• post_reboot_delay: The number of seconds to wait after the reboot command before trying to validate the managed host is available again
• pre_reboot_delay: The number of seconds to wait before actually issuing the reboot
• reboot_timeout: The maximum seconds to wait for the rebooted machine to respond to the test command
When the rebooted host is back, the current playbook continues its tasks. This scenario is shown in the example in Listing 14-7, where first all managed hosts are rebooted, and after a successful reboot is issued, the message “successfully rebooted” is shown. Listing 14-8 shows the result of running this playbook. In Exercise 14-2 you can practice rebooting hosts using the reboot module.
Listing 14-7 Rebooting Managed Hosts
::: pre_1 — - name: reboot all hosts hosts: all gather_facts: no tasks: - name: reboot hosts reboot: msg: reboot initiated by Ansible test_command: whoami - name: print message to show host is back debug: msg: successfully rebooted :::
Listing 14-8 Verifying the Success of the reboot Module
::: pre_1 [ansible@control rhce8-book]$ ansible-playbook listing147.yaml
PLAY [reboot all hosts] *************************************************************************************************

TASK [reboot hosts] *****************************************************************************************************
changed: [ansible2]
changed: [ansible1]
changed: [ansible3]
changed: [ansible4]
changed: [ansible5]

TASK [print message to show host is back] *******************************************************************************
ok: [ansible1] => {
    "msg": "successfully rebooted"
}
ok: [ansible2] => {
    "msg": "successfully rebooted"
}
ok: [ansible3] => {
    "msg": "successfully rebooted"
}
ok: [ansible4] => {
    "msg": "successfully rebooted"
}
ok: [ansible5] => {
    "msg": "successfully rebooted"
}

PLAY RECAP **************************************************************************************************************
ansible1                   : ok=2    changed=1    unreachable=0    failed=0    skipped=0    rescued=0    ignored=0
ansible2                   : ok=2    changed=1    unreachable=0    failed=0    skipped=0    rescued=0    ignored=0
ansible3                   : ok=2    changed=1    unreachable=0    failed=0    skipped=0    rescued=0    ignored=0
ansible4                   : ok=2    changed=1    unreachable=0    failed=0    skipped=0    rescued=0    ignored=0
ansible5                   : ok=2    changed=1    unreachable=0    failed=0    skipped=0    rescued=0    ignored=0
:::
::: box Exercise 14-2 Managing Boot State
1. As a preparation for this playbook, so that it actually changes the default boot target on the managed host, use ansible ansible2 -m file -a “state=link src=/usr/lib/systemd/system/graphical.target dest=/etc/systemd/system/default.target”.
2. Use your editor to create the file exercise142.yaml and write the following playbook header:
---
- name: set default boot target and reboot
  hosts: ansible2
  tasks:
3. Now you set the default boot target to multi-user.target. Add the following task to do so:
- name: set default boot target
  file:
    src: /usr/lib/systemd/system/multi-user.target
    dest: /etc/systemd/system/default.target
    state: link
4. Complete the playbook to reboot the managed hosts by including the following tasks:
- name: reboot hosts
  reboot:
    msg: reboot initiated by Ansible
    test_command: whoami
- name: print message to show host is back
  debug:
    msg: successfully rebooted
5. Run the playbook by using ansible-playbook exercise142.yaml.
6. Test that the reboot was issued successfully by using ansible ansible2 -a “systemctl get-default”. :::
Building an Ansible lab with Ansible
When I started studying for RHCE, the study guide had me manually set up virtual machines for the Ansible lab environment. I thought.. Why not start my automation journey right, and automate them using Vagrant.
I use Libvirt to manage KVM/QEMU Virtual Machines and the Virt-Manager app to set them up. I figured I could use Vagrant to automatically build this lab from a file. And I got part of the way. I ended up with this Vagrant file:
Vagrant.configure("2") do |config|
  config.vm.box = "almalinux/9"

  config.vm.provider :libvirt do |libvirt|
    libvirt.uri = "qemu:///system"
    libvirt.cpus = 2
    libvirt.memory = 2048
  end

   config.vm.define "control" do |control|
    control.vm.network "private_network", ip: "192.168.124.200"
    control.vm.hostname = "control.example.com"
  end

  config.vm.define "ansible1" do |ansible1|
    ansible1.vm.network "private_network", ip: "192.168.124.201"
    ansible1.vm.hostname = "ansible1.example.com"

  end

  config.vm.define "ansible2" do |ansible2|
    ansible2.vm.network "private_network", ip: "192.168.124.202"
    ansible2.vm.hostname = "ansible2.example.com"
  end

end
I could run this Vagrant file and Build and destroy the lab in seconds. But there was a problem. The Libvirt plugin, or Vagrant itself, I’m not sure which, kept me from doing a couple important things.
First, I could not specify the initial disk creation size. I could add additional disks of varying sizes but, if I wanted to change the size of the first disk, I would have to go back in after the fact and expand it manually…
Second, the Libvirt plugin networking settings were a bit confusing. When you add the private network option as seen in the Vagrant file, it would add this as a secondary connection, and route everything through a different public connection.
Now I couldn’t get the VMs to run using the public connection for whatever reason, and it seems the only workaround was to make DHCP reservations for the guests Mac addresses which gave me even more problems to solve. But I won’t go there..
So why not get my feet wet and learn how to deploy VMs with Ansible? This way, I would get the granularity and control that Ansible gives me, some extra practice with Ansible, and not having to use software that has just enough abstraction to get in the way.
The guide I followed to set this up can be found on Redhat’s blog here. And it was pretty easy to set up all things considered.
I’ll rehash the steps here:
- Download a cloud image
- Customize the image
- Install and start a VM
- Access the VM
Creating the role
Move to roles directory
cd roles
Initialize the role
ansible-galaxy role init kvm_provision
Switch into the role directory
cd kvm_provision/
Remove unused directories
rm -r files handlers vars
Define variables
Add default variables to main.yml
cd defaults/ && vim main.yml
---
# defaults file for kvm_provision
base_image_name: AlmaLinux-9-GenericCloud-9.5-20241120.x86_64.qcow2
base_image_url: https://repo.almalinux.org/almalinux/9/cloud/x86_64/images/{{ base_image_name }}
base_image_sha: abddf01589d46c841f718cec239392924a03b34c4fe84929af5d543c50e37e37
libvirt_pool_dir: "/var/lib/libvirt/images"
vm_name: f34-dev
vm_vcpus: 2
vm_ram_mb: 2048
vm_net: default
vm_root_pass: test123
cleanup_tmp: no
ssh_key: /root/.ssh/id_rsa.pub
# Added option to configure ip address
ip_addr: 192.168.124.250
gw_addr: 192.168.124.1
# Added option to configure disk size
vm_disksize: 20
Defining a VM template
The community.libvirt.virt module is used to provision a KVM VM. This module uses a VM definition in XML format with libvirt syntax. You can dump a VM definition of a current VM and then convert it to a template from there. Or you can just use this:
cd templates/ && vim vm-template.xml.j2
<domain type='kvm'>
  <name>{{ vm_name }}</name>
  <memory unit='MiB'>{{ vm_ram_mb }}</memory>
  <vcpu placement='static'>{{ vm_vcpus }}</vcpu>
  <os>
    <type arch='x86_64' machine='pc-q35-5.2'>hvm</type>
    <boot dev='hd'/>
  </os>
  <cpu mode='host-model' check='none'/>
  <devices>
    <emulator>/usr/bin/qemu-system-x86_64</emulator>
    <disk type='file' device='disk'>
      <driver name='qemu' type='qcow2'/>
      <source file='{{ libvirt_pool_dir }}/{{ vm_name }}.qcow2'/>
      <target dev='vda' bus='virtio'/>
      <address type='pci' domain='0x0000' bus='0x05' slot='0x00' function='0x0'/>
       <!-- Added: Specify the disk size using a variable -->
      <size unit='GiB'>{{ disk_size }}</size>
    </disk>
    <interface type='network'>
      <source network='{{ vm_net }}'/>
      <model type='virtio'/>
      <address type='pci' domain='0x0000' bus='0x01' slot='0x00' function='0x0'/>
    </interface>
    <channel type='unix'>
      <target type='virtio' name='org.qemu.guest_agent.0'/>
      <address type='virtio-serial' controller='0' bus='0' port='1'/>
    </channel>
    <channel type='spicevmc'>
      <target type='virtio' name='com.redhat.spice.0'/>
      <address type='virtio-serial' controller='0' bus='0' port='2'/>
    </channel>
    <input type='tablet' bus='usb'>
      <address type='usb' bus='0' port='1'/>
    </input>
    <input type='mouse' bus='ps2'/>
    <input type='keyboard' bus='ps2'/>
    <graphics type='spice' autoport='yes'>
      <listen type='address'/>
      <image compression='off'/>
    </graphics>
    <video>
      <model type='qxl' ram='65536' vram='65536' vgamem='16384' heads='1' primary='yes'/>
      <address type='pci' domain='0x0000' bus='0x00' slot='0x01' function='0x0'/>
    </video>
    <memballoon model='virtio'>
      <address type='pci' domain='0x0000' bus='0x06' slot='0x00' function='0x0'/>
    </memballoon>
    <rng model='virtio'>
      <backend model='random'>/dev/urandom</backend>
      <address type='pci' domain='0x0000' bus='0x07' slot='0x00' function='0x0'/>
    </rng>
  </devices>
</domain>
The template uses some of the variables from earlier. This allows flexibility to changes things by just changing the variables.
Define tasks for the role to perform
cd ../tasks/ && vim main.yml
---
# tasks file for kvm_provision

# ensure the required package dependencies `guestfs-tools` and `python3-libvirt` are installed. This role requires these packages to connect to `libvirt` and to customize the virtual image in a later step. These package names work on Fedora Linux. If you're using RHEL 8 or CentOS, use `libguestfs-tools` instead of `guestfs-tools`. For other distributions, adjust accordingly.

- name: Ensure requirements in place
  package:
    name:
      - guestfs-tools
      - python3-libvirt
    state: present
  become: yes

# obtain a list of existing VMs so that you don't overwrite an existing VM on accident. uses the `virt` module from the collection `community.libvirt`, which interacts with a running instance of KVM with `libvirt`. It obtains the list of VMs by specifying the parameter `command: list_vms` and saves the results in a variable `existing_vms`. `changed_when: no` for this task to ensure that it's not marked as changed in the playbook results. This task doesn't make any change in the machine; it only checks the existing VMs. This is a good practice when developing Ansible automation to prevent false reports of changes.
- name: Get VMs list
  community.libvirt.virt:
    command: list_vms
  register: existing_vms
  changed_when: no

#execute only when the VM name the user provides doesn't exist. And uses the module `get_url` to download the base cloud image into the `/tmp` directory
- name: Create VM if not exists
  block:
  - name: Download base image
    get_url:
      url: "{{ base_image_url }}"
      dest: "/tmp/{{ base_image_name }}"
      checksum: "sha256:{{ base_image_sha }}"

# copy the file to libvirt's pool directory so we don't edit the original, which can be used to provision other VMS later
  - name: Copy base image to libvirt directory
    copy:
      dest: "{{ libvirt_pool_dir }}/{{ vm_name }}.qcow2"
      src: "/tmp/{{ base_image_name }}"
      force: no
      remote_src: yes
      mode: 0660
    register: copy_results
  -
# Resize the VM disk
  - name: Resize VM disk
    command: qemu-img resize "{{ libvirt_pool_dir }}/{{ vm_name }}.qcow2" "{{ disk_size }}G"
    when: copy_results is changed

# uses command module to run virt-customize to customize the image
  - name: Configure the image
    command: |
      virt-customize -a {{ libvirt_pool_dir }}/{{ vm_name }}.qcow2 \
      --hostname {{ vm_name }} \
      --root-password password:{{ vm_root_pass }} \
      --ssh-inject 'root:file:{{ ssh_key }}' \
      --uninstall cloud-init --selinux-relabel
# Added option to configure an IP address
      --firstboot-command "nmcli c m eth0 con-name eth0 ip4 {{ ip_addr }}/24 gw4 {{ gw_addr }} ipv4.method manual && nmcli c d eth0 && nmcli c u eth0"

    when: copy_results is changed

  - name: Define vm
    community.libvirt.virt:
      command: define
      xml: "{{ lookup('template', 'vm-template.xml.j2') }}"
    when: "vm_name not in existing_vms.list_vms"

- name: Ensure VM is started
  community.libvirt.virt:
    name: "{{ vm_name }}"
    state: running
  register: vm_start_results
  until: "vm_start_results is success"
  retries: 15
  delay: 2

- name: Ensure temporary file is deleted
  file:
    path: "/tmp/{{ base_image_name }}"
    state: absent
  when: cleanup_tmp | bool
Changed my user to own the libvirt directory:
chown -R david:david /var/lib/libvirt/images
Create playbook kvm_provision.yaml
---
- name: Deploys VM based on cloud image
  hosts: localhost
  gather_facts: yes
  become: yes
  vars:
    pool_dir: "/var/lib/libvirt/images"
    vm: control
    vcpus: 2
    ram_mb: 2048
    cleanup: no
    net: default
    ssh_pub_key: "/home/davidt/.ssh/id_ed25519.pub"
    disksize: 20

  tasks:
    - name: KVM Provision role
      include_role:
        name: kvm_provision
      vars:
        libvirt_pool_dir: "{{ pool_dir }}"
        vm_name: "{{ vm }}"
        vm_vcpus: "{{ vcpus }}"
        vm_ram_mb: "{{ ram_mb }}"
        vm_net: "{{ net }}"
        cleanup_tmp: "{{ cleanup }}"
        ssh_key: "{{ ssh_pub_key }}"
Add the libvirt collection
ansible-galaxy collection install community.libvirt
Create a VM with a new name
ansible-playbook -K kvm_provision.yaml -e vm=ansible1
–run-command ’nmcli c a type Ethernet ifname eth0 con-name eth0 ip4 192.168.124.200 gw4 192.168.124.1'
parted /dev/vda resizepargit t 4 100%
Warning: Partition /dev/vda4 is being used. Are you sure you want to continue?
Yes/No? y
Information: You may need to update /etc/fstab.
lsblk NAME MAJ:MIN RM SIZE RO TYPE MOUNTPOINTS vda 252:0 0 20G 0 disk ├─vda2 252:2 0 200M 0 part /boot/efi ├─vda3 252:3 0 1G 0 part /boot └─vda4 252:4 0 8.8G 0 part /
variables {{ ansible_user }} {{ ansible_password }} {{ gw_addr }} {{ ip_addr }}
; useradd -m -p {{ ansible_user }} ; chage -d 0 {{ ansible_user }} ; cat {{ ansible_password }} > passwd {{ ansible_user }} –stdin" \
  - name: Configure the image
    command: |
      virt-customize -a {{ libvirt_pool_dir }}/{{ vm_name }}.qcow2 \
      --hostname {{ vm_name }} \
      --root-password password:{{ vm_root_pass }} \
      --uninstall cloud-init --selinux-relabel \
      --firstboot-command "nmcli c m eth0 con-name eth0 ip4 \
                           {{ ip_addr }}/24 gw4 {{ gw_addr }} \
                           ipv4.method manual && nmcli c d eth0 \
                           && nmcli c u eth0 && adduser \
                           {{ ansible_user }} && echo \
                           "{{ ansible_password }}" | passwd \
                           --stdin {{ ansible_user }}"
    when: copy_results is changed

  - name: Add ssh keys
    command: |
      virt-customize -a {{ libvirt_pool_dir }}/{{ vm_name }}.qcow2 \
      --ssh-inject '{{ ansible_user }}:file:{{ ssh_key }}'
Common modules with examples
uri: Interacts with basic http and https web services. (Verify connectivity to a web server +9)
Test httpd accessibility:
uri:
  url: http://ansible1
Show result of the command while running the playbook:
uri:
  url: http://ansible1
  return_content: yes
Show the status code that signifies the success of the request:
uri:
  url: http://ansible1
  status_code: 200
debug: Prints statements during execution. Used for debugging variables or expressions without stopping a playbook.
Print out the value of the ansible_facts variable:
debug:
  var: ansible_facts
Deploying files
This chapter covers the following subjects:
• Using Modules to Manipulate Files • Managing SELinux Properties • Using Jinja2 Templates
RHCE exam topics
• Use Ansible modules for system administration tasks that work with: • File contents • Use advanced Ansible features • Create and use templates to create customized configuration files
Using Modules to Manipulate Files
File Module Manipulation Overview
Common modules to manipulate files copy
- Copies files to remote locations fetch
- Fetches files from remote locations file
- Manage file and file properties
- Create new files or directories
- Create links
- Remove files
- Set permissions and ownership
acl
- Work with file system ACLs find
- Find files based on properties lineinfile
- Manages lines in text files blockinfile
- Manage blocks in text files replace
- Replaces strings in text files based on regex synchronize
- Performs rsync-based synchronization tasks stat
- Retrieves file or file system status
- enables you to retrieve file status information.
- gets status information and is not used to change anything
- use it to check specific file and perform an action if the properties are not set as expected. Shows:
- which permission mode is set,
- whether it is a link,
- which checksum is set on the file
- etc.
- See
ansible-doc statfor list of full output
Lab: View information about /etc/hosts file
- name: stat module tests
  hosts: ansible1
  tasks:
  - stat:
      path: /etc/hosts
    register: st
  - name: show current values
    debug:
      msg: current value of the st variable is {{ st }}
Lab: write a message if the expected permission mode is not set.
---
- name: stat module test
  hosts: ansible1
  tasks:
  - command: touch /tmp/statfile
  - stat:
      path: /tmp/statfile
    register: st
  - name: show current values
    debug:
      msg: current value of the st variable is {{ st }}
  - fail:
      msg: "unexpected file mode, should be set to 0640"
    when: st.stat.mode != '0640'
Lab: Use the file Module to Correct File Properties Discovered with stat
---
- name: stat module tests
  hosts: ansible1
  tasks:
  - command: touch /tmp/statfile
  - stat:
      path: /tmp/statfile
    register: st
  - name: show current values
    debug:
      msg: current value of the st variable is {{ st }}
  - name: changing file permissions if that's needed
    file:
      path: /tmp/statfile
      mode: 0640
    when: st.stat.mode != '0640'
Managing File Contents
Use lineinfile or blockinfile instead of copy to manage text in a file
Lab: Change a string, based on a regular expression.
---
- name: configuring SSH
  hosts: all
  tasks:
  - name: disable root SSH login
    lineinfile:
      dest: /etc/ssh/sshd_config
      regexp: "^PermitRootLogin"
      line: "PermitRootLogin no"
    notify: restart sshd

  handlers:
  - name: restart sshd
    service:
      name: sshd
      state: restarted
Lab: Manipulate multiple lines
---
- name: modifying file
  hosts: all
  tasks:
  - name: ensure /tmp/hosts exists
    file:
      path: /tmp/hosts
      state: touch
  - name: add some lines to /tmp/hosts
    blockinfile:
      path: /tmp/hosts
      block: |
        192.168.4.110 host1.example.com
        192.168.4.120 host2.example.com
      state: present
When blockinfile is used, the text specified in the block is copied with a start and end indicator.
[ansible@ansible1 ~]$ cat /tmp/hosts
127.0.0.1   localhost localhost.localdomain localhost4 localhost4.localdomain4
::1         localhost localhost.localdomain localhost6 localhost6.localdomain6
192.168.122.201 ansible1
192.168.122.202 ansible2
192.168.122.203 ansible3
# BEGIN ANSIBLE MANAGED BLOCK
192.168.4.110 host1.example.com
192.168.4.120 host2.example.com
# END ANSIBLE MANAGED BLOCK
Lab: Creating and Removing Files
Use the file module to create a new directory and in that directory create an empty file, then remove the directory recursively.
---
- name: using the file module
  hosts: ansible1
  tasks:
  - name: create directory
    file:
      path: /newdir
      owner: ansible
      group: ansible
      mode: 770
      state: directory
  - name: create file in that directory
    file:
      path: /newdir/newfile
      state: touch
  - name: show the new file
    stat:
      path: /newdir/newfile
    register: result
  - debug:
      msg: |
        This shows that newfile was created
        "{{ result }}"
  - name: removing everything again
    file:
      path: /newdir
state: absent - state: absent recursively removes the directory.
Moving Files Around
copy module copies a file from the Ansible control host to a managed machine.
fetch module enables you to do the opposite
synchronize module performs Linux rsync-like tasks, ensuring that a file from the control host is synchronized to a file with that name on the managed host.
copy module always creates a new file, whereas the synchronize module updates a current existing file.
Lab: Moving a File Around with Ansible
---
- name: file copy modules
  hosts: all
  tasks:
  - name: copy file demo
    copy:
      src: /etc/hosts
      dest: /tmp/
  - name: add some lines to /tmp/hosts
    blockinfile:
      path: /tmp/hosts
      block: |
        192.168.4.110 host1.example.com
        192.168.4.120 host2.example.com
      state: present
  - name: verify file checksum
    stat:
      path: /tmp/hosts
      checksum_algorithm: md5
    register: result
  - debug:
      msg: "The checksum of /tmp/hosts is {{ result.stat.checksum }}"
  - name: fetch a file
    fetch:
      src: /tmp/hosts
dest: /tmp/- Ansible creates a subdirectory on the control node for each managed host in the dest directory and puts the file that fetch has copied from the remote host in that subdirectory:
/tmp/ansible1/tmp/hosts
/tmp/ansible2/tmp/hosts
Lab: Managing Files with Ansible
1. Create a file with the name exercise81.yaml and give it the following play header:
2. Add a task that creates a new empty file:
3. Use the stat module to check on the status of the new file:
4. To see what the status module is doing, add a line that uses the debug module:
5. Now that you understand which values are stored in newfile, you can add a conditional play that changes the current owner if not set correctly:
6. Add a second play to the playbook that fetches a remote file:
7. Now that you have fetched the file so that it is on the Ansible control machine, use blockinfile to edit it:
8. In the final step, copy the modified file to ansible2 by including the following play:
9. At this point you’re ready to run the playbook. Type ansible-playbook exercise81.yaml to run it and observe the results.
10. Type ansible ansible2 -a "cat /tmp/motd" to verify that the modified motd file was successfully copied to ansible2.
---
- name: testing file manipulation skills
  hosts: ansible1
  tasks:
    - name: create new file
      file:
        name: /tmp/newfile
        state: touch
    - name: check the status of the new file
      stat:
        path: /tmp/newfile
      register: newfile
    - name: for debugging only
      debug:
        msg: the current values for newfile are {{ newfile }}
    - name: change file owner if needed
      file:
        path: /tmp/newfile
        owner: ansible
      when: newfile.stat.pw_name != 'ansible'

- name: fetching a remote file
  hosts: ansible1
  tasks:
    - name: fetch file from remote machine
      fetch:
        src: /etc/motd
        dest: /tmp

- name: adding text to the text file that is now on localhost
  hosts: localhost
  tasks:
  - name: add a message
    blockinfile:
      path: /tmp/ansible1/etc/motd
      block: |
        welcome to this server
        for authorized users only
      state: present

- name: copy the modified file to ansible2
  hosts: ansible2
  tasks:
  - name: copy motd file
    copy:
      src: /tmp/ansible1/etc/motd
      dest: /tmp
Discovering storage related facts
Table 15-2 Modules for Managing Storage

To make sure that your playbook is applied to the right devices, you first need to find which devices are available on your managed system.
After you find them, you can use conditionals to make sure that tasks are executed on the right devices.
Using Storage-Related Facts
Ansible_facts related to storage
ansible_devices
- Available storage and device info ansible_device_links
- info on how to access storage and other device info ansible_mounts
- Mount point info
ansible ansible1 -m setup -a 'filter=ansible_devices'
-
Find generic information about storage devices.
-
The filter argument to the setup module uses a shell-style wildcard to search for matching items and for that reason can search in the highest level facts, such as ansible_devices, but it is incapable of further specifying what is searched for. For that reason, in the filter argument to the setup module, you cannot use a construction like
ansible ansible1 -m setup -a "filter=ansible_devices.sda"which is common when looking up the variable in conditional statements.
Using Storage-Related Facts in Conditional Statements
Assert module
- show an error message if a device does not exist and to perform a task if the device exists.
- For an easier solution, you can also use a when statement to look for the existence of a device.
- The advantage of using the assert module is that an error message can be printed if the condition is not met.
Listing 15-2 Using assert to Run a Task Only If a Device Exists
    ---
    - name: search for /dev/sdb continue only if it is found
      hosts: all
      vars:
        disk_name: sdb
      tasks:
      - name: abort if second disk does not exist
        assert:
          that:
            - "ansible_facts['devices']['{{ disk_name }}'] is defined"
          fail_msg: second hard disk not found
      - debug:
          msg: "{{ disk_name }} was found, lets continue"
Write a playbook that finds out the name of the disk device and puts that in a variable that you can work with further on in the playbook.
The set_fact argument comes in handy to do so.
You can use it in combination with a when conditional statement to store a detected device name in a variable.
Storing the Detected Disk Device Name in a Variable
    ---
    - name: define variable according to diskname detected
      hosts: all
      tasks:
      - ignore_errors: yes
        set_fact:
          disk2name: sdb
        when: ansible_facts[’devices’][’sdb’]
- name: Detect secondary disk name
ignore_errors: yes
set_fact:
disk2name: vda
when: ansible_facts['devices']['vda'] is defined
- name: Search for second disk, continue only if it is found
assert:
that:
- "ansible_facts['devices'][disk2name] is defined"
fail_msg: second hard disk not found
- name: Debug detected disk
debug:
msg: "{{ disk2name }} was found. Moving forward."
~ Next, see Managing Partitions and LVM
Dynamic Inventory
Dynamic inventory scripts
A script is used to detect inventory hosts so that you do not have to manually enter them. This is good for larger environments. You can find community provided dynamic inventory scripts that come with an .ini file that provides information on how to connect to a resource.
Inventory scripts must include –list and –host options and output must be JSON formatted. Here is an example from sandervanvught that generates an inventory script using /etc/hosts:
[ansible@control base]$ cat inventory-helper.py

#!/usr/bin/python

from subprocess import Popen,PIPE
import sys

try:
     import json
except ImportError:
     import simplejson as json


result = {}

result['all'] = {}


pipe = Popen(['getent', 'hosts'], stdout=PIPE, universal_newlines=True)


result['all']['hosts'] = []

for line in pipe.stdout.readlines():
    s = line.split()
    result['all']['hosts']=result['all']['hosts']+s


result['all']['vars'] = {}


if len(sys.argv) == 2 and sys.argv[1] == '--list':
    print(json.dumps(result))

elif len(sys.argv) == 3 and sys.argv[1] == '--host':
    print(json.dumps({}))

else:
    print("Requires an argument, please use --list or --host <host>")
When ran on our sample lab:
[ansible@control base]$sudo python3 ./inventory-helper.py
Requires an argument, please use --list or --host <host>

[ansible@control base]$ sudo python3 ./inventory-helper.py --list
{"all": {"hosts": ["127.0.0.1", "localhost", "localhost.localdomain", "localhost4", "localhost4.localdomain4", "127.0.0.1", "localhost", "localhost.localdomain", "localhost6", "localhost6.localdomain6", "192.168.124.201", "ansible1", "192.168.124.202", "ansible2"], "vars": {}}}
To use a dynamic inventory script:
[ansible@control base]$ chmod u+x inventory-helper.py
[ansible@control base]$ sudo ansible -i inventory-helper.py all --list-hosts
[WARNING]: A duplicate localhost-like entry was found (localhost). First found localhost was 127.0.0.1
  hosts (11):
    127.0.0.1
    localhost
    localhost.localdomain
    localhost4
    localhost4.localdomain4
    localhost6
    localhost6.localdomain6
    192.168.124.201
    ansible1
    192.168.124.202
    ansible2
Configuring Dynamic Inventory
dynamic inventory
-
script that can be used to detect whether new hosts have been added to the managed environment.
-
Dynamic inventory scripts are provided by the community and exist for many different environments.
-
easy to write your own dynamic inventory script.
-
The main requirement is that the dynamic inventory script works with a --list and a --host <hostname> option and produces its output in JSON format.
-
Script must have the Linux execute permission set.
-
Many dynamic inventory scripts are written in Python, but this is not a requirement.
-
Writing dynamic inventory scripts is not an exam requirement
#!/usr/bin/python

from subprocess import Popen,PIPE
import sys

try:
     import json
except ImportError:
     import simplejson as json

result = {}
result['all'] = {}

pipe = Popen(['getent', 'hosts'], stdout=PIPE, universal_newlines=True)

result['all']['hosts'] = []

for line in pipe.stdout.readlines():
    s = line.split()
    result['all']['hosts']=result['all']['hosts']+s

result['all']['vars'] = {}

if len(sys.argv) == 2 and sys.argv[1] == '--list':
    print(json.dumps(result))

elif len(sys.argv) == 3 and sys.argv[1] == '--host':
    print(json.dumps({}))

else:
    print("Requires an argument, please use --list or --host <host>")
pipe = Popen(\['getent', 'hosts'\], stdout=PIPE, universal_newline=True)
- gets a list of hosts using the
getentfunction. - This queries all hosts in /etc/hosts and other mechanisms where host name resolving is enabled.
- To show the resulting host list, you can use the
\--listcommand - To show details for a specific host, you can use the option
\--host hostname.
    [ansible@control rhce8-book]$ ./listing101.py --list
{"all": {"hosts": ["127.0.0.1", "localhost", "localhost.localdomain", "localhost4", "localhost4.localdomain4", "127.0.0.1", "localhost", "localhost.localdomain", "localhost6", "localhost6.localdomain6", "192.168.4.200", "control.example.com", "control", "192.168.4.201", "ansible1.example.com", "ansible1", "192.168.4.202", "ansible2.example.com", "ansible2"], "vars": {}}}- Dynamic inventory scripts are activated in the same way as regular inventory scripts: you use the
-ioption to either theansibleor theansible-playbookcommand to pass the name of the inventory script as an argument.
External directory service can be based on a wide range of solutions:
-
FreeIPA
-
Active Directory
-
Red Hat Satellite
-
etc.
-
Also are available for virtual machine-based infrastructures such as VMware of Red Hat Enterprise Virtualization, where virtual machines can be discovered dynamically.
-
Can be found in cloud environments, where scripts are available for many solutions, including AWS, GCE, Azure, and OpenStack.
When you are working with dynamic inventory, additional parameters are normally required:
- To get an inventory from an EC2 cloud environment, you need to enter your web keys.
- To pass these parameters, many inventory scripts come with an additional configuration file that is formatted in .ini style.
- The community-provided ec2.py script, for instance, comes with an ec2.ini parameter file.
Another feature that is seen in many inventory scripts is cache management:
- Can use a cache to store names and parameters of recently discovered hosts.
- If a cache is provided, options exist to manage the cache, allowing you, for instance, to make sure that the inventory information really is recently discovered.
Encrypted passwords
Managing Encrypted Passwords
When managing users in Ansible, you probably want to set user passwords as well. The challenge is that you cannot just enter a password as the value to the password: argument in the user module because the user module expects you to use an encrypted string.
Understanding Encrypted Passwords
When a user creates a password, it is encrypted. The hash of the encrypted password is stored in the /etc/shadow file, a file that is strictly secured and accessible only with root privileges. The string looks like $6$237687687/$9809erhb8oyw48oih290u09. In this string are three elements, which are separated by $ signs:
• The hashing algorithm that was used
• The random salt that was used to encrypt the password
• The encrypted hash of the user password
When a user sets a password, a random salt is used to prevent two users who have identical passwords from having identical entries in /etc/shadow. The salt and the unencrypted password are combined and encrypted, which generates the encrypted hash that is stored in /etc/shadow. Based on this string, the password that the user enters can be verified against the password field in /etc/shadow, and if it matches, the user is authenticated.
Generating Encrypted Passwords
When you’re creating users with the Ansible user module, there is a password option. This option is not capable of generating an encrypted password. It expects an encrypted password string as its input. That means an external utility must be used to generate an encrypted string. This encrypted string must be stored in a variable to create the password. Because the variable is basically the user password, the variable should be stored securely in, for example, an Ansible Vault secured file.
To generate the encrypted variable, you can choose to create the variable before creating the user account. Alternatively, you can run the command to create the variable in the playbook, use register to write the result to a variable, and use that to create the encrypted user. If you want to generate the variable beforehand, you can use the following ad hoc command:
ansible localhost -m debug -a "msg={{ ‘password’ | password_hash(‘sha512’,’myrandomsalt’) }}"
This command generates the encrypted string as shown in Listing 13-11, and this string can next be used in a playbook. An example of such a playbook is shown in Listing 13-12.
Listing 13-11 Generating the Encrypted Password String
::: pre_1 [ansible@control ~]$ ansible localhost -m debug -a “msg={{ ‘password’ | password_hash(‘sha512’,’myrandomsalt’) }}” localhost | SUCCESS => { “msg”: “$6$myrandomsalt$McEB.xAVUWe0./6XqZ8n/7k9VV/Gxndy9nIMLyQAiPnhyBoToMWbxX2vA4f.Uv9PKnPRaYUUc76AjLWVAX6U10” } :::
Listing 13-12 Sample Playbook That Creates an Encrypted User Password
    ---
    - name: create user with encrypted pass
      hosts: ansible2.example.com
      vars:
        password: "$6$myrandomsalt$McEB.xAVUWe0./6XqZ8n/7k9VV/Gxndy9nIMLyQAiPnhyBoToMWbxX2vA4f.Uv9PKnPRaYUUc76AjLWVAX6U10"
      tasks:
      - name: create the user
        user:
          name: anna
          password: "{{ password }}"
The method that is used here works but is not elegant. First, you need to generate the encrypted password manually beforehand. Also, the encrypted password string is used in a readable way in the playbook. By seeing the encrypted password and salt, it’s possible to get to the original password, which is why the password should not be visible in the playbook in a secure environment.
In Exercise 13-3 you create a playbook that prompts for the user password and that uses the debug module, which was used in Listing 13-11 inside the playbook, together with register, so that the password no longer is readable in clear text. Before looking at Exercise 13-3, though, let’s first look at an alternative approach that also works.
The procedure to use encrypted passwords while creating user accounts is documented in the Frequently Asked Questions from the Ansible documentation. Because the documentation is available on the exam, make sure you know where to find this information! Search for the item “How do I generate encrypted passwords for the user module?”
Using an Alternative Approach
As has been mentioned on multiple occasions, in Ansible often different solutions exist for the same problem. And sometimes, apart from the most elegant solution, there’s also a quick-and-dirty solution, and that counts for setting a user-encrypted password as well. Instead of using the solution described in the previous section, “Generating Encrypted Passwords,” you can use the Linux command echo password | passwd --stdin to set the user password. Listing 13-13 shows how to do this. Notice this example focuses on how to do it, not on security. If you want to make the playbook more secure, it would be nice to store the password in Ansible Vault.
Listing 13-13 Setting the User Password: Alternative Solution
    ---
    - name: create user with encrypted password
      hosts: ansible3
      vars:
        password: mypassword
        user: anna
      tasks:
      - name: configure user {{ user }}
        user:
          name: "{{ user }}"
          groups: wheel
          append: yes
          state: present
      - name: set a password for {{ user }}
        shell: ‘echo {{ password }} | passwd --stdin {{ user }}’
::: box Exercise 13-3 Creating Users with Encrypted Passwords
1. Use your editor to create the file exercise133.yaml.
2. Write the play header as follows:
---
- name: create user with encrypted password
  hosts: ansible3
  vars_prompt:
  - name: passw
    prompt: which password do you want to use
  vars:
    user: sharon
  tasks:
3. Add the first task that uses the debug module to generate the encrypted password string and register to store the string in the variable mypass:
- debug:
    msg: "{{ ‘{{ passw }}’| password_hash(‘sha512’,’myrandomsalt’) }}"
  register: mypass
4. Add a debug module to analyze the exact format of the registered variable:
- debug:
    var: mypass
5. Use ansible-playbook exercise133.yaml to run the playbook the first time so that you can see the exact name of the variable that you have to use. This code shows that the mypass.msg variable contains the encrypted password string (see Listing 13-14).
Listing 13-14 Finding the Variable Name Using debug
::: pre_1
TASK [debug] *******************************************************************
ok: [ansible2] => {
    "mypass": {
        "changed": false,
        "failed": false,
        "msg": "$6$myrandomsalt$Jesm4QGoCGAny9ebP85apmh0/uUXrj0louYb03leLoOWSDy/imjVGmcODhrpIJZt0rz.GBp9pZYpfm0SU2/PO."
    }
}
:::
6. Based on the output that you saw with the previous command, you can now use the user module to refer to the password in the right way. Add the following task to do so:
- name: create the user
  user:
    name: "{{ user }}"
    password: "{{ mypass.msg }}"
7. Use ansible-playbook exercise133.yaml to run the playbook and verify its output. :::
Execution Environments
Why use EEs?
- Portable Ansible environments
- includes Ansible core version
- All desired collections
- Python dependencies
- Bindep dependencies
- Anything you need to run a playbook
A container that has a specific version of Ansible. Can test execution in a specific Ansible environment to make sure it will work with that version.
EEs are built leveraging ansible-bulder They can be pushed to a private automation hub or any container registry Run EEs from the cli using ansible-navigator Or run in your production environment using automation controller as part of the Ansible Automation Platform If you want them to automatically occur, schedule them as a job inside AAP
Handlers
Using Handlers
- A task that is triggered and is executed by a successful task.
Working with Handlers
- Define a notify statement at the level where the task is defined.
- The notify statement should list the name of the handler that is to be executed
- Handlers are listed at the end of the play.
- Make sure the name of the handler matches the name of the item that is called in the notify statement, because that is what the handler is looking for.
- Handlers can be specified as a list, so one task can call multiple handlers.
Lab
- Define the file index.html on localhost. Use this file in the second play to set up the web server.
- The handler is triggered from the task where the copy module is used to copy the index.html file.
- If this task is successful, the notify statement calls the handler.
- A second task is defined, which is intended to fail.
    ---
    - name: create file on localhost
      hosts: localhost
      tasks:
      - name: create index.html on localhost
        copy:
          content: "welcome to the webserver"
          dest: /tmp/index.html

    - name: set up web server
      hosts: all
      tasks:
        - name: install httpd
          yum:
            name: httpd
            state: latest
        - name: copy index.html
          copy:
            src: /tmp/index.html
            dest: /var/www/html/index.html
          notify:
            - restart_web
        - name: copy nothing - intended to fail
          copy:
            src: /tmp/nothing
            dest: /var/www/html/nothing.html
      handlers:
        - name: restart_web
          service:
            name: httpd
state: restarted-
All tasks up to copy index.html run successfully. However, the task copy nothing fails, which is why the handler does not run. The solution seems easy: the handler doesn’t run because the task that copies the file /tmp/nothing fails as the source file doesn’t exist.
-
Create the source file using
touch /tmp/nothingon the control host and run the task again. -
After creating the source file and running the playbook again, the handler still doesn’t run.
-
Handlers run only if the task that triggers them gives a changed status.
Run an ad hoc command to remove the /var/www/html/index.html file on the managed hosts and run the playbook again:
ansible ansible2 -m file -a "name=/var/www/html/index.html state=absent"
Run the playbook again and you’ll see the handler runs.
Understanding Handler Execution and Exceptions
When a task fails, none of the following tasks run. How does that make handlers different? A handler runs only on the success of a task, but the next task in the list also runs only if the previous task was successful. What, then, is so special about handlers?
The difference is in the nature of the handler.
- Handlers are meant to perform an extra action when a task makes a change to a host.
- Handler should be considered an extension to the regular task.
- A conditional task that runs only upon the success of a previous task.
Two methods to get Handlers to run even if a subsequent task fails:
force_handlers: true (More specific and preferred)
- Used in the play header to ensure that the handler will run even if a task fails.
ignore_errors: true
- Used in the play header to accomplish the same thing.
• Handlers are specified in a handlers section at the end of the play. • Handlers run in the order they occur in the handlers section and not in the order as triggered. • Handlers run only if the task calling them generates a changed status. • Handlers by default will not run if any task in the same play fails, unless force_handlers or ignore_errors are used. • Handlers run only after all tasks in the play where the handler is activated have been processed. You might want to define multiple plays to avoid this behavior.
Lab: Working with Handlers
1. Open a playbook with the name exercise73.yaml.
2. Define the play header:
---
- name: update the kernel
  hosts: all
  force_handlers: true
  tasks:
3. Add a task that updates the current kernel:
---
- name: update the kernel
  hosts: all
  force_handlers: true
  tasks:
  - name: update kernel
    yum:
      name: kernel
      state: latest
    notify: reboot_server
4. Add a handler that reboots the server in case the kernel was successfully updated:
---
- name: update the kernel
  hosts: all
  force_handlers: true
  tasks:
  - name: update kernel
    yum:
      name: kernel
      state: latest
    notify: reboot_server
  handlers:
  - name: reboot_server
    command: reboot
5. Run the playbook using ansible-playbook exercise73.yaml andobserve its result. Notice that the handler runs only if the kernel was updated. If the kernel already was at the latest version, nothing has changed and the handler does not run. Also notice that it wasn’t really necessary to use force_handlers in the play header, but by using it anyway, at least you now know where to use it.
Dealing with Failures
Understanding Task Execution
- Tasks in Ansible playbooks are executed in the order they are specified.
- If a task in the playbook fails to execute on a host, the task generates an error and the play does not further execute on that specific host.
- This also goes for handlers: if any task that follows the task that triggers a handler fails, the handlers do not run.
- In both of these cases, it is important to know that the tasks that have run successfully still generate their result. Because this can give an unexpected result, it is important to always restore the original situation if that happens.
any_errors_fatal
- Used in the play header or on a block.
- Stop executing on all hosts when a failing task is encountered
Managing Task Errors
Generically, tasks can generate three different types of results. ok
- The tasks has run successfully but no changes were applied changed
- The task has run successfully and changes have been applied failed
- While running the task, a failure condition was encountered
ignore_errors: yes
- Keep running the playbook even if a task fails
force_handlers. If
- can be used to ensure that handlers will be executed, even if a failing task was encountered.
Lab: ignore_errors
    ---
    - name: restart sshd only if crond is running
      hosts: all
      tasks:
        - name: get the crond server status
          command: /usr/bin/systemctl is-active crond
          ignore_errors: yes
          register: result
        - name: restart sshd based on crond status
          service:
            name: sshd
            state: restarted
          when: result.rc == 0
Lab: Forcing Handlers to Run
    ---
    - name: create file on localhost
      hosts: localhost
      tasks:
      - name: create index.html on localhost
        copy:
          content: "welcome to the webserver"
          dest: /tmp/index.html

    - name: set up web server
      hosts: all
      force_handlers: yes
      tasks:
        - name: install httpd
          yum:
            name: httpd
            state: latest
        - name: copy index.html
          copy:
            src: /tmp/index.html
            dest: /var/www/html/index.html
          notify:
            - restart_web
        - name: copy nothing - intended to fail
          copy:
            src: /tmp/nothing
            dest: /var/www/html/nothing.html
      handlers:
        - name: restart_web
          service:
            name: httpd
            state: restarted
Specifying Task Failure Conditions
failed_when
- conditional used to evaluate some expression.
- Set a failure condition on a task
Lab: failed_when
    ---
    - name: demonstrating failed_when
      hosts: all
      tasks:
      - name: run a script
        command: echo hello world
        ignore_errors: yes
        register: command_result
        failed_when: "’world’ in command_result.stdout"
      - name: see if we get here
        debug:
          msg: second task executed
fail module
- specify when a task fails.
- Using this module makes sense only if when is used to define the exact condition when a failure should occur.
Lab: Using the fail Module
    ---
    - name: demonstrating the fail module
      hosts: all
      ignore_errors: yes
      tasks:
      - name: run a script
        command: echo hello world
        register: command_result
      - name: report a failure
        fail:
          msg: the command has failed
        when: "’world’ in command_result.stdout"
      - name: see if we get here
        debug:
msg: second task executed- The ignore_errors statement has movedfrom the task definition to the play header.
- Without this move, the message “second task executed” would never be shown because the fail module always generates a failure message.
- The main advantage of using the fail module instead of using failed_when is that the fail module can easily be used to set a clear failure message, which is not possible when using failed_when.
Managing Changed Status
In Ansible, there are commands that change something and commands that don’t. Some commands, however, are not very obvious in reporting their status.
Lab: Change status
    ---
    - name: demonstrate changed status
      hosts: all
      tasks:
      - name: check local time
        command: date
        register: command_result

      - name: print local time
        debug:
var: command_result.stdout-
Reports a changed status, even if nothing really was changed!
-
Managing the changed status can be useful in avoiding unexpected results while running a playbook.
changed_when
- If you set changed_when to false, the playbook reports only an ok or failed status and never reports a changed status.
Lab: Using changed_when
---
- name: demonstrate changed status
  hosts: all
  tasks:
  - name: check local time
    command: date
    register: command_result
    changed_when: false

  - name: print local time
    debug:
      var: command_result.stdout
Using Blocks
- Useful when working with conditional statements.
- A group of tasks to which a when statement can be applied.
- As a result, if a single condition is true, multiple tasks can be executed.
- To do so, between the tasks: statement in the play header and the actual tasks that run the specific modules, you can insert a block: statement.
Lab: Using Blocks
---
- name: simple block example
  hosts: all
  tasks:
  - name: setting up http
    block:
    - name: installing http
      yum:
        name: httpd
        state: present
    - name: restart httpod
      service:
        name: httpd
        state: started
when: ansible_distribution == "CentOS"- The when statement is applied at the same level as the block definition.
- When you define it this way, the tasks in the block are executed only if the when statement is true.
Using Blocks with rescue and always Statements
- Blocks can be used for simple error handling as well, in such a way that if any task that is defined in the block statement fails, the tasks that are defined in the rescue section are executed.
- Besides that, an always section can be used to define tasks that should always run, regardless of the success or failure of the tasks in the block.
Lab: Using Blocks, rescue, and always
- name: using blocks
  hosts: all
  tasks:
  - name: intended to be successful
    block:
    - name: remove a file
      shell:
        cmd: rm /var/www/html/index.html
    - name: printing status
      debug:
        msg: block task was operated
    rescue:
    - name: create a file
      shell:
        cmd: touch /tmp/rescuefile
    - name: printing rescue status
      debug:
        msg: rescue task was operated
    always:
    - name: always write a message to logs
      shell:
        cmd: logger hello
    - name: always printing this message
      debug:
msg: this message is always printed- Run this twice to see the rescue. (The file is already created so a task in the block fails)
command_warnings=False
-
Setting in ansible.cfg to avoid seeing command module warning message.
-
you cannot use a block on a loop.
-
If you need to iterate over a list of values, think of using a different solution.
Host Name Patterns
Working with host name patterns
Working with Host Name Patterns
-
If you want to use an IP address in a playbook, the IP address must be specified as such in the inventory.
-
You cannot use IP addresses that are based only on DNS name resolving.
-
So specifying an IP address in the playbook but not in the inventory file—assuming DNS name resolution is going to take care of the IP address resolving—doesn’t work.
-
apart from the specified groups, there are the implicit host groups all and ungrouped.
-
host name wildcards may be used.
ansible -m ping 'ansible\*'- match all hosts that have a name starting with ansible.
- Must put the pattern between single quotes or it will fail with a no matching hosts error.
- Can be used at any place in the host name.
ansible -m ping '\*ble1'
-
When you use wildcards to match host names, Ansible doesn’t distinguish between IP addresses, host names, or hosts; it just matches anything.
'web\*'- Matches all servers that are members of the group ‘webservers’, but also hosts ‘web1’ and ‘web2’.
To address multiple hosts:
- You specify a comma-separated list of targets to address multiple hosts:
ansible -m ping ansible1,192.168.4.202- Can be a mix of host names, IP addresses, and host group names.
Operators:
- Can specify a logical AND condition by including an ampersand (&), and a logical NOT by using an exclamation point (!).
web,&fileapplies to hosts only if they are members of the web and file groupsweb,!webserver1applies to all hosts in the web group, except host webserver1.- When you use the logical AND operator, the position of the ampersand doesn’t matter.
web,&fileas&web,filealso.
- You can use a colon (:) instead of a comma (,), but using a comma is better to avoid confusion when using IPv6 addresses.
Including and importing Files
When content is included, it is dynamically processed at the moment that Ansible reaches that content.
- If content is imported, Ansible performs the import operation before starting to work on the tasks in the playbook.
Files can be included and imported at different levels:
• Roles: Roles are typically used to process a complete set of instructions provided by the role. Roles have a specific structure as well.
• Playbooks: Playbooks can be imported as a complete playbook. You cannot do this from within a play. Playbooks can be imported only at the top level of the playbook.
• Tasks: A task file is just a list of tasks and can be imported or included in another task.
• Variables: As discussed in Chapter 6, “Working with Variables and Facts,” variables can be maintained in external files and included in a playbook. This makes managing generic multipurpose variables easier.
Importing Playbooks
Importing playbooks is common in a setup where one master playbook is used, from which different additional playbooks are included. According to the Ansible Best Practices Guide (which is a part of the Ansible documentation), the master playbook could have the name site.yaml, and it can be used to include playbooks for each specific set of servers, for instance. When a playbook is imported, this replaces the entire play. So, you cannot import a playbook at a task level; it needs to happen at a play level. Listing 10-4 gives an example of the playbook imported in Listing 10-5. In Listing 10-6, you can see the result of running the ansible-playbook listing105.yaml command.
Listing 10-4 Sample Playbook to Be Imported
::: pre_1 - hosts: all tasks: - debug: msg: running the imported play :::
Listing 10-5 Importing a Playbook
::: pre_1 — - name: run a task hosts: all tasks: - debug: msg: running task1
- name: importing a playbook
  import_playbook: listing104.yaml
:::
Listing 10-6 Running ansible-playbook listing105.yaml Result
::: pre_1 [ansible@control rhce8-book]$ ansible-playbook listing105.yaml
PLAY [run a task] **************************************************************

TASK [Gathering Facts] *********************************************************
ok: [ansible2]
ok: [ansible1]
ok: [ansible3]
ok: [ansible4]

TASK [debug] *******************************************************************
ok: [ansible1] => {
    "msg": "running task1"
}
ok: [ansible2] => {
    "msg": "running task1"
}
ok: [ansible3] => {
    "msg": "running task1"
}
ok: [ansible4] => {
    "msg": "running task1"
}

PLAY [all] *********************************************************************

TASK [Gathering Facts] *********************************************************
ok: [ansible2]
ok: [ansible1]
ok: [ansible3]
ok: [ansible4]

TASK [debug] *******************************************************************
ok: [ansible1] => {
    "msg": "running the imported play"
}
ok: [ansible2] => {
    "msg": "running the imported play"
}
ok: [ansible3] => {
    "msg": "running the imported play"
}
ok: [ansible4] => {
    "msg": "running the imported play"
}

PLAY RECAP *********************************************************************
ansible1                   : ok=4    changed=0    unreachable=0    failed=0    skipped=0    rescued=0    ignored=0
ansible2                   : ok=4    changed=0    unreachable=0    failed=0    skipped=0    rescued=0    ignored=0
ansible3                   : ok=4    changed=0    unreachable=0    failed=0    skipped=0    rescued=0    ignored=0
ansible4                   : ok=4    changed=0    unreachable=0    failed=0    skipped=0    rescued=0    ignored=0
:::
Importing and Including Task Files
import_tasks
- tasks are statically imported while executing the playbook.
include_tasks
- tasks are dynamically included at the moment they are needed.
- Dynamically including task files is recommended when the task file is used in a conditional statement.
- If task files are mainly used to make development easier by working with separate task files, they can be statically imported.
There are a few considerations when working with import_tasks to statically import tasks:
• Loops cannot be used with import_tasks.
• If a variable is used to specify the name of the file to import, this cannot be a host or group inventory variable.
• When you use a when statement on the entire import_tasks file, the conditional statements are applied to each task that is involved.
As an alternative, include_tasks can be used to dynamically include a task file. This approach also comes with some considerations:
• When you use the ansible-playbook --list-tasks command, tasks that are in the included tasks are not displayed.
• You cannot use ansible-playbook --start-at-task to start a playbook on a task that comes from an included task file.
• You cannot use a notify statement in the main playbook to trigger a handler that is in the included tasks file.
::: note
Tip
When you use includes and imports to work with task files, the recommendation is to store the task files in a separate directory. Doing so makes it easier to delegate task management to specific users.
:::
Using Variables When Importing and Including Files
The main goal to work with imported and included files is to make working with reusable code easy. To make sure you reach this goal, the imported and included files should be as generic as possible. That means it’s a bad idea to include names of specific items that may change when used in a different context. Think, for instance, of the names of packages, users, services, and more.
To deal with include files in a flexible way, you should define specific items as variables. Within the include_tasks file, for instance, you refer to {{ package }}, and in the main playbook from which the include files are called, you can define the variables. Obviously, you can use this approach with a straight variable definition or by using host variable or group variable include files.
::: note
Exam tip
It’s always possible to configure items in a way that is brilliant but quite complex. On the exam it’s not a smart idea to go for complex. Just keep your solution as easy as possible. The only requirement on the exam is to get things working, and it doesn’t matter exactly how you do that.
:::
In Listings 10-7 through 10-10, you can see how include and import files are used to work on one project. The main playbook, shown in Listing 10-9, defines the variables to be used, as well as the names of the include and import files. Listings 10-7 and 10-8 show the code from the include files, which use the variables that are defined in Listing 10-9. The result of running the playbook in Listing 10-9 can be seen in Listing 10-10.
Listing 10-7 The Include Tasks File tasks/service.yaml Used for Services Definition
::: pre_1 - name: install {{ package }} yum: name: “{{ package }}” state: latest - name: start {{ service }} service: name: “{{ service }}” enabled: true state: started :::
The sample tasks file in Listing 10-7 is straightforward; it uses the yum module to install a package and the service module to start and enable the package. The variables this file refers to are defined in the main playbook in Listing 10-9.
Listing 10-8 The Import Tasks File tasks/firewall.yaml Used for Firewall Definition
::: pre_1 - name: install the firewall package: name: “{{ firewall_package }}” state: latest - name: start the firewall service: name: “{{ firewall_service }}” enabled: true state: started - name: open the port for the service firewalld: service: “{{ item }}” immediate: true permanent: true state: enabled loop: “{{ firewall_rules }}” :::
In the sample firewall file in Listing 10-8, the firewall service is installed, defined, and configured. In the configuration of the firewalld service, a loop is used on the variable firewall_rules. This variable obviously is defined in Listing 10-9, which is the file where site-specific contents such as variables are defined.
Listing 10-9 Main Playbook Example
::: pre_1 — - name: setup a service hosts: ansible2 tasks: - name: include the services task file include_tasks: tasks/service.yaml vars: package: httpd service: httpd when: ansible_facts[’os_family’] == ’RedHat’ - name: import the firewall file import_tasks: tasks/firewall.yaml vars: firewall_package: firewalld firewall_service: firewalld firewall_rules: - http - https :::
The main playbook in Listing 10-9 shows the site-specific configuration. It performs two main tasks: it defines variables, and it calls an include file and an import file. The variables that are defined are used by the include and import files. The include_tasks statement is executed in a when statement. Notice that the firewall_rules variable contains a list as its value, which is used by the loop that is defined in the import file.
Listing 10-10 Running ansible-playbook listing109.yaml
::: pre_1 [ansible@control rhce8-book]$ ansible-playbook listing109.yaml
PLAY [setup a service] *********************************************************

TASK [Gathering Facts] *********************************************************
ok: [ansible2]

TASK [include the services task file] ******************************************
included: /home/ansible/rhce8-book/tasks/service.yaml for ansible2

TASK [install httpd] ***********************************************************
ok: [ansible2]

TASK [start httpd] *************************************************************
changed: [ansible2]

TASK [install the firewall] ****************************************************
changed: [ansible2]

TASK [start the firewall] ******************************************************
ok: [ansible2]

TASK [open the port for the service] *******************************************
changed: [ansible2] => (item=http)
changed: [ansible2] => (item=https)

PLAY RECAP *********************************************************************
ansible2                   : ok=7    changed=3    unreachable=0    failed=0    skipped=0    rescued=0    ignored=0
:::
The interesting thing in the Listing 10-10 output is that the include file is dynamically included while running the playbook. This is not the case for the statically imported file. In Exercise 10-3 you practice working with include files.
::: box Exercise 10-3 Using Includes and Imports
In this exercise you create a simple master playbook that installs a service. The name of the service is defined in a variable file, and the specific tasks are included through task files.
1. Open the file exercise103-vars.yaml and define three variables as follows:
packagename: vsftpd
servicename: vsftpd
firewalld_servicename: ftp
2. Create the exercise103-ftp.yaml file and give it the following contents to install, enable, and start the vsftpd service and also to make it accessible in the firewall:
- name: install {{ packagename }}
  yum:
    name: "{{ packagename }}"
    state: latest
- name: enable and start {{ servicename }}
  service:
    name: "{{ servicename }}"
    state: started
    enabled: true
- name: open the service in the firewall
  firewalld:
    service: "{{ firewalld_servicename }}"
    permanent: yes
    state: enabled
3. Create the exercise103-copy.yaml file that manages the /var/ftp/pub/README file and make sure it has the following contents:
- name: copy a file
  copy:
    content: "welcome to this server"
    dest: /var/ftp/pub/README
4. Create the master playbook exercise103.yaml that includes all of them and give it the following contents:
---
- name: install vsftpd on ansible2
  vars_files: exercise103-vars.yaml
  hosts: ansible2
  tasks:
  - name: install and enable vsftpd
    import_tasks: exercise103-ftp.yaml
  - name: copy the README file
    import_tasks: exercise103-copy.yaml
5. Run the playbook and verify its output
6. Run an ad hoc command to verify the /var/ftp/pub/README file has been created: ansible ansible2 -a “cat /var/ftp/pub/README”.
End-of-Chapter Lab
In the end-of-chapter lab with this chapter, you reorganize a playbook to work with several different files instead of one big file. Do this according to the instructions in Lab 10-1.
Lab 10-1
The lab82.yaml file, which you can find in the GitHub repository that goes with this course, is an optimal candidate for optimization. Optimize this playbook according to the following requirements:
• Use includes and import to make this a modular playbook where different files are used to distinguish between the different tasks.
• Optimize this playbook such that it will run on no more than two hosts at the same time and completes the entire playbook on these two hosts before continuing with the next host.
Jinja2 templates
Using Jinja2 Templates
- A template is a configuration file that contains variables and, based on the variables, is generated on the managed hosts according to host-specific requirements.
- Using templates allows for a structural way to generate configuration files, which is much more powerful than changing specific lines from specific files.
- Ansible uses Jinja2 to generate templates.
- Jinja2 is a generic templating language for Python developers.
- It is used in Ansible templates, but Jinja2-based approaches are also found in other parts of Ansible. For instance, the way variables are referred to is based on Jinja2.
In a Jinja2 template, three elements can be used. data
sample textcomment{# sample text #}variable{{ ansible_facts['default_ipv4']['address'] }}expression
{% for myhost in groups['web'] %}
{{ myhost }}
{% endfor %}- To work with a template, you must create a template file, written in Jinja2.
- Template file must be included in an Ansible playbook that uses the template module.
Sample Template:
# {{ ansible_managed }}

<VirtualHost *:80>
        ServerAdmin webmaster@{{ ansible_facts['fqdn'] }}
        ServerName {{ ansible_facts['fqdn'] }}
        ErrorLog logs/{{ ansible_facts['hostname'] }}-error.log
        CustomLog       logs/{{ ansible_facts['hostname'] }}-common.log common
        DocumentRoot /var/www/vhosts/{{ ansible_facts['hostname'] }}/

        <Directory /var/www/vhosts/{{ ansible_facts['hostname'] }}>
                Options +Indexes +FollowSymlinks +Includes
                Require all granted
        </Directory>
</VirtualHost>-
starts with # {{ ansible_managed }}.
-
This string is commonly used to identify that a file is managed by Ansible so that administrators are not going to change file contents by accident.
-
While processing the template, this string is replaced with the value of the ansible_managed variable.
-
This variable can be set in ansible.cfg.
-
For instance, you can use ansible_managed = This file is managed by Ansible to substitute the variable with its value while generating the template.
-
template file is just a text file that uses variables to substitute specific variables to their values.
Calling a template:
    ---
    - name: installing a template file
      hosts: ansible1
      tasks:
      - name: install httpd
        yum:
          name: httpd
          state: latest
      - name: start and enable httpd
        service:
          name: httpd
          state: started
          enabled: true
      - name: install vhost config file
        template:
          src: listing813.j2
          dest: /etc/httpd/conf.d/vhost.conf
          owner: root
          group: root
          mode: 0644
      - name: restart httpd
        service:
          name: httpd
          state: restarted
Applying Control Structures in Jinja2 Using for
- Control structures can be used to dynamically generate contents.
- A for statement can be used to iterate over all elements that exist as the value of a variable.
{% for node in groups['all'] %}
host_port={{ node }}:8080
{% endfor %}- variable with the name host_ports is defined on the second line (which is the line that will be written to the target file).
- To produce its value, the host group all is processed in the for statement on the first line.
- While processing the host group, a temporary variable with the name node is defined.
- This value of the node variable is replaced with the name of the host while it is processed, and after the host name, the string :8080 is copied, which will result in a separate line for each host that was found.
- As the last element, {% endfor %} is used to close the for loop.
LAB: Generating a Template with a Conditional Statement
    ---
    - name: generate host list
      hosts: ansible2
      tasks:
      - name: template loop
        template:
          src: listing815.j2
          dest: /tmp/hostports.txt
To verify, you can use the ad hoc command ansible ansible2 -a "cat /tmp/hostports.txt"
Using Conditional Statements with if
- The for statement can be used in templates to iterate over a series of values.
- The if statement can be used to include text only if a variable contains a specific value or evaluates to a Boolean true.
Template Example with if if.j2
    {% if apache_package == 'apache2' %}
      Welcome to Apache2
    {% else %}
      Welcome to httpd
    {% endif %}
---
- name: work with template file
vars:
apache_package: 'httpd'
hosts: ansible2
tasks:
- template:
src: if.j2
dest: /tmp/httpd.conf[ansible@control ~]$ ansible ansible2 -a "cat /tmp/httpd.conf"
ansible2 | CHANGED | rc=0 >>
Welcome to httpdUsing Filters
- In Jinja2 templates, you can use filters.
- Filters are a way to perform an operation on the value of a template expression, such as a variable.
- The filter is included in the variable definition itself, and the result of the variable and its filter is used in the file that is generated.
Common filters {{ myvar | to_json }}
- writes the contents of myvar in JSON format {{ myvar || to_yaml }}
- writes the contents of myvar in YAML format {{ myvar | ipaddr }}
- tests whether myvar contains an IP address
From https://docs.ansible.com:
How do I loop over a list of hosts in a group, inside of a template?
A pretty common pattern is to iterate over a list of hosts inside of a host group, perhaps to populate a template configuration file with a list of servers. To do this, you can just access the “$groups” dictionary in your template, like this:
{% for host in groups['db_servers'] %}
    {{ host }}
{% endfor %}
If you need to access facts about these hosts, for example, the IP address of each hostname, you need to make sure that the facts have been populated. For example, make sure you have a play that talks to db_servers:
- hosts:  db_servers
  tasks:
    - debug: msg="doesn't matter what you do, just that they were talked to previously."
Then you can use the facts inside your template, like this:
{% for host in groups['db_servers'] %}
   {{ hostvars[host]['ansible_eth0']['ipv4']['address'] }}
{% endfor %}
Lab: Working with Conditional Statements in Templates
1. Use your editor to create the file exercise83.j2. Include the following line to open the Jinja2 conditional statement:
{% for host in groups['all'] %}2. This statement defines a variable with the name host. This variable iterates over the magic variable groups, which holds all Ansible host groups as defined in inventory. Of these groups, the all group (which holds all inventory host names) is processed.
3. Add the following line (write it as one line; it will wrap over two lines, but do not press Enter to insert a newline character):
{{ hostvars[host]['ansible_default_ipv4']['address'] }} {{ hostvars[host]['ansible_fqdn'] }} {{ hostvars[host]['ansible_hostname'] }}- This line writes a single line for each inventory host, containing three items.
- To do so, you use the magic variable hostvars, which can be used to identify Ansible facts that were discovered on the inventory host.
- The [host] part is replaced with the name of the current host, and after that, the specific facts are referred to. As a result, for each host a line is produced that holds the IP address, the FQDN, and next the host name.
4. Add the following line to close the for loop:
{% endfor %}5. Verify that the complete file contents look like the following and write and quit the file:
{% for host in groups['all'] %}
{{ hostvars[host]['ansible_default_ipv4']['address'] }} {{ hostvars[host]['ansible_fqdn'] }} {{ hostvars[host]['ansible_hostname'] }}
{% endfor %}
6. Use your editor to create the file exercise83.yaml. It should contain the following lines:
---
- name: generate /etc/hosts file
  hosts: all
  tasks:
  - name:
    template:
      src: exercise83.j2
      dest: /tmp/hosts
7. Run the playbook by using ansible-playbook exercise83.yaml
8. Verify the /tmp/hosts file was generated by using ansible all -a "cat /tmp/hosts"
This lab only worked if every host in the inventory file was reachable.
Lab: Generate an /etc/hosts File
Write a playbook that generates an /etc/hosts file on all managed hosts. Apply the following requirements:
• All hosts that are defined in inventory should be added to the /etc/hosts file.
[ansible@control ~]$ cat hostfile.yaml
---
- name: generate /etc/hosts
  hosts: all
  gather_facts: yes
  tasks:
  - name: Generate hosts file with template
    template:
      src: hosts.j2
      dest: /etc/hosts
[ansible@control ~]$ cat hosts.j2
{% for host in groups['all'] %}
{{ hostvars[host]['ansible_default_ipv4']['address'] }} {{ hostvars[host]['ansible_fqdn'] }} {{ hostvars[host]['ansible_hostname'] }}
{% endfor %}}
Lab: Manage a vsftpd Service
- Write a playbook that uses at least two plays to install a vsftpd service
- configure the vsftpd service using templates
- configure permissions as well as SELinux.
- Install, start, and enable the vsftpd service.
- open a port in the firewall to make it accessible.
- Use the /etc/vsftpd/vsftpd.conf file to generate a template.
- In this template, you should use the following variables to configure specific settings.
- Replace these settings with the variables and leave all else unmodified:
Anonymous_enable: yes
Local_enable: yes
Write_enable: yes
Anon_upload_enable: yes- Set permissions on the /var/ftp/pub directory to mode 0777.
- Configure the ftpd_anon_write Boolean to allow anonymous user writes.
- Set the public_content_rw_t SELinux context type to the /var/ftp/pub directory.
- If any additional tasks are required to get this done, take care of them.
vim vsftpd.yaml
---
- name: manage vsftpd
  hosts: ansible1
  vars:
    anonymous_enable: yes
    local_enable: yes
    write_enable: yes
    Anon_upload_enable: yes
  tasks:
    - name: install vsftpd
      dnf:
        name: vsftpd
        state: latest

    - name: configure vsftpd configuration file
      template:
        src: vsftpd.j2
        dest: /etc/vsftpd/vsftpd.conf

- name: apply permissions
  hosts: ansible1
  tasks:
    - name: set folder permissions to /var/ftp/pub
      file:
        path: /var/ftp/pub
        mode: 0777

    - name: set ftpd_anon_write boolean
      seboolean:
        name: ftpd_anon_write
        state: yes
        persistent: yes

    - name: set public_content_rw_t SELinux context type to /var/ftp/pub directory
      sefcontext:
        target: '/var/ftp/pub(/.*)?'
        setype: public_content_rw_t
        state: present
      notify: restore selinux contexts

    - name: firewall stuff
      firewalld:
        service: ftp
        state: enabled
        permanent: true
        immediate: true

    - name: start and enable fsftpd
      service:
        name: vsftpd
        state: started
        enabled: yes

  handlers:
    - name: restore selinux contexts
      command: restorecon -v /var/ftp/pub
vsftpd.j2
{{ ansible_managed }}

anonymous_enable={{ anonymous_enable }}
local_enable={{ local_enable }}
write_enable={{ write_enable }}
Anon_upload_enable{{ Anon_upload_enable }}
local_umask=022
dirmessage_enable=YES
xferlog_enable=YES
connect_from_port_20=YES
xferlog_std_format=YES
listen=NO
listen_ipv6=YES
pam_service_name=vsftpd
userlist_enable=YES
Managing Ansible Errors and Logs
Managing Ansible Errors and Logs
Using Check Mode
Before actually running a playbook in a way that all changes are implemented, you can start the playbooks in check mode. To do this, you use the --check or -C command-line argument to the ansible or ansible-playbook command. The effect of using check mode is that changes that would have been made are shown but not executed. You should realize, though, that check mode is not supported in all cases. You will, for instance, have problems with check mode if it is applied to conditionals, where a specific task can do its work only after a preceding task has made some changes. Also, to successfully use check mode, the modules need to support it, but some don’t. Modules that don’t support check mode don’t show any result while running check mode, but also they don’t make any changes.
Apart from the command-line argument, you can use check_mode: yes or check_mode: no with any task in a playbook. If check_mode: yes is used, the task always runs in check mode (and does not implement any changes), regardless of the use of the --check option. If a task has check_mode: no set, it never runs in check mode and just does its work, even if the ansible-playbook command is used with the --check option. Using check mode on individual tasks might be a good idea if using check mode on the entire playbook gives unpredicted results: you can enable it on just a couple of tasks to ensure that they run successfully before proceeding to the next set of tasks. Notice that using check_mode: no for specific tasks can be dangerous; these tasks will make changes, even if the entire playbook was started with the --check option!
::: note
Note
The check_mode argument is a replacement for the always_run option that was used in Ansible 2.5 and earlier. In current Ansible versions, you should not use always_run anymore.
Another option that is commonly used with the --check option is --diff. This option reports changes to template files without actually applying them. Listing 11-1 shows a sample playbook, Listing 11-2 shows the template that it is processing, and Listing 11-3 shows the result of running this playbook with the ansible-playbook listing111.yaml --check --diff command.
    ---
    - name: simple template example
      hosts: ansible2
      tasks:
      - template:
          src: listing112.j2
          dest: /etc/issue
:::

**Listing 11-2** Sample Template File

::: pre_1
    {# /etc/issue #}
    Welcome to {{ ansible_facts[’hostname’] }}
:::

**Listing 11-3** Running the listing111.yaml Sample Playbook

::: pre_1
    [ansible@control rhce8-book]$ ansible-playbook listing111.yaml --check --diff

    PLAY [simple template example] *************************************************

    TASK [Gathering Facts] *********************************************************
    ok: [ansible2]

    TASK [template] ****************************************************************
    --- before
    +++ after: /home/ansible/.ansible/tmp/ansible-local-4493uxbpju1e/tmpm5gn7crg/listing112.j2
    @@ -0,0 +1,3 @@
    +Welcome to ansible2
    +
    +

    changed: [ansible2]

    PLAY RECAP *********************************************************************
    ansible2                   : ok=2    changed=1    unreachable=0    failed=0    skipped=0    rescued=0    ignored=0
Understanding Output
When you run the ansible-playbook command, output is generated. You’ve probably had a glimpse of it before, but let’s look at the output in a more structured way now. Listing 11-4 shows some typical sample output generated by running the ansible-playbook command.
Listing 11-4 ansible-playbook Command Output
::: pre_1 [ansible@control rhce8-book]$ ansible-playbook listing52.yaml
PLAY [install start and enable httpd] ******************************************

TASK [Gathering Facts] *********************************************************
ok: [ansible2]
ok: [ansible1]
ok: [ansible3]
ok: [ansible4]

TASK [install package] *********************************************************
changed: [ansible2]
changed: [ansible1]
changed: [ansible3]
changed: [ansible4]

TASK [start and enable service] ************************************************
changed: [ansible2]
changed: [ansible1]
changed: [ansible3]
changed: [ansible4]

PLAY RECAP *********************************************************************
ansible1                   : ok=3    changed=2    unreachable=0    failed=0    skipped=0    rescued=0    ignored=0
ansible2                   : ok=3    changed=2    unreachable=0    failed=0    skipped=0    rescued=0    ignored=0
ansible3                   : ok=3    changed=2    unreachable=0    failed=0    skipped=0    rescued=0    ignored=0
ansible4                   : ok=3    changed=2    unreachable=0    failed=0    skipped=0    rescued=0    ignored=0
:::
In the output of any ansible-playbook command, you can see different items:
![]()
![]() {width=“64” height=“51”}
{width=“64” height=“51”}
• An indicator of the play that is started
• If not disabled, the Gathering Facts task that is executed for each play
• Each individual task, including the task name if that was specified
• The Play Recap, which summarizes the play results
In the Play Recap, different results can be shown. Table 11-2 gives an overview.
::: group Table 11-2 Playbook Recap Overview
 {width=“941” height=“338”}
:::
{width=“941” height=“338”}
:::
As discussed before, when you use the ansible-playbook command, you can increase the output verbosity level using one or more -v options. Table 11-3 lists what these options accomplish. For generic troubleshooting, you might want to consider using -vv, which shows output as well as input data. In particular cases using the -vvv option can be useful because it adds connection information as well.
The -vvvv option just brings too much information in many cases but can be useful if you need to analyze which exact scripts are executed or whether any problems were encountered in privilege escalation. Make sure to capture the output of any command that runs with -vvvv to a text file, though, so that you can read it in an easy way. Even for a simple playbook, it can easily generate more than 10 screens of output.
::: group Table 11-3 Verbosity Options Overview
 {width=“941” height=“209”}
:::
{width=“941” height=“209”}
:::
In Listing 11-5 you can see the output of a small playbook that runs different tasks on the managed hosts. Listing 11-5 shows details about execution of one task on host ansible4, and as you can see, it goes deep in the amount of detail that is shown. One component is worth looking at, and that is the escalation succeeded that you can see in the output. This means that privilege escalation was successful and tasks were executed because become_user was defined in ansible.cfg. Failing privilege escalation is one of the common reasons why playbook execution may go wrong, which is why it’s worth keeping an eye on this indicator.
Listing 11-5 Analyzing Partial -vvvv Output
    <ansible4> ESTABLISH SSH CONNECTION FOR USER: ansible
    <ansible4> SSH: EXEC ssh -vvv -C -o ControlMaster=auto -o ControlPersist=60s -o StrictHostKeyChecking=no -o KbdInteractiveAuthentication=no -o PreferredAuthentications=gssapi-with-mic,gssapi-keyex,hostbased,publickey -o PasswordAuthentication=no -o ’User="ansible"’ -o ConnectTimeout=10 -o ControlPath=/home/ansible/.ansible/cp/859d5267e3 ansible4 ’/bin/sh -c ’"’"’chmod u+x /home/ansible/.ansible/tmp/ansible-tmp-1587544652.4716983-118789810824208/ /home/ansible/.ansible/tmp/ansible-tmp-1587544652.4716983-118789810824208/AnsiballZ_systemd.py && sleep 0’"’"’’
    Escalation succeeded
    <ansible4> (0, b’’, b"OpenSSH_8.0p1, OpenSSL 1.1.1c FIPS  28 May 2019\r\ndebug1: Reading configuration data /etc/ssh/ssh_config\r\ndebug3: /etc/ssh/ssh_config line 51: Including file /etc/ssh/ssh_config.d/05-redhat.conf depth 0\r\ndebug1: Reading configuration data /etc/ssh/ssh_config.d/05-redhat.conf\r\ndebug2: checking match for ’final all’ host ansible4 originally ansible4\r\ndebug3: /etc/ssh/ssh_config.d/05-redhat.conf line 3: not matched ’final’\r\ndebug2: match not found\r\ndebug3: /etc/ssh/ssh_config.d/05-redhat.conf line 5: Including file /etc/crypto-policies/back-ends/openssh.config depth 1 (parse only)\r\ndebug1: Reading configuration data /etc/crypto-policies/back-ends/openssh.config\r\ndebug3: gss kex names ok: [gss-gex-sha1-,gss-group14-sha1-]\r\ndebug3: kex names ok: [curve25519-sha256,curve25519-sha256@libssh.org,ecdh-sha2-nistp256,ecdh-sha2-nistp384,ecdh-sha2-nistp521,diffie-hellman-group-exchange-sha256,diffie-hellman-group14-sha256,diffie-hellman-group16-sha512,diffie-hellman-group18-sha512,diffie-hellman-group-exchange-sha1,diffie-hellman-group14-sha1]\r\ndebug1: configuration requests final Match pass\r\ndebug1: re-parsing configuration\r\ndebug1: Reading configuration data /etc/ssh/ssh_config\r\ndebug3: /etc/ssh/ssh_config line 51: Including file /etc/ssh/ssh_config.d/05-redhat.conf depth 0\r\ndebug1: Reading configuration data /etc/ssh/ssh_config.d/05-redhat.conf\r\ndebug2: checking match for ’final all’ host ansible4 originally ansible4\r\ndebug3: /etc/ssh/ssh_config.d/05-redhat.conf line 3: matched ’final’\r\ndebug2: match found\r\ndebug3: /etc/ssh/ssh_config.d/05-redhat.conf line 5: Including file /etc/crypto-policies/back-ends/openssh.config depth 1\r\ndebug1: Reading configuration data /etc/crypto-policies/back-ends/openssh.config\r\ndebug3: gss kex names ok: [gss-gex-sha1-,gss-group14-sha1-]\r\ndebug3: kex names ok: [curve25519-sha256,curve25519-sha256@libssh.org,ecdh-sha2-nistp256,ecdh-sha2-nistp384,ecdh-sha2-nistp521,diffie-hellman-group-exchange-sha256,diffie-hellman-group14-sha256,diffie-hellman-group16-sha512,diffie-hellman-group18-sha512,diffie-hellman-group-exchange-sha1,diffie-hellman-group14-sha1]\r\ndebug1: auto-mux: Trying existing master\r\ndebug2: fd 4 setting O_NONBLOCK\r\ndebug2: mux_client_hello_exchange: master version 4\r\ndebug3: mux_client_forwards: request forwardings: 0 local, 0 remote\r\ndebug3: mux_client_request_session: entering\r\ndebug3: mux_client_request_alive: entering\r\ndebug3: mux_client_request_alive: done pid = 4764\r\ndebug3: mux_client_request_session: session request sent\r\ndebug3: mux_client_read_packet: read header failed: Broken pipe\r\ndebug2: Received exit status from master 0\r\n")
    <ansible4> ESTABLISH SSH CONNECTION FOR USER: ansible
    <ansible4> SSH: EXEC ssh -vvv -C -o ControlMaster=auto -o ControlPersist=60s -o StrictHostKeyChecking=no -o KbdInteractiveAuthentication=no -o PreferredAuthentications=gssapi-with-mic,gssapi-keyex,hostbased,publickey -o PasswordAuthentication=no -o ’User="ansible"’ -o ConnectTimeout=10 -o ControlPath=/home/ansible/.ansible/cp/859d5267e3 -tt ansible4 ’/bin/sh -c ’"’"’sudo -H -S -n  -u root /bin/sh -c ’"’"’"’"’"’"’"’"’echo BECOME-SUCCESS-muvtpdvqkslnlegyhoibfcrilvlyjcqp ; /usr/libexec/platform-python /home/ansible/.ansible/tmp/ansible-tmp-1587544652.4716983-118789810824208/AnsiballZ_systemd.py’"’"’"’"’"’"’"’"’ && sleep 0’"’"’’
    Escalation succeeded
Optimizing Command Output Error Formatting
You might have noticed that the formatting of error messages in Ansible command output can be a bit hard to read. Fortunately, there’s an easy way to make it a little more readable by including two options in the ansible.cfg file. These options are stdout_callback = debug and stdout_callback = error. After including these options, you’ll notice it’s a lot easier to read error output and distinguish between its different components!
Logging to Files
By default, Ansible does not write anything to log files. The reason is that the Ansible commands have all the options that may be useful to write output to the STDOUT. If so required, it’s always possible to use shell redirection to write the command output to a file.
If you do need Ansible to write log files, you can set the log_path parameter in ansible.cfg. Alternatively, Ansible can log to the filename that is specified as the argument to the $ANSIBLE_LOG_PATH variable. Notice that Ansible logs can grow big very fast, so if logging to output files is enabled, make sure that Linux log rotation is configured to ensure that files cannot grow beyond a specific maximum size.
Running Task by Task
When you analyze playbook behavior, it’s possible to run playbook tasks one by one or to start running a playbook at a specific task. The ansible-playbook --step command runs playbooks task by task and prompts for confirmation before running the next task. Alternatively, you can use the ansible-playbook --start-at-task="task name" command to start playbook execution as a specific task. Before using this command, you might want to use ansible-playbook --list-tasks for a list of all tasks that have been configured. To use these options in an efficient way, you must configure each task with its own name. In Listing 11-6 you can see what running playbooks this way looks like. This listing first shows how to list tasks in a playbook and next how the --start-at-task and --step options are used.
Listing 11-6 Running Tasks One by One
::: pre_1 [ansible@control rhce8-book]$ ansible-playbook –list-tasks exercise81.yaml
playbook: exercise81.yaml

  play #1 (ansible1): testing file manipulation skills.    TAGS: []
    tasks:
      create a new file              TAGS: []
      check status of the new file   TAGS: []
      for debugging purposes only    TAGS: []
      change file owner if needed    TAGS: []

  play #2 (ansible1): fetching a remote file.    TAGS: []
    tasks:
      fetch file from remote machine.    TAGS: []

  play #3 (localhost): adding text to the file that is now on localhost TAGS: []
    tasks:
      add a message.    TAGS: []

  play #4 (ansible2): copy the modified file to ansible2.    TAGS: []
    tasks:
      copy motd file.    TAGS: []
[ansible@control rhce8-book]$ ansible-playbook --start-at-task "add a message"  --step exercise81.yaml

PLAY [testing file manipulation skills] ****************************************

PLAY [fetching a remote file] **************************************************

PLAY [adding text to the file that is now on localhost] ************************
Perform task: TASK: Gathering Facts (N)o/(y)es/(c)ontinue:
:::
In Exercise 11-1 you learn how to apply check mode while working with templates.
::: box Exercise 11-1 Using Templates in Check Mode
1. Locate the file httpd.conf; you can find it in the rhce8-book directory, which you can download from the GitHub repository at https://github.com/sandervanvugt/rhce8-book. Use mv httpd.conf exercise111-httpd.j2 to rename it to a Jinja2 template file.
2. Open the exercise111-httpd.j2 file with an editor, and apply modifications to existing parameters so that they look like the following:
ServerRoot "{{ apache_root }}"
User {{ apache_user }}
Group {{ apache_group }}
3. Write a playbook that takes care of the complete Apache web server setup and installation, starts and enables the service, opens a port in the firewall, and uses the template module to create the /etc/httpd/conf/httpd.conf file based on the template that you created in step 2 of this exercise. The complete playbook with the name exercise111.yaml looks like the following (make sure you have the exact contents shown below and do not correct any typos):
---
- name: perform basic apache setup
  hosts: ansible2
  vars:
    apache_root: /etc/httpd
    apache_user: httpd
    apache_group: httpd
  tasks:
  - name: install RPM package
    yum:
      name: httpd
      state: latest
  - name: copy template file
    template:
      src: exercise111-httpd.j2
      dest: /etc/httpd/httpd.conf
  - name: start and enable service
    service:
      name: httpd
      state: started
      enabled: yes
  - name: open port in firewall
    firewalld:
      service: http
      permanent: yes
      state: enabled
      immediate: yes
4. Run the command ansible-playbook --syntax-check exercise111.yaml. If no errors are found in the playbook syntax, you should just see the name of the playbook.
5. Run the command ansible-playbook --check --diff exercise111.yaml. In the output of the command, pay attention to the task copy template file. After the line that starts with +++ after, you should see the lines in the template that were configured to use a variable, using the right variables.
6. Run the playbook to perform all its tasks step by step, using the command ansible-playbook --step exercise111.yaml. Press y to confirm the first step. Next, press c to automatically continue. The playbook will fail on the copy template file task because the target directory does not exist. Notice that the --syntax-check and the --check options do not check for any logical errors in the playbook and for that reason have not detected this problem.
7. Edit the exercise111.yaml file and ensure the template task contains the following corrected line: (replace the old line starting with dest:):
dest: /etc/httpd/conf/httpd.conf8. Type ansible-playbook --list-tasks exercise111.yaml to list all the tasks in the playbook.
9. To avoid running the entire playbook again, use ansible-playbook --start-at-task="copy template file" exercise111.yaml to run the playbook to completion. :::
Managing Packages
Using Modules to Manage Packages
Modules used to manage packages:

Configuring Repository Access
The yum_repository module lets you work with yum repository files in the /etc/yum.repos.d/ directory.
    ---
    - name: setting up repository access
      hosts: all
      tasks:
      - name: connect to example repo
        yum_repository:
          name: example repo
          description: RHCE8 example repo
          file: examplerepo
          baseurl: ftp://control.example.com/repo/
          gpgcheck: no
yum_repository Key Arguments

Notice that use of the gpgcheck argument is recommended but not mandatory. Most repositories are provided with a GPG key to verify that packages in the repository have not been tampered with. However, if no GPG key is set up for the repository, the gpgcheck parameter can be set to no to skip checking the GPG key.
Managing Software with yum
The yum module can be used to manage software packages. You use it to install and remove packages or to update packages. This can be done for individual packages, as well as package groups and modules. Let’s look at some examples that go beyond the mere installation or removal of packages, which was covered sufficiently in earlier chapters.
Listing 12-2 shows a module that will update all packages on this system.
Listing 12-2 Using yum to Perform a System Update
::: pre_1 — - name: updating all packages hosts: ansible2 tasks: - name: system update yum: name: ’*’ state: latest :::
Notice the use of the name argument to the yum module. It has ’*’ as its argument. To prevent the wildcard from being interpreted by the shell, you must make sure it is placed between single quotes.
Listing 12-3 shows an example where yum package groups are used to install the Virtualization Host package group.
Listing 12-3 Installing Package Groups
::: pre_1 — - name: install or update a package group hosts: ansible2 tasks: - name: install or update a package group yum: name: ’@Virtualization Host’ state: latest :::
When a yum package group instead of an individual package needs to be installed, the name of the package group needs to start with an at sign (@), and the entire package group name needs to be put between single quotes. Also notice the use of state: latest in Listing 12-3. This line ensures that the packages in the package group are installed if they have not been installed yet. If they have already been installed, they are updated to the latest version.
A new feature in RHEL 8 is the yum AppStream module. Modules as listed by the Linux yum modules list command can be managed with the Ansible yum module also. Working with yum modules is similar to working with yum package groups. In the example in Listing 12-4, the main difference is that a version number and the installation profile are included in the module name.
Listing 12-4 Installing AppStream Modules with the yum Module
::: pre_1 — - name: installing an AppStream module hosts: ansible2 tasks: - name: install or update an AppStream module yum: name: ’@php:7.3/devel’ state: present :::
::: note
Note
When using the yum module to install multiple packages, you can provide the name argument with a list of multiple packages. Alternatively, you can provide multiple packages in a loop. Of these solutions, using a list of multiple packages as the argument to name is always preferred. If multiple package names are provided in a loop, the module must execute a task for every single package. If multiple package names are provided as the argument to name, yum can install all these packages in one single task.
:::
Managing Package Facts
When Ansible is gathering facts, package facts are not included. To include package facts as well, you need to run a separate task; that is, you need to use the package_facts module. Facts that have been gathered about packages are stored to the ansible_facts.packages variable. The sample playbook in Listing 12-5 shows how to use the package_facts module.
Listing 12-5 Using the package_facts Module to Show Package Details
::: pre_1 — - name: using package facts hosts: ansible2 vars: my_package: nmap tasks: - name: install package yum: name: “{{ my_package }}” state: present - name: update package facts package_facts: manager: auto - name: show package facts for {{ my_package }} debug: var: ansible_facts.packages[my_package] when: my_package in ansible_facts.packages :::
As you can see, the package_facts module does not need much to do its work. The only argument used here is the manager argument, which specifies which package manager to communicate to. Its default value of auto automatically detects the appropriate package manager and uses that. If you want, you can specify the package manager manually, using any package manager such as yum or dnf. Listing 12-6 shows the output of running the Listing 12-5 playbook, where you can see details that are collected by the package_facts module.
Listing 12-6 Running ansible-playbook listing125.yaml Results
::: pre_1 [ansible@control rhce8-book]$ ansible-playbook listing125.yaml
PLAY [using package facts] **************************************************************

TASK [Gathering Facts] ******************************************************************
ok: [ansible2]

TASK [install package] ******************************************************************
ok: [ansible2]

TASK [update package facts] *************************************************************
ok: [ansible2]

TASK [show package facts for my_package] ************************************************
ok: [ansible2] => {
    "ansible_facts.packages[my_package]": [
        {
            "arch": "x86_64",
            "epoch": 2,
            "name": "nmap",
            "release": "5.el8",
            "source": "rpm",
            "version": "7.70"
        }
    ]
}

PLAY RECAP ******************************************************************************
ansible2                   : ok=4    changed=0    unreachable=0    failed=0    skipped=0    rescued=0    ignored=0
:::
In Exercise 12-1 you can practice working with the different tools Ansible provides for module management.
::: box Exercise 12-1 Managing Software Packages
1. Use your editor to create a new file with the name exercise121.yaml.
2. Write a play header that defines the variable my_package and sets its value to virt-manager:
---
- name: exercise121
  hosts: ansible2
  vars:
    my_package: virt-manager
  tasks:
3. Add a task that installs the package based on the name of the variable that was provided:
- name: install package
  yum:
    name: "{{ my_package }}"
    state: present
4. Add a task that gathers facts about installed packages:
- name: update package facts
  package_facts:
    manager: auto
5. As the last part of this exercise, add a task that shows facts about the package that you have just installed:
- name: show package facts for {{ my_package }}
  debug:
    var: ansible_facts.packages[my_package]
  when: my_package in ansible_facts.packages
6. Run the playbook using ansible-playbook exercise121.yaml and verify its output. :::
Managing Partitions and LVM
Managing Partitions and LVM
After detecting the disk device that needs to be used, you can move on and start creating partitions and logical volumes.
- partition a disk using the parted module,
- work with the lvg and lvol modules to manage LVM logical volumes,
- create file systems using the filesystem module and mount them using the mount module
- manage swap storage.
Creating Partitions
Parted Module name:
- Assign unique name, required for GPT partitions label:
- type of partition table, msdos is default, gpt for gpt device:
- Device where you are creating partition number:
- partition number state:
- present or absent to add/remove
part_start:
- Starting position expressed as an offset from the beginning of the disk part_end:
- Where to end the partition If these arguments are not used, the partition starts at 0% and ends at 100% of the available disk space.
flags:
- Set specific partition properties such as LVM partition type.
- Required for LVM partition type
      - name: create new partition
        parted:
          name: files
          label: gpt
          device: /dev/sdb
          number: 1
          state: present
          part_start: 1MiB
          part_end: 2GiB
      - name: create another new partition
        parted:
          name: swap
          label: gpt
          device: /dev/sdb
          number: 2
          state: present
          part_start: 2GiB
          part_end: 4GiB
          flags: [ lvm ]
Managing Volume Groups and LVM Logical Volumes
lvg module
- manage LVM logical volumes
- managing LVM volume groups
lvol module
- managing LVM logical volumes.
Creating an LVM volume group
- vg argument to set the name of the volume group
- pvs argument to identify the physical volume (which is often a partition or a disk device) on which the volume group needs to be created.
- May need to specify the pesize to refer to the size of the physical extents.
- name: create a volume group
  lvg:
    vg: vgdata
    pesize: "8"
    pvs: /dev/sdb1
After you create an LVM volume group, you can create LVM logical volumes.
lvol Common Options: lv
- Name of the LV pvs
- comma separated list of pvs, if it is a partition then it should have the lvm option set resizefs
- Indicates whether to resize filesystem when the lv is expanded size
- size of the lv snapshot
- specify name if this lv is a snapshot vg
- VG is which the lv should be created
Creating an LVM Logical Volume
- name: create a logical volume
    lvol:
      lv: lvdata
      size: 100%FREE
      vg: vgdata
Creating and Mounting File Systems
filesystem module
- Supports creating as well as resizing file systems.
Options: dev
- block device name fstype
- filesystem type opts
- options passed to mkfs command resizefs
- Extends the filesystem if set to yes. Extended to the current block size
Creating an XFS File System
- name: create an XFS filesystem
  filesystem:
    dev: /dev/vgdata/lvdata
    fstype: xfs
Mounting a filesystem
mount module.
- Used to mount a filesystem
Options: fstype
- Filesystem type is not automatically dedected.
- Used to specify filesystem type path
- directory to mount the filesystem to src
- device to be mounted state
- Current mount state
- mounted to mount device now
- present to set in /etc/fstab but not mount it now
      - name: mount the filesystem
        mount:
          src: /dev/vgdata/lvdata
          fstype: xfs
          state: mounted
          path: /mydir
Configuring Swap Space
-
To set up swap space, you first must format a device as swap space and next mount the swap space.
-
To format a device as swap space, you use the filesystem module.
-
There is no specific Ansible module to activate theswap space, so you use the command module to run the Linux swapon command.
-
Because adding swap space is not always required, it can be done in a conditional statement.
-
In the statement, use the ansible_swaptotal_mb fact to discover how much swap is actually available.
-
If that amount falls below a specific threshold, the swap space can be created and activated.
A conditional check is performed, and additional swap space is configured if the current amount of swap space is lower than 256 MiB.
    ---
    - name: configure swap storage
      hosts: ansible2
      tasks:
      - name: setup swap
        block:
        - name: make the swap filesystem
          filesystem:
            fstype: swap
            dev: /dev/sdb1
        - name: activate swap space
          command: swapon /dev/sdb1
        when: ansible_swaptotal_mb < 256
Run an ad hoc command to ensure that /dev/sdb on the target host is empty:
ansible ansible2 -a "dd if=/dev/zero of=/dev/sdb bs=1M count=10"To make sure that you don’t get any errors about partitions that are in use, also reboot the target host:
ansible ansible2 -m reboot- Lack of idempotency if the size is specified as 100%FREE, which is a relative value, not an absolute value.
- This value works the first time you run the playbook, but it does not the second time you run the playbook.
- Because no free space is available, the LVM layer interprets the task as if you wanted to create a logical volume with a size of 0 MiB and will complain about that. To ensure that plays are written in an idempotent way, make sure that you use absolute values, not relative values.
Managing Services
Managing Services
Services can be managed in many ways. You can manage systemd services, but Ansible also allows for management of tasks using Linux cron and at. Apart from that, you can use Ansible to manage the desired systemd target that a managed system should be started in, and it can reboot running machines. Table 14-2 gives an overview of the most significant modules for managing services.
Table 14-2 Modules Related to Service Management

Managing Systemd Services
Throughout this book you have used the service module a lot. This module enables you to manage services, regardless of the init system that is used, so it works with System-V init, with Upstart, as well as systemd. In many cases, you can use the service module for any service-related task.
If systemd specifics need to be addressed, you must use the systemd module instead of the service module. Such systemd-specific features include daemon_reload and mask. The daemon_reload feature forces the systemd daemon to reread its configuration files, which is useful after applying changes (or after editing the service files directory, without using the Linux systemctl command). The mask feature marks a systemd service in such a way that it cannot be started, not even by accident. Listing 14-1 shows an example where the systemd module is used to manage services.
Listing 14-1 Using systemd Module Features
::: pre_1 — - name: using systemd module to manage services hosts: ansible2 tasks: - name: enable service httpd and ensure it is not masked systemd: name: httpd enabled: yes masked: no daemon_reload: yes :::
Given the large amount of functionality that is available in systemd, the functions that are offered by the systemd services are a bit limited, and for many specific features, you must use generic modules such as file and command instead. An example is setting the default target, which is done by creating a symbolic link using the file module.
Managing cron Jobs
The cron module can be used to manage cron jobs. A Linux cron job is one that is periodically executed by the Linux crond daemon at a specific time. The cron module can manage jobs in different ways:
• Write the job directly to a user’s crontab
• Write the job to /etc/crontab or under the /etc/cron.d directory
• Pass the job to anacron so that it will be run once an hour, day, week, month, or year without specifically defining when exactly
If you are familiar with Linux cron, using the Ansible cron module is straightforward. Listing 14-2 shows an example that runs the fstrim command every day at 4:05 and at 19:05.
Listing 14-2 Running a cron Job
---
- name: run a cron job
  hosts: ansible2
  tasks:
  - name: run a periodic job
    cron:
      name: "run fstrim"
      minute: "5"
      hour: "4,19"
      job: "fstrim"
As a result of this playbook, a crontab file is created for user root. To create a crontab file for another user, you can use the user attribute. Notice that while managing cron jobs using the cron module, a name attribute is specified. This attribute is required for Ansible to manage the cron jobs and has no meaning for Linux crontab itself. If, for instance, you later want to remove a cron job, you must use the name of the job as an identifier.
Listing 14-3 shows a sample playbook that removes the job that was created in Listing 14-2. Notice that it just specifies state: absent as well as the name of the job that was previously created; no other parameters are required.
Listing 14-3 Removing a cron Job Using the name Attribute
::: pre_1 — - name: run a cron job hosts: ansible2 tasks: - name: run a periodic job cron: name: “run fstrim” state: absent :::
Managing at Jobs
Whereas you use Linux cron to schedule tasks at a regular interval, you use Linux at to manage tasks that need to run once only. To interface with Linux at, the Ansible at module is provided. Table 14-3 gives an overview of the arguments it takes to specify how the task should be executed.
::: group Table 14-3 at Module Arguments Overview

The most important point to understand when working with at is that it is used to defined how far from now a task has to be executed. This is done using count and units. If, for example, you want to run a task five minutes from now, you specify the job with the arguments count: 5 and units: minutes. Also notice the use of the unique argument. If set to yes, the task is ignored if a similar job is scheduled to run already. Listing 14-4 shows an example.
Listing 14-4 Running Commands in the Future with at
::: pre_1 — - name: run an at task hosts: ansible2 tasks: - name: run command and write output to file at: command: “date > /tmp/my-at-file” count: 5 units: minutes unique: yes state: present :::
In Exercise 14-1 you practice your skills working with the cron module.
::: box Exercise 14-1 Managing cron Jobs
1. Use your editor to create the playbook exercise141-1.yaml and give it the following contents:
---
- name: run a cron job
  hosts: ansible2
  tasks:
  - name: run a periodic job
    cron:
      name: "run logger"
      minute: "0"
      hour: "5"
      job: "logger IT IS 5 AM"
2. Use ansible-playbook exercise141-1.yaml to run the job.
3. Use the command ansible ansible2 -a “crontab -l” to verify the cron job has been added. The output should look as follows:
ansible2 | CHANGED | rc=0 >>
#Ansible: run logger
0 5 * * * logger IT IS 5 AM
4. Create a new playbook with the name exercise141-2 that runs a new cron job but uses the same name:
---
- name: run a cron job
  hosts: ansible2
  tasks:
  - name: run a periodic job
    cron:
      name: "run logger"
      minute: "0"
      hour: "6"
      job: "logger IT IS 6 AM"
5. Run this new playbook by using ansible-playbook exercise141-2.yaml. Notice that the job runs with a changed status.
6. Repeat the command ansible ansible2 -a “crontab -l”. This shows you that the new cron job has overwritten the old job because it was using the same name. Here is something important to remember: all cron jobs should have a unique name!
7. Write the playbook exercise141-3.yaml to remove the cron job that you just created:
---
- name: run a cron job
  hosts: ansible2
  tasks:
  - name: run logger
    cron:
      name: "run logger"
      state: absent
8. Use ansible-playbook exercise141-3.yaml to run the last playbook. Next, use ansible ansible2 -a “crontab -l” to verify that the cron job was indeed removed.
Networking with Ansible
3 modules for managing the networking on nodes:
- service
- daemon
- system settings
NFS Setup
Server hosting the storage:
---
  - name: Install Packages
    package:
      name:
        - nfs-utils
      state: present

  - name: Ensure directories to export exist
    file:  # noqa 208
      path: "{{ item }}"
      state: directory
    with_items: "{{ nfs_exports | map('split') | map('first') | unique }}"

  - name: Copy exports file
    template:
      src: exports.j2
      dest: /etc/exports
      owner: root
      group: root
      mode: 0644
    notify: reload nfs

  - name: Add firewall rule to enable NFS service
    ansible.posix.firewalld:
      immediate: true
      state: enabled
      permanent: true
      service: nfs
    notify: reload firewalld

  - name: Start and enable NFS service
    service:
      name: nfs-server
      state: started
      enabled: yes
     when: nfs_exports|length > 0

  - name: Set SELinux boolean for NFS
    ansible.posix.seboolean:
      name: nfs_export_all_rw
      state: yes
      persistent: yes

  - name: install required package for sefcontext module
    yum:
      name: policycoreutils-python-utils
      state: present

  - name: Set proper SELinux context on export dir
    sefcontext:
      target: /{{ item }}(/.*)?
      setype: nfs_t
      state: present
    notify: run restorecon
    with_items: "{{ nfs_exports | map('split') | map('first') | unique }}"
{% for host in nfs_hosts %}
/data {{ host }} (rw,wdelay,root_squash,no_subtree_check,sec=sys,rw,root_squash,no_all_squash)
{% endfor %}Variables: nfs_exports:
- /data server(rw,wdelay,root_squash,no_subtree_check,sec=sys,rw,root_squash,no_all_squash)
Handlers
---
- name: reload nfs
  command: 'exportfs -ra'

- name: reload firewalld
  command: firewall-cmd --reload

- name: run restorecon
  command: restorecon -Rv /codata
storage:
 name: Detect secondary disk name
    ignore_errors: yes
    set_fact:
      disk2name: vda
    when: ansible_facts['devices']['vda'] is defined

  - name: Search for second disk, continue only if it is found
    assert:
      that:
        - disk2name is defined
      fail_msg: second hard disk not found

  - name: Debug detected disk
    debug:
      msg: "{{ disk2name }} was found. Moving forward."

  - name: Create LVM and partitions
    block:
    - name: Create LVM Partition on second disk
      parted:
        name: data
        label: gpt
        device: /dev/{{ disk2name }}
        number: 1
        state: present
        flags: [ lvm ]

    - name: Create an LVM volume group
      lvg:
        vg: vgcodata
        pvs: /dev/{{ disk2name }}1

    - name: Create lv
      lvol:
        lv: lvdata
        size: 100%FREE
        vg: vgdata

    - name: create filesystem
      filesystem:
        dev: /dev/vgdata/lvdata
        fstype: xfs

    when: ansible_facts['devices']['vda']['partitions'] is not defined

  - name: Create data directory
    file:
      dest: /data
      mode: 777
      state: directory

  - name: Mount the filesystem
    mount:
      src: /dev/vgdata/lvdata
      fstype: xfs
      state: present
      path: /data

  - name: Set permissions on mounted filesystem
    file:
      path: /data
      state: directory
      mode: '0777'
    ```
Optimizing Ansible Processing
Optimizing Ansible Processing
Parallel task execution
- manages the number of hosts on which tasks are executed simultaneously. Serial task execution
- tasks are executed on a host or group of hosts before proceeding to the next host or group of hosts.
Parallel Task Execution
- Ansible can run tasks on all hosts at the same time, and in many cases that would not be a problem because processing is executed on the managed host anyway.
- If, however, network devices or other nodes that do not have their own Python stack are involved, processing needs to be done on the control host.
- To prevent the control host from being overloaded in that case, the maximum number of simultaneous connections by default is set to 5.
- You can manage this setting by using the forks parameter in ansible.cfg.
- Alternatively, you can use the
-foption with theansibleandansible-playbookcommands. - If only Linux hosts are managed, there is no reason to keep the maximum number of simultaneous tasks much lower than 100.
Managing Serial Task Execution
- While executing tasks, Ansible processes tasks in a playbook one by one.
- This means that, by default, the first task is executed on all managed hosts. Once that is done, the next task is processed, until all tasks have been executed.
- There is no specific order in the execution of tasks, so you may see that in one run ansible1 is processed before ansible2, while on another run they might be processed in the opposite order.
- In some cases, this is undesired behavior.
- If, for instance, a playbook is used to update a cluster of hosts this way, this would create a situation where the old software has been updated, but the new version has not been started yet and the entire cluster would be down.
- Use the serial keyword in the play header to configure
- serial: 3
- all tasks are executed on three hosts, and after completely running all tasks on three hosts, the next group of three hosts is handled.
- serial: 3
Lab: Managing Parallelism
- Add two more managed nodes with the names ansible3.example.com and ansible4.example.com.
- Open the inventory file with an editor and add the following lines:
ansible3
ansible4- Open the ansible.cfg file and add the line
forks = 4to the [defaults] section. - Write a playbook with the name exercise102-install that installs and enables the Apache web server and another playbook with the name exercise102-remove that disables and removes the Apache web server.
- Run
ansible-playbook exercise102-remove.yamlto remove and disable the Apache web server on all hosts. This is just to make sure you start with a clean configuration. - Run the playbook to install and run the web server, using
time ansible-playbook exercise102-install.yaml, and notice the time it takes to run the playbook. - Run
ansible-playbook exercise102-remove.yamlagain to get back to a clean state. - Edit ansible.cfg and change the forks parameter to
forks = 2. - Run the
time ansible-playbook exercise102-install.yamlcommand again to see how much time it takes now - Edit the
exercise102-install.yamlplaybook and include the lineserial: 2in the play header. - Run the
ansible-playbook exercise102-remove.yamlcommand again to get back to a clean state. - Run the
ansible-playbook exercise102-install.yamlcommand again and observe that the entire play is executed on two hosts only before the next group of two hosts is taken care of.
Repositories and subscriptions
Using Modules to Manage Repositories and Subscriptions
To work with software packages, you need to make sure that repositories are accessible and subscriptions are available. In the previous section you learned how to write a playbook that enables you to access an existing repository. In this section you learn how to set up the server part of a repository if that still needs to be done. Also, you learn how to manage RHEL subscriptions using Ansible.
Setting Up Repositories
Most managed systems access the default distributions that are provided while installing the operating system. In some cases external repositories might not be accessible. If that happens, you need to set up a repository yourself. Before you can do that, however, it’s important to know what a repository is. A repository is a directory that contains RPM files, as well as the repository metadata, which is an index that allows the repository client to figure out which packages are available in the repository.
Ansible does not provide a specific module to set up a repository. You must use a number of modules instead. Exactly which modules are involved depends on how you want to set up the repository. For instance, if you want to set up an FTP-based repository on the Ansible control host, you need to accomplish the following tasks:
• Install the FTP package.
• Start and enable the FTP server.
• Open the firewall for FTP traffic.
• Make sure the FTP shared repository directory is available.
• Download packages to the repository directory.
• Use the Linux createrepo command to generate the index that is required in each repository.
The playbook in Listing 12-7 provides an example of how this can be done.
Listing 12-7 Setting Up an FTP-based Repository
::: pre_1 - name: install FTP to export repo hosts: localhost tasks: - name: install FTP server yum: name: - vsftpd - createrepo_c state: latest - name: start FTP server service: name: vsftpd state: started enabled: yes - name: open firewall for FTP firewalld: service: ftp state: enabled permanent: yes
- name: setup the repo directory
  hosts: localhost
  tasks:
  - name: make directory
    file:
      path: /var/ftp/repo
      state: directory
  - name: download packages
    yum:
      name: nmap
      download_only: yes
      download_dir: /var/ftp/repo
  - name: createrepo
    command: createrepo /var/ftp/repo
:::
The most significant tasks in setting up the repository are the download packages and createrepo tasks. In the download packages task, the yum module is used to download a single package. To do so, the download_only argument is used to ensure that the package is not installed but downloaded to a directory. When you use the download_only argument, you also must specify where the package needs to be installed. To do this, the task uses the download_dir argument.
There is one disadvantage in using this approach to download the package, though: it requires repository access. If repository access is not available, the fetch module can be used instead to download a file from a specific URL.
Managing GPG Keys
To guarantee the integrity of packages, most repositories are set up with a GPG key. This enables the client to verify that packages have not been tampered with while transmitted between the repository server and client. For that reason, if packages are installed from a repository server on the Internet, you should always make sure that gpgcheck: yes is set while using the yum_repository module.
However, if you want to make sure that a GPG check is performed, you need to make sure the client knows where to fetch the repository key. To help with that, you can use the rpm_key module. You can see how to do this in Listing 12-8. Notice that the playbook in this listing doesn’t work because no GPG-protected repository is available. Setting up GPG-protected repositories is complex and outside the scope of the EX294 objectives, and for that reason is not covered here.
Listing 12-8 Using rpm_key to Fetch an RPM Key
::: pre_1 - name: use rpm_key in repository access hosts: all tasks: - name: get the GPG public key rpm_key: key: ftp://control.example.com/repo/RPM-GPG-KEY state: present - name: set up the repository client yum_repository: file: myrepo name: myrepo description: example repo baseurl: ftp://control.example.com/repo enabled: yes gpgcheck: yes state: present :::
Managing RHEL Subscriptions
When you work with Red Hat Enterprise Linux, configuring repository access using the method described before is not enough. Red Hat Enterprise Linux works with subscriptions, and to be able to access software that is provided through your subscription entitlement, you need to set up managed systems to access these subscriptions.
::: note
Tip
Free developer subscriptions are available for RHEL as well as Ansible. Register yourself at https://developers.redhat.com and sign up for a free subscription if you want to test the topics described in this section on RHEL and you don’t have a valid subscription yet.
:::
To understand how to use the Ansible modules to register a RHEL system, you need to understand how to use the Linux command-line utilities. When you are managing subscriptions from the Linux command line, multiple steps are involved.
1. First, you use the subscription-manager register command to provide your RHEL credentials. Use, for instance, subscription-manager register --username=yourname --password=yourpassword.
2. Next, you need to find out which pools are available in your account. A pool is a collection of software channels available to your account. Use subscription-manager list --available for an overview.
3. Now you can connect to a specific pool using subscription-manager attach --pool=poolID. Note that if only one subscription pool is available in your account, you don’t have to provide the --pool argument.
4. Next, you need to find out which additional repositories are available to your account by using subscription-manager repos --list.
5. To register to use additional repositories, you use subscription-manager repos --enable “repos name”. Your system then has full access to its subscription and related repositories.
Two significant modules are provided by Ansible:
• redhat_subscription: This module enables you to perform subscription and registration in one task.
• rhsm_repository: This module enables you to add subscription manager repositories.
Listing 12-9 shows an example of a playbook that uses these modules to fully register a new RHEL 8 machine and add a new repository to the managed machine. Notice that this playbook is not runnable as such because important additional information needs to be provided. Exercise 12-3, later in the section titled “Implementing a Playbook to Manage Software,” will guide you to a scenario that shows how to use this code in production.
Listing 12-9 Using Subscription Manager to Set Up Ansible
::: pre_1 — - name: use subscription manager to register and set up repos hosts: ansible5 tasks: - name: register and subscribe ansible5 redhat_subscription: username: bob@example.com password: verysecretpassword state: present - name: configure additional repo access rhsm_repository: name: - rh-gluster-3-client-for-rhel-8-x86_64-rpms - rhel-8-for-x86_64-appstream-debug-rpms state: present :::
In the sample playbook in Listing 12-9, you can see how the redhat_subscription and rhsm_repository modules are used. Notice that redhat_subscription requires a password. In Listing 12-9 the username and password are provided as clear-text values in the playbook. From a security perspective, this is very bad practice. You should use Ansible Vault instead. Exercise 12-3 will guide you through a setup where this is done.
In Exercise 12-2 you are guided through the procedure of setting up your own repository and using it. This procedure consists of two distinct parts. In the first part you set up a repository server that is based on FTP. Because in Ansible you often need to configure topics that don’t have your primary attention, you set up the FTP server and also change its configuration. Next, you write a second playbook that configures the clients with appropriate repository access, and after doing so, install a package.
::: box Exercise 12-2 Setting Up a Repository
1. Use your editor to create the file exercise122-server.yaml.
2. Define the play that sets up the basic FTP configuration. Because all its tasks should be familiar to you at this point, you can enter all the tasks at once:
---
- name: install, configure, start and enable FTP
  hosts: localhost
  tasks:
  - name: install FTP server
    yum:
      name: vsftpd
      state: latest
  - name: allow anonymous access to FTP
    lineinfile:
      path: /etc/vsftpd/vsftpd.conf
      regexp: ’^anonymous_enable=NO’
      line: anonymous_enable=YES
  - name: start FTP server
    service:
      name: vsftpd
      state: started
      enabled: yes
  - name: open firewall for FTP
    firewalld:
      service: ftp
      state: enabled
      immediate: yes
      permanent: yes
3. Set up a repository directory. Add the following play to the playbook. Notice the use of the download packages task, which uses the yum module to download a package without installing it. Also notice the createrepo task, which creates the repository metadata that converts the /var/ftp/repo directory into a repository.
- name: setup the repo directory
  hosts: localhost
  tasks:
  - name: make directory
    file:
      path: /var/ftp/repo
      state: directory
  - name: download packages
    yum:
      name: nmap
      download_only: yes
      download_dir: /var/ftp/repo
  - name: install createrepo package
    yum:
      name: createrepo_c
      state: latest
  - name: createrepo
    command: createrepo /var/ftp/repo
    notify:
    - restart_ftp
  handlers:
  - name: restart_ftp
    service:
      name: vsftpd
      state: restarted
4. Use the command ansible-playbook exercise122-server.yaml to set up the FTP server on control.example.com. If you haven’t made any typos, you shouldn’t encounter any errors.
5. Now that the repository server has been installed, it’s time to set up the repository client. Use your editor to create the file exercise122-client.yaml and write the play header as follows:
---
- name: configure repository
  hosts: all
  vars:
    my_package: nmap
  tasks:
6. Add a task that uses the yum_repository module to configure access to the new repository:
- name: connect to example repo
  yum_repository:
    name: exercise122
    description: RHCE8 exercise 122 repo
    file: exercise122
    baseurl: ftp://control.example.com/repo/
    gpgcheck: no
7. After setting up the repository client, you also need to make sure that the clients know how to reach the repository server by addressing its name. Add the next task that writes a new line to /etc/hosts to make sure host name resolving on the clients is set up correctly:
- name: ensure control is resolvable
  lineinfile:
    path: /etc/hosts
    line: 192.168.4.200  control.example.com  control

- name: install package
  yum:
    name: "{{ my_package }}"
    state: present
8. If you are using the package_facts module, you need to remember to update it after installing new packages. Add the following task to get this done:
- name: update package facts
  package_facts:
    manager: auto
9. As the last task, just because it’s fun, use the debug module together with the package facts to get information about the newly installed package:
- name: show package facts for {{ my_package }}
  debug:
    var: ansible_facts.packages[my_package]
  when: my_package in ansible_facts.packages
10. Use the command ansible-playbook exercise122-client.yaml -e my_package=redis. That’s right; this command overwrites the my_package variable that was set in the playbook—just to remind you a bit about variable precedence. :::
SeLinux File Properties
Managing SELinux Properties
- SELinux can be used on files to manage file context
- context can be set on ports
- SELinux properties can be managed using Booleans.
Modules for Managing Changes on SELinux: file
- Manages context on files but not in the SELinux Policy sefcontext
- Manages file context in the SELinux policy command
- Is required to run the
restoreconcommand after using sefcontext selinux - Manages current SELinux state seboolean
- Manages SELinux Booleans
Managing SELinux File Context
- The context type that is set on the file defines which processes can work with the files.
- The file context type can be set on a file directly, or it can be set on the SELinux policy.
- All SELinux properties should be set in the SELinux policy.
sefcontext module.
- Setting a context type in the policy doesn’t automatically apply it to files though.
- You still need to run the Linux
restoreconcommand to do this. - Ansible does not offer a module to run this command; it needs to be invoked using the command module.
file module
- Can set SELinux context.
- The context is set directly on the file, not in the SELinux policy.
- As a result, if at any time default context is applied from the policy to the file system, all context that has been set with the Ansible file module risks being overwritten.
policycoreutils-python-utils RPM
- Not installed by default in all installation patterns.
- Needed to be able to work with the Ansible sefcontext module and the Linux
restoreconcommand
Lab Managing SELinux Context with sefcontext
---
- name: show selinux
  hosts: all
  tasks:
  - name: install required packages
    yum:
      name: policycoreutils-python-utils
      state: present
  - name: create testfile
    file:
      name: /tmp/selinux
      state: touch
  - name: set selinux context
    sefcontext:
      target: /tmp/selinux
      setype: httpd_sys_content_t
      state: present
    notify:
      - run restorecon
  handlers:
    - name: run restorecon
command: restorecon -v /tmp/selinux- You might just have to configure a service with a nondefault documentroot, which means that SELinux will deny access to the service.
- You should ask yourself if this task requires any changes at an SELinux level.
Applying Generic SELinux Management Tasks
selinux module
- enables you to set the current state of SELinux to either permissive, enforcing, or disabled.
seboolean module
- enables you to easily enable or disable functionality in SELinux using Booleans.
Lab: Changing SELinux State and Booleans
    ---
    - name: enabling SELinux and a boolean
      hosts: ansible1
      vars:
        myboolean: httpd_read_user_content
      tasks:
      - name: enabling SELinux
        selinux:
          policy: targeted <--- must specify policy
          state: enforcing
      - name: checking current {{ myboolean }} Boolean status
        shell: getsebool -a | grep {{ myboolean }}
        register: bool_stat
      - name: showing boolean status
        debug:
          msg: the current {{ myboolean }} status is {{ bool_stat.stdout }}
      - name: enabling boolean
        seboolean:
          name: "{{ myboolean }}"
          state: yes
          persistent: yes
Lab: Changing SELinux Context
- Install, start, and configure a web server that has the DocumentRoot set to the /web directory.
- In this directory, create a file named index.html that shows the message “welcome to the webserver.”
- Ensure that SELinux is enabled and allows access to the web server document root.
- Also ensure that SELinux allows users to publish web pages from their home directory.
1. Start by creating a playbook outline. A good approach for doing this is to create the playbook play header and list all tasks that need to be accomplished by providing a name as well as the name of the task that you want to run.
2. Enable SELinux and set to the enforcing state.
3. Install the web server, start and enable it, create the /web directory, and create the index.html file in the /web directory.
4. Use the lineinfile module to change the httpd.conf contents. Two different lines need to be changed.
5. Configure the SELinux-specific settings.
6. Run the playbook and verify its output.
8. Verify that the web service is accessible by using curl http://ansible1. In this case, it should not work. Try to analyze why.
---
- name: Managing web server SELinux properties
  hosts: ansible1
  tasks:
  - name: ensure SELinux is enabled and enforcing
    selinux:
      policy: targeted
      state: enforcing
  - name: install the webserver
    yum:
      name: httpd
      state: latest
  - name: start and enable the webserver
    service:
      name: httpd
      state: started
      enabled: yes
  - name: open the firewall service
    firewalld:
      service: http
      state: enabled
      immediate: yes
  - name: create the /web directory
    file:
      name: /web
      state: directory
  - name: create the index.html file in /web
    copy:
      content: ’welcome to the exercise82 web server’
      dest: /web/index.html
  - name: use lineinfile to change webserver configuration
    lineinfile:
      path: /etc/httpd/conf/httpd.conf
      regexp: ’^DocumentRoot "/var/www/html"’
      line: DocumentRoot "/web"
    notify: restart httpd

  - name: use lineinfile to change webserver security
    lineinfile:
      path: /etc/httpd/conf/httpd.conf
      regexp: ’^<Directory "/var/www">’
      line: ’<Directory "/web">’
  - name: use sefcontext to set context on new documentroot
    sefcontext:
      target: ’/web(/.*)?’
      setype: httpd_sys_content_t
      state: present
  - name: run the restorecon command
    command: restorecon -Rv /web
  - name: allow the web server to run user content
    seboolean:
      name: httpd_read_user_content
      state: yes
      persistent: yes

  handlers:
    - name: restart httpd
      service:
        name: httpd
        state: restarted
Setting up an Ansible Lab
Requirements for Ansible
- Python 3 on control node and managed nodes
- sudo ssh access to managed nodes
- Ansible installed on the Control node
Lab Setup
For this lab, we will need three virtual machines using RHEL 9. 1 control node and 2 managed nodes. Use IP addresses based on your lab network environment:
| Hostname | pretty hostname | ip addreess | RAM | Storage | vCPUs |
|---|---|---|---|---|---|
| control.example.com | control | 192.168.122.200 | 2048MB | 20G | 2 |
| ansible1.example.com | ansible1 | 192.168.122.201 | 2048MB | 20G | 2 |
| ansible2.example.com | ansible2 | 192.168.122.202 | 2048MB | 20G | 2 |
| I have set these VMs up in virt-manager, then cloned them so I can rebuild the lab later. You can automate this using Vagrant or Ansible but that will come later. Ignore the Win10 VM. It’s a necessary evil: |
Setting hostnames and verifying dependencies
Set a hostname on all three machines:
[root@localhost ~]# hostnamectl set-hostname control.example.com
[root@localhost ~]# hostnamectl set-hostname --pretty control
Install Ansible on Control Node
[root@localhost ~]# dnf -y install ansible-core
...
Verify python3 is installed:
[root@localhost ~]# python --version
Python 3.9.18
Configure Ansible user and SSH
Add a user for Ansible. This can be any username you like, but we will use “ansible” as our lab user. Also, the ansible user needs sudo access. We will also make it so no password is required for convenience. You will need to do this on the control node and both managed nodes:
[root@control ~]# useradd ansible
[root@control ~]# visudo
Add this line to the file that comes up:
ansible ALL=(ALL) NOPASSWD: ALL
Configure a password for the ansible user:
[root@control ~]# passwd ansible
Changing password for user ansible.
New password:
BAD PASSWORD: The password is shorter than 8 characters
Retype new password:
passwd: all authentication tokens updated successfully.
On the control node only: Add host names of the nodes to /etc/hosts:
echo "192.168.124.201 ansible1 >> /etc/hosts
> ^C
[root@control ~]# echo "192.168.124.201 ansible1" >> /etc/hosts
[root@control ~]# echo "192.168.124.202 ansible2" >> /etc/hosts
[root@control ~]# cat /etc/hosts
127.0.0.1   localhost localhost.localdomain localhost4 localhost4.localdomain4
::1         localhost localhost.localdomain localhost6 localhost6.localdomain6
192.168.124.201 ansible1
192.168.124.202 ansible2
Log in to the ansible user account for the remaining steps. Note, Ansible assumes passwordless (key-based) login for ssh. If you insist on using passwords, add the –ask-pass (-k) flag to your Ansible commands. (This may require sshpass package to work)
On the control node only: Generate an ssh key to send to the hosts for passwordless Login:
[ansible@control ~]$ ssh-keygen -N "" -q
Enter file in which to save the key (/home/ansible/.ssh/id_rsa):
Copy the public key to the nodes and test passwordless access and test passwordless login to the managed nodes:
^C[ansible@control ~]$ ssh-copy-id ansible@ansible1
/usr/bin/ssh-copy-id: INFO: Source of key(s) to be installed: "/home/ansible/.ssh/id_rsa.pub"
/usr/bin/ssh-copy-id: INFO: attempting to log in with the new key(s), to filter out any that are already installed
/usr/bin/ssh-copy-id: INFO: 1 key(s) remain to be installed -- if you are prompted now it is to install the new keys
ansible@ansible1's password:

Number of key(s) added: 1

Now try logging into the machine, with:   "ssh 'ansible@ansible1'"
and check to make sure that only the key(s) you wanted were added.

[ansible@control ~]$ ssh-copy-id ansible@ansible2
/usr/bin/ssh-copy-id: INFO: Source of key(s) to be installed: "/home/ansible/.ssh/id_rsa.pub"
The authenticity of host 'ansible2 (192.168.124.202)' can't be established.
ED25519 key fingerprint is SHA256:r47sLc/WzVA4W4ifKk6w1gTnxB3Iim8K2K0KB82X9yo.
This key is not known by any other names
Are you sure you want to continue connecting (yes/no/[fingerprint])? yes
/usr/bin/ssh-copy-id: INFO: attempting to log in with the new key(s), to filter out any that are already installed
/usr/bin/ssh-copy-id: INFO: 1 key(s) remain to be installed -- if you are prompted now it is to install the new keys
ansible@ansible2's password:

Number of key(s) added: 1

Now try logging into the machine, with:   "ssh 'ansible@ansible2'"
and check to make sure that only the key(s) you wanted were added.

[ansible@control ~]$ ssh ansible1
Register this system with Red Hat Insights: insights-client --register
Create an account or view all your systems at https://red.ht/insights-dashboard
Last failed login: Thu Apr  3 05:34:20 MST 2025 from 192.168.124.200 on ssh:notty
There was 1 failed login attempt since the last successful login.
[ansible@ansible1 ~]$
logout
Connection to ansible1 closed.
[ansible@control ~]$ ssh ansible2
Register this system with Red Hat Insights: insights-client --register
Create an account or view all your systems at https://red.ht/insights-dashboard
[ansible@ansible2 ~]$
logout
Connection to ansible2 closed.
Install lab stuff from the RHCE guide:
sudo dnf -y install git
[ansible@control base]$ cd

[ansible@control ~]$ git clone https://github.com/sandervanvugt/rhce8-book
Cloning into 'rhce8-book'...
remote: Enumerating objects: 283, done.
remote: Counting objects: 100% (283/283), done.
remote: Compressing objects: 100% (233/233), done.
remote: Total 283 (delta 27), reused 278 (delta 24), pack-reused 0 (from 0)
Receiving objects: 100% (283/283), 62.79 KiB | 357.00 KiB/s, done.
Resolving deltas: 100% (27/27), done.
SSH Connections
Managing SSH Connections
- How to provide for SSH keys for new users in such a way that users are provided with SSH keys without having to set them up themselves.
- To do this, you use the authorized_key module together with the generate_ssh_key argument to the user module.
Understanding SSH Connection Management Requirements
How SSH keys are used in the communication process between a user and an SSH server:
- The user initiates a session with an SSH server.
- The server sends back an identification token that is encrypted with the server private key to the user.
- The user uses the server’s public key fingerprint, which is stored in the ~/.ssh/known_hosts file to verify the identification token.
- If no public key fingerprint was stored yet in the ~/.ssh/known_hosts file, the user is prompted to store the remote server identity in the ~/.ssh/known_hosts file. At this point there is no good way to verify whether the user is indeed communicating with the intended server.
- After establishing the identity of the remote server, the user can either send over a password or generate an authentication token that is based on the user’s private key.
- If an authentication token that was based on the user’s private key is sent over, this token is received by the server, which tries to match it against the user’s public key that is stored in the ~/.ssh/authorized_keys file.
- After the incoming authentication token to the stored user public key in the authorized_keys file is matched, the user is authenticated. If this authentication fails and password authentication is allowed, password authentication is attempted next.
In the authentication procedure, two key pairs play an important role. First, there is the server’s public/private key pair, which is used to establish a secure connection. To manage the host public key, you can use the Ansible known_hosts module. Next, there is the user’s public/private key pair, which the user uses to authenticate. To manage the public key in this key pair, you can use the Ansible authorized_key module.
Lookup Plug-in
- Enables Ansible to access data from outside sources.
- Read the file system or contact external datastores and services.
- Ran on the Ansible control host.
- Results are usually stored in variables or templates.
Set the value of a variable to the contents of a file:
---
- name: simple demo with the lookup plugin
  hosts: localhost
  vars:
    file_contents: "{{lookup(‘file’, ‘/etc/hosts’)}}"
  tasks:
  - debug:
                var: file_contents
Setting Up SSH User Keys
- To use SSH to connect to a user account on a managed host you can copy over the local user public key to the remote user ~/.ssh/authorized_keys file.
- If the target authorized_keys file just has to contain one single key, you could use the copy module to copy it over.
- To manage multiple keys in the remote user authorized_keys file, you’re better off using the authorized_key module.
authorized_key module
- Copy the authorized_key for a user
- /home/ansible/.ssh/id_rsa.pub is used as the source.
- lookup plug-in is used to refer to the file contents that should be used:
---
- name: authorized_key simple demo
  hosts: ansible2
  tasks:
  - name: copy authorized key for ansible user
    authorized_key:
      user: ansible
      state: present
      key: "{{ lookup(‘file’, ‘/home/ansible/.ssh/id_rsa.pub’) }}"
Do the same for multiple users: vars/users
---
users:
  - username: linda
    groups: sales
  - username: lori
    groups: sales
  - username: lisa
    groups: account
  - username: lucy
    groups: account
vars/groups
---
usergroups:
  - groupname: sales
  - groupname: account
---
- name: configure users with SSH keys
hosts: ansible2
vars_files:
- vars/users
- vars/groups
tasks:
- name: add groups
group:
name: "{{ item.groupname }}"
loop: "{{ usergroups }}"
- name: add users
user:
name: "{{ item.username }}"
groups: "{{ item.groups }}"
loop: "{{ users }}"
- name: add SSH public keys
authorized_key:
user: "{{ item.username }}"
key: "{{ lookup(‘file’, ‘files/’+ item.username + ‘/id_rsa.pub’) }}"
loop: "{{ users }}"-
authorized_key module is set up to work on item.username, using a loop on the users variable.
-
The id_rsa.pub files that have to be copied over are expected to exist in the files directory, which exists in the current project directory.
-
Copying over the user public keys to the project directory is a solution because the authorized_keys module cannot read files from a hidden directory.
-
It would be much nicer to use key: “{{ lookup(‘file’, ‘/home/’+ item.username + ‘.ssh/id_rsa.pub’) }}”, but that doesn’t work.
-
In the first task you create a local user, including an SSH key.
-
Because an SSH key should include the name of the user and host that it applies to, you need to use the generate_ssh_key argument, as well as the ssh_key_comment argument to write the correct comment into the public key.
-
Without this content, the key will have generic content and not be considered a valid key.
- name: create the local user, including SSH key
  user:
    name: "{{ username }}"
    generate_ssh_key: true
ssh_key_comment: "{{ username }}@{{ ansible_fqdn }}"- After creating the SSH keys this way, you aren’t able to fetch the key directly from the user home directory.
- To fix that problem, you create a directory with the name of the user in the project directory and copy the user public key from there by using the shell module:
- name: create a directory to store the file
  file:
    name: "{{ username }}"
    state: directory
- name: copy the local user ssh key to temporary {{ username }} key
  shell: ‘cat /home/{{ username }}/.ssh/id_rsa.pub > {{ username }}/id_rsa.pub’
- name: verify that file exists
command: ls -l {{ username }}/- Next, in the second play you create the remote user and use the authorized_key module to copy the key from the temporary directory to the new user home directory.
Exercise 13-2 Managing Users with SSH Keys Steps
- Create a user on localhost.
- Use the appropriate arguments to create the SSH public/private key pair according to the required format.
- Make sure the public key is copied to a directory where it can be accessed.
- Uses the user module to create the user, as well as the authorized_key module to fetch the key from localhost and copy it to the .ssh/authorized_keys file in the remote user home directory.
- Use the command ansible-playbook exercise132.yaml -e username=radha to create the user radha with the appropriate SSH keys.
- To verify it has worked, use sudo su - radha on the control host, and type the command ssh ansible1. You should able to log in without entering a password.
---
- name: prepare localhost
  hosts: localhost
  tasks:

  - name: create the local user, including SSH key
    user:
      name: "{{ username }}"
      generate_ssh_key: true
      ssh_key_comment: "{{ username }}@{{ ansible_fqdn }}"

  - name: create a directory to store the file
    file:
      name: "{{ username }}"
      state: directory

  - name: copy the local user ssh key to temporary {{ username }} key
    shell: ‘cat /home/{{ username }}/.ssh/id_rsa.pub > {{ username }}/id_rsa.pub’
  - name: verify that file exists
    command: ls -l {{ username }}/

- name: setup remote host
  hosts: ansible1
  tasks:
  - name: create remote user, no need for SSH key
    user:
      name: "{{ username }}"

  - name: use authorized_key to set the password
    authorized_key:
      user: "{{ username }}"
      key: "{{ lookup(‘file’, ‘./’+ username +’/id_rsa.pub’) }}"
Troubleshooting Common Scenarios
Troubleshooting Common Scenarios
Apart from the problems that may arise in playbooks, another type of error relates to connectivity issues. To connect to managed hosts, SSH must be configured correctly, and also authentication and privilege escalation must work as expected.
Analyzing Connectivity Issues
To be able to connect to a managed host, you need to have an IP network connection. Apart from that, you need to make sure that the host has been set up correctly:
• The SSH service needs to be accessible on the remote host.
• Python must be installed.
• Privilege escalation needs to be set up.
Apart from these, inventory settings may be specified to indicate how to connect to a remote host. Normally, the inventory contains a host name only. If a host resolves to multiple IP addresses, you may want to specify how exactly the remote host must be connected to. The ansible_host parameter can be configured to do so. In inventory, for instance, you may include the following line to ensure that your host is connected in the right way:
ansible5.example.com ansible_host=192.168.4.55
Notice that this setting makes sense only in an environment where a host can be reached on multiple different IP addresses.
To test connectivity to remote hosts, you can use the ping module. It checks for IP connectivity, accessibility of the SSH service, sudo privilege escalation, and the availability of a Python stack. The ping module does not take any arguments. Listing 11-18 shows the result of running on the ad hoc command ansible all -m ping where hosts that are available send “pong” as a reply, and for hosts that are not available, you see why they are not available.
Listing 11-18 Verifying Connectivity Using the ping Module
::: pre_1 [ansible@control rhce8-book]$ ansible all -m ping ansible2 | SUCCESS => { “ansible_facts”: { “discovered_interpreter_python”: “/usr/libexec/platform-python” }, “changed”: false, “ping”: “pong” } ansible1 | SUCCESS => { “ansible_facts”: { “discovered_interpreter_python”: “/usr/libexec/platform-python” }, “changed”: false, “ping”: “pong” } ansible3 | SUCCESS => { “ansible_facts”: { “discovered_interpreter_python”: “/usr/libexec/platform-python” }, “changed”: false, “ping”: “pong” } ansible4 | FAILED! => { “msg”: “Missing sudo password” } :::
Analyzing Authentication Issues
A few settings play a role in authentication on the remote host to execute tasks:
• The remote_user setting determines which user account to use on the managed nodes.
• SSH keys need to be configured for the remote_user to enable smooth authentication.
• The become parameter needs to be set to true.
• The become_user needs to be set to the root user account.
• Linux sudo needs to be set up correctly.
In Exercise 11-4 you work on troubleshooting some common scenarios.
::: box Exercise 11-4 Troubleshooting Connectivity Issues
1. Use an editor to create the file exercise114-1.yaml and give it the following contents:
---
- name: remove user from wheel group
  hosts: ansible4
  tasks:
  - user:
      name: ansible
      groups: ’’
2. Run the playbook using ansible-playbook exercise114-1.yaml and use ansible ansible4 -m reboot to reboot node ansible4.
3. Once the reboot is completed, use ansible all -m ping to verify connectivity. Host ansible4 should give a “Missing sudo password” error.
4. Type ansible ansible4 -m raw -a “usermod -aG wheel ansible” -u root -k to make user ansible a member of the group wheel again.
5. Repeat the ansible all -m ping command. You should now be able to connect normally to the host ansible4 again. :::
Users and Groups
Using Ansible Modules to Manage Users and Groups
- management of the user and group accounts and their direct properties.
- management of sudo privilege escalation
- Setting up SSH connections and setting user passwords
Modules
user
- manage users and their base properties
group
- Manage groups and their properties
pamd
- Manage advanced authentication configuration through linux pluggable authentication modules (PAM)
known_hosts
- manage ssh known hosts
authorized_key
- copy authorized key to a managed host
lineinfile
- modify config file
Managing Users and Groups
    ---
    - name: creating a user and group
      hosts: ansible2
      tasks:
      - name: setup the group account
        group:
          name: students
          state: present
      - name: setup the user account
        user:
          name: anna
          create_home: yes
          groups: wheel,students
          append: yes
          generate_ssh_key: yes
          ssh_key_bits: 2048
          ssh_key_file: .ssh/id_rsa
group argument is
- used to specify the primary group of the user.
groups argument is
-
used to make the user a member of additional groups.
-
While using the groups argument for existing users, make sure to include the append argument as well.
-
Without append, all current secondary group assignments are overwritten.
Also notice that the user module has some options that cannot normally be managed with the Linux useradd command. The module can also be used to generate an SSH key and specify its properties.
Managing sudo
No Ansible module specifically targets managing a sudo configuration
two options:
- You can use the template module to create a sudo configuration file in the directory /etc/sudoers.d.
- Using such a file is recommended because the file is managed independently, and as such, there is no risk it will be overwritten by an RPM update.
- The alternative is to use the lineinfile module to manage the /etc/sudoers main configuration file directly.
Users are created and added to a sudo file that is generated from a template:
    [ansible@control rhce8-book]$ cat vars/sudo
    sudo_groups:
      - name: developers
        groupid: 5000
        sudo: false
      - name: admins
        groupid: 5001
        sudo: true
      - name: dbas
        groupid: 5002
        sudo: false
      - name: sales
        groupid: 5003
        sudo: true
      - name: account
        groupid: 5004
        sudo: false
    [ansible@control rhce8-book]$ cat vars/users
    users:
      - username: linda
        groups: sales
      - username: lori
        groups: sales
      - username: lisa
        groups: account
      - username: lucy
groups: account- vars/users file defines users and the groups they should be a member of.
- vars/sudo file defines new groups and, for each of these groups, sets a sudo parameter, which will be used in the template file:
{% for item in sudo_groups %}
{% if item.sudo %}
%{{ item.name}} ALL=(ALL:ALL) NOPASSWD:ALL
{% endif %}
{% endfor %}- a for loop is used to walk through all items that have been defined in the sudo_groups variable in the vars/sudo file.
- for each of these groups an if statement is used to check the value of the Boolean variable sudo. If this variable is set to the Boolean value true, the group is added as a sudo group to the /etc/sudoers.d/sudogroups file.
Listing 13-4 Managing sudo
    ---
    - name: configure sudo
      hosts: ansible2
      vars_files:
        - vars/sudo
        - vars/users
      tasks:
      - name: add groups
        group:
          name: "{{ item.name }}"
        loop: "{{ sudo_groups }}"
      - name: add users
        user:
          name: "{{ item.username }}"
          groups: "{{ item.groups }}"
        loop: "{{ users }}"
      - name: allow group members in sudo
        template:
          src: listing133.j2
          dest: /etc/sudoers.d/sudogroups
          validate: ‘visudo -cf %s’
          mode: 0440
Using Loops and Items
Using Loops and Items
- Some modules enable you to provide a list that needs to be processed.
- Many modules don’t, and in these cases, it makes sense to use a loop mechanism to iterate over a list of items.
- Take, for instance, the yum module. While specifying the names of packages, you can use a list of packages.
- If, however, you want to do something similar for the service module, you find out that this is not possible.
- That is where loops come in.
Working with Loops
Install software packages using the yum module and then ensures that services installed from these packages are started using the service module:
    ---
    - name: install and start services
      hosts: ansible1
      tasks:
      - name: install packages
        yum:
          name:
          - vsftpd
          - httpd
          - samba
          state: latest
      - name: start the services
        service:
          name: "{{ item }}"
          state: started
          enabled: yes
        loop:
        - vsftpd
        - httpd
- smb-
A loop is defined at the same level as the service module.
-
The loop has a list of services in a list (array) statement
-
Items in the loop can be accessed by using the system internal variable item.
-
At no place in the playbook is there a definition of the variable item; the loop takes care of this.
-
When considering whether to use a loop, you should first investigate whether a module offers support for providing lists as values to the keys that are used.
-
If this is the case, just provide a list, as all items in the list can be considered in one run of the module.
-
If not, define the list using loop and provide "{{ item }}" as the value to the key.
-
When using loop, the module is activated again on each iteration.
Using Loops on Variables
- Although it’s possible to define a loop within a task, it’s not the most elegant way.
- To create a flexible environment where static code is separated from dynamic site-specific parameters, it’s a much better idea to define loops outside the static code, in variables.
- When you define loops within a variable, all the normal rules for working with variables apply: The variables can be defined in the play header, using an include file, or as host/hostgroup variables.
Include the loop from a variable:
    ---
    - name: install and start services
      hosts: ansible1
      vars:
        services:
        - vsftpd
        - httpd
        - smb
      tasks:
      - name: install packages
        yum:
          name:
          - vsftpd
          - httpd
          - samba
          state: latest
      - name: start the services
        service:
          name: "{{ item }}"
          state: started
          enabled: yes
        loop: "{{ services }}"
Using Loops on Multivalued Variables
An item can be a simple list, but it can also be presented as a multivalued variable, as long as the multivalued variable is presented as a list.
Use variables that are imported from the file vars/users-list:
users:
  - username: linda
    homedir: /home/linda
    shell: /bin/bash
    groups: wheel
  - username: lisa
    homedir: /home/lisa
    shell: /bin/bash
    groups: users
  - username: anna
    homedir: /home/anna
    shell: /bin/bash
    groups: users
Use the list in a playbook:
    ---
    - name: create users using a loop from a list
      hosts: ansible1
      vars_files: vars/users-list
      tasks:
      - name: create users
        user:
          name: "{{ item.username }}"
          state: present
          groups: "{{ item.groups }}"
          shell: "{{ item.shell }}"
loop: "{{ users }}"- Working with multivalued variables is possible, but the variables in that case must be presented as a list; using dictionaries is not supported.
- The only way to loop over dictionaries is to use the dict2items filter.
- Use of filters is not included in the RHCE topics and for that reason is not explained further here.
- You can look up “Iterating over a dictionary” in the Ansible documentation for more information.
Understanding with_items
- Since Ansible 2.5, using loop has been the command way to iterate over the values in a list.
- In earlier versions of Ansible, the with_keyword statement was used instead.
- In this approach, the keyword is replaced with the name of an Ansible look-up plug-in, but the rest of the syntax is very common.
- Will be deprecated in a future version of Ansible.
With_keyword Options Overview with_items
- Used like loop to iterate over values in a list with_file
- Used to iterate over a list of filenames on the control node with_sequence
- Used to generate a list of values based on a numeric sequence
Loop over a list using with_keyword:
    ---
    - name: install and start services
      hosts: ansible1
      vars:
        services:
        - vsftpd
        - httpd
        - smb
      tasks:
      - name: install packages
        yum:
          name:
          - vsftpd
          - httpd
          - samba
          state: latest
      - name: start the services
        service:
          name: "{{ item }}"
          state: started
          enabled: yes
        with_items: "{{ services }}"
Lab: Working with loop
1. Use your editor to define a variables file with the name vars/packages and the following contents:
packages:
- name: httpd
  state: absent
- name: vsftpd
  state: installed
- name: mysql-server
  state: latest
2. Use your editor to define a playbook with the name exercise71.yaml and create the play header:
- name: manage packages using a loop from a list
  hosts: ansible1
  vars_files: vars/packages
  tasks:
3. Continue the playbook by adding the yum task that will manage the packages, using the packages variable as defined in the vars/packages variable include file:
- name: manage packages using a loop from a list
  hosts: ansible1
  vars_files: vars/packages
  tasks:
  - name: install packages
    yum:
      name: "{{ item.name }}"
      state: "{{ item.state }}"
    loop: "{{ packages }}"
4. Run the playbook using ansible-playbook exercise71.yaml, and observe the results. In the results you should see which packages it is trying to manage and in which state it is trying to get the packages.
Using Modules for Troubleshooting and Testing
Using Modules for Troubleshooting and Testing
While working with playbooks, you may use different modules for troubleshooting. The debug module was used in previous chapters and is particularly useful for analyzing variable behavior. Some other modules may prove useful when troubleshooting Ansible. Table 11-4 gives an overview.
::: group Table 11-4 Troubleshooting Modules Overview
 {width=“940” height=“295”}
:::
{width=“940” height=“295”}
:::
The following sections discuss how these modules can be used.
Using the Debug Module
The debug module is useful to visualize what is happening at a certain point in a playbook. It works with two arguments: the msg argument can be used to print a message, and the var argument can be used to print the value of a variable. Notice that when you use the var argument, the variable does not have to be referred to using the usual {{ varname }} structure, just use varname instead. If variables are used in the msg argument, they must be referred to the normal way, using the {{ varname }} syntax.
Because you have already seen the debug module in action in numerous examples in Chapters 6, 7, and 8 of this book, no new examples are included here.
Using the uri Module
The best way to learn how to work with these modules is to look at some examples. Listing 11-7 shows an example where the uri module is used.
Listing 11-7 Using the uri Module
::: pre_1 — - name: test webserver access hosts: localhost become: no tasks: - name: connect to the web server uri: url: http://ansible2.example.com return_content: yes register: this failed_when: “’welcome’ not in this.content” - debug: var: this.content :::
The playbook in Listing 11-7 uses the uri module to connect to a web server. The return_content argument captures the web server content, which is stored in a variable using register. Next, the failed_when statement makes this module fail if the text “welcome” is not in the registered variable. For debugging purposes, the debug module is used to show the contents of the variable.
In Listing 11-8 you can see the partial result of running this playbook. Notice that the playbook does not generate a failure because the default web page that is shown by the Apache web server contains the text “welcome.”
Listing 11-8 ansible-playbook listing117.yaml Command Result
[ansible@control rhce8-book]$ ansible-playbook listing117.yaml

    PLAY [test webserver access] ***************************************************

    TASK [Gathering Facts] *********************************************************
    ok: [localhost]

    TASK [connect to the web server] ***********************************************
    ok: [localhost]

    TASK [debug] *******************************************************************
    ok: [localhost] => {
        "this.content": "

    PLAY RECAP *********************************************************************
    localhost                  : ok=3    changed=0    unreachable=0    failed=0    skipped=0    rescued=0    ignored=0
Using the uri module can be useful to perform a simple test to check whether a web server is available, but you can also use it to check accessibility or returned information from an API endpoint.
Using the stat Module
You can use the stat module to check on the status of files. Although this module can be useful for checking on the status of just a few files, it’s not a file system integrity checker that was developed to check file status on a large scale. If you need large-scale file system integrity checking, you should use Linux utilities such as aide.
The stat module is useful in combination with register. In this use, the stat module is used to register the status of a specific file, and in a when statement, a check can be done to see whether the file status is not as expected. In combination with the fail module, you can use this module to generate a failure and error message if the file does not meet the expected status. Listing 11-9 shows an example, and Listing 11-10 shows the resulting output, where you can see that the fail module fails the playbook because the file owner is not root.
Listing 11-9 Using stat to Check Expected File Status
::: pre_1 — - name: create a file hosts: all tasks: - file: path: /tmp/statfile state: touch owner: ansible
- name: check file status
  hosts: all
  tasks:
  - stat:
      path: /tmp/statfile
    register: stat_out
  - fail:
      msg: "/tmp/statfile file owner not as expected"
    when: stat_out.stat.pw_name != ’root’
:::
Listing 11-10 ansible-playbook listing119.yaml Command Result
::: pre_1 [ansible@control rhce8-book]$ ansible-playbook listing119.yaml
PLAY [create a file] ***********************************************************

TASK [Gathering Facts] *********************************************************
ok: [ansible2]
ok: [ansible1]
ok: [ansible3]
ok: [ansible4]
fatal: [ansible6]: UNREACHABLE! => {"changed": false, "msg": "Failed to connect to the host via ssh: ansible@ansible6: Permission denied (publickey,gssapi-keyex,gssapi-with-mic,password).", "unreachable": true}
fatal: [ansible5]: UNREACHABLE! => {"changed": false, "msg": "Failed to connect to the host via ssh: ssh: connect to host ansible5 port 22: No route to host", "unreachable": true}

TASK [file] ********************************************************************
changed: [ansible2]
changed: [ansible1]
changed: [ansible3]
changed: [ansible4]

PLAY [check file status] *******************************************************

TASK [Gathering Facts] *********************************************************
ok: [ansible1]
ok: [ansible2]
ok: [ansible3]
ok: [ansible4]

TASK [stat] ********************************************************************
ok: [ansible2]
ok: [ansible1]
ok: [ansible3]
ok: [ansible4]

TASK [fail] ********************************************************************
fatal: [ansible2]: FAILED! => {"changed": false, "msg": "/tmp/statfile file owner not as expected"}
fatal: [ansible1]: FAILED! => {"changed": false, "msg": "/tmp/statfile file owner not as expected"}
fatal: [ansible3]: FAILED! => {"changed": false, "msg": "/tmp/statfile file owner not as expected"}
fatal: [ansible4]: FAILED! => {"changed": false, "msg": "/tmp/statfile file owner not as expected"}

PLAY RECAP *********************************************************************
ansible1                   : ok=4    changed=1    unreachable=0    failed=1    skipped=0    rescued=0    ignored=0
ansible2                   : ok=4    changed=1    unreachable=0    failed=1    skipped=0    rescued=0    ignored=0
ansible3                   : ok=4    changed=1    unreachable=0    failed=1    skipped=0    rescued=0    ignored=0
ansible4                   : ok=4    changed=1    unreachable=0    failed=1    skipped=0    rescued=0    ignored=0
ansible5                   : ok=0    changed=0    unreachable=1    failed=0    skipped=0    rescued=0    ignored=0
ansible6                   : ok=0    changed=0    unreachable=1    failed=0    skipped=0    rescued=0    ignored=0
:::
Using the assert Module
The assert module is a bit like the fail module. You can use it to perform a specific conditional action. The assert module works with a that option that defines a list of conditionals. If any one of these conditionals is false, the task fails, and if all the conditionals are true, the task is successful. Based on the success or failure of a task, the module uses the success_msg or fail_msg options to print a message. Listing 11-11 shows an example that uses the assert module.
Listing 11-11 Using the assert Module
::: pre_1 — - hosts: localhost vars_prompt: - name: filesize prompt: “specify a file size in megabytes” tasks: - name: check if file size is valid assert: that: - “{{ (filesize | int) <= 100 }}” - “{{ (filesize | int) >= 1 }}” fail_msg: “file size must be between 0 and 100” success_msg: “file size is good, let\’s continue” - name: create a file command: dd if=/dev/zero of=/bigfile bs=1 count={{ filesize }} :::
The example in Listing 11-11 contains a few new items. As you can see, the play header starts with a vars_prompt. This defines a variable named filesize, which is based on the input provided by the user. This filesize variable is next used by the assert module. The that statement contains a list in which two conditions are stated. If specified like this, all conditions stated in the that condition must be true. So you are looking for filesize to be equal to or bigger than 1, and smaller than or equal to 100.
Before this can be done, one little problem needs to be managed: when vars_prompt is used, the variable type is set to be a string by default. This means that a statement like
**filesize left caret= 100**would fail with a type mismatch. That is why a Jinja2 filter is used to convert the variable type from string to integer.
Filters are a powerful feature provided by the Jinja2 templating language and can be used in Ansible to modify variables before processing. For more information about filters, see https://docs.ansible.com/ansible/latest/user_guide/playbooks_filters.html. The int filter can be used to convert the value of a string variable to an integer. To do this, you need to rewrite the entire variable as a Jinja2 operation, which is done using "{{ (filesize | int) left caret= 100 }}".
In this line, the entire string is written as a variable. The variable is further treated in a Jinja2 context. In this context, the part (filesize | int) ensures that the string is converted to an integer, which makes it possible to check if the value is smaller than 100.
When you run the code in Listing 11-11, the result shown in Listing 11-12 is produced.
Listing 11-12 ansible-playbook listing1111.yaml Output
::: pre_1 [ansible@control rhce8-book]$ ansible-playbook listing1111.yaml
PLAY [localhost] *****************************************************************
TASK [Gathering Facts] ***********************************************************
ok: [localhost]
TASK [check if file size is valid] ***********************************************
fatal: [localhost]: FAILED! => {
"assertion": "filesize left caret= 100",
"changed": false,
"evaluated_to": false,
"msg": "file size must be between 0 and 100"
}
PLAY RECAP ***********************************************************************
localhost : ok=1 changed=0 unreachable=0 failed=1 skipped=0 rescued=0 ignored=0
:::
As you can see, the task that is defined with the assert module fails because the variable has a value that is not between the minimum and maximum sizes that are defined.
Understanding the need for using the filter to convert the variable type might not be easy. So, let’s also look at Listing 11-13, which shows an example of a playbook that will fail. You can see its behavior in Listing 11-14, where the playbook is executed.
Listing 11-13 Failing Version of the Listing 11-11 Playbook
::: pre_1 — - hosts: localhost vars_prompt: - name: filesize prompt: “specify a file size in megabytes” tasks: - name: check if file size is valid assert: that: - filesize <= 100 - filesize >= 1 fail_msg: “file size must be between 0 and 100” success_msg: “file size is good, let\’s continue” - name: create a file command: dd if=/dev/zero of=/bigfile bs=1 count={{ filesize }} :::
Listing 11-14 ansible-playbook listing1113.yaml Failing Result
::: pre_1 [ansible@control rhce8-book]$ ansible-playbook listing1113.yaml specify a file size in megabytes:
PLAY [localhost] *****************************************************************
TASK [Gathering Facts] ***********************************************************
ok: [localhost]
TASK [check if file size is valid] ***********************************************
fatal: [localhost]: FAILED! => {"msg": "The conditional check ’filesize left caret= 100’ failed. The error was: Unexpected templating type error occurred on ({% if filesize left caret= 100 %} True {% else %} False {% endif %}): ’left caret=’ not supported between instances of ’str’ and ’int’"}
PLAY RECAP ***********************************************************************
localhost : ok=1 changed=0 unreachable=0 failed=1 skipped=0 rescued=0 ignored=0
:::
As you can see, the code in Listing 11-13 fails because the \left caret= test is not supported between a string and an integer.
In Exercise 11-2 you work with some of the modules discussed in this section.
::: box Exercise 11-2 Using Modules for Troubleshooting
1. Open your editor to create the file exercise112.yaml and define the play header:
---
- name: using assert to check if volume group vgdata exists
hosts: all
tasks:2. Add a task that uses the command vgs vgdata to check whether a volume group with the name vgdata exists. The task should use register to register the command result, and it should continue if this is not the case.
- name: check if vgdata exists
command: vgs vgdata
register: vg_result
ignore_errors: true3. To make it easier to use assert in the next step on the right variable, include a debug task to show the value of the variable:
- name: show vg_result variable
debug:
var: vg_result4. Add a task to print a success or failure message, depending on the result of the vgs command from the first task:
- name: print a message
assert:
that:
- vg_result.rc == 0
fail_msg: volume group not found
success_msg: volume group was found5. Use the command ansible-playbook exercise112.yaml to verify its contents. Assuming that the LVM Volume Group vgdata was not found, it should print “volume group not found.”
6. Change the playbook to verify that it will print the success_msg if the requested volume group was found. You can do so by having it run the command vgs cl, which on CentOS 8 should give a positive result. :::
Using Multiple Inventories
Working with Multiple Inventory Files
- Ansible supports working with multiple inventory files.
- One way of using multiple inventory files is to enter multiple
-iparameters with theansibleoransible-playbookcommands to specify the name of the files to be used. ansible-inventory -i inventory -i listing101.py --list- Would produce an output list based on the static inventory in the inventory file, as well as the dynamic inventory that is generated by the listing101.py Python script.
- You can also specify the name of a directory using the
-ioption.- Uses all files in the directory as inventory files.
- When using an inventory directory, dynamic inventory files still must be executable for this approach to work.
Lab: Using Multiple Inventories
- Open a shell as the ansible user and create a directory with the name inventories.
- Copy the file listing101.py to the directory inventories.
- Also copy the inventory file to the directory inventories.
- To make sure both inventories have some unique contents, add the following lines to the file inventories/inventory:
webserver1
webserver2- Add the following lines to the Linux /etc/hosts file:
192.168.4.203 ansible3.example.com ansible3
192.168.4.204 ansible4.example.com ansible4- Use the command
ansible-inventory -i inventories --list.
Using RHEL System roles
Using RHEL System Roles
- Allows for a uniform approach while managing multiple RHEL versions
- Red Hat provides RHEL System Roles.
- RHEL System Roles make managing different parts of the operating system easy.
RHEL System Roles:
rhel-system-roles.kdump
- Configures the kdump crash recovery service rhel system-roles.network
- Configures network interfaces rhel system-roles.postfix
- Configures hosts as a Mail Transfer Agent using Postfix rhel system-roles.selinux
- Manages SELinux settings rhel system-roles.storage
- Configures storage rhel system-roles.timesync
- Configures time synchronization
Understanding RHEL System Roles
- RHEL System Roles are based on the community Linux System Roles
- Provide a uniform interface to make configuration tasks easier where significant differences may exist between versions of the managed operating system.
- RHEL System Roles can be used to manage Red Hat Enterprise Linux 6.10 and later, as well as RHEL 7.4 and later, and all versions of RHEL 8.
- Linux System Roles are not supported by RHEL technical support.
Installing RHEL System Roles
-
To use RHEL System Roles, you need to install the rhel-system-roles package on the control node by using
sudo yum install rhel-system-roles. -
This package can be found in the RHEL 8 AppStream repository.
-
After installation, the roles are copied to the /usr/share/ansible/roles directory, a directory that is a default part of the Ansible roles_path setting.
-
If a modification to the roles_path setting has been made in ansible.cfg, the roles are applied to the first directory listed in the roles_path.
-
With the roles, some very useful documentation is installed also; you can find it in the /usr/share/doc/rhel-system-roles directory.
-
To pass configuration to the RHEL System Roles, variables are important.
-
In the documentation directory, you can find information about variables that are required and used by the role.
-
Some roles also contain a sample playbook that can be used as a blueprint when defining your own role.
-
It’s a good idea to use these as the basis for your own RHEL System Roles–based configuration.
-
The next two sections describe the SELinux and the TimeSync System Roles, which provide nice and easy-to-implement examples of how you can use the RHEL System Roles.
Using the RHEL SELinux System Role
-
You learned earlier how to manage SELinux settings using task definitions in your own playbooks.
-
Using the RHEL SELinux System Role provides an easy-to-use alternative.
-
To use this role, start by looking at the documentation, which is in the /usr/share/doc/rhel-system-roles/selinux directory.
-
A good file to start with is the README.md file, which provides lists of all the ingredients that can be used.
-
The SELinux System Role also comes with a sample playbook file.
-
The most important part of this file is the vars: section, which defines the variables that should be applied by SELinux.
Variable Definition in the SELinux System Role:
---
- hosts: all
become: true
become_method: sudo
become_user: root
vars:
selinux_policy: targeted
selinux_state: enforcing
selinux_booleans:
- { name: ’samba_enable_home_dirs’, state: ’on’ }
- { name: ’ssh_sysadm_login’, state: ’on’, persistent: ’yes’ }
selinux_fcontexts:
- { target: ’/tmp/test_dir(/.*)?’, setype: ’user_home_dir_t’, ftype: ’d’ }
selinux_restore_dirs:
- /tmp/test_dir
selinux_ports:
- { ports: ’22100’, proto: ’tcp’, setype: ’ssh_port_t’, state: ’present’ }
selinux_logins:
- { login: ’sar-user’, seuser: ’staff_u’, serange: ’s0-s0:c0.c1023’, state: ’present’ }SELinux Variables Overview
selinux_policy
-
Policy to use, usually set to targeted selinux_state
-
SELinux state, as managed with setenforce selinux_booleans
-
List of Booleans that need to be set selinux_fcontext
-
List of file contexts that need to be set, including the target file or directory to which they should be applied. selinux_restore_dir
-
List of directories at which the Linux restorecon command needs to be executed to apply new context. selinux_ports
-
List of ports and SELinux port types selinux_logins
-
A list of SELinux user and roles that can be created
-
Most of the time while configuring SELinux, you need to apply the correct state as well as file context.
-
To set the appropriate file context, you first need to define the selinux_fcontext variable.
-
Next, you have to define selinux_restore_dirs also to ensure that the desired context is applied correctly.
Lab: Sets the httpd_sys_content_t context type to the /web directory.
- Sample doc is used and unnecessary lines are removed and the values of two variables have been set
- When you use the RHEL SELinux System Role, some changes require the managed host to be rebooted.
- To take care of this, a block structure is used, where the System Role runs in the block.
- When a change that requires a reboot is applied, the SELinux System Role sets the variable selinux_reboot_required and fails.
- As a result, the rescue section in the playbook is executed.
- This rescue section first makes sure that the playbook fails because of the selinux_reboot_required variable being set to true.
- If that is the case, the reboot module is called to reboot the managed host.
- While rebooting, playbook execution waits for the rebooted host to reappear, and when that happens, the RHEL SELinux System Role is called again to complete its work.
---
- hosts: ansible2
vars:
selinux_policy: targeted
selinux_state: enforcing
selinux_fcontexts:
- { target: ’/web(/.*)?’, setype: ’httpd_sys_content_t’, ftype: ’d’ }
selinux_restore_dirs:
- /web
# prepare prerequisites which are used in this playbook
tasks:
- name: Creates directory
file:
path: /web
state: directory
- name: execute the role and catch errors
block:
- include_role:
name: rhel-system-roles.selinux
rescue:
# Fail if failed for a different reason than selinux_reboot_required.
- name: handle errors
fail:
msg: "role failed"
when: not selinux_reboot_required
- name: restart managed host
shell: sleep 2 && shutdown -r now "Ansible updates triggered"
async: 1
poll: 0
ignore_errors: true
- name: wait for managed host to come back
wait_for_connection:
delay: 10
timeout: 300
- name: reapply the role
include_role:
name: rhel-system-roles.selinuxUsing the RHEL TimeSync System Role
timesync_ntp_servers variable
-
most important setting
-
specifies attributes to indicate which time servers should be used.
-
The hostname attribute identifies the name of IP address of the time server.
-
The iburst option is used to enable or disable fast initial time synchronization using the timesync_ntp_servers variable.
-
The System Role finds out which version of RHEL is used, and according to the currently used version, it either configures NTP or Chronyd.
Lab: Using an RHEL System Role to Manage Time Synchronization
1. Copy the sample timesync playbook to the current directory:
cp /usr/share/doc/rhel-system-roles/timesync/example-single-pool-playbook.yml timesync.yaml
2. Add the target host, NTP hostname pool.ntp.org, and remove pool true in the file timesync.yaml:
---
- name: Configure NTP
hosts: "{{ host }}"
vars:
timesync_ntp_servers:
- hostname: pool.ntp.org
iburst: true
roles:
- rhel-system-roles.timesync3. Add the timezone module and the timezone variable to the playbook to set the timezone as well. The complete playbook should look like the following:
---
- hosts: ansible2
vars:
timesync_ntp_servers:
- hostname: pool.ntp.org
iburst: yes
timezone: UTC
roles:
- rhel-system-roles.timesync
tasks:
- name: set timezone
timezone:
name: "{{ timezone }}"4. Use ansible-playbook timesync.yaml to run the playbook. Observe its output. Notice that some messages in red are shown, but these can safely be ignored.
5. Use ansible ansible2 -a "timedatectl show" and notice that the timezone variable is set to UTC.
Using Tags
Using Tags
When you are using larger playbooks, Ansible enables you to use the tags attribute. A tag is a label that is applied to a task or another item like a block or a play, and while using the ansible-playbook --tags or ansible-playbook --skip-tags command, you can specify which tags need to be executed. Listing 11-15 shows a simple playbook example where tags are used, and in Listing 11-16 you can see the output generated while running this playbook.
Listing 11-15 Using tags in a Playbook
::: pre_1 — - name: using tags example hosts: all vars: service: - vsftpd - httpd tasks: - yum: name: - httpd - vsftpd state: present tags: - install - service: name: “{{ item }}” state: started enabled: yes loop: “{{ services }}” tags: - services :::
Listing 11-16 ansible-playbook --tags “install” listing1115.yaml Output
::: pre_1 [ansible@control rhce8-book]$ ansible-playbook –tags “install” listing1115.yaml
PLAY [using tags example] ******************************************************
TASK [Gathering Facts] *********************************************************
ok: [ansible2]
ok: [ansible1]
ok: [ansible4]
ok: [ansible3]
TASK [yum] *********************************************************************
ok: [ansible2]
ok: [ansible1]
changed: [ansible3]
changed: [ansible4]
PLAY RECAP *********************************************************************
ansible1 : ok=2 changed=0 unreachable=0 failed=0 skipped=0 rescued=0 ignored=0
ansible2 : ok=2 changed=0 unreachable=0 failed=0 skipped=0 rescued=0 ignored=0
ansible3 : ok=2 changed=1 unreachable=0 failed=0 skipped=0 rescued=0 ignored=0
ansible4 : ok=2 changed=1 unreachable=0 failed=0 skipped=0 rescued=0 ignored=0
:::
Tags can be applied to many structures, such as imported plays, tasks, and roles, but the easiest way to get familiar with tags is to use them on a task. Note that tags cannot be applied on items that are dynamically included (instead of imported), using include_roles or include_tasks.
While writing playbooks, you may apply the same tag multiple times. This capability allows you to define groups of tasks, where multiple tasks are configured with the same tag, and as a result, you can easily run a specific part of the requested configuration. When multiple tasks with multiple tags are used, you can get an overview of each using the ansible-playbook --list-tasks --list-tags command. In Listing 11-17 you can see an example that is based on the playbook listing1114.yaml.
Listing 11-17 Listing Tasks and Tags
::: pre_1 [ansible@control rhce8-book]$ ansible-playbook –list-tags –list-tasks listing1115.yaml
playbook: listing1115.yaml
play #1 (all): using tags example. TAGS: []
tasks:
yum. TAGS: [install]
service. TAGS: [services]
TASK TAGS: [install, services]
:::
When working with tags, you can use some special tags. Table 11-5 gives an overview.
Table 11-5 Special Tags Overview
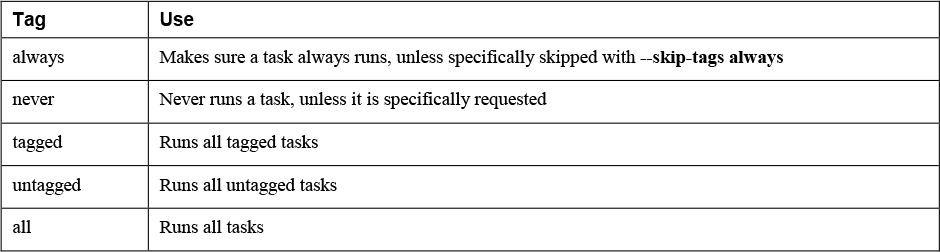
Apart from these special tags, you might also want to set a debug tag to easily identify tasks that should be run only if you specifically want to run debug tasks as well. If combined with the never tag, the task that is tagged with the debug,never tasks runs only if the debug tag is specifically requested. So in case you want to run the entire playbook, including tasks that have been tagged with debug, you need to use the ansible-playbook --tags all,debug command. In Exercise 11-3 you can see how this can be used to optimize the playbook that was previously used in Exercise 11-2.
::: box Exercise 11-3 Using Tags to Make Debugging Easier
1. Rewrite the exercise112.yaml playbook that you created in the previous exercise, and include the line tags: [never, debug ] in the debug task. The complete playbook looks as follows:
---
- name: using assert to check if volume group vgdata exists
hosts: all
tasks:
- name: check if vgdata exists
command: vgs vgdata
register: vg_result
ignore_errors: true
- name: show vg_result variable
debug:
var: vg_result
tags: [ never, debug ]
- name: print a message
assert:
that:
- vg_result.rc == 0
fail_msg: volume group not found
success_msg: volume group was found2. Run the playbook using ansible-playbook --tags all exercise113.yaml. Notice that it does not run the debug task.
3. Run the playbook using ansible-playbook --tags all,debug exercise113.yaml. Notice that it now does run the debug task as well. :::
Using when to Run Tasks Conditionally
Using when to Run Tasks Conditionally
- Use a when statement to run tasks conditionally.
- you can test whether:
- a variable has a specific value
- whether a file exists
- whether a minimal amount of memory is available
- etc.
Working with when
Install the right software package for the Apache web server, based on the Linux distribution that was found in the Ansible facts. Notice that
- when used in when statements, the variable that is evaluated is not placed between double curly braces.
---
- name: conditional install
hosts: all
tasks:
- name: install apache on Red Hat and family
yum:
name: httpd
state: latest
when: ansible_facts[’os_family’] == "RedHat"
- name: install apache on Ubuntu and family
apt:
name: apache2
state: latest
when: ansible_facts[’os_family’] == "Debian"-
not a part of any properties of the modules on which it is used
-
must be indented at the same level as the module itself.
-
For a string test, the string itself must be between double quotes.
-
Without the double quotes, it would be considered an integer test.
Using Conditional Test Statements
Common conditional tests that you can perform with the when statement:
Variable exists
-
variable is defined Variable does not exist
-
variable is not defined First variable is present in list mentioned as second
-
ansible_distribution in distributions Variable is true, 1 or yes
-
variable Variable is false, 0 or no
-
not variable Equal (string)
-
key == “value” Equal (numeric)
-
key == value Less than
-
key < value Less than or equal to
-
key <= value Greater than
-
key > value Greater than or equal to
-
key >= value Not equal to
-
key != value
-
Look for “Tests” in the Ansible documentation, and use the item that is found in Templating (Jinja2).
-
When referring to variables in when statements, you don’t have to use curly brackets because items in a when statement are considered to be variables by default.
-
So you can write when: text == “hello” instead of when: “{{ text }}” == “hello”.
There are roughly four types of when conditional tests: • Checks related to variable existence • Boolean checks • String comparisons • Integer comparisons
The first type of test checks whether a variable exists or is a part of another variable, such as a list.
Checks for the existence of a specific disk device, using variable is defined and variable is not defined. All failing tests result in the message “skipping.”
---
- name: check for existence of devices
hosts: all
tasks:
- name: check if /dev/sda exists
debug:
msg: a disk device /dev/sda exists
when: ansible_facts[’devices’][’sda’] is defined
- name: check if /dev/sdb exists
debug:
msg: a disk device /dev/sdb exists
when: ansible_facts[’devices’][’sdb’] is defined
- name: dummy test, intended to fail
debug:
msg: failing
when: dummy is defined
- name: check if /dev/sdc does not exist
debug:
msg: there is no /dev/sdc device
when: ansible_facts[’devices’][’sdc’] is not definedLab: Check that finds whether the first variable value is present in the second variable’s list.
- executes the debug task if the variable my_answer is in supported_packages.
- vars_prompt is used. This stops the playbook, asks the user for input, and stores the input in a variable with the name my_answer.
---
- name: test if variable is in another variables list
hosts: all
vars_prompt:
- name: my_answer
prompt: which package do you want to install
vars:
supported_packages:
- httpd
- nginx
tasks:
- name: something
debug:
msg: you are trying to install a supported package
when: my_answer in supported_packagesBoolean check
- Works on variables that have a Boolean value (not very common) T
- Should not be defined with the check for existence.
- Used to check whether a variable is defined.
string comparisons and integer comparisons
- Ie: Check if more than 1 GB of disk space is available.
- When doing checks on available disk space and available memory, carefully look at the expected value.
- Memory is shown in megabytes, by default, whereas disk space is expressed in bytes.
Lab: integer check, install vsftpd if more than 50 MB of memory is available.
---
- name: conditionals test
hosts: all
tasks:
- name: install vsftpd if sufficient memory available
package:
name: vsftpd
state: latest
when: ansible_facts[’memory_mb’][’real’][’free’] > 50Testing Multiple Conditions
- when statements can also be used to evaluate multiple conditions.
- To do so, you can group the conditions with parentheses and combine them with and and or keywords.
- and runs if both conditionals are ture
- or runs if one of the conditions are true
Lab: and is used and runs the task only if both conditions are true.
---
- name: testing multiple conditions
hosts: all
tasks:
- name: showing output
debug:
msg: using CentOS 8.1
when: ansible_facts[’distribution_version’] == "8.1" and ansible_facts[’distribution’] == "CentOS"- You can make more complex statements by grouping conditions together in parentheses.
- group the when statement starts with a > sign to wrap the statement over the next five lines for readability.
Lab: Combining complex statements
---
- name: using multiple conditions
hosts: all
tasks:
- package:
name: httpd
state: removed
when: >
( ansible_facts[’distribution’] == "RedHat" and
ansible_facts[’memfree_mb’] < 512 )
or
( ansible_facts[’distribution’] == "CentOS" and
ansible_facts[’memfree_mb’] < 256 )Combining loop and when
Lab: Combining loop and when, Perform a kernel update only if /boot is on a dedicated mount point and at least 200 MBis available in the mount.
---
- name: conditionals test
hosts: all
tasks:
- name: update the kernel if sufficient space is available in /boot
package:
name: kernel
state: latest
loop: "{{ ansible_facts[’mounts’] }}"
when: item.mount == "/boot" and item.size_available > 200000000Combining loop and register
Lab: Combining register and loop
---
- name: test register
hosts: all
tasks:
- shell: cat /etc/passwd
register: passwd_contents
- debug:
msg: passwd contains user lisa
when: passwd_contents.stdout.find(’lisa’) != -1passwd_contents.stdout.find,
- passwd_contents.stdout does not contain any item with the name find.
- Construction that is used here is variable.find, which enables a task to search a specific string in a variable. (thefind function in Python is used)
- When the Python find function does not find a string, it returns a value of −1.
- If the requested string is found, the find function returns an integer that returns the position where the string was found.
- For instance, if the string lisa is found in /etc/passwd, it returns an unexpected value like 2604, which is the position in the file, expressed as a byte offset from the beginning, where the string is found for the first time.
- Because of the behavior of the Python find function, variable.find needs not to be equal to −1 to have the task succeed. So don’t write passwd_contents.stdout.find(’lisa’) = 0 (because it is not a Boolean), but instead write passwd_contents.stdout.find(’lisa’) != -1.
Lab: Practice working with conditionals using register.
- When using register, you might want to define a task that runs a command that will fail, just to capture the return code of that command, after which the playbook should continue. If that is the case, you must ensure that ignore_errors: yes is used in the task definition.
1. Use your editor to create a new file with the name exercise72.yaml. Start writing the play header as follows:
---
- name: restart sshd service if httpd is running
hosts: ansible1
tasks:2. Add the first task, which checks whether the httpd service is running, using command output that will be registered. Notice the use of ignore_errors: yes. This line makes sure that if the service is not running, the play is still executed further.
---
- name: restart sshd service if httpd is running
hosts: ansible1
tasks:
- name: get httpd service status
command: systemctl is-active httpd
ignore_errors: yes
register: result3. Add a debug task that shows the output of the command so that you can analyze what is currently in the registered variable:
---
- name: restart sshd service if httpd is running
hosts: ansible1
tasks:
- name: get httpd service status
command: systemctl is-active httpd
ignore_errors: yes
register: result
- name: show result variable contents
debug:
msg: printing contents of the registered variable {{ result }}4. Complete the playbook by including the service task, which is started only if the value stored in result.rc (which is the return code of the command that was registered) contains a 0. This is the case if the previous command executed successfully.
---
- name: restart sshd service if httpd is running
hosts: ansible1
tasks:
- name: get httpd service status
command: systemctl is-active httpd
ignore_errors: yes
register: result
- name: show result variable contents
debug:
msg: printing contents of the registered variable {{ result }}
- name: restart sshd service
service:
name: sshd
state: restarted
when: result.rc == 05. Use an ad hoc command to make sure the httpd service is installed: ansible ansible1 -m yum -a "name=httpd state=latest".
6. Use an ad hoc command to make sure the httpd service is stopped: ansible ansible1 -m service -a "name=httpd state=stopped".
7. Run the playbook using ansible-playbook exercise72.yaml and analyze the result. You should see that the playbook skips the service task.
8. Type ansible ansible1 -m service -a "name=httpd state=started" and run the playbook again, using ansible-playbook exercise72.yaml. Playbook execution at this point should be successful.
Variables
Using and working with variables
- Capture command output using register
Variables
Three types of variables:
- Fact
- Variable
- Magic Variable
Variables make Ansible really flexible. Especially when used in combination with conditionals. These are defined at the discretion of the user.:
---
- name: create a user using a variable
hosts: ansible1
vars:
users: lisa <-- defaults value for this play
tasks:
- name: create a user {{ users }} on host {{ ansible_hostname }} <-- ansible fact variable
user:
name: "{{ users }}" <-- If value starts with variable, the whole line must have double quotesWorking with Variables
- Variables can be used to refer to a wide range of dynamic data, such as names of files, services, packages, users, URLs to specific servers, etc.
Defining Variables
To define a variable
- key: value structure in a vars section in the play header.
---
- name: using variables
hosts: ansible1
vars: <-------------
ftp_package: vsftpd <------------
tasks:
- name: install package
yum:
name: "{{ ftp_package }}" <------------
state: latest- As the variable is the first item in the value, its name must be placed between double curly brackets as well as double quotes.
Variable equirements:
• Must start with a letter. • Case sensitive. • Can contain only letters, numbers, and underscores.
Using Include Files
- It is common to define variables in include files. Specific host and host group variables can be used as include files
- it’s also possible to include an arbitrary file as a variable file, using the vars_files: statement.
- The vars_files: parameter can have a single value or a list providing multiple values. If a list is used, each item needs to start with a dash
- When you include variables from files, it’s a good idea to work with a separate directory that contains all variables because that makes it easier to manage as your projects grow bigger.
---
- name: using a variable include file
hosts: ansible1
vars_files: vars/common <--------------
tasks:
- name: install package
yum:
name: "{{ my_package }}" <------------
state: latestvars/common
my_package: nmap
my_ftp_service: vsftpd
my_file_service: smb- If variables are defined in individual playbooks, they are spread all over, and it may be difficult to get an overview of all variables that are used on a site.
Managing Host and Group Variables
host_vars and group_vars
- set variables for specific hosts or specific host groups.
- In older versions of Ansible, it was common to set host variables and group variables in inventory, but this practice is now deprecated.
host_vars
- Must create a subdirectory with the name host_vars within the Ansible project directory.
- In this directory, create a file that matches the inventory name of the host to which the variables should be applied.
- So the variables for host ansible1 are defined in host_vars/ansible1.
group_vars
- Must create a directory with the name group_vars.
- In this directory, a file with the name of the host group is created, and in this file all variables are defined.
- ie: group_vars/webservers
If no variables are defined at the command prompt, it will use the variable set for the play. You can also define the variables with the -e flag when running the playbook:
[ansible@control base]$ ansible-playbook variable-pb.yaml -e users=john
PLAY [create a user using a variable] ************************************************************************************************************************
TASK [Gathering Facts] ***************************************************************************************************************************************
ok: [ansible1]
TASK [create a user john on host ansible1] *******************************************************************************************************************
changed: [ansible1]
PLAY RECAP ***************************************************************************************************************************************************
ansible1 : ok=2 changed=1 unreachable=0 failed=0 skipped=0 rescued=0 ignored=0 LAB: Using Host and Host Group Variables
1. Create a project directory in your home directory. Type mkdir ~/chapter6 to create the chapter6 project directory, and use cd ~/chapter6 to go into this directory.
2. Type cp ../ansible.cfg . to copy the ansible.cfg file that you used before. No further modifications to this file are required.
3. Type vim inventory to create a file with the name inventory, and ensure it has the following contents:
[webservers]
ansible1
[dbservers]
ansible24. Create the file webservers.yaml, containing the following contents. Notice that nothing is really changed by running this playbook. It just uses the debug module to show the current value of the variables.
---
- name: configure web services
hosts: webservers
tasks:
- name: this is the {{ web_package }} package
debug:
msg: "Installing {{ web_package }}"
- name: this is the {{ web_service }} service
debug:
msg: "Starting the {{ web_service }}"5. Create the file group_vars/webservers with the following contents:
web_package: httpd
web_service: httpd6. Run the playbook with some verbosity to verify it is working by using ansible-playbook -vv webservers.yaml
Using Multivalued Variables
Two types of multivalued variables:
array (list)
- key that can have multiple items as its value.
- Each item in a list starts with a dash (-).
- Individual items in a list can be addressed using the index number (starting at zero), as in {{ users[1] }} (which would print the key-value pairs that are set for user lisa)
users:
- linda:
username: linda
homedir: /home/linda
shell: /bin/bash
- lisa:
username: lisa
homedir: /home/lisa
shell: /bin/bash
- anna:
username: anna
homedir: /home/anna
shell: /bin/bashdictionary (hash)
- Unordered collection of items, a collection of key-value pairs.
- In Python, a dictionary is defined as my_dict = { key1: ‘car’, key2:‘bike’ }.
- Because it is based on Python, Ansible lets users use dictionaries as an alternative notation to arrays
- not as common in use as arrays.
- Items in values in a dictionary are not started with a dash.
users:
linda:
username: linda
homedir: /home/linda
shell: /bin/bash
lisa:
username: lisa
homedir: /home/lisa
shell: /bin/bash
anna:
username: anna
homedir: /home/anna
shell: /bin/bashAddressing Specific Keys in a Dictionary Multivalued Variable:
---
- name: show dictionary also known as hash
hosts: ansible1
vars_files:
- vars/users-dictionary
tasks:
- name: print dictionary values
debug:
msg: "User {{ users.linda.username }} has homedirectory {{ users.linda.homedir }} and shell {{ users.linda.shell }}"Using the Square Brackets Notation to Address Multivalued Variables (recommended method)
---
- name: show dictionary also known as hash
hosts: ansible1
vars_files:
- vars/users-dictionary
tasks:
- name: print dictionary values
debug:
msg: "User {{ users[’linda’][’username’] }} has homedirectory {{ users[’linda’][’homedir’] }} and shell {{ users[’linda’][’shell’] }}"Magic Variables
- Variables that are set automatically by Ansible to reflect an Ansible internal state.
- There are about 30 magic variables
- Common Magic Variables

- you cannot use their name for anything else.
- If you try to set a magic variable to another value anyway, it always resets to the default internal value.
Debug module can be used to show the current values assigned to the hostvars magic variable.
- Shows many settings that you can change by modifying the ansible.cfg configuration file.
- If local facts are defined on the host, you will see them also.
[ansible@control ~]$ ansible localhost -m debug -a 'var=hostvars["ansible1"]'
localhost | SUCCESS => {
"hostvars[\"ansible1\"]": {
"ansible_check_mode": false,
"ansible_diff_mode": false,
"ansible_facts": {},
"ansible_forks": 5,
"ansible_inventory_sources": [
"/home/ansible/inventory"
],
"ansible_playbook_python": "/usr/bin/python3.6",
"ansible_verbosity": 0,
"ansible_version": {
"full": "2.9.5",
"major": 2,
"minor": 9,
"revision": 5,
"string": "2.9.5"
},
"group_names": [
"ungrouped"
],
"groups": {
"all": [
"ansible1",
"ansible2"
],
"ungrouped": [
"ansible1",
"ansible2"
]
},
"inventory_dir": "/home/ansible",
"inventory_file": "/home/ansible/inventory",
"inventory_hostname": "ansible1",
"inventory_hostname_short": "ansible1",
"omit": "__omit_place_holder__38849508966537e44da5c665d4a784c3bc0060de",
"playbook_dir": "/home/ansible"
}
}Variable Precedence
- Avoid using variables with the same names that are defined at different levels.
- If a variable with the same name is defined at different levels, the most specific variable always wins.
- Variables that are defined while running the playbook command using the -e key=value command-line argument have the highest precedence.
- After variables that are passed as command-line options, playbook variables are considered.
- Next are variables that are defined for inventory hosts or host groups.
- Consult the Ansible documentation item “Variable precedence” for more details and an overview of the 22 different levels where variables can be set and how precedence works for them.
1. Variables passed on the command line 2. Variables defined in or included from a playbook 3. Inventory variables
Capturing Command Output Using register
The result of commands can also be used as a variable byusing the register parameter in a task.
---
- name: test register
hosts: ansible1
tasks:
- shell: cat /etc/passwd
register: passwd_contents
- debug:
var: "passwd_contents"The cat /etc/passwd command is executed by the shell module. Notice that in this playbook no names are used for tasks. Using names for tasks is
not mandatory; it’s just recommended in more complex playbooks because this convention makes identification of the tasks easier. The entire contents of the command are next stored in the variable passwd_contents.
This variable contains the output of the command, stored in different keys. Table 6-7 provides an overview of the most
useful keys, and Listing 6-19 shows the partial result of the ansible-playbook listing618.yaml command.
Keys Used with register cmd
- Command that was used rc
- Return code of the command stderr
- Error messages stderr_lines
- Errors line by line stdout
- command output stdout_line
- Command output line by line
[ansible@control ~]$ ansible-playbook listing618.yaml
PLAY [test register] *******************************************************************
TASK [Gathering Facts] *****************************************************************
ok: [ansible2]
ok: [ansible1]
TASK [shell] ***************************************************************************
changed: [ansible2]
changed: [ansible1]
TASK [debug] ***************************************************************************
ok: [ansible1] => {
"passwd_contents": {
"changed": true,
"cmd": "cat /etc/passwd",
"delta": "0:00:00.004149",
"end": "2020-04-02 02:28:10.692306",
"failed": false,
"rc": 0,
"start": "2020-04-02 02:28:10.688157",
"stderr": "",
"stderr_lines": [],
"stdout": "root:x:0:0:root:/root:/bin/bash\nbin:x:1:1:bin:/bin:/sbin/nologin\ndaemon:x:2:2:daemon:/sbin:/sbin/nologin\nadm:x:3:4:adm:/var/adm:/sbin/nologin\nlp:x:4:7:lp:/var/spool/lpd:/sbin/nologin\nsync:x:5:0:sync:/sbin:/bin/sync\nshutdown:x:6:0:shutdown:/sbin:/sbin/shutdown\nhalt:x:7:0:halt:/sbin:/sbin/halt\nansible:x:1000:1000:ansible:/home/ansible:/bin/bash\napache:x:48:48:Apache:/usr/share/httpd:/sbin/nologin\nlinda:x:1002:1002::/home/linda:/bin/bash\nlisa:x:1003:1003::/home/lisa:/bin/bash",
"stdout_lines": [
"root:x:0:0:root:/root:/bin/bash",
"bin:x:1:1:bin:/bin:/sbin/nologin",
"daemon:x:2:2:daemon:/sbin:/sbin/nologin",
"adm:x:3:4:adm:/var/adm:/sbin/nologin",
"lp:x:4:7:lp:/var/spool/lpd:/sbin/nologin",
"sync:x:5:0:sync:/sbin:/bin/sync",
"shutdown:x:6:0:shutdown:/sbin:/sbin/shutdown",
"halt:x:7:0:halt:/sbin:/sbin/halt",
"ansible:x:1000:1000:ansible:/home/ansible:/bin/bash",
"apache:x:48:48:Apache:/usr/share/httpd:/sbin/nologin",
"linda:x:1002:1002::/home/linda:/bin/bash",
"lisa:x:1003:1003::/home/lisa:/bin/bash"
]
}
}Ensure that a task runs only if a command produces a specific result by using register with conditionals.
register shows the values that are returned by specific tasks. Tasks have common return values, but modules may have specific return values. That means you cannot assume, based on the result of an example using a specific module, that the return values you see are available for all modules. Consult the module documentation for more information about specific return values.