Variable and Facts
-
Ansible Facts
-
Ansible Vault
-
All about Ansible variables
Ansible Facts
Ansible Vault
All about Ansible variables
An ansible fact variable is a variable that is automatically set based on the managed system. Facts are a default behavior used to discover information to use in conditionals. They are collected when Ansible executes on a remote system.
There are systems facts and custom facts. Systems facts are system property values. And custom facts are user-defined variables stored on managed hosts.
If no variables are defined at the command prompt, it will use the variable set for the play. You can also define the variables with the -e flag when running the playbook:
[ansible@control base]$ ansible-playbook variable-pb.yaml -e users=john

PLAY [create a user using a variable] ************************************************************************************************************************

TASK [Gathering Facts] ***************************************************************************************************************************************
ok: [ansible1]

TASK [create a user john on host ansible1] *******************************************************************************************************************
changed: [ansible1]

PLAY RECAP ***************************************************************************************************************************************************
ansible1                   : ok=2    changed=1    unreachable=0    failed=0    skipped=0    rescued=0    ignored=0
A magic variable is a system variable that is automatically set.
Notice the “Gathering Facts” task. when you run a playbook. This is an implicit tasks ran every time you run a playbook. This task grabs facts from managed hosts and stores them in the variable ansible_facts.
You can use the debug module to display variables like so:
---
- name: show facts
  hosts: all
  tasks:
  - name: show facts
    debug:
      var: ansible_facts <-- this module does require variables to be enclosed in curly brackets
This outputs a gigantic list of facts from our managed nodes.
Two formats for using ansible facts variables:
Square brackets (prefered): ansible_facts['default_ipv4']['address']
Dotted: ansible_facts.default_ipv4.address
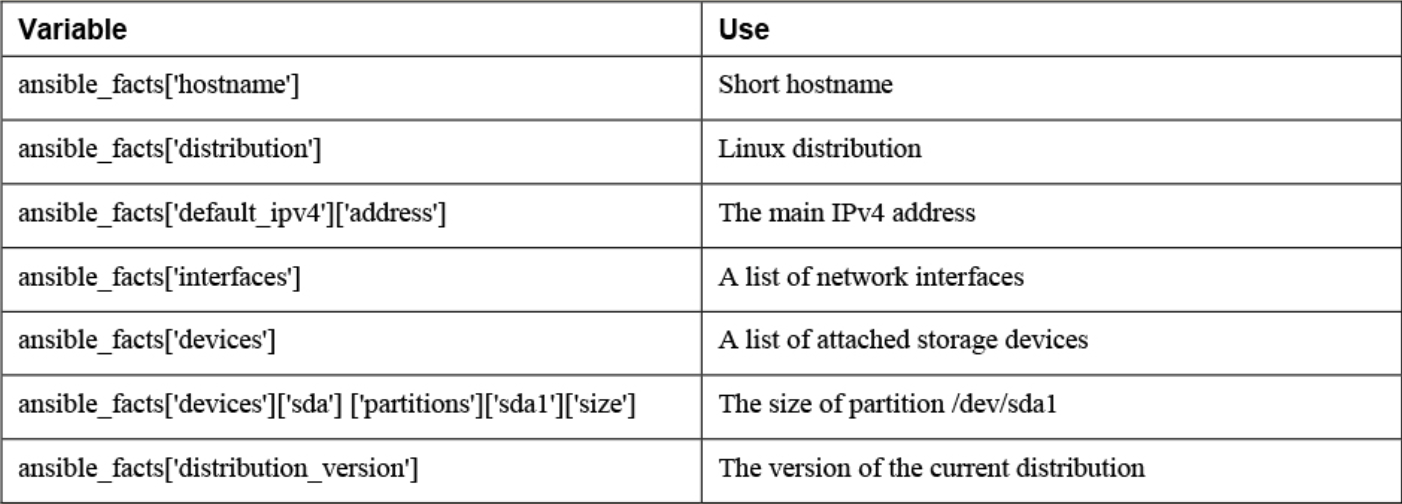
Commonly used ansible_facts:
There are additional Ansible modules for gathering more information. See `ansible-doc -l | grep fact
package_facts module collects information about software packages installed on managed hosts.
Ansible_facts variable (current way)
ansible_facts['distribution_version']injected variables (old way)
Variable are prefixed with the string ansible_
Will lose support eventually
Old approach and the new approach both still occur.
ansible ansible1 -m setup command Ansible facts are injected as variables. ansible1 | SUCCESS => {
"ansible_facts": {
"ansible_all_ipv4_addresses": [
"192.168.122.1",
"192.168.4.201"
],
"ansible_all_ipv6_addresses": [
"fe80::e564:5033:5dec:aead"
],
"ansible_apparmor": {Comparing ansible_facts Versus Injected Facts as Variables
ansible_facts                               Injected Variable
--------------------------------------------------------------
ansible_facts['hostname']                  ansible_hostname
ansible_facts['distribution']              ansible_distribution
ansible_facts['default_ipv4']['address']   ansible_default_ipv4['address']
ansible_facts['interfaces']                ansible_interfaces
ansible_facts['devices']                   ansible_devices
ansible_facts['devices']['sda']\
['partitions']['sda1']['size']             ansible_devices['sda']['partitions']['sda1']['size']
ansible_facts['distribution_version']      ansible_distribution_version
Different notations can be used in either method, the listings address the facts in dotted notation, not in the notation with square brackets.
Addressing Facts with Injected Variables:
    - hosts: all
      tasks:
      - name: show IP address
        debug:
          msg: >
            This host uses IP address {{ ansible_default_ipv4.address }}
Addressing Facts Using the ansible_facts Variable
    ---
    - hosts: all
      tasks:
      - name: show IP address
        debug:
          msg: >
            This host uses IP address {{ ansible_facts.default_ipv4.address }}
If, for some reason, you want the method where facts are injected into variables to be the default method, you can use inject_facts_as_vars=true in the [default] section of the ansible.cfg file.
• In Ansible versions since 2.5, all facts are stored in one variable: ansible_facts. This method is used while gathering facts from a playbook.
• Before Ansible version 2.5, facts were injected into variables such as ansible_hostname. This method is used by the setup module. (Note that this may change in future versions of Ansible.)
• Facts can be addressed in dotted notation:
{{ansible_facts.default_ipv4.address }}
• Alternatively, facts can be addressed in square brackets notation:
{{ ansible_facts['default_ipv4']['address'] }}. (preferred)
By default, upon execution of each playbook, facts are gathered. This does slow down playbooks, and for that reason, it is possible to disable fact gathering completely. To do so, you can use the gather_facts: no parameter in the play header. If later in the same playbook it is necessary to gather facts, you can do this by running the setup module in a task.
Even if it is possible to disable fact gathering for all of your Ansible configuration, this practice is not recommended. Too many playbooks use conditionals that are based on the current value of facts, and all of these conditionals would stop working if fact gathering were disabled altogether.
As an alternative to make working with facts more efficient, you can disable a fact cache. To do so, you need to install an external plug-in. Currently, two plug-ins are available for this purpose: jsonfile and redis. To configure fact caching using the redis plug-in, you need to install it first. Next, you can enable fact caching through ansible.cfg.
The following procedure describes how to do this:
1. Use yum install redis.
2. Use service redis start.
3. Use pip install redis.
4. Edit /etc/ansible/ansible.cfg and ensure it contains the following parameters:
[defaults]
gathering = smart
fact_caching = redis
fact_caching_timeout = 86400
Note
Fact caching can be convenient but should be used with caution. If, for instance, a playbook installs a certain package only if a sufficient amount of disk space is available, it should not do this based on information that may be up to 24 hours old. For that reason, using a fact cache is not recommended in many situations.
Used to provide a host with arbitrary values that Ansible can use to change the behavior of plays.
can be provided as static files.
files must
can be generated by a script, and
Dynamic custom facts are useful because they allow the facts to be determined at the moment that a script is running. provides an example of a static custom fact file.
Custom Facts Sample File:
    [packages]
    web_package = httpd
    ftp_package = vsftpd

    [services]
    web_service = httpd
    ftp_service = vsftpd
To get the custom facts files on the managed hosts, you can use a playbook that copies a local custom fact file (existing in the current Ansible project directory) to the appropriate location on the managed hosts. Notice that this playbook uses variables, which are explained in more detail in the section titled “Working with Variables.”
    ---
    - name: Install custom facts
      hosts: all
      vars:
        remote_dir: /etc/ansible/facts.d
        facts_file: listing68.fact
      tasks:
      - name: create remote directory
        file:
          state: directory
          recurse: yes
          path: "{{ remote_dir }}"
      - name: install new facts
        copy:
          src: "{{ facts_file }}"
          dest: "{{ remote_dir }}"
Custom facts are stored in the variable ansible_facts.ansible_local. In this variable, you use the filename of the custom fact file and the label in the custom fact file. For instance, after you run the playbook in Listing 6-9, the web_package fact that was defined in listing68.fact is accessible as
{{ ansible_facts[’ansible_local’][’listing67’][’packages’][’web_package’] }}
To verify, you can use the setup module with the filter argument. Notice that because the setup module produces injected variables as a result, the ad hoc command to use is ansible all -m setup -a "filter=ansible_local" . The command ansible all -m setup -a "filter=ansible_facts\['ansible_local'\]" does not work.
1. Create a custom fact file with the name custom.fact and the following contents:
[software]
package = httpd
service = httpd
state = started
enabled = true
2. Write a playbook with the name copy_facts.yaml and the following contents:
---
- name: copy custom facts
  become: yes
  hosts: ansible1
  tasks:
  - name: create the custom facts directory
    file:
      state: directory
      recurse: yes
      path: /etc/ansible/facts.d
  - name: copy the custom facts
    copy:
      src: custom.fact
      dest: /etc/ansible/facts.d
3. Apply the playbook using ansible-playbook copy_facts.yaml -i inventory
4. Check the availability of the custom facts by using ansible all -m setup -a "filter=ansible_local" -i inventory
5. Use an ad hoc command to ensure that the httpd service is not installed on any of the managed servers: ansible all -m yum -a "name=httpd state=absent" -i inventory -b
6. Create a playbook with the name setup_with_facts.yaml that installs and enables the httpd service, using the custom facts:
---
- name: install and start the web service
  hosts: ansible1
  tasks:
  - name: install the package
    yum:
      name: "{{ ansible_facts['ansible_local']['custom']['software']['package'] }}"
      state: latest
  - name: start the service
    service:
      name: "{{ ansible_facts['ansible_local']['custom']['software']['service'] }}"
      state: "{{ ansible_facts['ansible_local']['custom']['software']['state'] }}"
      enabled: "{{ ansible_facts['ansible_local']['custom']['software']['enabled'] }}"
7. Run the playbook to install and set up the service by using ansible-playbook setup_with_facts.yaml -i inventory -b
8. Use an ad hoc command to verify the service is running: ansible ansible1 -a "systemctl status httpd" -i inventory -b
1. Sensitive data is stored as values in variables in a separate variable file. 2. The variable file is encrypted, using the ansible-vault command. 3. While accessing the variable file from a playbook, you enter a password to decrypt.
ansible-vault create secret.yaml
ansible-vault create \--vault-password-file=passfile secret.yamlansible-vault encrypt
ansible-vault decrypt
Commonly used ansible-vault commands:
create
encryptencrypt_stringdecryptrekeyviewedit--vault-id @prompt
ansible-playbook command prompt for a password for each of the Vault-encrypted files that may be usedansible-playbook --ask-vault-pass
ansible-playbook --vault-password-file=secret
You should separate files containing unencrypted variables from files that contain encrypted variables.
Use group_vars and host_vars variable inclusion for this.
You may create a directory (instead of a file) with the name of the host or host group.
Within that directory you can create a file with the name vars, which contains unencrypted variables, and a file with the name vault, which contains Vault-encrypted variables.
Vault-encrypted variables can be included from a file using the vars_files parameter.
1. Create a secret file containing encrypted values for a variable user and a variable password by using ansible-vault create secrets.yaml
Set the password to password and enter the following lines:
username: bob
pwhash: password
When creating users, you cannot provide the password in plain text; it needs to be provided as a hashed value. Because this exercise focuses on the use of Vault, the password is not provided as a hashed value, and as a result, a warning is displayed. You may ignore this warning.
2. Create the file create-users.yaml and provide the following contents:
---
- name: create a user with vaulted variables
  hosts: ansible1
  vars_files:
    - secrets.yaml
  tasks:
  - name: creating user
    user:
      name: "{{ username }}"
      password: "{{ pwhash }}"
3. Run the playbook by using ansible-playbook --ask-vault-pass create-users.yaml
4. Change the current password on secrets.yaml by using ansible-vault rekey secrets.yaml and set the new password to
secretpassword.
5. To automate the process of entering the password, use echo secretpassword > vault-pass
6. Use chmod 400 vault-pass to ensure the file is readable for the ansible user only; this is about as much as you can do to secure the file.
7. Verify that it’s working by using ansible-playbook --vault-password-file=vault-pass create-users.yaml
JunctionScallopPoise
Using and working with variables
Three types of variables:
Variables make Ansible really flexible. Especially when used in combination with conditionals. These are defined at the discretion of the user.:
---
- name: create a user using a variable
  hosts: ansible1
  vars:
    users: lisa <-- defaults value for this play
  tasks:
    - name: create a user {{ users }} on host {{ ansible_hostname }} <-- ansible fact variable
      user:
name: "{{ users }}" <-- If value starts with variable, the whole line must have double quotesTo define a variable
    ---
    - name: using variables
      hosts: ansible1
      vars: <-------------
        ftp_package: vsftpd <------------
      tasks:
      - name: install package
        yum:
          name: "{{ ftp_package }}" <------------
state: latestVariable equirements:
• Must start with a letter. • Case sensitive. • Can contain only letters, numbers, and underscores.
    ---
    - name: using a variable include file
      hosts: ansible1
      vars_files: vars/common <--------------
      tasks:
      - name: install package
        yum:
          name: "{{ my_package }}" <------------
          state: latest
vars/common
    my_package: nmap
    my_ftp_service: vsftpd
my_file_service: smbhost_vars and group_vars
host_vars
group_vars
1. Create a project directory in your home directory. Type mkdir ~/chapter6 to create the chapter6 project directory, and use cd ~/chapter6 to go into this directory.
2. Type cp ../ansible.cfg . to copy the ansible.cfg file that you used before. No further modifications to this file are required.
3. Type vim inventory to create a file with the name inventory, and ensure it has the following contents:
[webservers]
ansible1

[dbservers]
ansible2
4. Create the file webservers.yaml, containing the following contents. Notice that nothing is really changed by running this playbook. It just uses the debug module to show the current value of the variables.
---
- name: configure web services
  hosts: webservers
  tasks:
  - name: this is the {{ web_package }} package
    debug:
      msg: "Installing {{ web_package }}"
  - name: this is the {{ web_service }} service
    debug:
      msg: "Starting the {{ web_service }}"
5. Create the file group_vars/webservers with the following contents:
web_package: httpd
web_service: httpd
6. Run the playbook with some verbosity to verify it is working by using ansible-playbook -vv webservers.yaml
Two types of multivalued variables:
array (list)
    users:
      - linda:
        username: linda
        homedir: /home/linda
        shell: /bin/bash
      - lisa:
        username: lisa
        homedir: /home/lisa
        shell: /bin/bash
      - anna:
        username: anna
        homedir: /home/anna
        shell: /bin/bash
dictionary (hash)
    users:
      linda:
        username: linda
        homedir: /home/linda
        shell: /bin/bash
      lisa:
        username: lisa
        homedir: /home/lisa
        shell: /bin/bash
      anna:
        username: anna
        homedir: /home/anna
        shell: /bin/bash
Addressing Specific Keys in a Dictionary Multivalued Variable:
    ---
    - name: show dictionary also known as hash
      hosts: ansible1
      vars_files:
      - vars/users-dictionary
      tasks:
      - name: print dictionary values
        debug:
          msg: "User {{ users.linda.username }} has homedirectory {{ users.linda.homedir }} and shell {{ users.linda.shell }}"
Using the Square Brackets Notation to Address Multivalued Variables (recommended method)
    ---
    - name: show dictionary also known as hash
      hosts: ansible1
      vars_files:
        - vars/users-dictionary
      tasks:
        - name: print dictionary values
          debug:
            msg: "User {{ users[’linda’][’username’] }} has homedirectory {{ users[’linda’][’homedir’] }} and shell {{ users[’linda’][’shell’]  }}"
Magic Variables

Debug module can be used to show the current values assigned to the hostvars magic variable.
    [ansible@control ~]$ ansible localhost -m debug -a 'var=hostvars["ansible1"]'
    localhost | SUCCESS => {
        "hostvars[\"ansible1\"]": {
            "ansible_check_mode": false,
            "ansible_diff_mode": false,
            "ansible_facts": {},
            "ansible_forks": 5,
            "ansible_inventory_sources": [
                "/home/ansible/inventory"
            ],
            "ansible_playbook_python": "/usr/bin/python3.6",
            "ansible_verbosity": 0,
            "ansible_version": {
                "full": "2.9.5",
                "major": 2,
                "minor": 9,
                "revision": 5,
                "string": "2.9.5"
            },
            "group_names": [
                "ungrouped"
            ],
            "groups": {
                "all": [
                    "ansible1",
                    "ansible2"
                ],
                "ungrouped": [
                    "ansible1",
                    "ansible2"
                ]
            },
            "inventory_dir": "/home/ansible",
            "inventory_file": "/home/ansible/inventory",
            "inventory_hostname": "ansible1",
            "inventory_hostname_short": "ansible1",
            "omit": "__omit_place_holder__38849508966537e44da5c665d4a784c3bc0060de",
            "playbook_dir": "/home/ansible"
        }
}1. Variables passed on the command line 2. Variables defined in or included from a playbook 3. Inventory variables
The result of commands can also be used as a variable byusing the register parameter in a task.
    ---
    - name: test register
      hosts: ansible1
      tasks:
      - shell: cat /etc/passwd
        register: passwd_contents
      - debug:
          var: "passwd_contents"
The cat /etc/passwd command is executed by the shell module. Notice that in this playbook no names are used for tasks. Using names for tasks is
not mandatory; it’s just recommended in more complex playbooks because this convention makes identification of the tasks easier. The entire contents of the command are next stored in the variable passwd_contents.
This variable contains the output of the command, stored in different keys. Table 6-7 provides an overview of the most
useful keys, and Listing 6-19 shows the partial result of the ansible-playbook listing618.yaml command.
Keys Used with register cmd
    [ansible@control ~]$ ansible-playbook listing618.yaml

    PLAY [test register] *******************************************************************

    TASK [Gathering Facts] *****************************************************************
    ok: [ansible2]
    ok: [ansible1]

    TASK [shell] ***************************************************************************
    changed: [ansible2]
    changed: [ansible1]

    TASK [debug] ***************************************************************************
    ok: [ansible1] => {
        "passwd_contents": {
            "changed": true,
            "cmd": "cat /etc/passwd",
            "delta": "0:00:00.004149",
            "end": "2020-04-02 02:28:10.692306",
            "failed": false,
            "rc": 0,
            "start": "2020-04-02 02:28:10.688157",
            "stderr": "",
            "stderr_lines": [],
            "stdout": "root:x:0:0:root:/root:/bin/bash\nbin:x:1:1:bin:/bin:/sbin/nologin\ndaemon:x:2:2:daemon:/sbin:/sbin/nologin\nadm:x:3:4:adm:/var/adm:/sbin/nologin\nlp:x:4:7:lp:/var/spool/lpd:/sbin/nologin\nsync:x:5:0:sync:/sbin:/bin/sync\nshutdown:x:6:0:shutdown:/sbin:/sbin/shutdown\nhalt:x:7:0:halt:/sbin:/sbin/halt\nansible:x:1000:1000:ansible:/home/ansible:/bin/bash\napache:x:48:48:Apache:/usr/share/httpd:/sbin/nologin\nlinda:x:1002:1002::/home/linda:/bin/bash\nlisa:x:1003:1003::/home/lisa:/bin/bash",
            "stdout_lines": [
                "root:x:0:0:root:/root:/bin/bash",
                "bin:x:1:1:bin:/bin:/sbin/nologin",
                "daemon:x:2:2:daemon:/sbin:/sbin/nologin",
                "adm:x:3:4:adm:/var/adm:/sbin/nologin",
                "lp:x:4:7:lp:/var/spool/lpd:/sbin/nologin",
                "sync:x:5:0:sync:/sbin:/bin/sync",
                "shutdown:x:6:0:shutdown:/sbin:/sbin/shutdown",
                "halt:x:7:0:halt:/sbin:/sbin/halt",
                "ansible:x:1000:1000:ansible:/home/ansible:/bin/bash",
                "apache:x:48:48:Apache:/usr/share/httpd:/sbin/nologin",
                "linda:x:1002:1002::/home/linda:/bin/bash",
                "lisa:x:1003:1003::/home/lisa:/bin/bash"
            ]
        }
    }
Ensure that a task runs only if a command produces a specific result by using register with conditionals.
register shows the values that are returned by specific tasks. Tasks have common return values, but modules may have specific return values. That means you cannot assume, based on the result of an example using a specific module, that the return values you see are available for all modules. Consult the module documentation for more information about specific return values.